
New Relic
The New Relic Digital Intelligence Platform delivers full-stack visibility from the host, through the application, and end-user experience via a unified dashboard. With New Relic, gain instant end-to-end intelligence across your customer experience, application performance, and dynamic infrastructure, and further extend its capabilities by integrating with xMatters.
This workflow lets you send actionable alerts to on-call resources when xMatters gets a signal from New Relic. Responders can initiate an incident with the press of a button, or you can build on the flow to perform automated resolution tasks.
How it works
When an alert is generated in New Relic, it sends a JSON-formatted webhook to xMatters, based on user-defined alert rules. A New Relic trigger in xMatters parses the webhook and initiates a flow. The webhook includes essential alert data you can use to enrich notifications to users or when building automated tasks.
Prerequisites
If this is your first time installing the New Relic workflow, there are no prerequisites.
If you've previously installed the New Relic workflow through our one-click installation process, New Relic has updated a number of parameters which affect the integration with xMatters. The easiest way to take advantage of the new functionality in New Relic is to install a new version of the workflow. However if you've highly customized your workflow and want to keep using it, the Update an existing workflow section will provide you information on what you'll need to update.
Install the workflow
The following instructions describe how to install the workflow through the xMatters one-click installation process.
If you have the previous version of the integration installed and need the installation or configuration instructions, you can find them here.
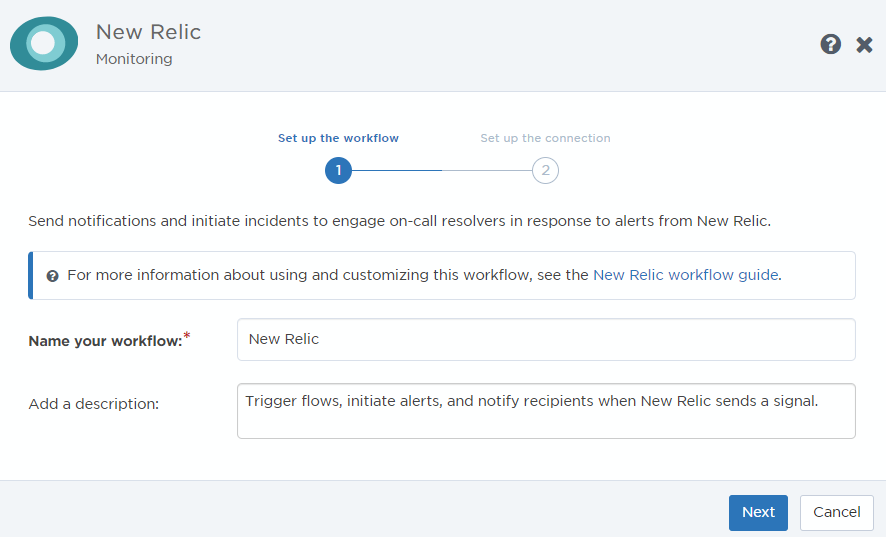
- Go to the Workflow Templates page and click the New Relic tile.
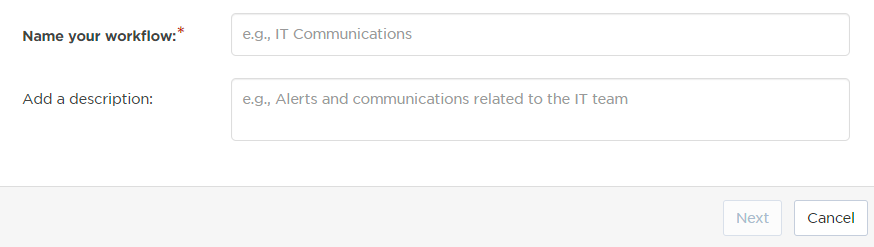
- On the Set up the Workflow tab, give the workflow a name that identifies its purpose (this must be unique in your instance), add an optional description, and set the default incident type (if applicable). Any built-in Initiate Incident steps in the workflow will automatically be set to the selected incident type.
- You can edit these later, if needed.
- You can edit these later, if needed.
- Click Next to set up the connection.
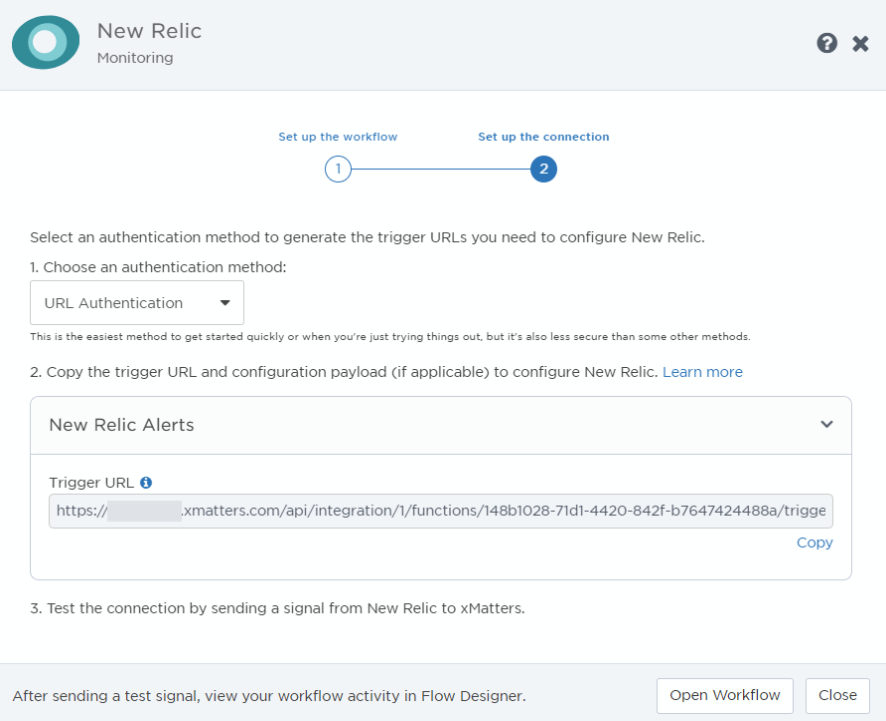
- Choose the authentication method. A trigger URL is generated based on the selected authentication method.
- Copy the trigger URL — you’ll use this to configure the webhook in NewRelic.
- The trigger URL includes the recipients parameter, which specifies who should be notified. By default, this parameter is set to notify you (the logged in user), but you can set it to target any user or group you want.
- The trigger URL includes the recipients parameter, which specifies who should be notified. By default, this parameter is set to notify you (the logged in user), but you can set it to target any user or group you want.
- Send a test signal to the trigger URL to test the connection.
- Click Open Workflow.
Configure New Relic to send requests to the trigger URL
To have New Relic send alerts to the flow trigger, you need to configure a webhook and set it to use the trigger URL.
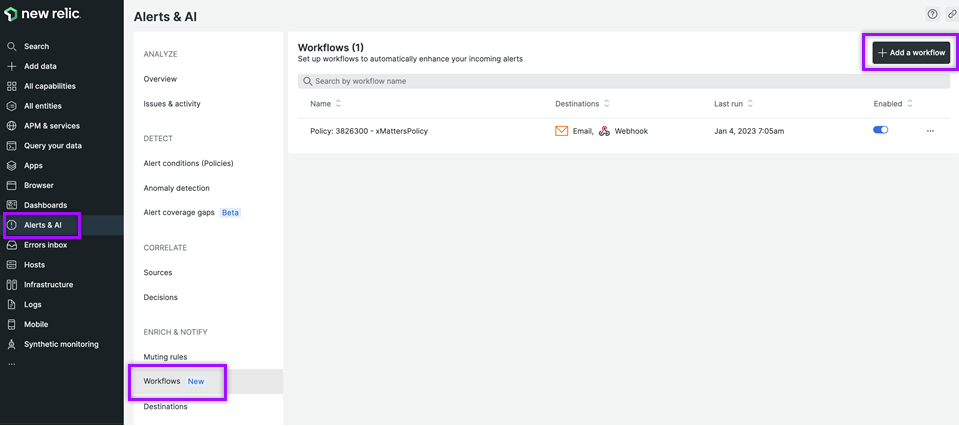
- In New Relic, go to Alerts and AI > Workflows and click Add a workflow.
- On the Configure your workflow page, fill in the following fields:
- Name: Give the workflow a unique name.
- Filter data: Set at least one filter parameter using the Tag, Policy, and Priority drop-down menus.
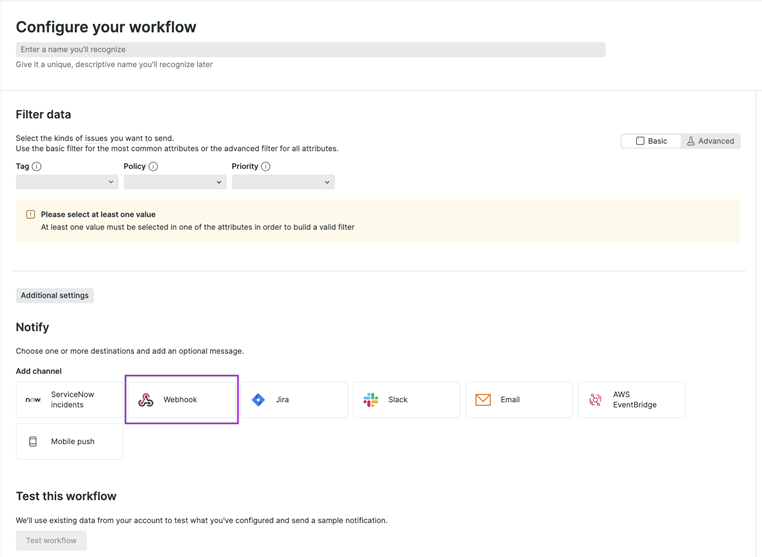
- In the Notify section, select Webhook.
- On the Edit notification message screen go to the Destination drop-down menu. Select an existing destination or create a new one.
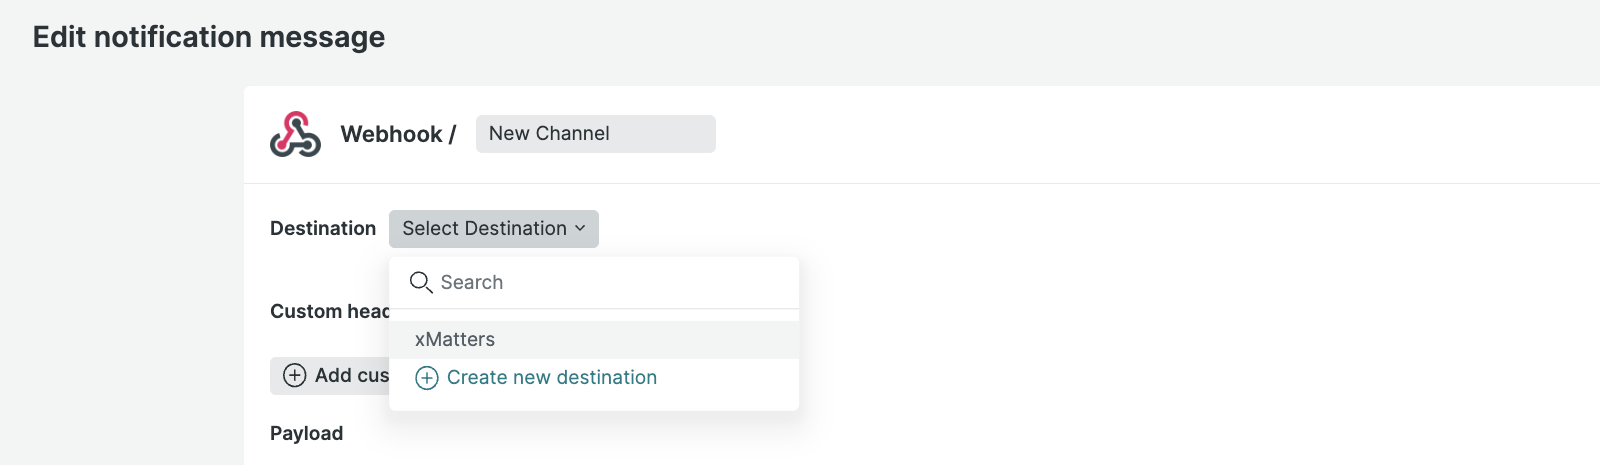
- If you select an existing destination, skip to Step 7.
- If you need to create a new destination go to Step 5.
- To create a new destination, fill in the following fields on the Add a destination screen:
- Webhook name: Give the webhook a unique name.
- Endpoint URL: Paste the URL you copied from the xMatters trigger. Add the target names of any recipients you want to notify when the alert fires to the end of the URL.
- For URL authentication, use an ampersand to attach recipients. For example, if you want to notify Emma Pearson and the on-call members in the group responsible for the Antares service, you'd add &recipients=epearson,antares to the URL.
- For other authentication types, use a question mark to attach recipients. For example, if you want to notify Barry Gull and the on-call members in the group responsible for the Cassiopeia service, you'd add ?recipients=bgull,cassiopeia to the URL.
- You must URL-encode any special characters or spaces in the target names.
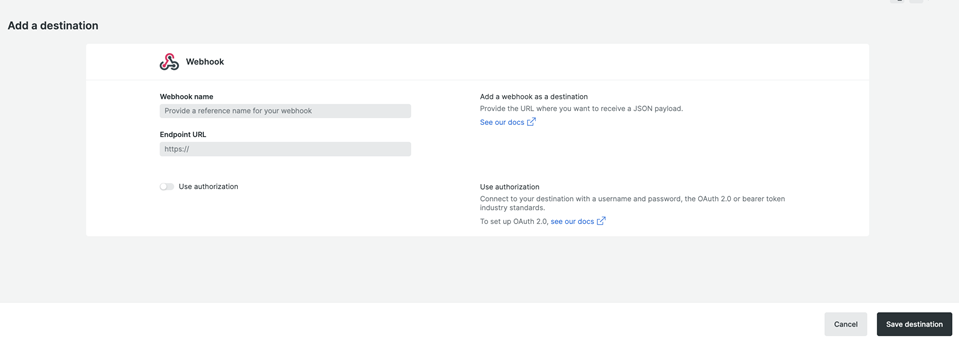
- Click Save destination.
- On the Edit notification message screen, go to Payload. In the Template section, enter the payload you copied from the trigger in xMatters.
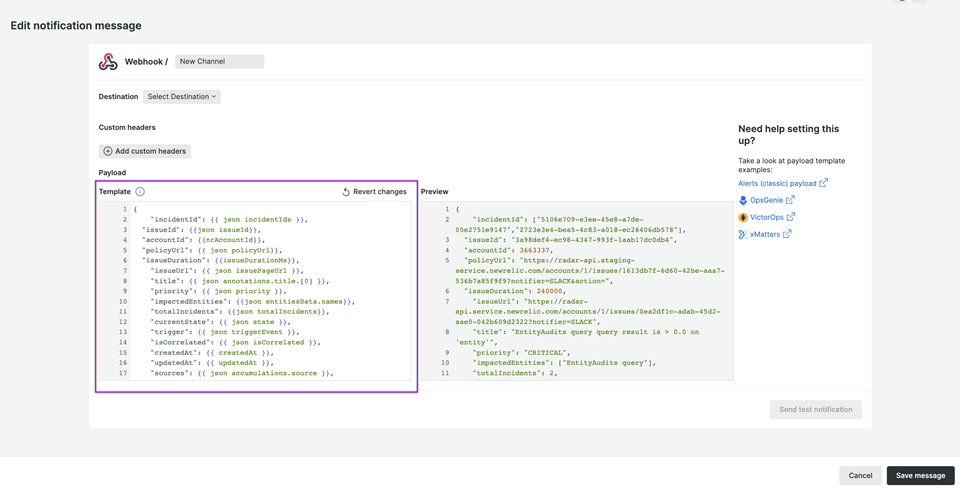
- Optional: Click Send test notification to send a test alert and confirm the configuration is correct.
- Click Save message.
You're ready to use the webhook to trigger automated flows, including steps such as sending alerts and initiating incidents, though we always recommend testing before putting things into use.
Set recipients in the trigger URL
The trigger expects the recipients in the trigger URL. When you copy the URL from xMatters, it includes the recipients parameter: recipients=<yourname>. Of course, you don’t want to receive all the alerts.
To change the recipients for alerts from this webhook, swap out your name for the people or groups you want to target.
- For URL authentication, use an ampersand to attach recipients. For example, if you want to notify Emma Pearson and the on-call members in the group responsible for the Antares service, you'd add &recipients=epearson,antares to the URL.
- For other authentication types, use a question mark to attach recipients. For example, if you want to notify Barry Gull and the on-call members in the group responsible for the Cassiopeia service, you'd add ?recipients=bgull,cassiopeia to the URL.
Remember to URL-encode any special characters, including spaces, in your group names.
We recommend using groups so you can take advantage of the xMatters group features — rotations, escalations, and absences — to reach the right on-call people to jump on an issue.
How to use the workflow
When a condition you've set fires, it sends a signal to xMatters, which creates an alert and notifies the individual or the on-call members of the people or groups you set as recipients in the webhook URL. When the trigger receives a signal saying the issue is resolved, it automatically terminates related alerts in xMatters.
The person responding to the notification has the following response options:
- Acknowledge: Acknowledges the notifications and stops escalations.
- Escalate: Immediately escalates the alert to the next on-call resolver in a targeted group.
- Close: Ends the xMatters alert and stops notifying all targeted recipients.
- Initiate Incident: Initiates an incident in xMatters.
Next Steps
Now that you've installed the workflow, you can use it as-is, or customize it to suit your needs better. Here are some examples of things you can add to the workflow to customize it:
- Use Slack, Zoom, and Microsoft Teams steps to add collaboration channels to the flow.
- Change the severity of incidents created when a recipient selects the Initiate Incident response.
- Update the message sent to resolvers to include the information most relevant to your team.
- Use the New Relic Incidents trigger to build your own custom flows.
Update an existing workflow
The following information is only to be used when you have customized the New Relic trigger and workflow and want to take advantage of new New Relic functionality by updating steps in your existing workflow.
The following table provides a summary of the differences between where (or if) specific outputs were used in the default version of the previous workflow and where the outputs are used in the new version.
| Output Name | Previous workflow usage | New workflow usage |
|---|---|---|
|
Signal Mode |
Signal Mode switch step. | Values sent by New Relic have changed. |
| Signal ID | Find Alert step. | Updated to use the New Relic Issue ID. |
| Account Name | Not used. | Deleted. |
| Condition Name | Not used. | Now populated by an array of values. |
| Current State | Not used. | Values sent by New Relic have changed. |
| Details | Create Alert step Email/App message and Initiate Incident details. | Deleted. |
| Event Type | Not used. | Deleted. |
|
Incident URL
|
Create Alert step Email/App message and Initiate Incident details. | Deleted. |
| Policy Name | Create Alert subject for all device types and Initiate Incident summary | Deleted. |
| Policy URL | Not used. | Now populated by an array of values. |
| Severity | Create Alert subject for all device types and to set incident severity | Values sent by New Relic have changed. |
| Timestamp | Create Alert step Email/App message | Deleted. |
| Violation URL | Not used. | Deleted. |
To take advantage of the updated New Relic trigger functionality while using your existing customized workflow, you'll need to update the following fields in the workflow steps.
| Step name | Change required |
|---|---|
|
Switch |
No change is required unless you want to take advantage of the PRIORITY_CHANGE or manual USER_ACTION signal modes. |
| Create Alert |
Update the following fields in the Email/App message template:
|
| Map Incident Severity | New Relic no longer sends signals using the Warn or Info severity levels. Update the step to map specific Critical, High, Medium, and Low severity levels. If the step isn't updated, any unrecognized severity level will be mapped to High. |
| Initiate Incident |
Update the following fields on the Setup tab:
|
Now that you've updated all the required steps, you will receive signals from New Relic as though they were coming in from the new trigger and updated workflow. However we always recommend testing before putting things in use.
Previous version
While the previous version of New Relic is no longer available, the instructions are included below for anyone who has it installed in their system already.
Install the workflow
The following instructions describe how to install the workflow through the xMatters one-click installation process. If you already installed the previous, built-in version of the integration, you can find instructions here.
- Go to the Workflow Templates page and click the New Relic tile.
- On the Set up the Workflow tab, give the workflow a name (this must be unique in your instance) and add an optional description.
- You can edit these later, if needed.
- You can edit these later, if needed.
- Click Next to set up the connection.
- Choose the authentication method. A trigger URL is generated based on the selected authentication method.
- Copy the trigger URL — you’ll use this to configure the webhook in NewRelic.
- The trigger URL includes the recipients parameter, which specifies who should be notified. By default, this parameter is set to notify you (the logged in user), but you can set it to target any user or group you want.
- The trigger URL includes the recipients parameter, which specifies who should be notified. By default, this parameter is set to notify you (the logged in user), but you can set it to target any user or group you want.
- Send a test signal to the trigger URL to test the connection.
- Click Open Workflow.
Configure New Relic to send requests to the trigger URL
To have New Relic send alerts to the flow trigger, you need to configure a webhook and set it to use the trigger URL.
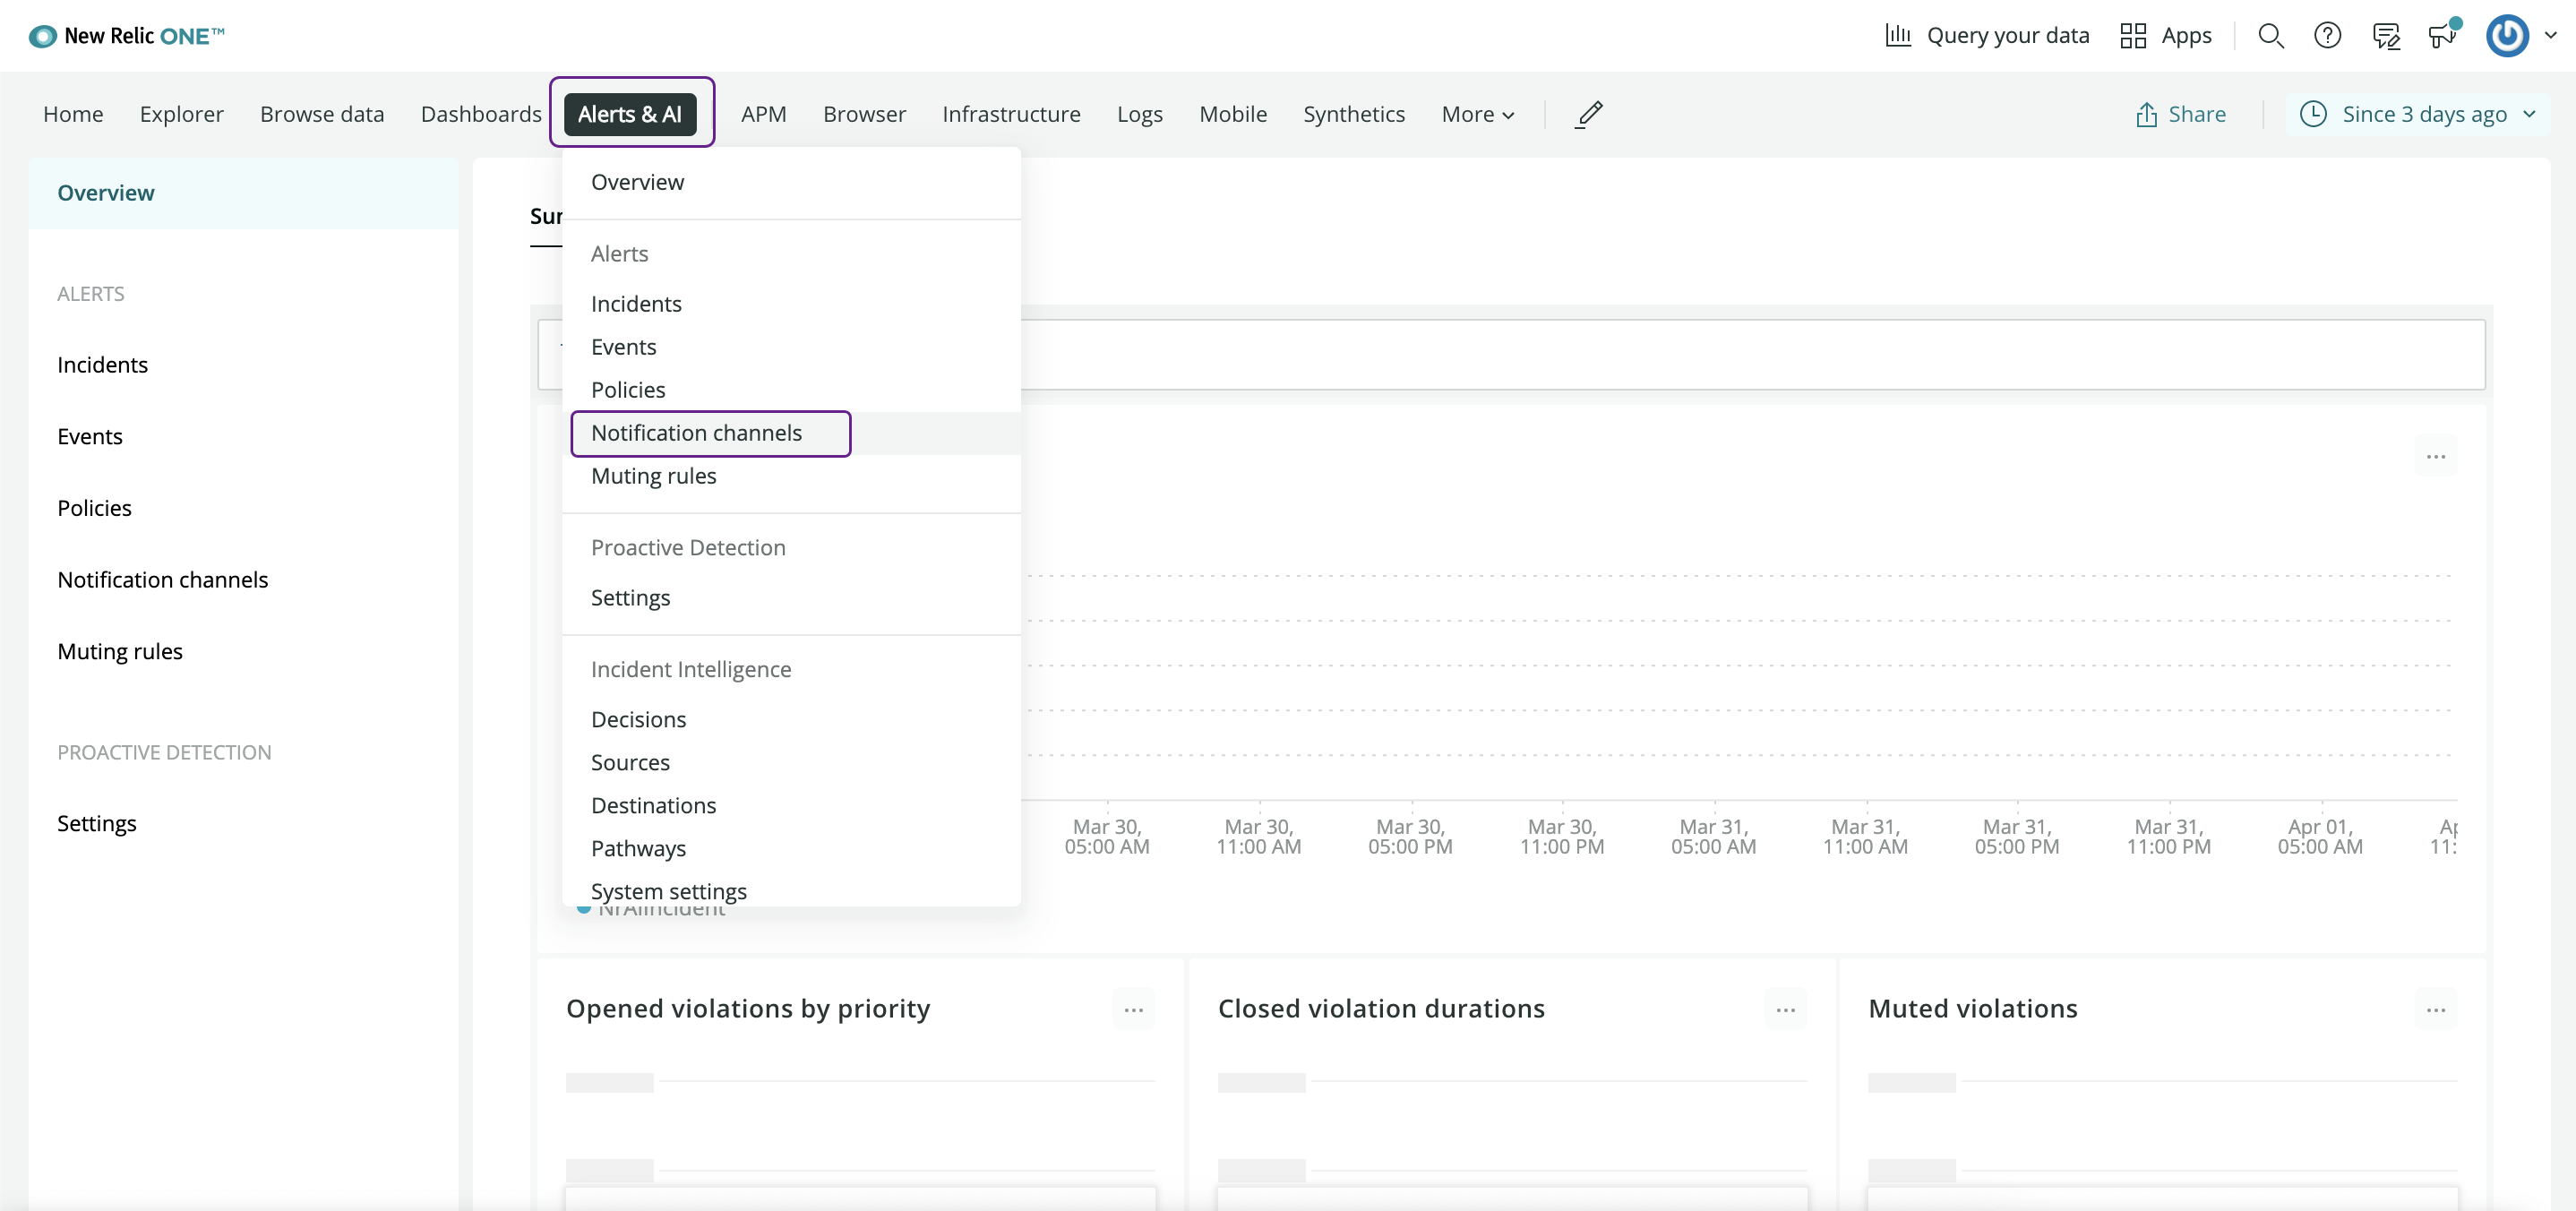
- In New Relic, go to Alerts and AI and select Notification channels from the drop-down menu.
- On the top right-hand side of the screen click New notification channel.

- On the Channel details tab, fill in the following fields:
- Select a channel type: Expand the drop-down menu and select xMatters from the list of available options.
- Channel name: Enter a unique channel name.
- Integration URL: Paste the URL from the trigger. Add the target names of any recipients you want to notify when the alert fires to the end of the URL.
- For URL authentication, use an ampersand to attach recipients. For example, if you want to notify Emma Pearson and the on-call members in the group responsible for the Antares service, you'd add &recipients=epearson,antares to the URL.
- For other authentication types, use a question mark to attach recipients. For example, if you want to notify Barry Gull and the on-call members in the group responsible for the Cassiopeia service, you'd add ?recipients=bgull,cassiopeia to the URL.
- You must URL-encode any special characters or spaces in the target names.
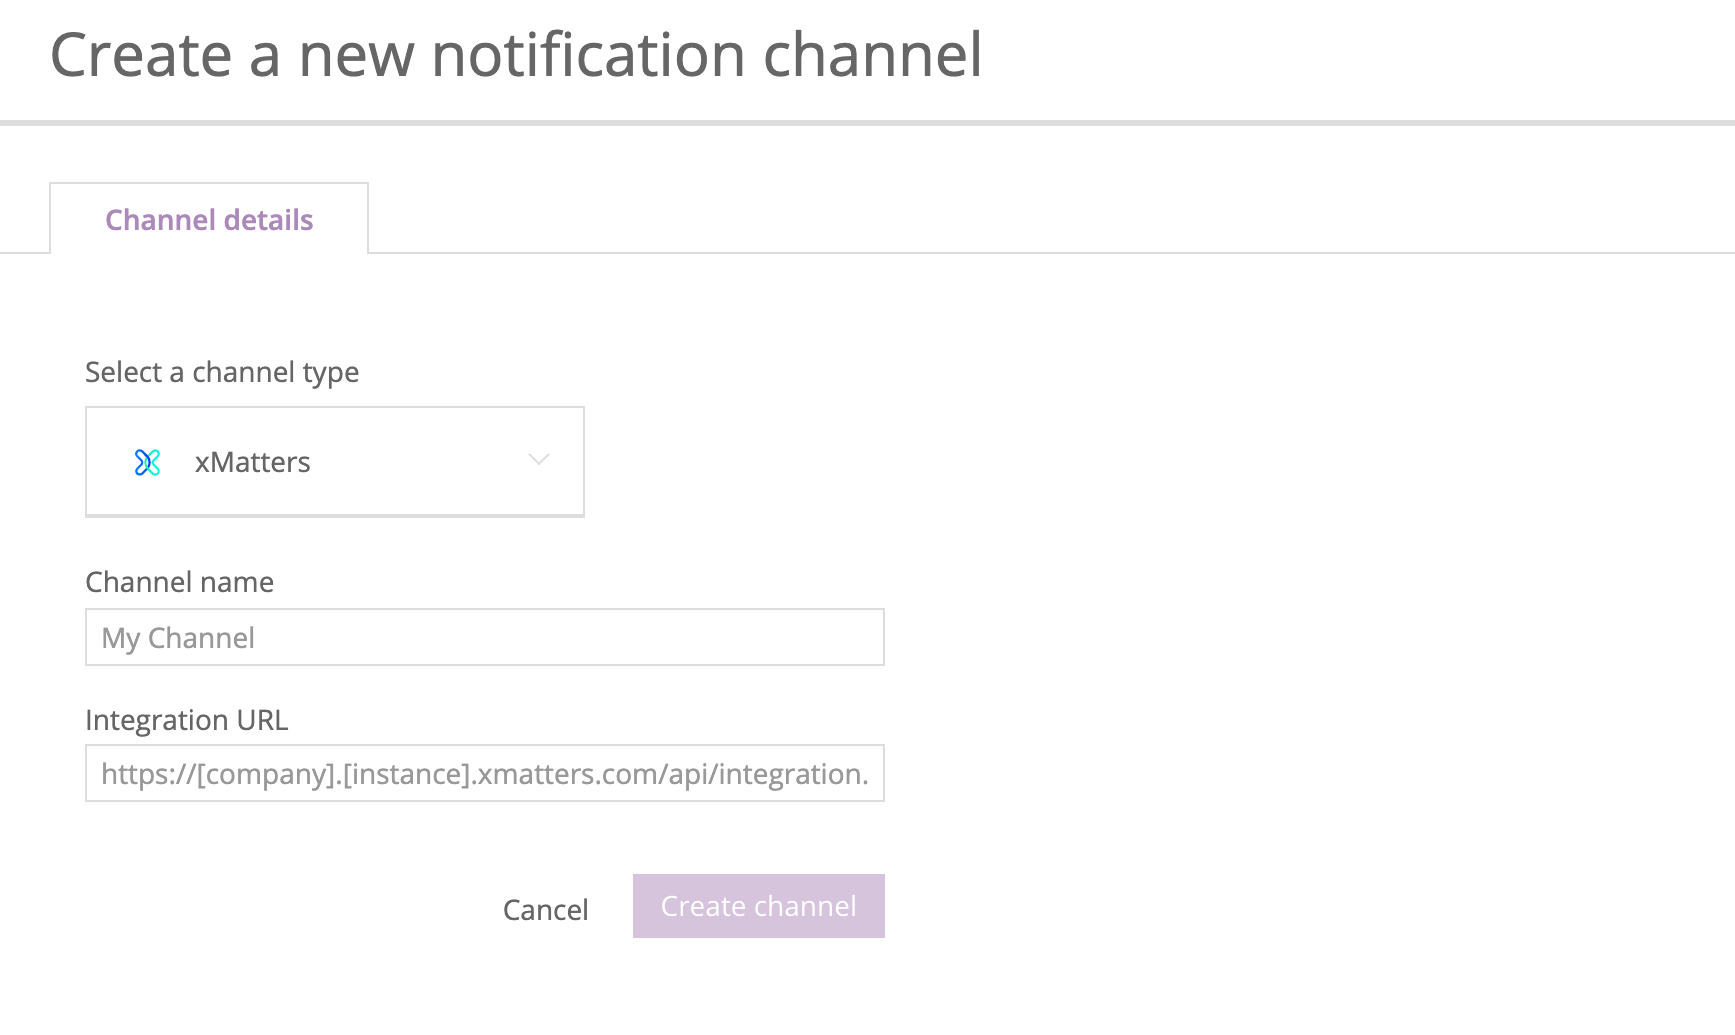
- Click Create channel.
You're ready to use the webhook to trigger automated flows, including steps such as sending alerts and initiating incidents, though we always recommend testing before putting things into use.
Set recipients in the trigger URL
The trigger expects the recipients in the trigger URL. When you copy the URL from xMatters, it includes the recipients parameter: recipients=<yourname>. Of course, you don’t want to receive all the alerts.
To change the recipients for alerts from this webhook, swap out your name for the people or groups you want to target.
- For URL authentication, use an ampersand to attach recipients. For example, if you want to notify Emma Pearson and the on-call members in the group responsible for the Antares service, you'd add &recipients=epearson,antares to the URL.
- For other authentication types, use a question mark to attach recipients. For example, if you want to notify Barry Gull and the on-call members in the group responsible for the Cassiopeia service, you'd add ?recipients=bgull,cassiopeia to the URL.
Remember to URL-encode any special characters, including spaces, in your group names.
We recommend using groups so you can take advantage of the xMatters group features — rotations, escalations, and absences — to reach the right on-call people to jump on an issue.
How to use the workflow
When a condition you've set fires, it sends a signal to xMatters, which creates an alert and notifies the individual or the on-call members of the people or groups you set as recipients in the webhook URL. When the trigger receives a signal saying the issue is resolved, it automatically terminates related alerts in xMatters.
The person responding to the notification has the following response options:
- Acknowledge: Acknowledges the notifications and stops escalations.
- Escalate: Immediately escalates the alert to the next on-call resolver in a targeted group.
- Close: Ends the xMatters alert and stops notifying all targeted recipients.
- Initiate Incident: Initiates an incident in xMatters.
Next Steps
Now that you've installed the workflow, you can use it as-is, or customize it to suit your needs better. Here are some examples of things you can add to the workflow to customize it:
- Use Slack, Zoom, and Microsoft Teams steps to add collaboration channels to the flow.
- Change the severity of incidents created when a recipient selects the Initiate Incident response.
- Update the message sent to resolvers to include the information most relevant to your team.
- Use the New Relic Incidents trigger to build your own custom flows.