BMC Remedy Change Management
This article provides you with the installation and configuration details you need to integrate xMatters with BMC Remedy Change Management.
This integration uses a workflow within xMatters to become the voice and interface of an automation engine. When BMC Remedy detects change requests that require approval or notification, xMatters places phone calls, send emails, or notifies your mobile app.
Integration Version
This version of the integration (5.0) is compatible with BMC Remedy 9.1 Change Management and above, and is designed specifically for xMatters.
These instructions cover the following topics:
- The Overview: How it works and Features and updates
- Before you begin: Download the integration and Enable REST API in BMC Remedy
- Configure xMatters: Set up an integration user, Import the workflow, Configure inbound integrations, Create a web service user, and determine identifiers
- Configure the Integration Agent: Install the integration files, set the password files, and configure deduplication.
- Configure BMC Remedy: Import the workflow definition files, Create an xMatters user in BMC Remedy
- How to use the integration: Trigger a notification, respond to a notification, view response results
- Extend and optimize your integration: Change the statuses that send notifications, send notifications of changes to a change request, disable delivery annotation, disable alternate approver lookup, modify workflow filters.
How it works
The change management integration service runs in the Integration Agent and handles alerts and responses associated with change requests in BMC Remedy Change Management and approval requests in BMC Remedy Approval Server.
After BMC Remedy Change Management triggers one of the xMatters filters available as part of this integration, the filter pushes data to a backing form, which sends the request to xMatters via the Integration Agent. xMatters notifies the correct recipients, and then sends response information back to BMC Remedy, allowing users to approve, reject, hold or view the change request from their device.
Features and updates in this version
This version of the integration includes several updates and enhancements:
The integration now targets the inbound integrations included in the workflow rather than the form itself. This provides access to all of the enhancements and options available in the Integration Builder, including the Activity Stream, transformation scripts, and authentication options.
Before you begin
Before you get started configuring the integration, there are a couple of things you can do ahead of time to make it easier:
- Download the integration archive
- Enable and configure REST API in BMC Remedy
Download the .zip or .tar file that contains all of the components required by xMatters and BMC Remedy Change Management. Save the file to a location on your local machine, and extract the contents.
If you navigate through the folders, you will find another .zip file within the extracted integration archive. This is the workflow, which contains pre-configured integrations, forms, properties, and messages specifically designed for BMC Remedy. . Do NOT extract the contents of the workflow .zip file — you'll import it directly into xMatters.
You need to enable and configure REST API in BMC Remedy for this integration to work. For information about enabling REST API in BMC Remedy Action Request System, see the BMC Remedy documentation.
Configure xMatters
The first step in configuring this integration is to set up the components on the xMatters side.
This integration requires a user who can authenticate REST web service calls when working with alerts – these permissions are provided by the "REST Web Service User" role in xMatters. See Create an integration user for more information.
Make sure you keep the user ID and password of this user handy. You'll need them when configuring other parts of this integration.
The next step is to import the workflow. You can find workflow .zip file in the components > xmatters folder you downloaded and extracted.
To import the workflow:
- In xMatters, click the Workflows tab, and then click Import.
- Browse to the BMCRemedyChangeManagement.zip file, or drag it onto the Import Workflow dialog box.
- Click Import.
- Once the import is finished, the workflow should be automatically enabled. If it isn't, click the Disabled toggle to enable it.
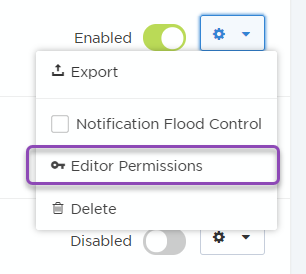
- Click the gear icon beside the workflow, and select Editor Permissions.

- Add the integration user, and then click Save.
- Click the workflow name to open the Forms tab.
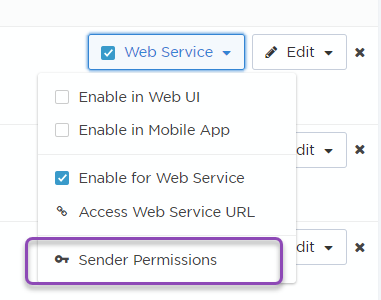
- For the first form in the list (Change Request Approval), click the Web Service Only drop-down list, and then select Sender Permissions.

- Add the integration user, and then click Save Changes.
- Repeat steps 7-8 for each of the other forms.
You'll need to configure the authentication and retrieve the URLs for the inbound integration.
To configure an inbound integration:
- In the Integration Builder, expand the list of inbound integrations.
- Click the name of an integration to view its details.
- Under the Select authentication method step, select Basic from the drop-down list.
- Click Save.
- Scroll down to the bottom of the page, and click Copy beside the field:

This integration requires a web service user with specific permissions in xMatters to receive user responses and notifications about event status changes for the Integration Agent. ("Web service users" are a specific type of user in xMatters that can work with the SOAP web services used by the Integration Agent; this means you can't just use a regular user and assign them a specific role or permission – you have to create a dedicated user.)
To set up a web service user:
- In xMatters, click the Users tab, and then, in the menu on the left side of the page, click Add Web Service User.
- On the Add Web Service User page, enter a User ID.
- This user should match the xMatters user created in BMC Remedy.
- In the Denied Web Services list, locate and select the following web services, and then click Add:
- Query Incident
- Query User
- Receive APXML
- Register Integration Agent
- Submit APXML
- Enter a Password for the new web service user.
- Click Save.
Some configuration fields require a UUID (Universal Unique Identifier) for a specific component or property - usually the responses. To retrieve the identifier for an element, look for the API icon in the xMatters user interface:
![]()
Clicking this button will display the identifier for the component in a dialog box; you can copy and paste the string to the appropriate location in the configuration file.
As an example, the following instructions describe how to retrieve the UUID for a specific response choice; the process is similar for any identifier you want to determine.
To retrieve the identifier for a response choice:
- In xMatters, open the BMC Remedy Change Management workflow.
- On the Change Request Approval form, click Edit > Responses.
- Beside the Approve response, click the API icon.
Configure the xMatters Integration Agent
Now that you've configured xMatters, it's time to configure the Integration Agent.
The installation instructions below assume you already have a working xMatters Integration Agent. If this is a new installation and you have not yet deployed the Integration Agent, follow this link to download, deploy and configure it: Integration Agent for xMatters 5.x & xMatters
Note: As usual for our Integration Agent documentation, <IAHOME> refers to the installation folder of the Integration Agent on your system.
- Within the extracted integration archive, navigate to components\integration-agent\integrationservices, and copy the entire contents of the folder to the <IAHOME>\integrationservices directory.
- Open the <IAHOME>\conf\IAConfig.xml file and add the following line to the "service-configs" section:<path>bmcremedychange50/bmcremedychange.xml</path>
- Save and close the file.
- Open the <IAHOME>\integrationservices\applications\bmcremedychange50\configuration.js file and add or set the values for the following variables:
Variable Description REMEDY_SERVER_HOSTNAME BMC Remedy server URL that can be resolved to an IP address. REMEDY_AR_SERVER_NAME BMC Remedy Action Request (AR) server name. XMATTERS_COMPANY_NAME The company name to display in the notification email. REMEDY_WS_USERNAME User name of the account used to access the BMC Remedy web services that support the integration. REMEDY_WS_PASSWORD_FILE Location of the file containing the web services user's password. XMATTERS_REMEDY_CHANGE_APPROVAL_URL URL of inbound integration used to handle incoming alerts RESPONSE_OPTIONS The identifiers for the response options for the xMatters form. INITIATOR The User ID of the integration (REST) user. PASSWORD Path and filename of the password file containing the encrypted password of the xMatters initiator user. DELETE_EXISTING_EVENTS When set to true, sends a 'delete' prior to creating the new event to clear any existing alerts for this Change Request ID. TIME_TO_SLEEP_BEFORE_ PROCESSING_DEL_FOR_REJECTED_APPOVALS Defines how long (in milliseconds) xMatters should wait for BMC Remedy to finish updating approval records before deleting associated notifications in xMatters. The default is 2000 (2 seconds). - Save and close the file.
- Restart the Integration Agent.
This integration includes encrypted files, located in the <IAHOME>\conf folder, that store the passwords for the integration user and the BMC Remedy web services user. You will need to update (or create) the files with the correct passwords for these users.
Password files:
- initiatorpasswd stores the password for the integration user
- xm_chg_ws.pwd stores the password for the BMC Remedy web services user
If you store the passwords with a different file name or in a different location, you must update the <IAHOME>\integrationservices\applications\bmcremedychange50\configuration.js file with the correct name and path.
To configure the REST API user password:
- Open a command prompt and navigate to <IAHOME>\bin
- Run the following command, where <new_password> is the password for the INITIATOR (the integration user) specified in the <IAHOME>\integrationservices\applications\bmcremedychange50\configuration.js file, and <old_password> is the existing password (the default password for a newly installed integration is "password"):
iapassword.bat --new <new_password> --old <old_password> --file conf/.initiatorpasswd - Now run the command again, but where <new_password> is the password for the REMEDY_WS_USERNAME (the BMC Remedy web service user) specified in the <IAHOME>\integrationservices\applications\bmcremedychange50\configuration.js file, and <old_password> is the existing password (the default password for a newly installed integration is "password"):
iapassword.bat --new <new_password> --old <old_password> --file conf/xm_chg_ws.pwd
For more information about working with the iapassword command, and creating password files, refer to the xMatters Integration Agent Guide.
The integration package includes a filter that engages the Integration Agent's filtering and suppression module to suppress duplicate alerts (also known as deduplication). This can help to avoid disruption of traffic due to event floods (a potential hazard with improperly configured management systems).
The deduplicator is installed into the <IAHOME>\conf folder, and is configured by default to suppress up to 100 duplicate alerts for two minutes. You can configure the filter to extend the time period in which an event is considered to be a duplicate, the number of alerts within that period, and the tokens or properties that xMatters uses to determine what makes the event unique.
To enable deduplication:
- Navigate to the <IAHOME>\conf directory.
- If you have an existing deduplicator-filter.xml file in this folder, create a backup version in a separate location.
- Copy the deduplicator-filter.xml file from the integration-agent\conf folder in the extracted integration archive into the <IAHOME>\conf directory.
- If you backed up an existing deduplicator file, merge the contents of your backup with the newly installed <IAHOME>\conf\deduplicator-filter.xml file: open both files in a text editor, and then copy the <filter> node from the backup file into the new deduplicator file after the last </filter> node.
- Save and close the file.
- Restart the Integration Agent.
For more information about the deduplication filter and the available settings, refer to the "Filtering and Suppression" section in the xMatters Integration Agent Guide.
Configure BMC Remedy
To configure BMC Remedy to integrate with xMatters, you need to:
- Import workflow definitions into BMC Remedy
- Add an xMatters user to BMC Remedy
To import the workflow definition files into BMC Remedy:
- Log in to the BMC Remedy Developer Studio, and then select File > Import.
- Select BMC Remedy Developer Studio > Object Definitions, and then click Next.
- Select the AR System server into which you want to upload the integration objects, and then click Next.
- Do one of the following:
- Type in the location of the xm_foundation_9_1.def file.
- Click the Browse button to the right of the text field and navigate to the location of the xm_foundation_9_1.def file. Select the file, and then click Open.
- Click Next.
- If you have already imported a workflow definition file, ensure that you select Replace Objects on the Destination Server check box (do not select the other check boxes), but note that any changes you have made to those objects will be lost. If you are sure the changes you made are necessary for your installation, you will be required to re-apply those changes to the new version of the files being imported unless you applied those changes to overlay objects.
- Repeat the above steps to import the xm_change_9_1.def file.
- This file must be imported after the foundation file.
- Click Finish.
You need to create a new user in BMC Remedy for the xMatters integration so that xMatters can write to any ticket. To create the xmchange user:
- Go to Applications > Quick Links > Approval Administration Console.
- On the Administrator tab, click Create.
- On the Process Administrator tab, fill in the following information:
- Individual: Match the user ID for the xMatters web services user
- Authority: Full Admin
- Click Save.
Your integration is now ready to go.
How to use the integration
When the integration is configured, BMC Remedy automatically sends information about any approval request it detects to xMatters via the Integration Agent.
Trigger a notification
To test the incident notification portion of the integration, create a new change request in BMC Remedy that targets a user with a device that you can access (so you can respond to the notification when it arrives) and who exists in both BMC Remedy and xMatters.
The targeted user receives a notification from xMatters.
Respond to a notification
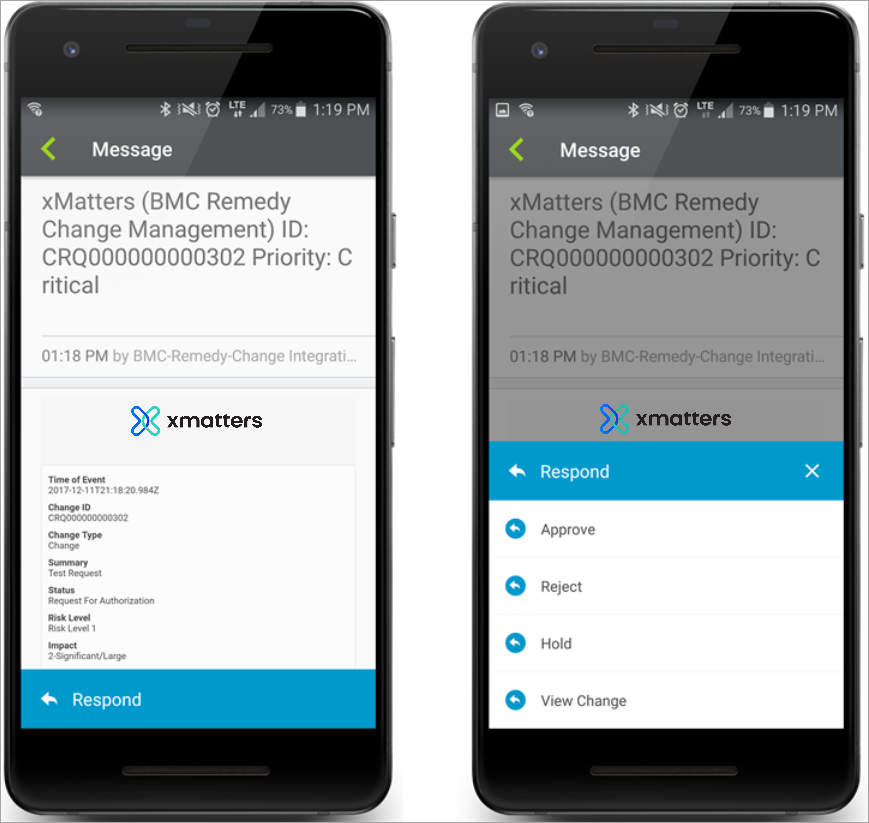
On a device with the xMatters mobile app, you can respond to the message simply by tapping Respond, and then tapping one of the response choices:

Other devices use similar methods.
View response results
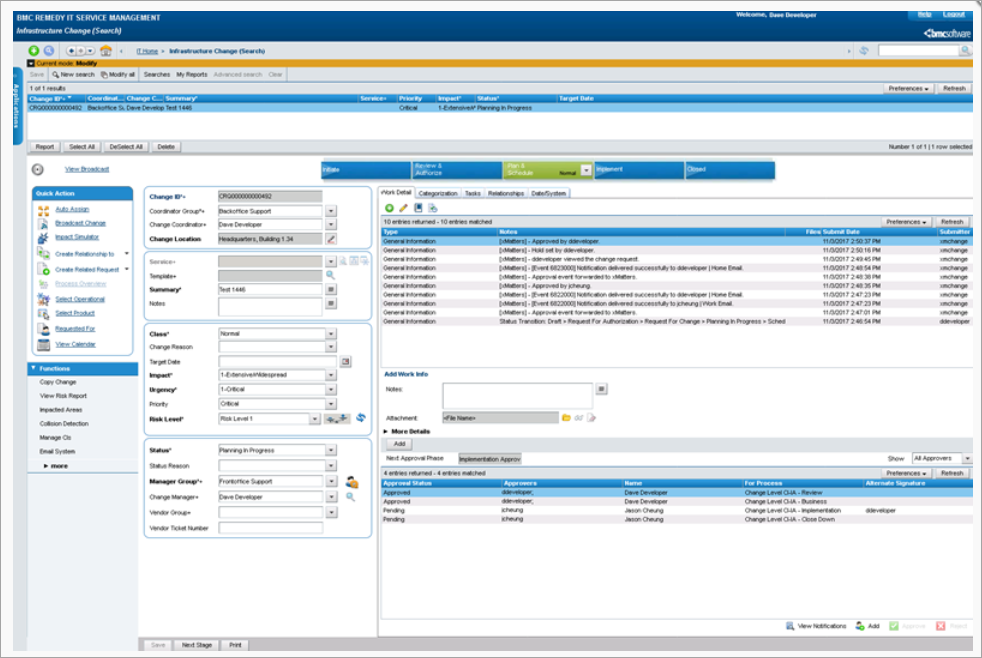
After you respond to the notification, you can see how the integration automatically updates the event information with the response details in BMC Remedy Change Management.
For approval requests, the notification and response results are recorded on the Work Detail tab of the associated change request:

Extend and optimize your integration
You can use the following tips to customize your integration to better suit your deployment.
- Change the statuses that trigger notifications to be sent.
- Send change alerts in addition to approval requests.
- Disable delivery annotation.
- Disable alternate approver lookup.
- Modify the filters in the definition files using BMC Developer Studio.
Change the statuses that send notifications to Change Managers and Change Coordinators
By default, the integration sends notifications to the Change Manager and Change Coordinator when the approval status of a change request is updated.
xMatters sends notifications for these approval statuses: Cancelled, Closed, Completed, Draft, Implementation In Progress, Pending, Planning In Progress, Rejected, Request For Authorization, Request For Change, Scheduled, Scheduled For Approval, and Scheduled For Review. You can change this functionality, depending on your needs.
To change the statuses that send notifications:
- Open the <IAHOME>\integrationservices\applications\bmcremedychange50\configuration.js file and change the values for the following variables to the values you want to trigger these notifications:
- CHANGE_COORDINATOR_ALERT_ STATUS
- CHANGE_MANAGER_ALERT_STATUS
- Save and close the file.
- Restart the Integration Agent.
To send a notification to all managers and coordinators, regardless of the approval status, set the value for these parameters to null.
Send notifications of change alerts
By default, xMatters only sends notifications for approval requests. You can also configure the integration to send notifications for changes in the status of a change request.
To enable notifications for change alerts:
- Open the <IAHOME>\integrationservices\applications\bmcremedychange50\configuration.js file.
- Set the value of the SEND_ACTIVE_APPROVAL_ONLY variable to false.
- Save and close the file.
- Restart the Integration Agent.
Disable delivery annotation
This integration extensively annotates the originating BMC Remedy change request, but you can disable this behavior if needed for your environment (for example, if there is a large group of approvers).
To disable delivery annotation:
- Open the <IAHOME>\integrationservices\applications\bmcremedychange50\configuration.js file.
- Set the value of the ANNOTATE_DELIVERY variable to false.
- Save and close the file.
- Restart the Integration Agent.
Disable alternate approver lookup
BMC Remedy Change Management lets you set up an alternate approver. By default, xMatters will notify the alternate approver, but you can disable this.
To disable alternate approver lookup:
- Open the <IAHOME>\integrationservices\applications\bmcremedychange50\configuration.js file.
- Set the value of the ALTERNATE_APPROVERS_LOOKUP variable to false.
- Save and close the file.
- Restart theIntegration Agent.
Modify the workflow definition filters
This integration uses filters defined in the workflow definition (.def) files provided in the integration package. You can use BMC Developer Studio to modify those filters to better suite your environment. See the BMC Remedy documentation for details.
