Jira Cloud
Jira delivers a cloud-based platform that teams use to plan, track, release, and support software. Jira gives you high availability and disaster recovery, so no request goes unresolved. Use xMatters to keep track of your important issues and incidents, and automatically notify the right people whenever an issue needs attention.
xMatters automates communications by integrating people into your toolchains so you can proactively prevent outages, rapidly engage resolvers, manage major incidents, and keep stakeholders informed.
Do more with this integration
Incorporate this integration into your orchestrated incident resolution workflows with Flow Designer. After you create a configuration, the Flows tab appears. From there, you can build your flows — add new response options, connect to other apps, or even create new xMatters alerts based on activities in the flow — enriching the information injected by this integration along the way.
Are you looking to integrate Jira Cloud steps into your automated toolchain in Flow Designer? Check out these instructions instead.
Get all your questions on integrating with Jira answered — take a live, online workshop led by one of our xPerts.
Get started with Jira Cloud
To install this integration in xMatters, simply go to Workflow Templates on the Workflows tab and start typing the name of the integration you're looking for to filter the list. Once you find it, click its tile then click Next to get to the configuration screen.
Important information for existing integrations
Jira is changing what user information it returns in requests to its API, introducing an account ID as the primary identifier for users rather than a username or user key. We have updated our integration to support these changes. However, to ensure an integration continues to function as expected, you need to make sure you have a "Jira SD User ID" custom field in xMatters and that it is populated with users' Jira account ID.
How to set up a Jira integration
There are three steps to setting up the integration: create the configuration, add a Jira SD User ID field in to match an xMatters user ID to a user in Jira, and install the integration in Jira Cloud.
Create the configuration
After you give your configuration a name and description, type a name to use when sending alerts (so you can easily tell which configuration or integration the alerts are from), and add all of the people or groups you want to be notified.
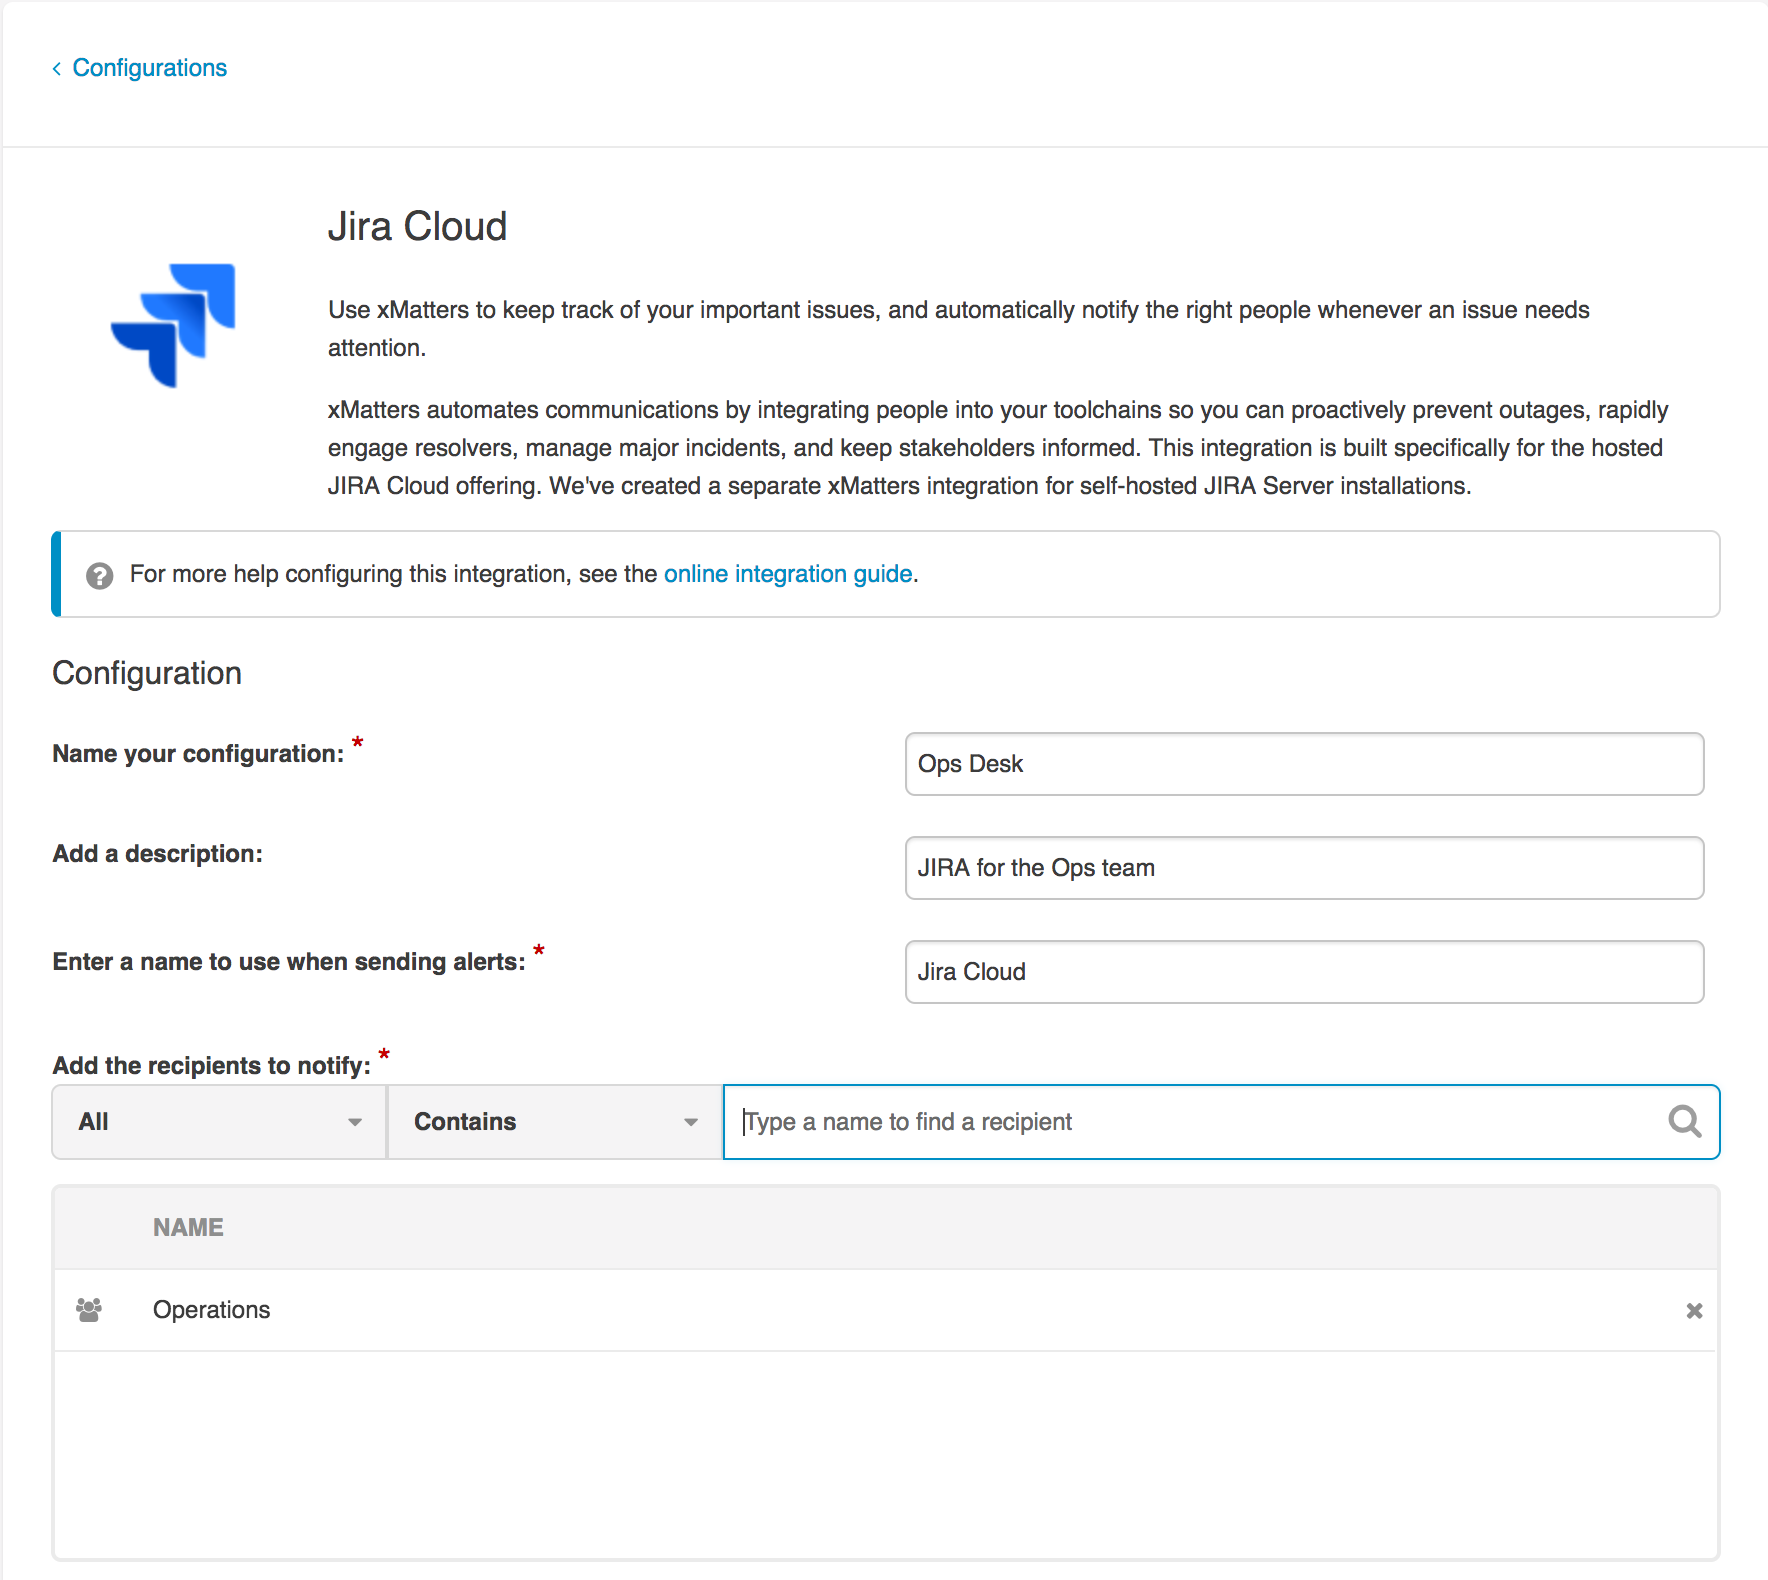
Once you save the configuration, xMatters displays the hostname you need to configure Jira:

When you install the xMatters add-on in Jira, use this URL as the value for the "xMatters Hostname" field.
Create and populate the Jira SD User ID field
To enable automatic issue assignment and the Engage with xMatters feature, you need to map users in xMatters with their Jira account ID. You can do this by creating a custom user property in xMatters that stores the Jira account ID.
- Create a custom user property in xMatters, making sure you name the field "Jira SD User ID". This name is important (and case-sensitive!) as the code relies on this specific text to find the username.
- For each user, populate this field with the user's Jira account ID. You can use the User Upload feature in xMatters to populate custom user properties if you have many users to update.
To find your Jira account ID:
- Click on your user icon and select Profile.
- This opens your profile page.
- Take note of the numbers and letters after the last "/" — this is your account ID.

For more information, see the Jira community.
Note: You can retrieve multiple account IDs at once by exporting your user list from Jira, and looking at the User ID column in the exported .csv file.
Install the integration in Jira Cloud
The instructions for setting things up on the Jira side are slightly different depending on where you're installing it.
- Log in to Jira as an administrator, navigate to the Atlassian Marketplace, and locate the xMatters app.
- In the Search Results area, click the Install button for the xMatters Actionable IT Alerts for Jira add-on.
- On the add-on setup page, enter the hostname of your xMatters instance, along with your username and password, or the credentials of an xMatters user with permission to submit REST web service requests.
- For this integration, make sure your authenticating user has the Developer and Standard User roles in addition to the REST Web Service User role. The integration uses these credentials to retrieve your list of available configurations, and the default REST Web Service User role may not have enough permissions to get the list. Also, make sure to add your authenticating user to the editor permissions for the configuration.
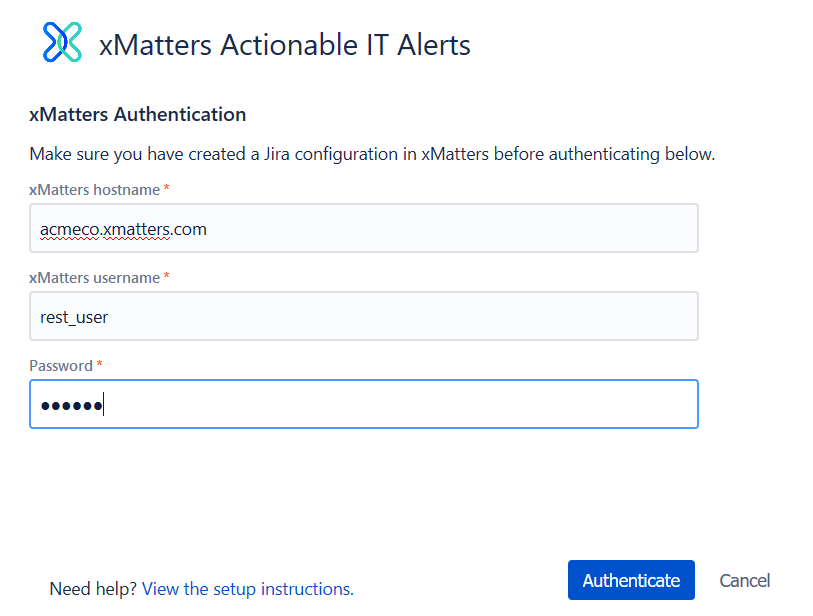
- Click Test Authentication to confirm that your user has access, and display the rest of the settings.
- In the Configured Integrations drop-down list, select the configuration you just created.
- In the Minimum Trigger Priority drop-down list, set the lowest level of priority for which you want xMatters to send notifications.
- For example, if you accept the default of "High", xMatters will send notifications for all issues with a priority of High or Highest.
- Set whether you want to enable or disable Conference Bridges as part of the Engage with xMatters feature.
- Click Save Settings to finish configuring the add-on.
- The add-on then displays the URLs you can target using Jira webhooks to create or terminate alerts in xMatters.
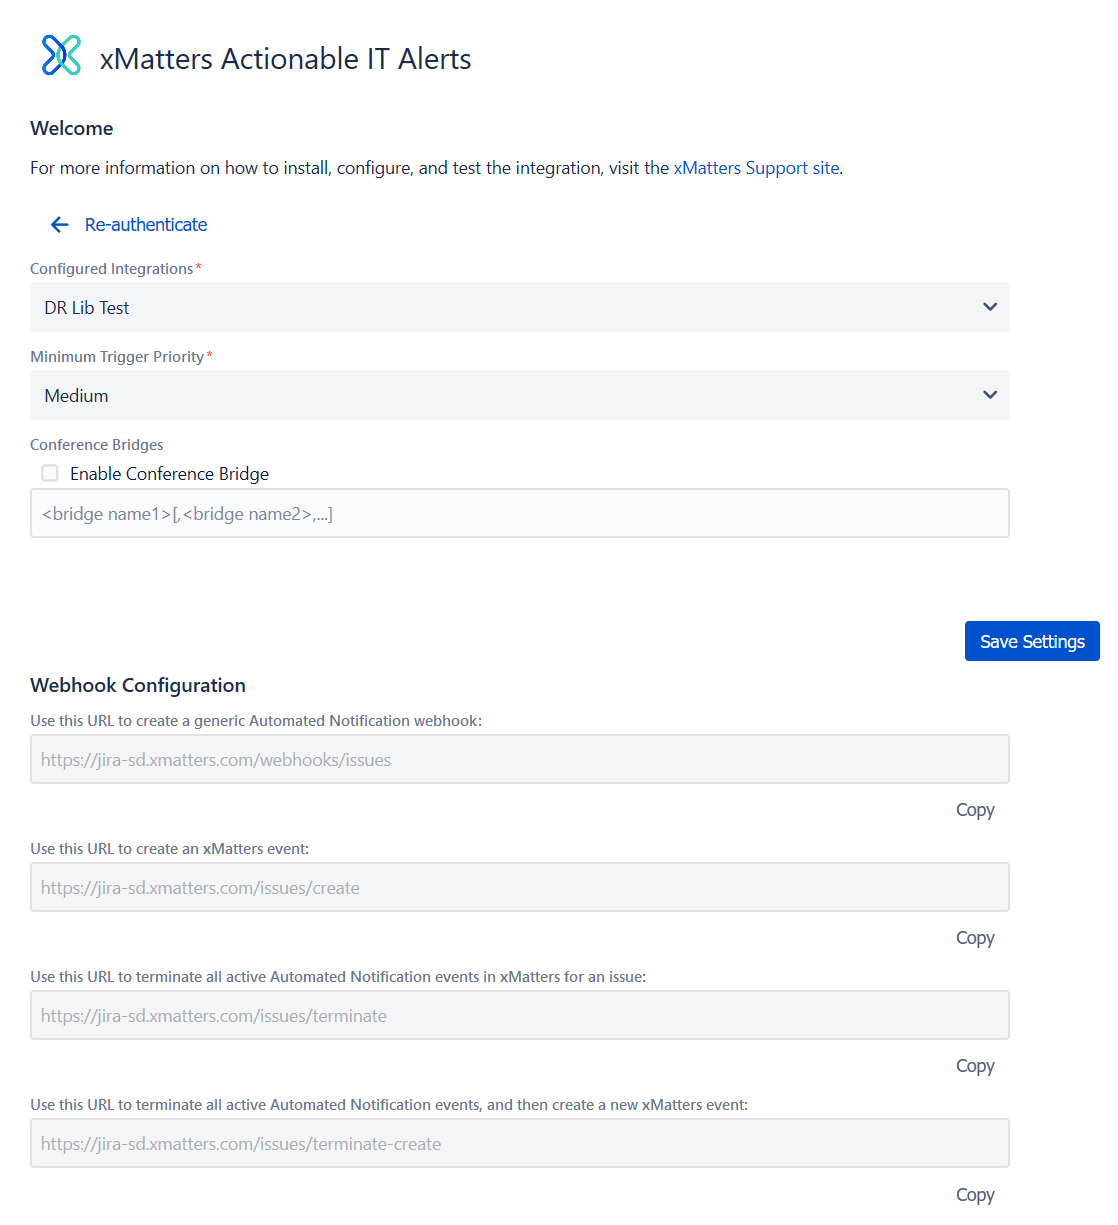
- To configure the default behavior, copy the /webhooks/issues URL to your clipboard.
- Go to your Jira System Dashboard and click Jira Settings, then click System.
- In the System settings menu, under Advanced, click Webhooks.
- On the Webhooks page, click Create a Webhook.
- Give the new webhook a name, and set the Status to Enabled.
- Paste the URL you copied from the xMatters add-on configuration into the URL field.
- Select the check boxes for created and updated.

- Make sure the "Exclude body" check box is NOT selected, and then click Save.
Your integration is now complete! For more information about the additional options and features offered by this integration, such as customizing notification and update settings, see Extend your Jira integration. This is also where you'll find information on setting up users in xMatters and Jira for the issue assignment workflow.
How to use your integration
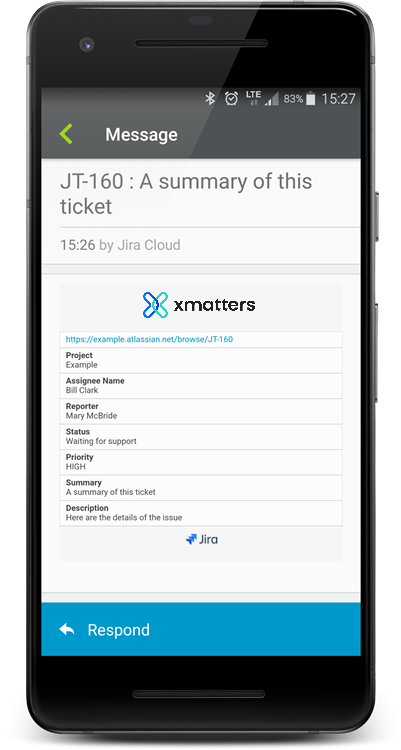
To use the integration, create a new issue or incident and xMatters will automatically send a notification to the recipients you defined in the configuration settings. Check out the screenshots at the top of this page to see what the notifications would look like in the xMatters mobile app.
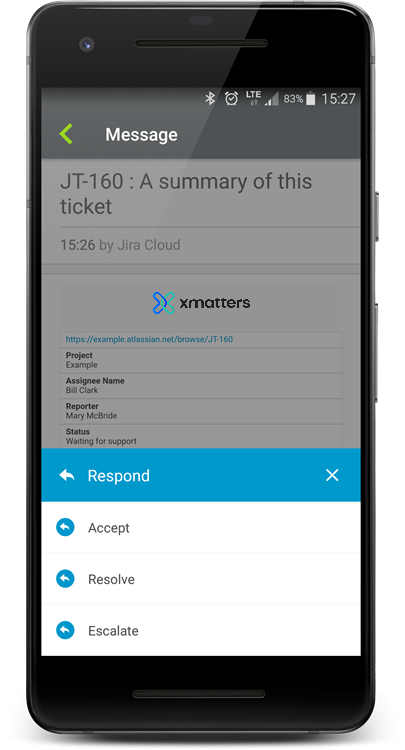
Create a new issue in Jira and assign it a priority of "High" or "Highest" (or whatever minimum trigger priority you configured when setting up the integration in Jira). xMatters sends a notification with the following response options to the groups or users you specified in the configuration:
- Accept: This assigns the issue to the recipient, updating the issue in Jira. If you don't see the assignee update in Jira, there's a few things you can check.
- Resolve: This resolves the issue, terminating the alert in xMatters and updates the issue in Jira.
- Escalate: This manually escalates the notification to the next recipient in the escalation path set up in xMatters. That recipient is then given the same response options.
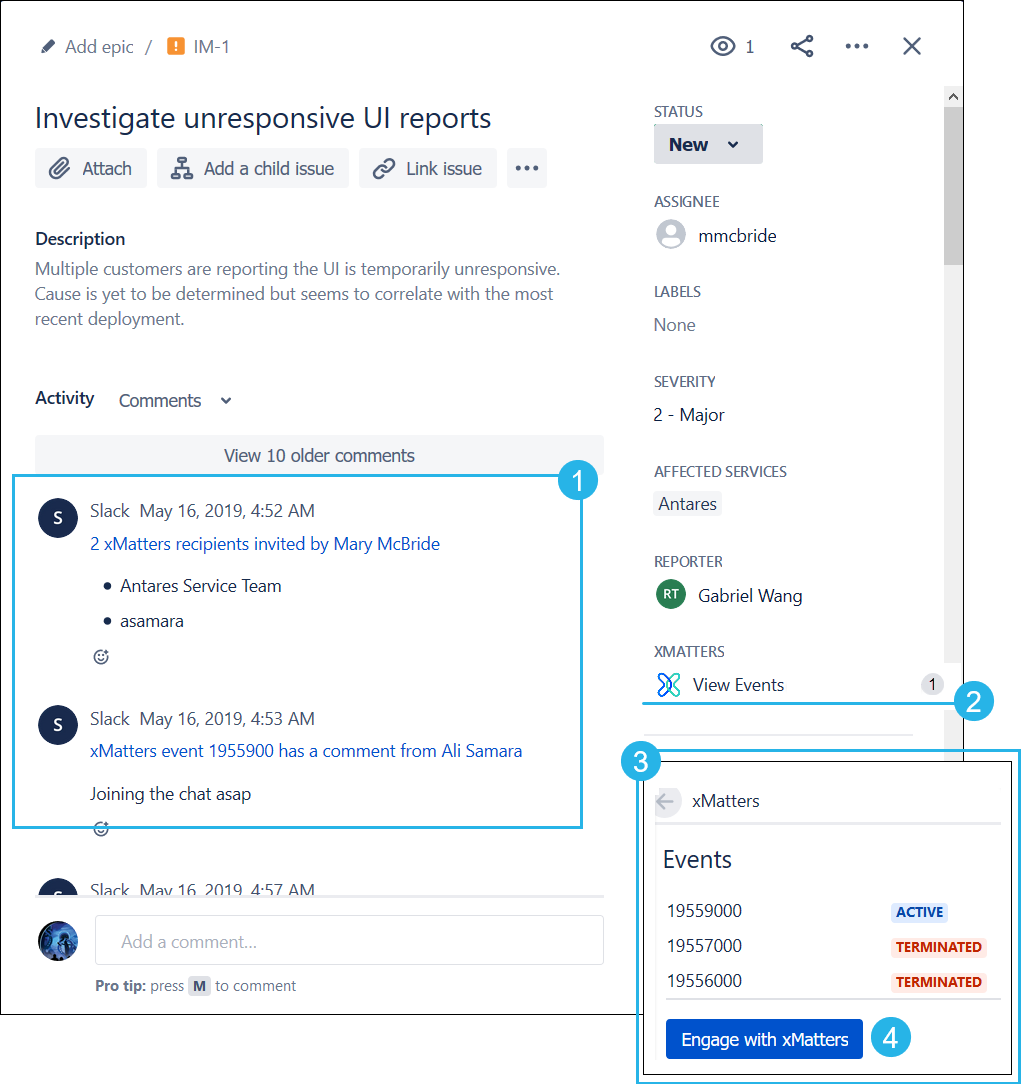
When a recipient selects a response, xMatters automatically updates and comments on the issue in Jira (1).
The xMatters glance in the sidebar (2) shows active alerts associated with the issue; click View Events to see a list of all associated alerts (3). You can also use the Engage with xMatters feature (4) to invite people to the issue. When you invite them, they receive a notification which they can acknowledge or escalate, adding comments in either case.
To use the Engage with xMatters feature, click View Events under the xMatters glance in the issue sidebar, and then click the Engage with xMatters button (you can also click the ••• button to find more actions and select Engage with xMatters):
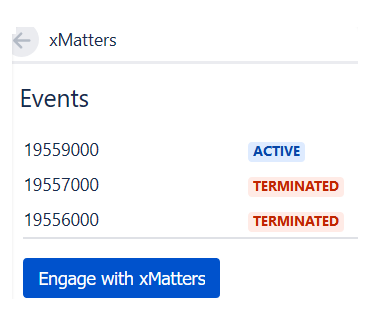
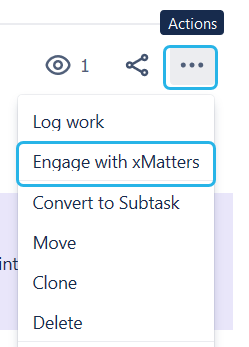
If you're using the old issue view, you'll also see an Engage with xMatters button near the actions (•••) button.

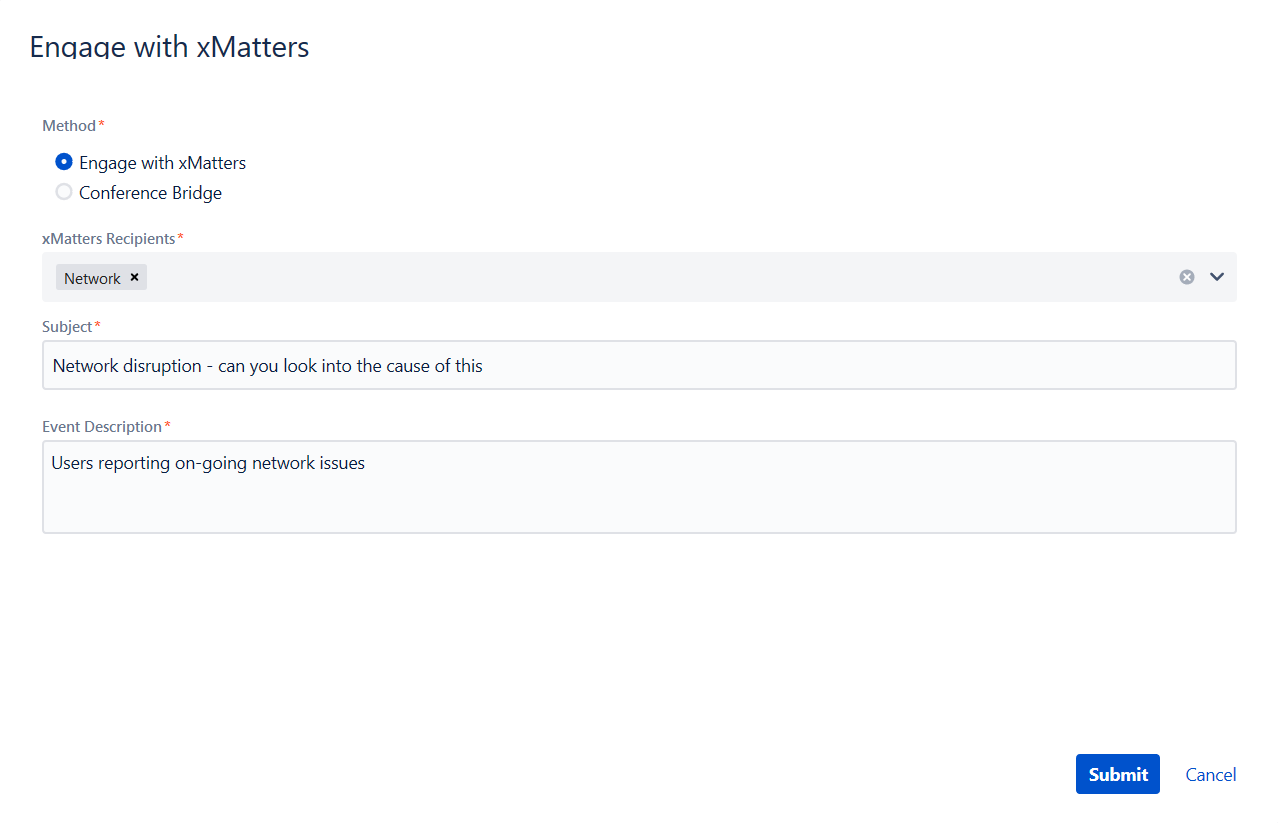
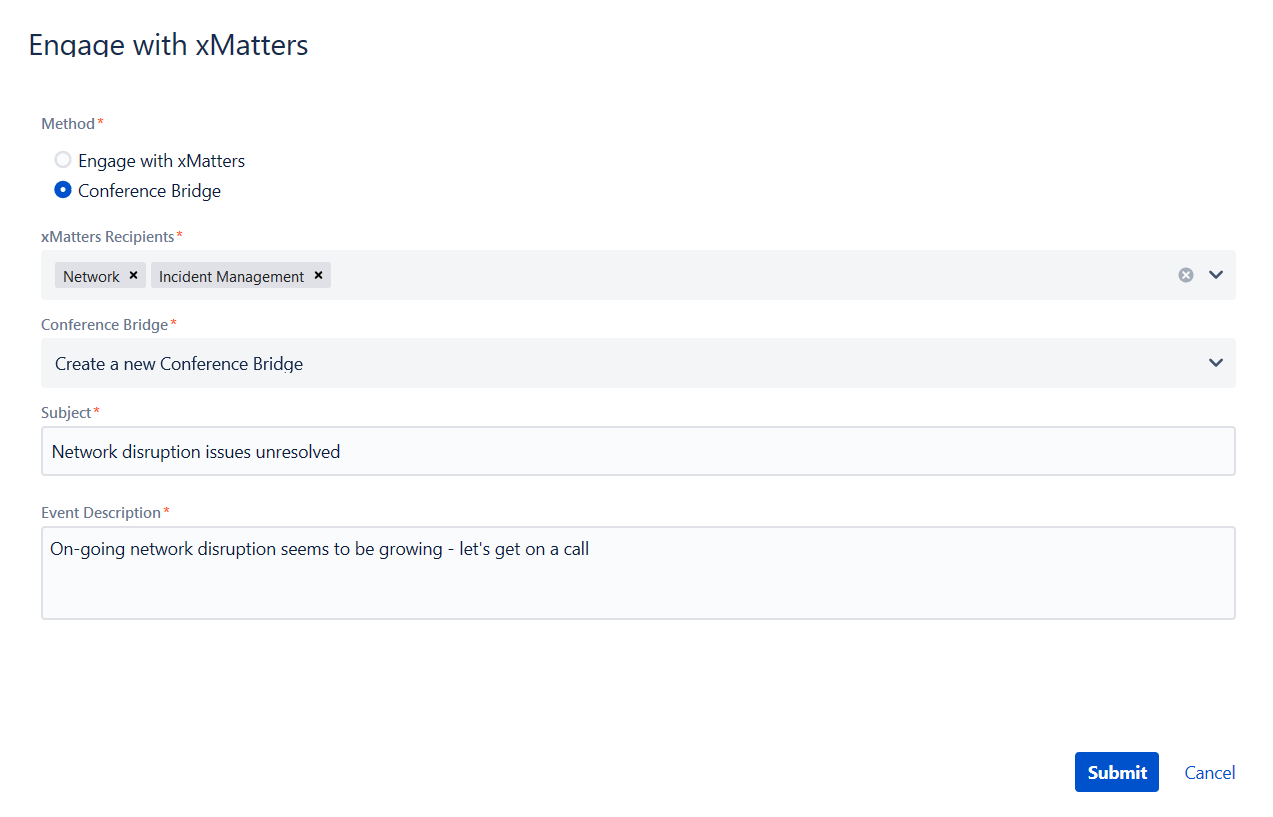
If you haven't enabled Conference Bridges, you're simply presented with a Recipients field where you can enter the users or groups you want to target. If you have enabled this options, you'll need to choose your engagement method:

- Engage with xMatters: search for people and groups in xMatters and add them to the Recipients list.
- Conference Bridge: search for people and groups in xMatters and invite them to a conference call.
Depending on your chosen engagement method, you'll see one of the dialog boxes show below. Start typing in the Recipients field to see a list of users or groups, and then select one or more recipients. Enter the remaining details, and then click Submit. This generates a new alert targeting the recipients listed and deliver notifications across the users' devices.
Engage with xMatters
Conference Bridge
The integration creates alerts in xMatters and sends notifications to the appropriate recipients when issues are created or updated in Jira. When a webhook triggers an HTTP call to the add-on server, the server builds the alert payload, and queries xMatters for the assignee (if one is populated) based on the Jira SD User ID custom field. If the user is found, xMatters sets them as a recipient and creates the alert. If they are not found, xMatters targets the default recipient set in the integration configuration.
When a user responds with "Accept", the add-on server queries xMatters for the account ID stored in the "Jira SD User ID" custom field, and uses that to set the responder as the assignee in Jira. To do this, the user also needs to have access to the project in Jira and have the Assignable User permission.
You can customize and extend the behavior of the integration by modifying the webhooks in Jira.
Extending your integration
Looking to do more with xMatters and Jira? There is some customization you can do in Jira Cloud. You can also tailor the settings and notifications for the integration if you convert it to a custom workflow.
Customize the integration in Jira
The integration includes the following webhooks, each of which can be customized to suit your specific requirements.
/webhooks/issues
The issue assignment webhook installed with the built-in integration is intended to require minimal configuration. By default, this webhook has the following behaviors:
- When an issue is created or updated, it triggers an alert in xMatters and notifies the affected recipients.
- When an issue is closed or resolved, it terminates all active automated notification alerts in xMatters for the issue.
- When an issue is transferred from an assignee to "Unassigned", it terminates all active automated notification alerts in xMatters for the issue.
- When an issue is reassigned, it terminates all active automated notification alerts in xMatters for the issue, and creates a new xMatters alert with the new assignee as the target recipient.
/issues/create
This webhook creates a new automated notification alert in xMatters. You can use this webhook to implement finer control on how and when to create an alert. For example, you may want to create alerts only for issues with a Priority of "Highest" or only for issues filed by a specific user type.
To avoid having multiple webhooks firing for the same issue, which would result in duplicate xMatters alerts, you may want to disable the issue assignment webhook before implementing a new rule.
/issues/terminate
This webhook terminates all active automated notification alerts in xMatters for a specific Jira issue. You can use this webhook to better control when alerts are terminated in xMatters. For example, you may want to terminate all associated xMatters alerts whenever an issue's resolution changes.
/issues/terminate-create
This webhook terminates all active automated notification alerts in xMatters for a specific Jira issue, and then create a new xMatters alert. For example, you could make sure that existing notifications are cleared and a new alert started if an issue is reassigned.
How to configure a webhook
You can configure most of the settings for a webhook using the Webhooks page in Jira, and you can always access the URLs you need on the xMatters add-on configuration screen.
As an example, the following instructions explain how you would configure the /issues/terminate-create webhook to terminate all existing automated notification alerts for an issue and create a new alert when an issue was reassigned.
To configure a webhook:
- Log in to Jira as an administrator, and go to your Jira System Dashboard.
- Click Jira Settings, then click System.
- In the System menu, under Advanced, click Webhooks.
- On the Webhooks page, click Create a Webhook.
- Give your new webhook a name, and set its Status to Enabled.
- In the URL field, paste the terminate-create URL from the xMatters add-on configuration screen.
- In the criteria field in the Events section, type the following:
assignee changed AFTER -1m and statusCategory is not Resolved - In the Issue list, select the check box for updated.

- Ensure that the Exclude body check box is NOT selected.
- Click Save.
To configure a more complicated set of webhooks, you can use the automation rules feature. As an example, the following instructions explain how to configure the /issues/create webhook to create an alert in xMatters only when an new issue is created with a priority of "Highest".
To configure an automation rule:
- Log in to Jira as an administrator, and go to your Jira System Dashboard.
- Click Projects, then click the name of the project for which you want to configure a webhook.
- Click Automation in the Project settings menu.
- On the Automation page, click Add rule.
- In the New automation rule dialog box, select Custom rule, and then click Next.
- Type a name and description for the new rule.
- In the WHEN box, click Add a trigger.
- In the Edit WHEN dialog box, click Add a trigger, and then select a trigger from the drop-down list (for example, Issue created), and then click Add.
- Click the IF box, and then, in the Edit IF dialog box, click Add condition.
- Set the conditions for when you want to create a new alert (for example, Issue matches > Priority > Highest), and then click Confirm.
- In the THEN box, click Add an action.
- In the Edit THEN dialog box, select Webhook in the drop-down list, and then click Add.
- In the URL field, paste the URL for the /issues/create webhook from the xMatters add-on configuration screen.
- Select the Include payload in request body check box, and then click Confirm.

- Ensure that the Enable rule check box is selected, and then click Save.
Customize the integration after converting to a custom workflow
There are some additional changes you can make to your integration if you convert it to a custom workflow.
If you want to extend your integration even further, keep in mind that the integration relies on certain integrations with particular names.
- To use the webhook features, your workflow needs to include the “Automated Notification” inbound integration.
- To use the Engage with xMatters features, your workflow needs to include the “Engage with xMatters” inbound integration.
- To use the Engage with xMatters – Conference Bridge feature, your workflow needs to include the “Conference Bridge” inbound integration.
If you want to extend the outbound integration functionality, we suggest that you call the Jira Cloud API directly from the Integration Builder rather than using the Connect application used by the built-in integration (see the Authentication section for their recommendations on authenticating REST API requests).
Troubleshooting
The first place to look for any problems is in the Activity Stream for the integration. You can also check out the Jira logs at $JIRAHOME/log/atlassian-jira.log, which will have any stack traces or error messages generated by the xMatters add-on.
Troubleshooting issue assignment
If you run into issues with the integration not assigning the responder as the assignee in Jira, make sure:
- you've entered the Jira account ID in the Jira SD User ID custom user property.
- the user has the Assignable User permission in Jira (see the Jira documentation for details).
- the user has access to the project in Jira.

