ServiceNow (Flow Designer)
This page contains instructions for the built-in ServiceNow (Flow Designer) workflow created for integrations using the xMatters app (version 5.5 and above). If this is your first time integrating xMatters with ServiceNow, we recommend that you start your integration with the new ServiceNow (Flow Designer) v2 workflow instead, which comes with more out-of-the-box features that integrate with Flow Designer and allows you to seamlessly connect ServiceNow to your xMatters toolchain.
If you want to maintain your existing direct integration, see xMatters for ServiceNow (Direct Integration).
ServiceNow (Flow Designer) is an xMatters workflow that uses the xMatters app for ServiceNow (versions 5.5 and above) to become the voice and interface of an automation engine. When ServiceNow detects something that requires attention, xMatters places phone calls, sends emails, or notifies your mobile app. This integration incorporates ServiceNow records into your xMatters toolchain, letting you add steps to your workflow as part of a ServiceNow record.
Integration version – features and updates
Version 5.8 of the xMatters application within ServiceNow is certified with the following releases: Zurich, Yokohama, Xanadu, Washington DC, Vancouver, and older releases.
Read through the new features and updates for this version and see a list of previous versions here.
How it works
When ServiceNow sends a signal, it sends a JSON-formatted webhook to xMatters. A ServiceNow 5.x trigger in xMatters parses the webhook and initiates a flow. The webhook includes essential alert data you can use to enrich notifications to users or when building automated tasks.
Install the workflow
The following instructions describe how to install the workflow through the xMatters one-click installation process.
- Go to the Workflow Templates page and click the ServiceNow (Flow Designer) tile.
- On the Set up the workflow tab, give the workflow a name that identifies its purpose (this must be unique in your instance), add an optional description, and set the default incident type (if applicable). Any built-in Initiate Incident steps in the workflow will automatically be set to the selected incident type.
- You can edit these later, if needed.

- You can edit these later, if needed.
- Click Next to set up the connection.
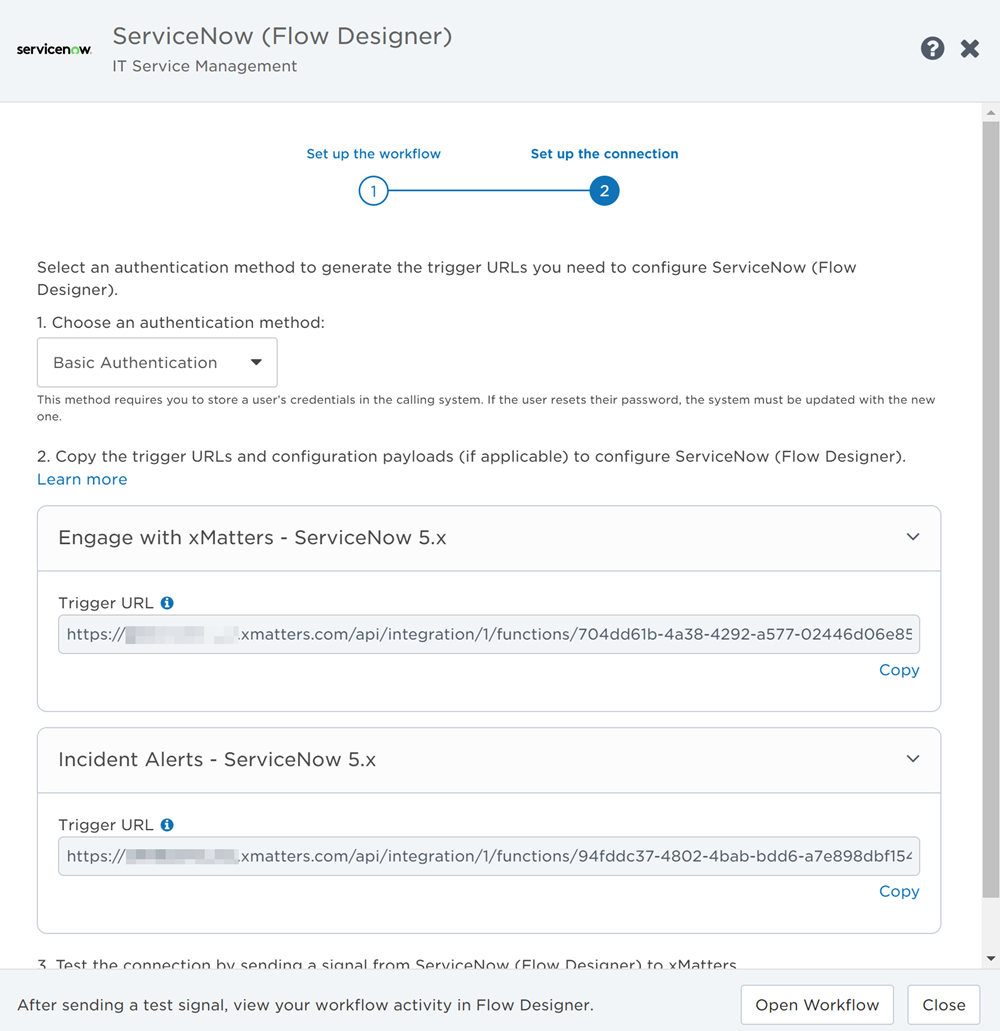
- Choose the authentication method (we recommend Basic Authentication or API Key). Trigger URLs for Engage with xMatters and Incident Alerts are generated based on the selected authentication method.
- Copy the trigger URLs — you’ll use these to configure the webhooks in ServiceNow.
- By default, the workflow notifies the user or group assigned to the ServiceNow incident.
- By default, the workflow notifies the user or group assigned to the ServiceNow incident.
- Click Open Workflow to view and customize the workflow, or Close to return to the Workflows page.
Configure ServiceNow to send requests to the trigger URL
To have ServiceNow send alerts to the flow trigger, you need to configure a webhook and set it to use the trigger URL.
Prepare ServiceNow
There are a couple of steps to get ServiceNow ready to integrate with xMatters — first and foremost, installing the xMatters app. However, you also need to create a user in ServiceNow to make requests, and assign the user specific roles installed with the application.
To begin, install the free xMatters app in ServiceNow (if you're upgrading, see our upgrade instructions). Make sure your app is version 5.5 or later.
- Go to the ServiceNow store at store.servicenow.com, and search for "xMatters".
- When you find the app, click Get. You'll be prompted to enter your system credentials to add the app to ServiceNow.
- Log into ServiceNow as a system administrator, and navigate to System Applications > Applications.
- Click Downloads.
- Search for "xMatters", and then click Install.
To configure the ServiceNow endpoint in xMatters, you need the username and password for a ServiceNow API user to handle REST requests from xMatters to ServiceNow. To access the REST endpoint and make the required integration requests, this user must have both the x_xma_xmatters.xmatters_rest and itil roles (added with the xMatters application). For additional security, select the 'Web service access only' check box on the user's details page.
For information about adding users and assigning roles in ServiceNow, refer to the ServiceNow documentation.
The xMatters app installs roles into ServiceNow that control who can use or make changes to its components and that manage the communications between ServiceNow and xMatters.
- x_xma_xmatters.xmatters_admin: Only users with this role can modify xMatters components within the ServiceNow interface.
- x_xma_xmatters.xmatters_rest: You must have a ServiceNow API user with this role to successfully access the REST endpoint and execute the required integration requests.
- x_xma_xmatters.xmatters_engage: Users with this role can use the Engage with xMatters feature.
- x_xma_xmatters.xmatters: Assign this role to any users or groups you want synchronized into xMatters.
- itil: Users with this role can create and modify incidents, allowing them to use the Create Incident, Update Incident, and Add Comment ServiceNow steps in this workflow.
To assign a role to multiple users at once, you can:
- assign the role to a group — any users in that group inherit the role.
- assign the role to an existing role — any users assigned the existing role inherit the xMatters role.
Configure xMatters
Now that you've completed the first part of the configuration in ServiceNow, it's time to configure xMatters.
The integration requires a user who can authenticate REST requests from ServiceNow to xMatters when working with alerts. The necessary permissions are provided by the 'REST Web Service User' role in xMatters. See Create an integration user for more information on creating an integration user.
Keep the user ID and password of this user handy. You'll need them when configuring other parts of the integration.
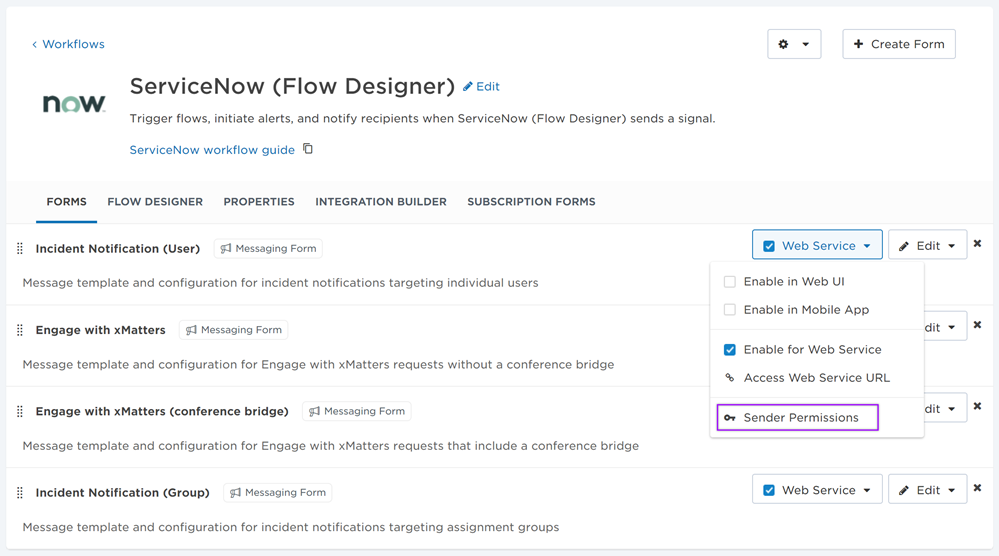
When you add the workflow, it comes with four pre-installed forms: Incident Notification (User), Engage with xMatters, Engage with xMatters (conference bridge), and Incident Notification (Group). You need to assign sender permissions for each of these forms to the xMatters integration user that ServiceNow is configured for.
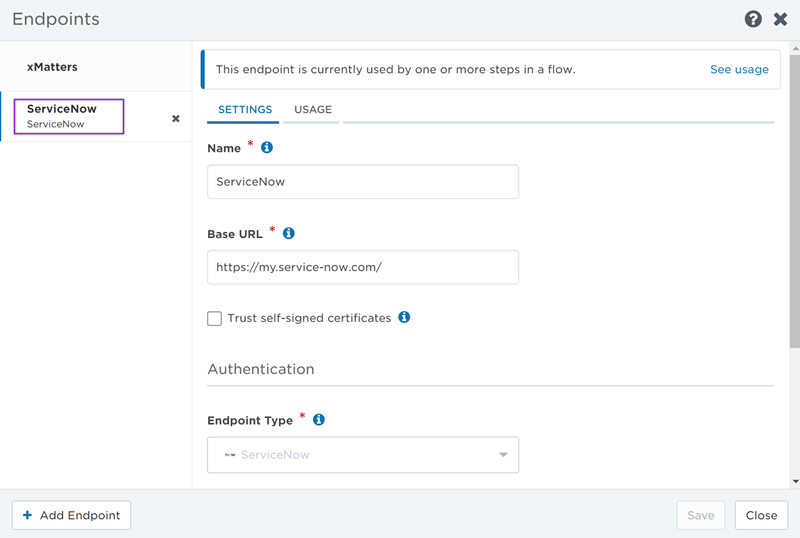
The workflow uses an endpoint with the ServiceNow authentication type. Set the endpoint's URL and authentication credentials (the username and password for your ServiceNow API user).
To configure the endpoint:
- On the workflow page in xMatters, go to the Flow Designer tab and select one of the flows to open Flow Designer.
- Click Components from the top menu then select Endpoints.
- In the Endpoints dialog, select the ServiceNow endpoint to view its details.
- Update the Base URL to that of your ServiceNow system.
- Enter the credentials for the ServiceNow API user.
- Click Test Authentication to send a request using the username and password to the ServiceNow instance you entered in the Base URL field.
- If the page displays a message that the authentication failed, check the Base URL you entered is correct, then check the credentials match the ServiceNow API user and that the user has the x_xma_xmatters.xmatters_rest role.
- Click Save, and then close the Endpoints dialog.
Complete the xMatters Configuration pages
The xMatters application installs four configuration pages into ServiceNow:
- Common Configuration: Configures the connection, credentials, and logging level for the communication between xMatters and ServiceNow.
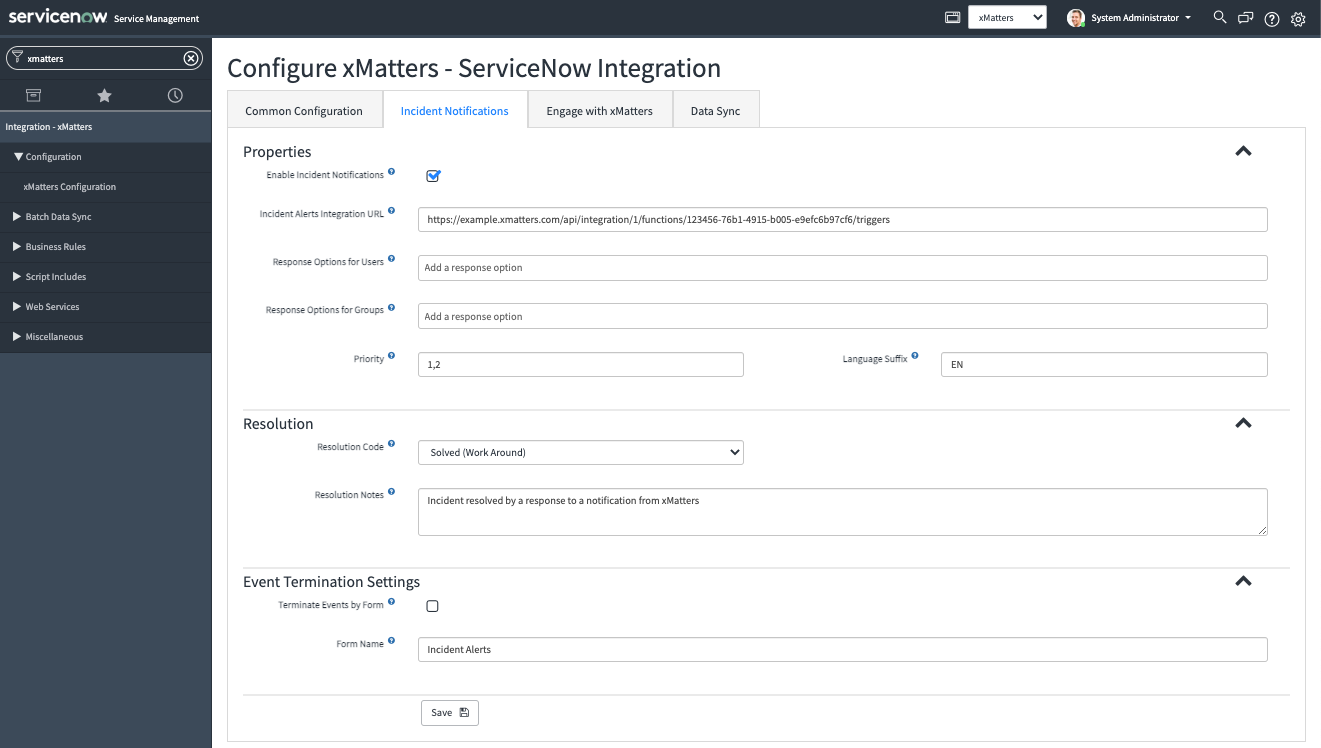
- Incident Notifications: Enables or disables the incident notification features, and configures when and how ServiceNow sends an incident to xMatters for notification.
- Engage with xMatters: Enables or disables the Engage with xMatters action in the ServiceNow user interface, sets the connection parameters for the feature, and sets the maximum number of results to return when searching for people or groups to target.
- Data Sync: Configures the user and group seeding, and the data synchronization between xMatters and ServiceNow.
You need to update most of the settings on these pages with information specific to your xMatters deployment. See the following sections for more information on the settings in the Common Configuration, Incident Notifications, Engage with xMatters, and Data Sync tabs.
- Log into ServiceNow as a user with the 'admin' role, and open the Navigator.
- Only users with the ServiceNow x_xma_xmatters.xmatters_admin role (added by the xMatters application) can modify xMatters components within the ServiceNow interface.
- Locate and expand the Integration – xMatters entry in the All Applications list, and then click xMatters Configuration.
- Click the tabs at the top of the window to switch between pages.
- For an existing integration, we recommend doing a hard refresh before configuring settings (for example, CTRL+F5 on Windows or CMD+SHIFT+R on Mac) to make sure you have the latest and greatest version of the page.
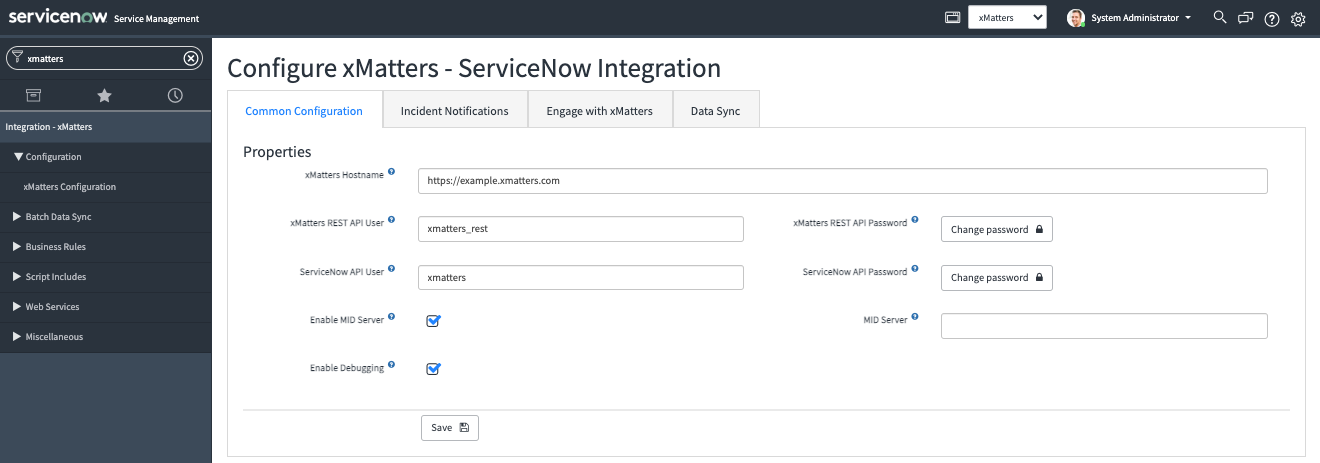
- xMatters Hostname: The hostname of your xMatters deployment (for example, https://your-company.na1.xmatters.com). Make sure that the hostname doesn't end with '/'.
- xMatters REST API User: The username of the integration user used to authenticate requests to xMatters.
- xMatters REST API Password: The password of the integration user.
- ServiceNow API User: The ServiceNow API user you created to authenticate requests from xMatters to ServiceNow.
- ServiceNow API Password: The password of the ServiceNow API user.
- Enable MID Server and MID Server: Sets whether the integration should use a MID server when making requests to xMatters and the name of the MID server to use. See the ServiceNow documentation for information on using MID servers.
- Enable Debugging: Sets whether DEBUG messages are included in the xMatters log in ServiceNow. See the ServiceNow documentation for more information on ServiceNow logs.
After you save your settings, the password fields turn into buttons, indicating there is a password entered for the user. Click the password button to update the saved password (for example, if you changed the integration user's password in xMatters).
- Enable Incident Notifications: Turns on incident notifications.
- Incident Alerts Integration URL: The trigger URL for the workflow's Incident Alerts integration.
- Response Options for Users: Leave blank as this option is not used by this workflow.
- Response Options for Groups: Leave blank as this option is not used by this workflow.
- Priority: The priority of incidents that you want to send to xMatters.
- Language Suffix: The language of incident properties sent to xMatters. This value is appended to property names when the integration performs certain actions.
- Resolution: Use Resolution Code and Resolution Notes to set the values used for the resolution information when a recipient responds with Resolve. This is required to resolve or close an incident if the resolution data policy installed with the Incident Management Best Practices is enabled. If the policy is enabled, the resolution code cannot be None.
- Event Termination Settings: Leave the Terminate Events by Form setting unchecked as it does not work with this workflow.
- To use this setting, modify the workflow to only use one of the Incident Notification (User) or Incident Notification (Group) forms (by default, both of them are enabled in the workflow). Select the check box to only terminate alerts created by the workflow form specified in the Form Name field when a termination event happens (for example, when the incident is closed or the priority changes). For example, if you only want to terminate alerts created by Incident Notification (User) but want to keep Engage with xMatters alerts open, select the check box and add Incident Notification (User) in the Form Name field.
- Enable Engage with xMatters: Enables the Engage with xMatters feature (users need to be assigned the x_xma_xmatters.xmatters_engage role to be able to use the feature).
- Maximum number of suggestions in recipients list: The maximum number of suggestions the Engage with xMatters dialog displays when searching for recipients.
- Engage with xMatters Integration URL: The trigger URL for the workflow's Engage with xMatters integration.
- Conference Bridge Integration URL: The trigger URL for the workflow's Engage with xMatters integration (enter the same URL as the 'Engage with xMatters integration URL' field).
- External Conference Bridges: The names of external conference bridges to make available in the Engage with xMatters dialog; leave blank to use xMatters-hosted conference bridges. See the xMatters online help for more information on conference bridges.

Before configuring the data sync settings, we recommend you review the information on syncing users, groups, and properties from ServiceNow to xMatters.
Properties
- Enable Dynamic Sync: Turns on dynamic syncing of users, groups, and properties from ServiceNow to xMatters.
- Check Instance URL: The data sync to xMatters will only be attempted if the ServiceNow instance URL matches the value entered in this field. Entering a URL into this field is optional.
- Site: The xMatters site to assign users and groups added via the data sync to. If you haven't configured any sites in xMatters, use 'Default Site'.
- Supervisor: The user ID of the supervisor in xMatters you want users added via the data sync to be assigned to. If this is left blank, the user will not have a supervisor in xMatters until you manually add one.
- Always Sync Group Managers: Sync group managers even if they aren't assigned the x_xma_xmatters.xmatters role. See how ServiceNow Supervisors and Group Managers are synced.
- Time Zone: The time zone you want to set for users and groups when they're added to xMatters.
- Externally Own Data: When set, synchronized data can only be removed from xMatters by removing it from ServiceNow.
- Web Login Type: Whether the user logs into xMatters using their web login (native) or LDAP.
- Language: The language to set for users when they're added to xMatters.
- LDAP Domain: The LDAP domain to use if Web Login Type is set to LDAP.
People
- Role: The xMatters role to assign to people added to xMatters via the data sync. Use the xMatters web user interface to give the user additional roles.
- Phone Device: The xMatters device name to assign to a user's voice device.
- SMS Phone Device: The xMatters device name to assign to a user's SMS device.
- Email Device: The xMatters device name to assign to a user's email device.
- Phone Extension Identifier: The component of a phone number in ServiceNow that denotes an extension (for example, 'x' or 'ext'); this lets xMatters recognize phone extensions.
Groups
- Allow Duplicates: Enables the Allow Duplicates setting for a group added via the data sync; this setting determines whether a member can be added to the escalation timeline more than once.
- Group - Use Default Devices: Enables the Use Failsafe Devices setting for a group added via the data sync; this setting determines if xMatters should contact a group members failsafe (default) device if they don't have any devices with an active timeframe.
- Default Shift Name: The name of the shift the data sync adds users to. If you already have a default shift name, update this setting to match. Otherwise you can leave it as is to match the current Default Shift default in xMatters.
Incident Properties
- Configuration Item Identifier: The UUID of the configuration item list property in the ServiceNow workflow. To sync the values of this list from ServiceNow to xMatters, see Batch load incident properties.
- Configuration Item Query: The ServiceNow query of cmdb_ci records to send for the configuration item list property. See the ServiceNow documentation for more information on querying for cmdb_ci records.
You're ready to use the webhook to trigger automated flows, including steps such as sending updates and initiating incidents, though we always recommend testing before putting things into use.
Send payloads to xMatters using the latest payload format
To maintain compatibility with existing integrations, the payload to trigger an alert is sent using a legacy format. For new installations, we recommend you change this to use the latest payload format. Besides being more future proof, it means you can also use the information in the xMatters REST API documentation to customize your payload if needed.
- Navigate to the Advanced System Properties screen under Integration - xMatters.
- Find the Event - Use Event Legacy Payload Format setting and clear the check box.
If you want to upgrade an existing integration to use the new format, follow the upgrade instructions and make sure you update the integration scripts as outlined in this article.
How to use the workflow
When a condition you've set fires, it sends a signal to xMatters, which creates an alert and notifies the workflow recipients.
The user responding to the notification has the following response options:
- Accept: Assigns the alert to the responder.
- Dismiss: Ends the xMatters alert.
The member of a group responding to the notification has the following response options:
- Assign to me: Assigns the alert and incident to the responder and stops escalations.
- Escalate: Immediately escalates the alert to the next on-call resolver in a targeted group.
Activate the clone cleanup script
If you intend to clone your ServiceNow production environment, make sure the clone cleanup script for xMatters is set to Active before beginning the cloning operation.
The purpose of the clone cleanup script is to prevent the new clone instance from deleting user and group records in xMatters. If the clone cleanup script is not enabled when the clone is created, data sync activity on the clone can delete data from the xMatters production instance. To prevent this, the clone cleanup script removes user and password information so the clone cannot access the xMatters instance.
- Navigate to System Clone > Clone Definition > Cleanup Scripts.
- Click on the xMatters Clone script to open it.
- Select the Active check box.
- If you can't select the check box, make sure you're in the xMatters application.
- Click Update.
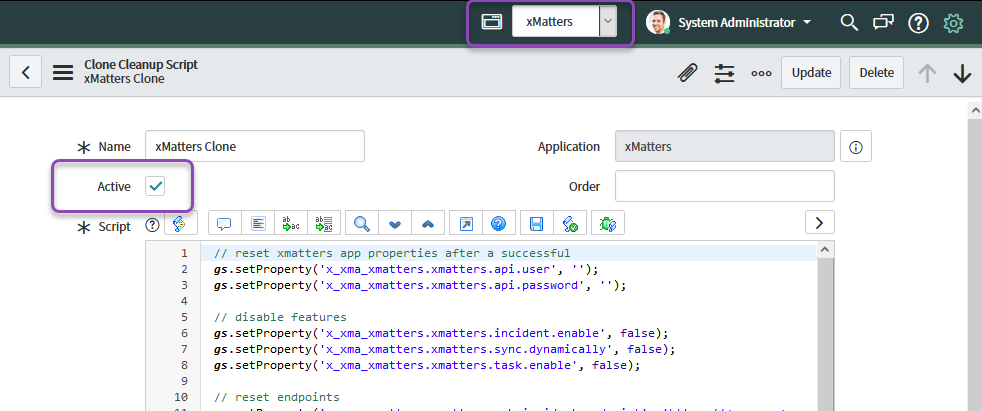
The cleanup script runs automatically after the cloning process finishes. The ServiceNow admin can verify that the script ran correctly by checking the “x_xma_xmatters.xmatters.api.user” and password properties, and the “x_xma_xmatters.xmatters.reb.user” and password properties immediately after the clone is created; all of these values should be blank.
If you want the cloned environment to interact with a non-production xMatters instance, you need to configure the integration in the clone.
Next Steps
Now that you've installed the workflow, you can use it as-is, or customize it to suit your needs better. Here are some examples of things you can add to the workflow to customize it:
- Use Slack, Zoom, and Microsoft Teams steps to add collaboration channels to the flow.
- Change the severity of incidents created when a recipient selects the Initiate Incident response.
- Update the message sent to resolvers to include the information most relevant to your team.
- Use the ServiceNow 5.x trigger to build your own custom flows. If you want to update an incident or engage record in an existing xMatters for ServiceNow integration, add the Send Integration Update step to your flow.
