
xMatters for ServiceNow (Direct Integration)
This page contains instructions for maintaining existing direct integrations. If this is your first time integrating xMatters with ServiceNow, we recommend that you start your integration with our built-in ServiceNow (Flow Designer) v2 workflow instead. The workflow comes with more out-of-the-box features that integrate with Flow Designer, allowing you to seamlessly connect ServiceNow to your xMatters toolchain.
xMatters for ServiceNow is a direct, cloud-to-cloud integration, leveraging an xMatters workflow to become the voice and interface of an automation engine. When ServiceNow detects something that requires attention, xMatters places phone calls, sends emails, or notifies your mobile app.
The instructions cover the following topics:
- The Overview: how it works and features and updates
- Prepare ServiceNow: install the xMatters app, create a ServiceNow API user, and understand the roles installed with the app
- Configure xMatters: download and import the workflow, create an integration user, configure the ServiceNow endpoint, and copy URLs and IDs needed to complete the setup
- Configure ServiceNow: complete the app configuration pages, set the payload format and what happens when an incident is canceled, enable the clone cleanup script (if you're cloning your environment), and set up data synchronization
- How to use the integration: validate the data sync settings, trigger a notification, and use Engage with xMatters
- Extend your integration: check out our add-ons to enhance and customize the integration
- See how it works: diagrams to show how the parts of the integration work together
- Upgrade: instructions to upgrade the integration
Integration version — features and updates
As of version 5.8.3, the legacy xMatters app requires approval to install on your ServiceNow instance. To set up a new integration between xMatters and ServiceNow, use the ServiceNow Flow Designer v2 workflow paired with the Everbridge Flow Designer app.
If your organization requires the legacy xMatters app, please contact xMatters customer support for assistance.
Version 5.8 of the xMatters application within ServiceNow is certified with the following releases: Australia, Zurich, Yokohama, Xanadu, and older releases.
Along with all of the fixes and updates from previous versions, this release (5.8) includes the following enhancements:
- Data sync now does not sync inactive ServiceNow users to xMatters even when they are assigned a role.
- Updated the 'Mobile Phone Device Name' tooltip on the Data Sync settings page.
- Fixed an issue where users could not enable the clone cleanup script before cloning a ServiceNow environment.
- Fixed an issue when sending Incident Alerts requests to xMatters.
To upgrade from a previous version of the integration, see our instructions to guide you through the process.
For a list of previous updates, see what we added in previous versions.
Are you using the ServiceNow steps in Flow Designer?
Flow Designer — our drag-and-drop, visual workflow builder — includes steps to add ServiceNow to your incident resolution workflow. You don't need to do any of the setup below if you simply want to use these in your flows; all you need to get started is an endpoint that targets your ServiceNow instance.
How the integration works
The integration consists of a workflow and the xMatters application within ServiceNow, which includes the following components:
- Incident Alerts: Handles automatic notification about incidents and the sharing of incident information between ServiceNow to xMatters.
- Engage with xMatters: enables ad hoc communications, including conference bridges, using xMatters.
- User and data sync: synchronizes ServiceNow users, groups, and group members to xMatters.
For an overview of each component, expand the following sections. If you want a behind-the-scenes look at the different business rules, script includes, and web services each component uses to accomplish their tasks and how the pieces fit together, see our detailed how it works section.
For a live walk-through of how to set up the integration, attend one of our ServiceNow workshops – you can check for available workshops here.
When an incident occurs in ServiceNow that matches the criteria you define when you configure the integration, it sends a request to xMatters with information on the incident. If the incident is assigned to a user or group that exists in xMatters, xMatters notifies the user or on-call members of the group on their preferred devices. The recipient can take ownership of the incident, resolve it, or immediately escalate it to the next on-call member in a group (if assigned to a group).
xMatters then updates the incident record with information about the alert status, who responded and how, and any comments that were added.
This feature allows users with a particular role to leverage xMatters to call in additional members from other teams to assist with an existing incident.
ServiceNow users can also use this feature to get help from or notify users of xMatters that don't exist in ServiceNow — if the group or person you're looking for doesn't exist in ServiceNow, you can still notify them via xMatters so you can get them up to speed directly.
For example, imagine a support team member takes ownership of a ticket, but needs help from the database team to resolve part of the problem. Instead of assigning the ticket to someone else and losing the benefits of incident ownership, the support team member can use the Engage with xMatters feature to contact the on-call person in the database group. When the on-call person in the database group gets the alert from xMatters, they can see who sent them the request. In the meantime, xMatters continues to update the work notes of the ServiceNow incident so the support team member receives real-time updates on whether someone else has started work on the incident and who that person is.
Alternately, the support team member could use the Engage with xMatters conference bridges to bring multiple groups together to work on a solution. You can even add people to an on-going conference bridge for a ServiceNow incident.
The Batch Load features let you seed xMatters with your ServiceNow users, groups, and configuration items.
Once you've seeded xMatters with your users and groups, you can use dynamic data sync to keep xMatters in tune with ServiceNow. See Sync users, groups and incident properties for more information on the data sync component.
Our integration boffins have been hard at work experimenting with ways to extend the functionality and features offered in this integration. For more information, see the Extended functionality section.
The Resolve response and the "Incident Management Best Practice" plug-in
The Kingston release of ServiceNow introduced a new data policy, installed with the Incident Management Best Practice plug-in, that requires both the Resolution code and Resolution notes fields to be completed before the incident can be resolved or closed.
If you have this data policy enabled, make sure you configure the Resolution section of the Incident Notifications configuration screen with the values you want to use for these fields when a recipient responds with Resolve.
Prepare ServiceNow
There are a couple of steps to get ServiceNow ready to integrate with xMatters — first and foremost, installing the xMatters app. However, you also need to create a user in ServiceNow to make requests, and assign the user specific roles installed with the application.
To begin, install the free xMatters app in ServiceNow (if you're upgrading, see our upgrade instructions). The app contains all of the batch loading utilities, configuration pages, business rules, scripts, web services, and other components required for ServiceNow to communicate with xMatters.
- Go to the ServiceNow store at store.servicenow.com, and search for "xMatters".
- When you find the app, click Get. You'll be prompted to enter your system credentials to add the app to ServiceNow.
- Log into ServiceNow as a system administrator, and navigate to System Applications > Applications.
- Click Downloads.
- Search for "xMatters", and then click Install.
To configure the ServiceNow endpoint in xMatters, you need the username and password for a ServiceNow API user to handle REST requests from xMatters to ServiceNow. To access the REST endpoint and make the required integration requests, this user must have both the x_xma_xmatters.xmatters_rest and itil roles (added with the xMatters application). For additional security, select the Web service access only check box on the user's details page.
You should also assign the x_xma_xmatters.xmatters_engage role to this user so they can update Engage with xMatters records.
For information about adding users and assigning roles in ServiceNow, refer to the ServiceNow documentation.
This integration installs roles into ServiceNow that control who can use or make changes to its components and that manage the communications between ServiceNow and xMatters.
- x_xma_xmatters.xmatters_admin: Only users with this role can modify xMatters components within the ServiceNow interface.
- x_xma_xmatters.xmatters_rest: You must have a ServiceNow API user with this role to successfully access the REST endpoint and execute the required integration requests.
- x_xma_xmatters.xmatters_engage: Users with this role can use the Engage with xMatters feature. (You should also assign this role to the ServiceNow API user so they can update the Engage with xMatters records.)
- x_xma_xmatters.xmatters: Assign this role to any users or groups you want synchronized into xMatters.
- itil: Users with this role can create and modify incidents, allowing them to use the Create Incident, Update Incident, and Add Comment ServiceNow steps in the ServiceNow (Flow Designer) workflow.
To assign a role to multiple users at once, you can:
- assign the role to a group — any users in that group inherit the role.
- assign the role to an existing role — any users assigned the existing role inherit the xMatters role.
Configure xMatters
Now that you've completed the first part of the configuration in ServiceNow, it's time to configure xMatters. After you import the workflow into xMatters and copy some specific IDs and URLs, you'll return to ServiceNow to finish the setup (or you can have both applications open and switch between them as you go).
The basic steps to configure the workflow in xMatters are: create a user for the integration (this is optional but it makes it easier to identify which integrations are making requests and adding information to logs), download and import the workflow, configure the endpoint to point to your ServiceNow instance, and gather the inbound triggers URLs and response identifiers.
The integration requires a user who can authenticate REST requests from ServiceNow to xMatters when working with alerts. The necessary permissions are provided by the "REST Web Service User" role in xMatters. See Create an integration user for more information on creating an integration user.
Keep the user ID and password of this user handy. You'll need them when configuring other parts of the integration.
The workflow contains integrations, forms, properties, and messages specifically designed for ServiceNow. Download the .zip file to a location on your local machine, but don't unzip it — you'll import it directly into xMatters.
Next, import the ServiceNow workflow into xMatters.
- In xMatters, click the Workflows tab, and then click Import.
- Browse to the .zip file you downloaded or drag it onto the Import Workflow dialog, and then click Import Workflow.
- Once the import finishes, the workflow should automatically be enabled. If it isn't, click the Disabled toggle to enable it.
- Click the workflow name to open the Forms tab.
- Make sure the drop-down beside the form says Web Service as one of the options. If not, click it and select Enable for Web Service.
- For the "Incident Alerts" form, click the drop-down beside the name and select Sender Permissions.
- Add the integration user, and then click Save Changes.
- Repeat steps 4-5 for the "Engage with xMatters" and "Conference Bridge" forms.
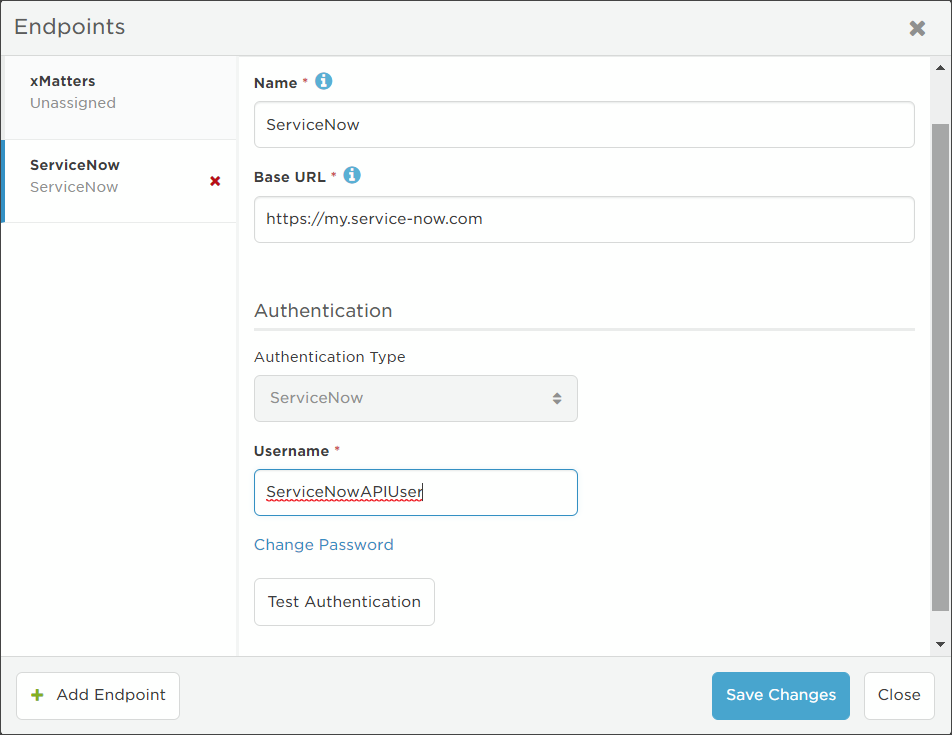
The workflow uses an endpoint with the ServiceNow authentication type. After you import the workflow, you need to set the endpoint's URL and authentication credentials (the username and password for your ServiceNow API user).
To configure the endpoint:
- On the Flow Designer tab, click Components.
- Click the ServiceNow endpoint to open its details.
- Update the Base URL to that of your ServiceNow system.
- Enter the credentials for the ServiceNow API user.
- Click Test Authentication to send a request using the username and password to the ServiceNow instance you entered in the Base URL field.
- If the page displays a message that the authentication failed, check the Base URL you entered is correct, then check the credentials match the ServiceNow API user and that the user has the x_xma_xmatters.xmatters_rest role.
- Click Save, and then close the Endpoints dialog box.
Changing the authentication type
Because ServiceNow steps in Flow Designer require the ServiceNow authentication type, we recommend leaving it as is if you want to use those steps in your flows. To change the authentication type, you need to create a new endpoint to replace the existing one. The easiest way to do this is to delete the existing endpoint and create a new endpoint that uses the same name before any steps in Flow Designer are configured to use the endpoint.
The next step is to update each of the inbound triggers to use basic authentication, and retrieve the URLs of those triggers, which you can then copy and paste into the appropriate location in ServiceNow.
To configure an inbound trigger and retrieve its URL:
- On the Flow Designer tab, click the Incident Alerts canvas to open it:

- Double-click the Incident Alerts trigger (the block with the arrow pointing right) to open its configuration screen:

- In the Authentication Method section, select Basic Authentication, then copy the URL and paste it somewhere easy to find — you'll need this to set up the integration in ServiceNow.
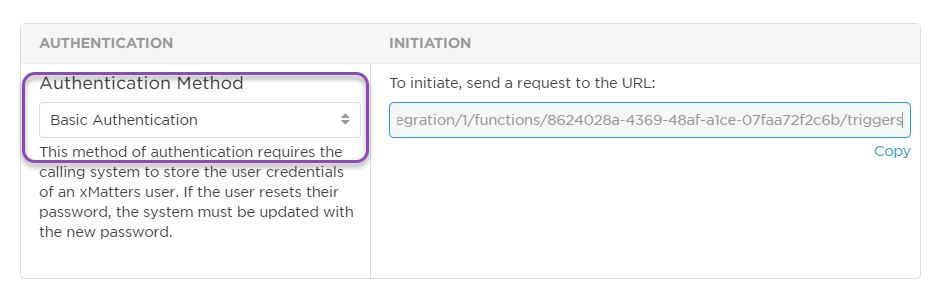
- Repeat the above steps for the "Conference Bridge" and "Engage with xMatters" canvases and their triggers.
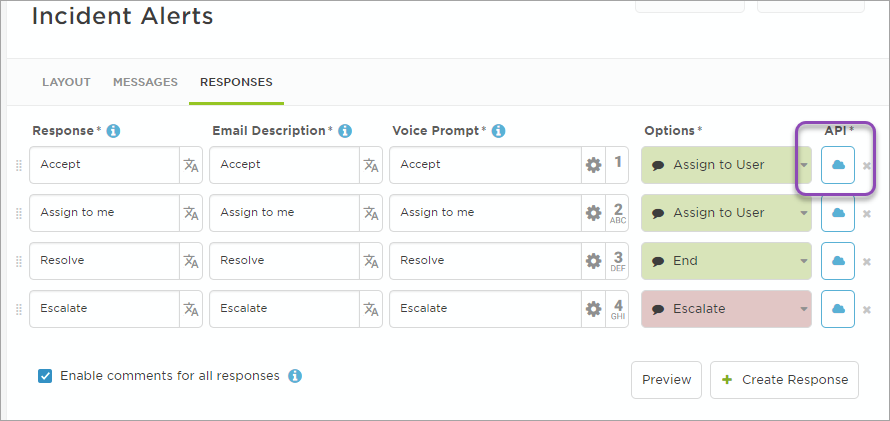
Some configuration fields in ServiceNow require a UUID (Universal Unique Identifier) for a specific component or property in the workflow. To retrieve the identifier for an element, look for the API icon in the xMatters user interface:

When you click this button, a dialog box displays the identifier for the component. You can then copy and paste the string to the field in ServiceNow (you can see which fields need UUIDs in Complete the xMatters configuration pages).
As an example, the following instructions describe how to retrieve the UUID for a specific response choice, but the process is similar for any identifier you need to find.
To retrieve the identifier for a response choice:
- In xMatters, open the ServiceNow workflow.
- For the "Incident Alerts" form, click Edit > Responses.
- Beside the Accept response, click the API icon:
Configure ServiceNow
To configure ServiceNow to integrate with xMatters, you need to specify the assignment, synchronization, web services, and other settings on the configuration pages installed with the xMatters application. You can also use the data sync feature to seed your users and groups into xMatters.
Complete the xMatters Configuration pages
The xMatters application installs four configuration pages into ServiceNow:
- Common Configuration: Configures the connection, credentials, and logging level for the communication between xMatters and ServiceNow.
- Incident Notifications: Enables or disables the incident notification features, and configures when and how ServiceNow sends an incident to xMatters for notification.
- Engage with xMatters: Enables or disables the Engage with xMatters action in the ServiceNow user interface, sets the connection parameters for the feature, and sets the maximum number of results to return when searching for people or groups to target.
- Data Sync: Configures the user and group seeding, and the data synchronization between xMatters and ServiceNow.
You need to update most of the settings on these pages with information specific to your xMatters deployment. See the following sections for more information on the settings in the Common Configuration, Incident Notifications, Engage with xMatters, and Data Sync tabs.
- Log into ServiceNow as a user with the "admin" role, and open the Navigator.
- Only users with the ServiceNow x_xma_xmatters.xmatters_admin role (added by the xMatters application) can modify xMatters components within the ServiceNow interface.
- Locate and expand the Integration – xMatters entry in the All Applications list, and then click xMatters Configuration.
- Click the tabs at the top of the window to switch between pages.
- For an existing integration, we recommend doing a hard refresh before configuring settings (for example, CTRL+F5 on Windows or CMD+SHIFT+R on Mac) to make sure you have the latest and greatest version of the page.
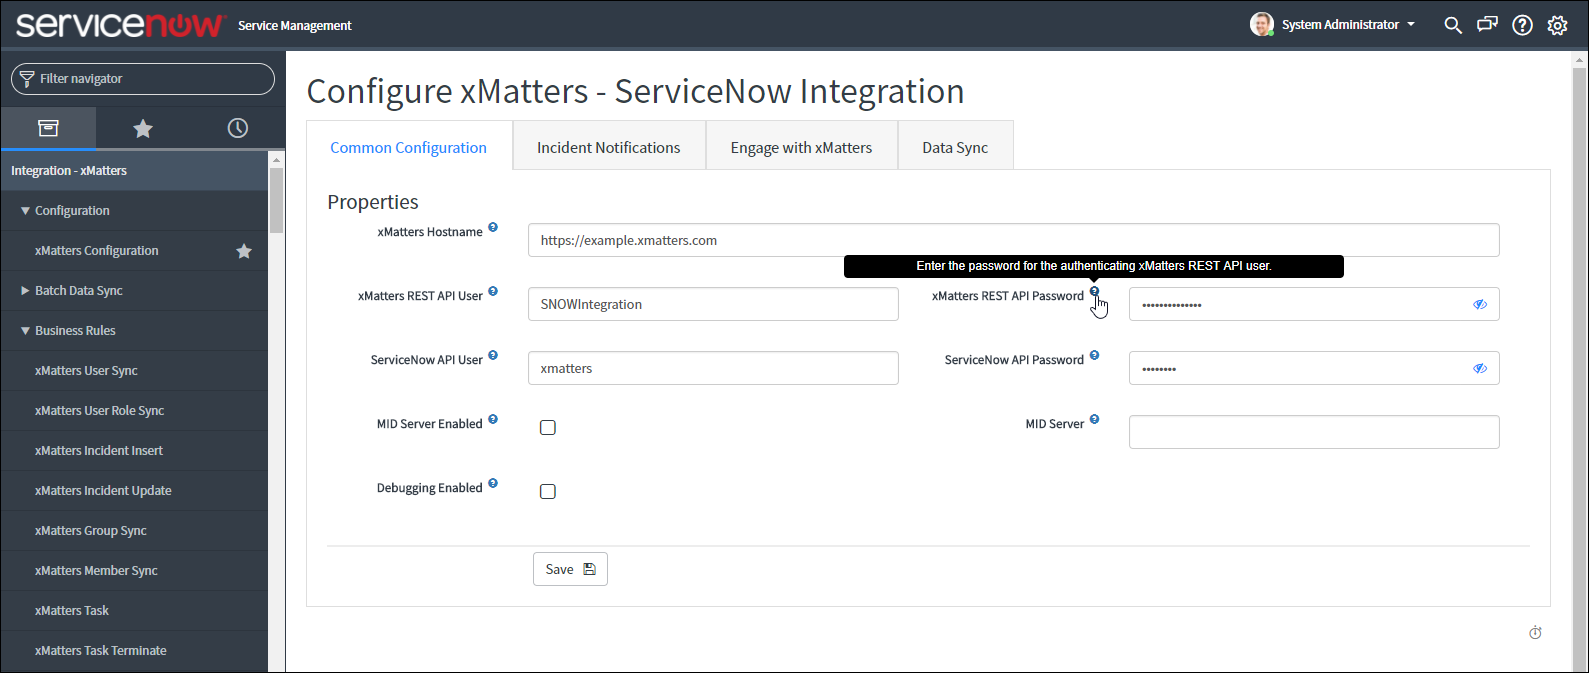
- Hostname: The hostname of your xMatters deployment (for example, https://your-company.na1.xmatters.com) without any trailing '/'.
- xMatters REST API User: The username of the integration user, used to authenticate requests to xMatters.
- xMatters REST API Password: The password of the integration user.
- ServiceNow API User: The ServiceNow API user you created to authenticate requests from xMatters to ServiceNow.
- ServiceNow API Password: The password of the ServiceNow API user.
- Enable MID Server and MID Server: Sets whether the integration should use a MID server when making requests to xMatters and the name of the MID server to use. See the ServiceNow documentation for information on using MID servers.
- Enable Debugging: Sets whether DEBUG messages are included in the xMatters log in ServiceNow. See the ServiceNow documentation for more information on ServiceNow logs.
After you save your settings, the password fields turn into buttons, indicating there is a password entered for the user. Click the password button to update the saved password (for example, if you changed the integration user's password in xMatters).
- Enable Incident Notifications: Turns on incident notifications.
- Incident Alerts Integration URL: The integration URL for the workflow's Incident Alerts integration.
- Response Options for Users: The UUIDs of the response options you want to be available on notifications to individual users. For the default integration, add the UUIDs for Accept and Resolve.
- Response Options for Groups: The UUIDs of the response options you want to be available on notifications to groups: for the default integration, add Assign to Me, Resolve, and Escalate.
- Priority: The priority of incidents that you want to send to xMatters.
- Language Suffix: The language of incident properties sent to xMatters. This value is appended to property names when the integration performs certain actions.
- Resolution: Use Resolution Code and Resolution Notes to set the values used for the resolution information when a recipient responds with Resolve. This is required to resolve or close an incident if the resolution data policy installed with the Incident Management Best Practices is enabled. If the policy is enabled, the resolution code cannot be None.
- Event Termination Settings: Select the Terminate Events by Form check box to only terminate alerts created by the workflow form specified in the Form Name field when a termination event happens (for example, when the incident is closed or the priority changes). For example, if you only want to terminate alerts created by Incident Alerts, but want to keep Engage with xMatters alerts open, select the check box and add Incident Alerts in the Form Name field.
- Enable Engage with xMatters: Enables the Engage with xMatters feature (users need to be assigned the x_xma_xmatters.xmatters_engage role to be able to use the feature).
- Maximum number of suggestions in recipients list: The maximum number of suggestions the Engage with xMatters dialog box displays when searching for recipients.
- Engage with xMatters integration URL: The integration URL for the workflow's Engage with xMatters integration.
- Conference Bridge Integration URL: The integration URL for the workflow's Conference Bridge integration.
- External Conference Bridges: The names of external conference bridges to make available in the Engage with xMatters dialog box; leave blank to use xMatters-hosted conference bridges. See the xMatters online help for more information on conference bridges.
Before configuring the data sync settings, we recommend you review the information on syncing users, groups, and properties from ServiceNow to xMatters.
Properties
- Enable Dynamic Sync: Turns on dynamic syncing of users, groups, and properties from ServiceNow to xMatters.
- Check Instance URL: The data sync to xMatters will only be attempted if the ServiceNow instance URL matches the value entered in this field. Entering a URL into this field is optional.
- Site: The xMatters site to assign users and groups added via the data sync to.
- Supervisor: The user ID of the supervisor in xMatters you want users added via the data sync to be assigned to. If this is left blank, the user will not have a supervisor in xMatters until you manually add one.
- Always Sync Group Managers: Sync group managers even if they aren't assigned the x_xma_xmatters.xmatters role. See how ServiceNow Supervisors and Group Managers are synced.
- Time Zone: The time zone you want to set for users and groups when they're added to xMatters.
- Externally Own Data: When set, synchronized data can only be removed from xMatters by removing it from ServiceNow.
- Web Login Type: Whether the user logs into xMatters using their web login (native) or LDAP.
- Language: The language to set for users when they're added to xMatters.
- LDAP Domain: The LDAP domain to use if Web Login Type is set to LDAP.
People
- Role: The xMatters role to assign to people added to xMatters via the data sync. Use the xMatters web user interface to give the user additional roles.
- Phone Device: The xMatters device name to assign to a user's voice device.
- SMS Phone Device: The xMatters device name to assign to a user's SMS device.
- Email Device: The xMatters device name to assign to a user's email device.
- Phone Extension Identifier: The component of a phone number in ServiceNow that denotes an extension (for example, 'x' or 'ext'); this lets xMatters recognize phone extensions.
Groups
- Allow Duplicates: Enables the Allow Duplicates setting for a group added via the data sync; this setting determines whether a member can be added to the escalation timeline more than once.
- Group - Use Default Devices: Enables the Use Failsafe Devices setting for a group added via the data sync; this setting determines if xMatters should contact a group members failsafe (default) device if they don't have any devices with an active timeframe.
- Default Shift Name: The name of the shift the data sync adds users to. If you already have a default shift name, update this setting to match. Otherwise you can leave it as is to match the current Default Shift default in xMatters.
Incident Properties
- Configuration Item Identifier: The UUID of the configuration item list property in the ServiceNow workflow. To sync the values of this list from ServiceNow to xMatters, see Batch load incident properties.
- Configuration Item Query: The ServiceNow query of cmdb_ci records to send for the configuration item list property. See the ServiceNow documentation for more information on querying for cmdb_ci records.
Send payloads to xMatters using the latest payload format
To maintain compatibility with existing integrations, the payload to trigger an alert is sent using a legacy format. For new installations, we recommend you change this to use the latest payload format. Besides being more future proof, it means you can also use the information in the xMatters REST API documentation to customize your payload if needed.
- Navigate to the Advanced System Properties screen under Integration - xMatters.
- Find the Event - Use Legacy Event Payload Format setting and clear the check box.

If you want to upgrade an existing integration to use the new format, follow the upgrade instructions and make sure you update the integration scripts as outlined in this article.
Add Engage with xMatters records to a related list
You can use the Related Lists feature in ServiceNow to have any related Engage with xMatters records included on the incident details.
- Open an existing incident record, click the menu button, and then select Configure > Related Lists.
- If the current application is not global, you will see a read-only screen with several options for editing. Select the Edit this view in Global link.
- In the Available list, select "xMatters Engage Records", and move it to the Selected list (do not select "Engage with xMatters - Parent" or "Engage with xMatters - Parent Incident").
- Click Save.
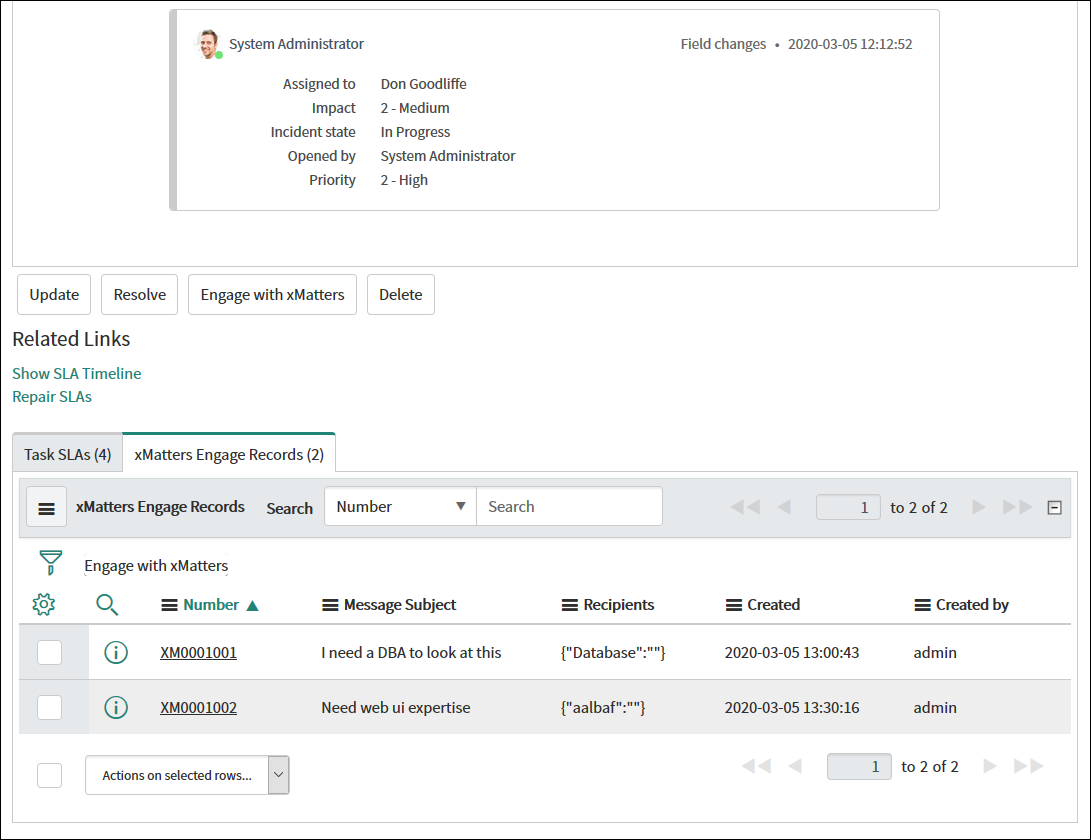
- The xMatters Engage Records tab at the bottom of the incident details screen displays the Engage with xMatters records related to that incident.
Set what happens when an incident is canceled
When the ServiceNow incident's state changes to Canceled, the associated xMatters alert is terminated. You can removed Canceled from the list of states that terminated alerts if you want the xMatters alert to continue even if the incident is Canceled.
- Navigate to the Advanced System Properties screen under Integration - xMatters.
- Find the Incident - Inactive States and remove 8 (Canceled) from the list.
- The other values that terminate the alert are 6 (Resolved) and 7 (Closed).

Activate the clone cleanup script
If you intend to clone your ServiceNow production environment, make sure the clone cleanup script for xMatters is set to Active before beginning the cloning operation.
The purpose of the clone cleanup script is to prevent the new clone instance from deleting user and group records in xMatters. If the clone cleanup script is not enabled when the clone is created, data sync activity on the clone can delete data from the xMatters production instance. To prevent this, the clone cleanup script removes user and password information so the clone cannot access the xMatters instance.
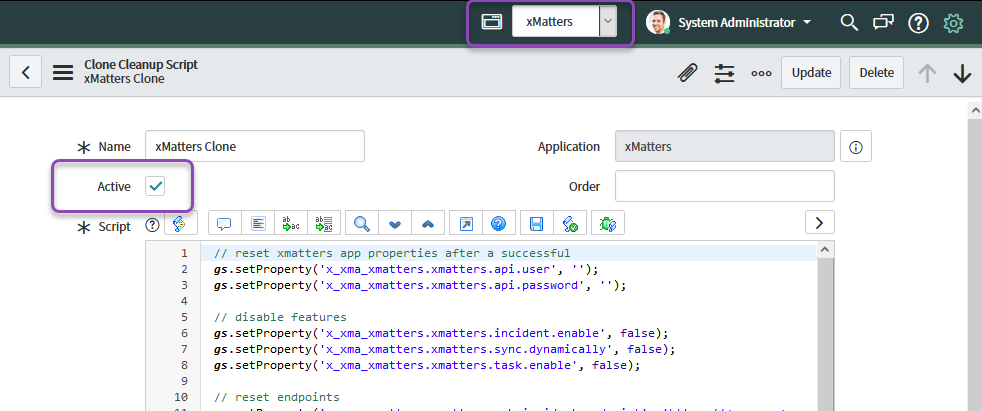
- Navigate to System Clone > Clone Definition > Cleanup Scripts.
- Click on the xMatters Clone script to open it.
- Select the Active check box.
- If you can't select the check box, make sure you're in the xMatters application.
- Click Update.
The cleanup script runs automatically after the cloning process finishes. The ServiceNow admin can verify that the script ran correctly by checking the “x_xma_xmatters.xmatters.api.user” and password properties, and the “x_xma_xmatters.xmatters.reb.user” and password properties immediately after the clone is created; all of these values should be blank.
If you want the cloned environment to interact with a non-production xMatters instance, you need to configure the integration in the clone.
Sync user, group and incident property information with xMatters
After you've done the basic configuration for the integration, you can use the Batch Load features to seed xMatters with your ServiceNow users, groups, and configuration items.
Once you've seeded xMatters with your users and groups, you can use dynamic data sync to keep xMatters in tune with ServiceNow. If you add supervisors to a group or user in xMatters, or give a user additional roles, these are preserved in future syncs.
How it works
Here's an overview of the user, group and property sync from ServiceNow to xMatters:
- Assign the x_xma_xmatters.xmatters role to any users or groups you want to synchronize into xMatters. Assigning this role to a group automatically assigns it to all users within the group, or you can add this role to an existing role to automatically assign it to all users with that existing role.
- Batch load users then groups (and incident properties, if needed).
- Enable Dynamic Sync on the Data Sync tab of the xMatters configuration pages to have any future changes synced to xMatters (either updates to synced objects or new users or groups assigned the x_xma_xmatters.xmatters role).
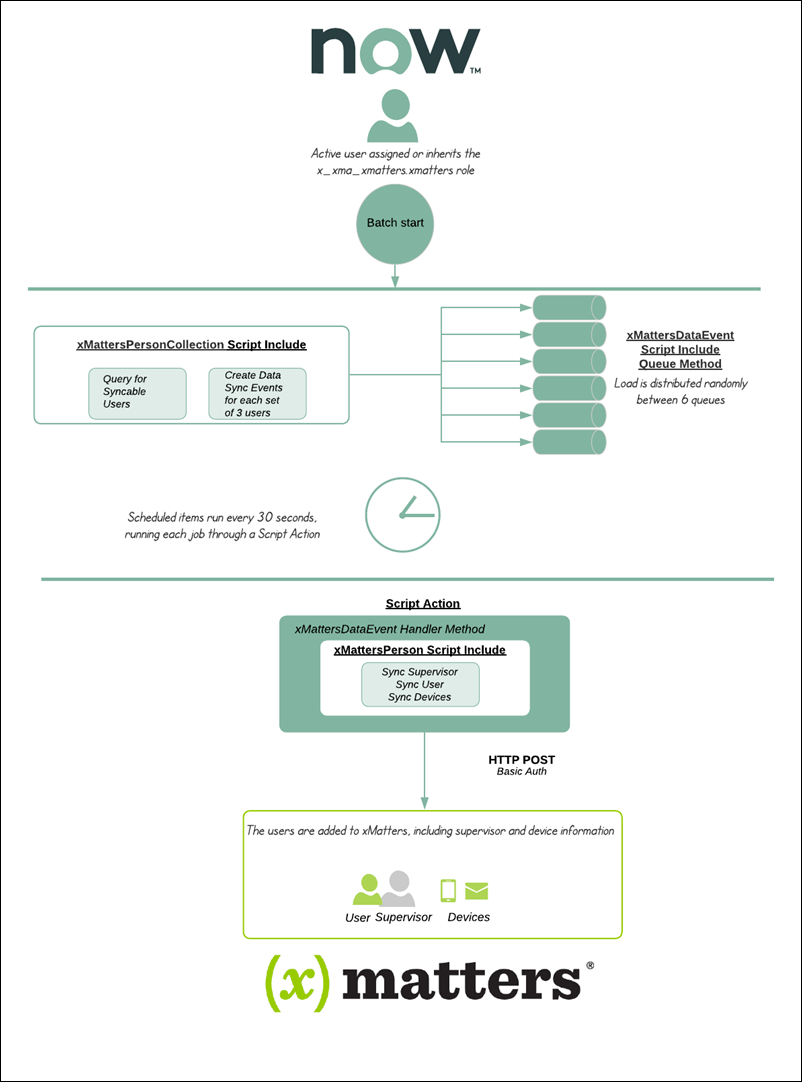
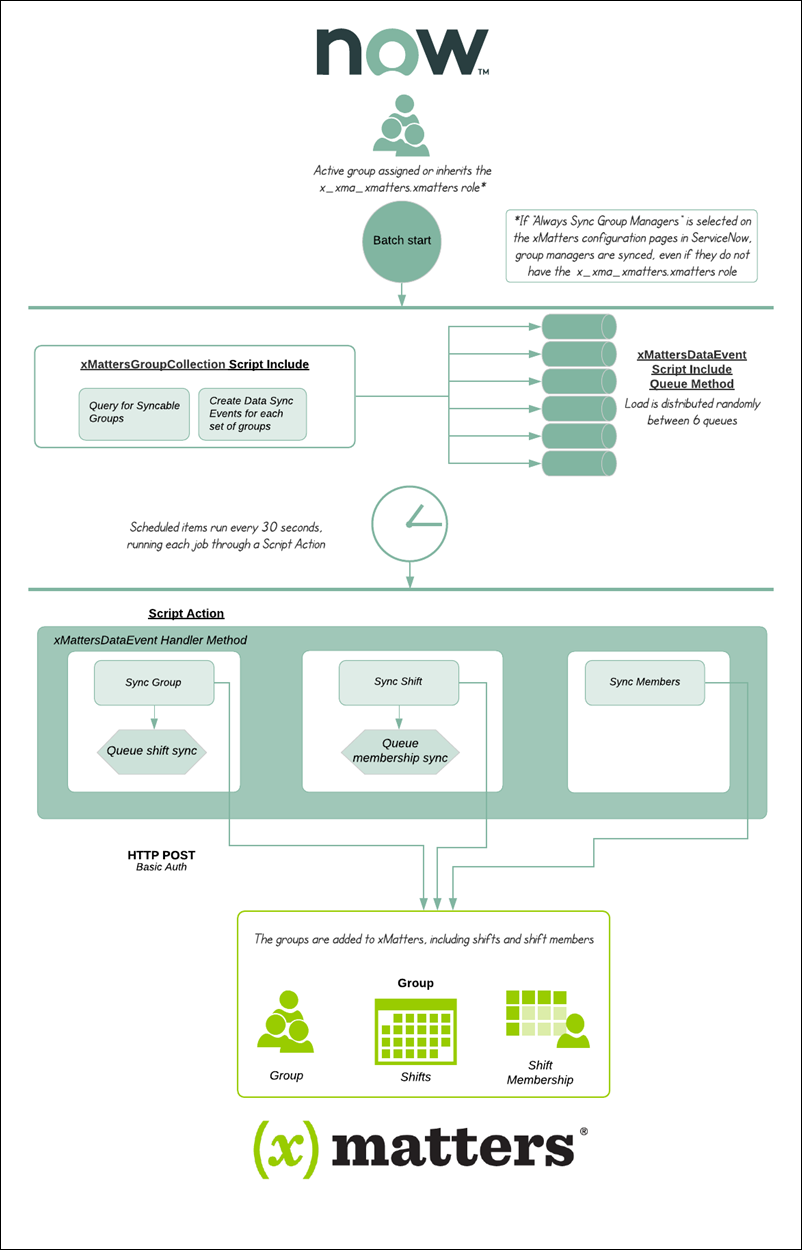
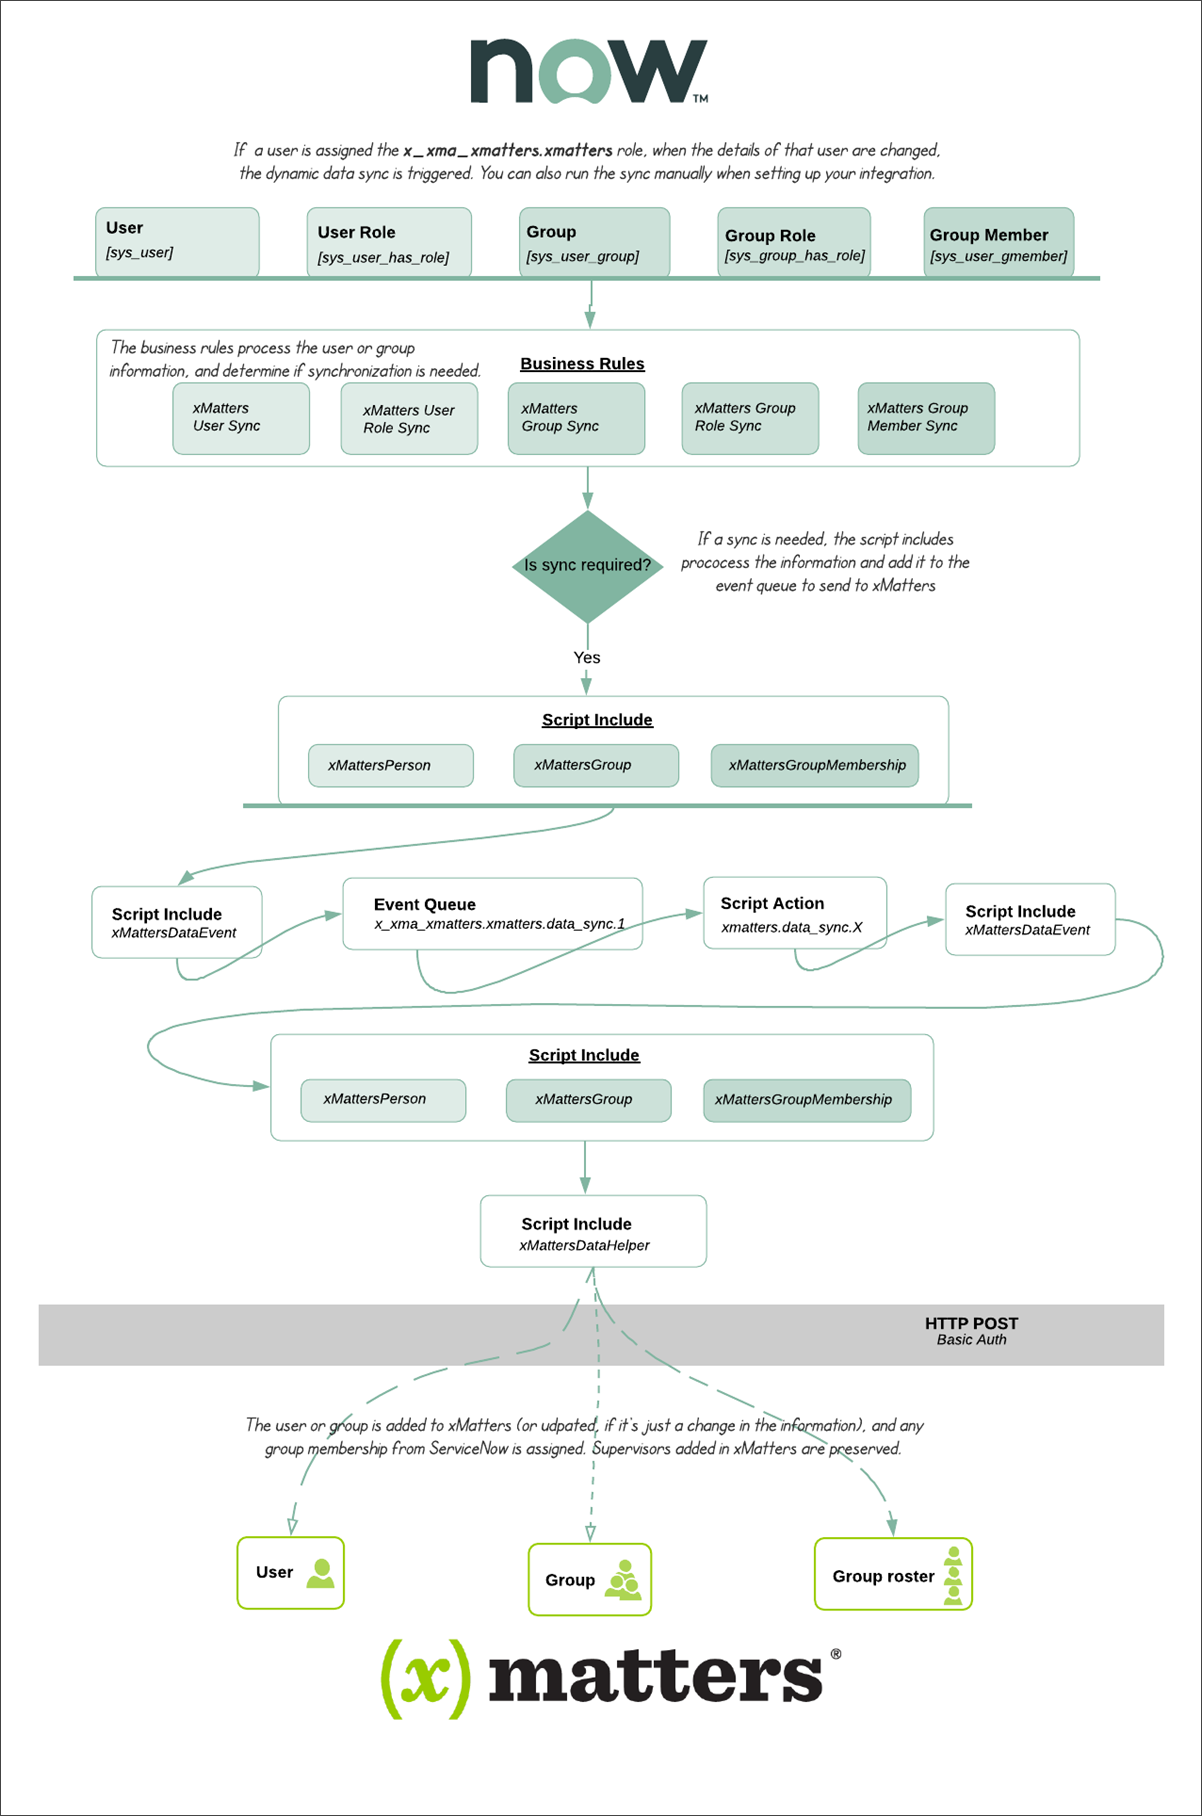
If you'd like a visual of how it works, we have diagrams of the batch load of users and groups, and for the dynamic data sync process.
There are some fundamental differences between batch data load and dynamic synchronization that you should consider when designing your integration between xMatters and ServiceNow.
Batch loads are generally only recommended when initially setting up your integration because they tend to be resource-intense processes, while dynamic sync is generally recommended for on-going synchronization of users and groups from ServiceNow to xMatters.
Dynamic sync
If enabled, dynamic sync processes are run when a user or group is assigned the x_xma_xmatters.xmatters role, or when a user or group with that role is updated. The dynamic sync process is initiated for each object by a business rule in the foreground then runs in background worker processes.
What does this mean? If you add the role to 300 users, the integration fires the business rule 300 times — once for each affected user — and performs separate processing and REST requests to xMatters for each user. Since these business rules run independently from each other, no economies of scale are possible. If the integration needs to look up whether a ServiceNow user exists in xMatters, or if they're already set as a group supervisor, all of the logic, look-ups, and updates are performed each time the business rule fires. The same is true for determining group memberships: even if all members are part of the same group, the integration needs to query the group membership from xMatters for each user.
Also, the business rule itself must be run in the foreground, even though the REST calls and actual synchronization of data occurs in the background processes during a dynamic sync. This allows current values to be compared against previous values to determine if the sync is necessary.
Batch load
Batch loads are manual processes that run entirely in the background but deal with collections of objects, such as ALL users assigned the x_xma_xmatters.xmatters role.
Batch loads perform fewer data lookup queries than the dynamic sync, and cache the results for re-use. By minimizing redundant network traffic (REST requests) and database look-ups, a batch of user updates can be run much more efficiently, and entirely in background processes.
However, running a batch load script is a resource-intense process that can significantly affect server performance. This feature processes every user and group in your ServiceNow instance to determine whether they should be synchronized to xMatters. It is recommended that you only run the batch load process when the integration is initially installed, and only during non-peak server times to minimize the server strain and processing time required to complete the synchronization.
ServiceNow supervisors are synced to xMatters with the Person Supervisor role, if they don't already have it.
For a user's supervisors, the process is additive – when the data sync happens, if a user has a supervisor in xMatters that they don't have in ServiceNow, the xMatters supervisor remains in place (in addition to any supervisor included in the sync from ServiceNow).
ServiceNow group managers are synced to xMatters with the Group Supervisor role, if they don't already have it.
You can choose to sync group managers from ServiceNow even if they don't have the xMatters sync role (x_xma_xmatter.xmatters). To use this feature, select the Always Sync Group Managers option on the xMatters Configuration – Data Sync page.
On the xMatters Configuration > Data Sync configuration page, the Supervisor field displays the user that will be set as the supervisor of any users added to xMatters by the data sync. The selected user MUST exist in ServiceNow and must have the x_xma_xmatters.xmatters role.
If the selected supervisor does not exist as a user in ServiceNow, or does not have the x_xma_xmatters.xmatters role, the user and group data sync will not complete properly.
Batch load users and groups
The batch data load processes all users, groups, and group members in ServiceNow and attempts to update them in xMatters if they have the x_xma_xmatters.xmatters role. If the user or group does not exist in xMatters, it is added; if the user or group already exists in xMatters, it is updated. A user or group that exists in xMatters but not in ServiceNow is not modified by the batch process; updates to these items are handled by the user and group synchronization process based on individual changes only after the initial data load is complete.
To prevent groups from attempting to include users that do not yet exist in xMatters, always run Batch Load Users before Batch Load Groups.
- In ServiceNow, under Integration – xMatters, click Batch Load Users.
- On the Batch Load Users page, click Load Users.
- When the process is complete, click Batch Load Groups.
- On the Batch Load Groups page, click Load Groups.
Batch load incident properties
You can populate the configuration_item_list property in the xMatters integration with the configuration items available in ServiceNow. This allows users to subscribe to incidents that occur on a specific Configuration item.
By default, this property is set to include only the value NONE; to use this property, you must seed it with values using the Batch Load Incident Properties script. This retrieves the configuration items as defined by the "Configuration Item Property Query" in the Data Sync configuration page, and sends them to the configuration_item_list property in xMatters.
The code to populate a value in the configuration_item_list property is disabled when the xMatters integration is first installed because, once enabled, the integration validates the entries in all of the list properties, and rejects the signal if a configuration item is sent that is not in the list.
- In ServiceNow, navigate to Advanced System Properties under Integration – xMatters.
- Select the box under Incident - Send Configuration Item List.
- Save your changes.
- In ServiceNow, under Integration – xMatters, click Batch Load Incident Properties.
- On the Batch Load Incident Properties page, click Load Properties.
Notify non-synchronized users
By default, the integration is configured so that ServiceNow only sends incidents to users who are synchronized with xMatters. However, you can set it up to send incidents to xMatters users who are not part of the data sync.
- In ServiceNow, navigate to Advanced System Properties under Integration – xMatters.
- Select the box under Incident – Send to Synced Recipients Only.
- Save your changes.
How to use the integration
After you complete the configuration steps and perform the initial batch data load, you can test notification delivery and response, and the synchronization between xMatters and ServiceNow.
Validate data synchronization
The user and group synchronizations work in an identical way, but you should still validate each synchronization independently.
When you create, modify, or remove a user in ServiceNow, the system activates a business rule that adds, updates, or deletes the corresponding user in xMatters, along with their device details.
To test the user synchronization:
- In ServiceNow, navigate to User Administration > Users.
- On the Users page, click New.
- Enter the details for a new user on the User page, including first and last names, a user ID, and an email address that you can access (so you can use this user to test the notification portion of the integration in the following sections):
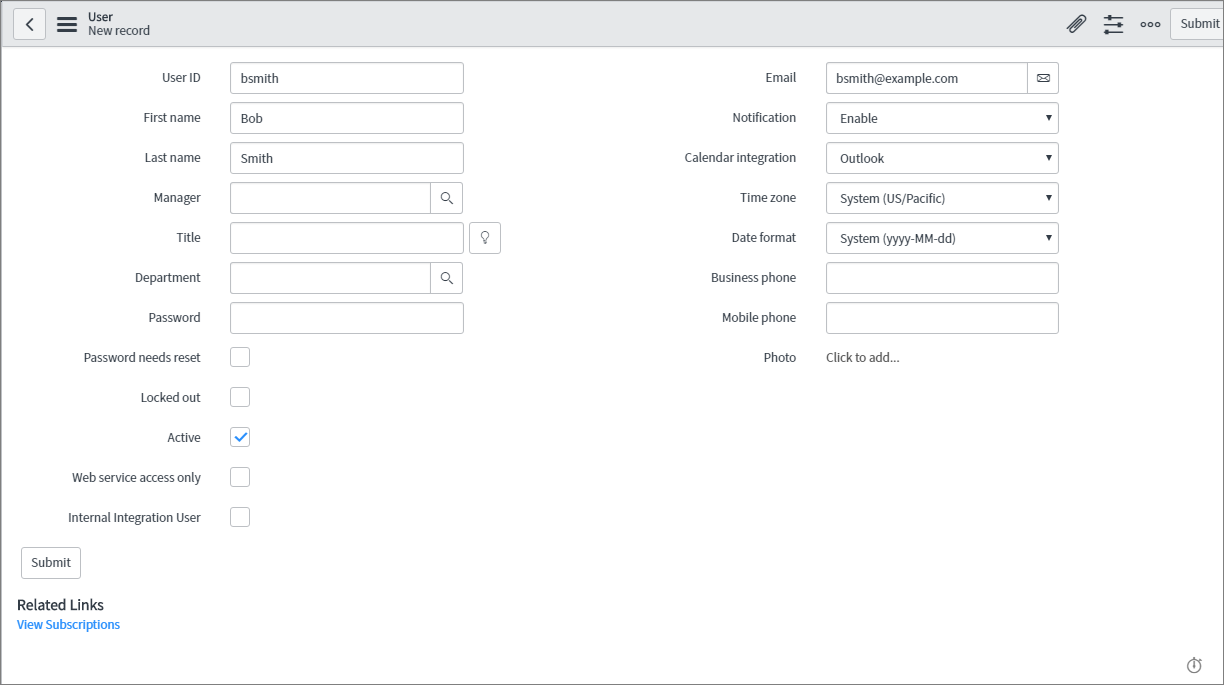
- Click Submit.
- In the Users list, locate the user you just added and click their name.
- On the User page, in the Roles tab, click Edit.
- On the Edit Members page, in the Collection list, select x_xma_xmatters.xmatters and click the >.
- All ServiceNow users you want to be synchronized with or receive notifications from xMatters require this role.
- Click Save.
Now log in to your xMatters instance and navigate to the Users page. If the synchronization is correctly configured, the new user appears in xMatters with the default settings from the Data Sync configuration page, and the email address as their email device.
When you create, modify, or remove a group in ServiceNow, the system activates a business rule that adds, updates, or deletes the corresponding group in xMatters.
To test the group synchronization:
- In ServiceNow, navigate to User Administration > Groups.
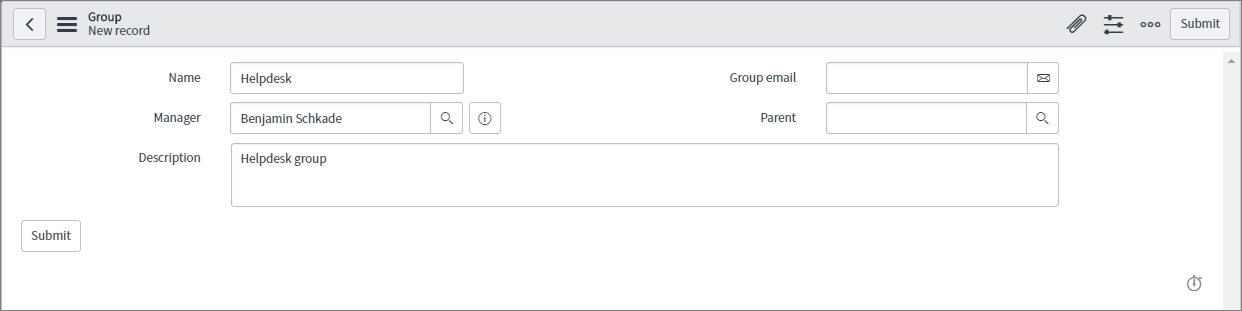
- On the Groups page, click New.
- Enter the details for a new group on the groups page, and then click Submit.
- In the Groups list, locate the group you just added and click its name.
- On the Group page, in the Roles tab, click Edit.
- On the Edit Members page, in the Collection list, select x_xma_xmatters.xmatters and click the >.
- All ServiceNow groups that you want to be synchronized with xMatters require this role.
- Click Save.
Now log in to your xMatters instance and navigate to the Groups page. If the synchronization is correctly configured, the group appears in xMatters, with a default shift and an empty roster. To further test the synchronization, add the user you created to test the user synchronization to the new group in ServiceNow, and confirm that the user is added to the group in xMatters.
Trigger and respond to notifications
To test the incident notification, create an incident in ServiceNow and assign it to the user or group you created for the synchronization test. If you assign it to the user, only that individual is notified; if you assign it to the group, xMatters works its way through the group escalation until someone responds with "Accept". When that happens, the Assigned to field in ServiceNow is updated to the user that responded.
To trigger a notification:
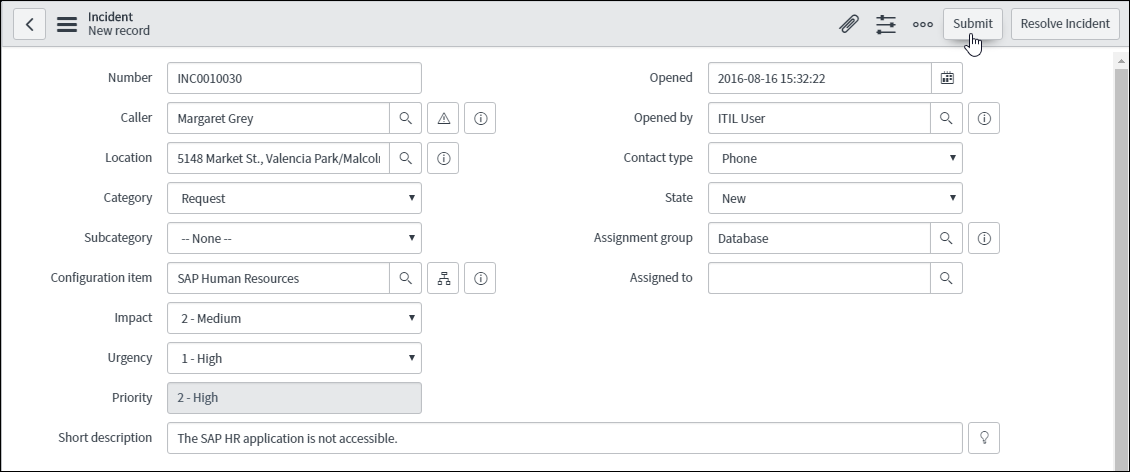
- In ServiceNow, navigate to Incident > Create New.
- On the Incident Details page, enter the details for a test incident with a Priority setting of "High" or "Critical".
- In the Assigned To field, enter the name of your test user or group.
- Click Submit to trigger the notification.
When the notification for the test user or group arrives on your device, open the message to view its details. The following image is an example of how a ServiceNow notification from xMatters appears in the xMatters mobile app:
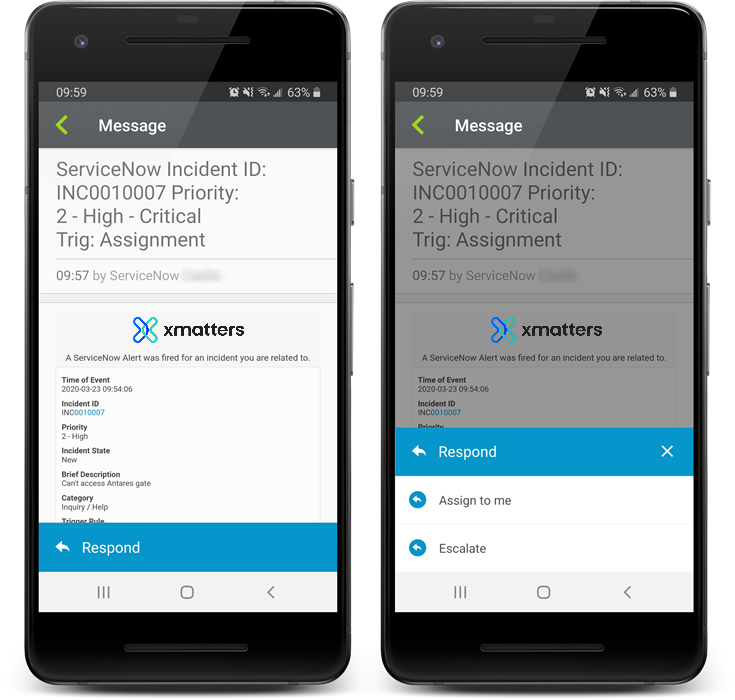
You can respond to the message simply by tapping one of the response choices (other devices use similar methods).
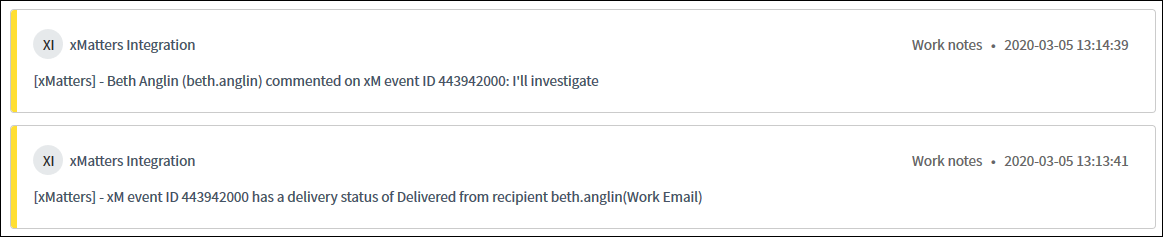
After you respond to the notification, check the incident to see how the integration automatically updates the Activity section of the Notes:
Engage with xMatters
You can test the Engage with xMatters feature using an existing incident.
- In ServiceNow, navigate to Incident > Open.
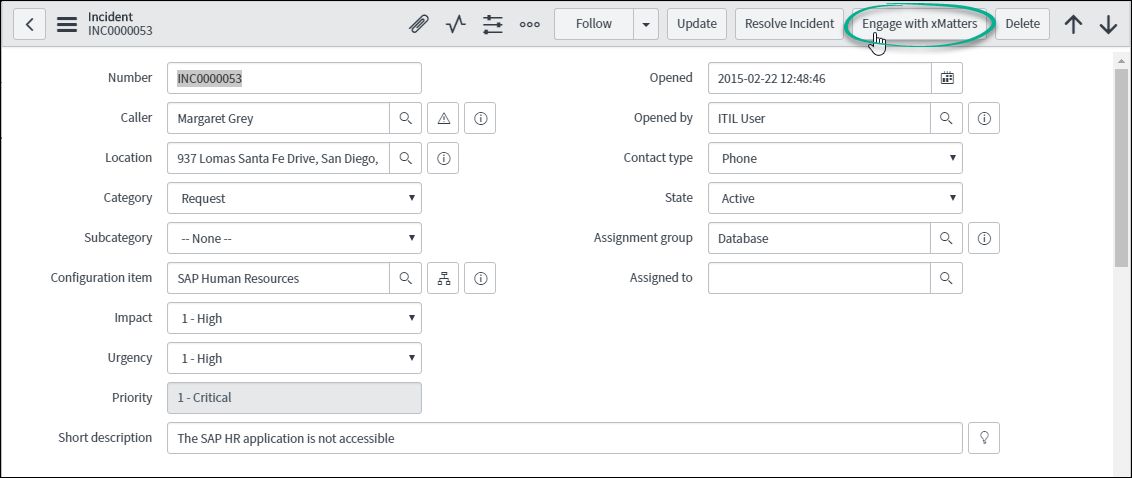
- In the list of incidents, click an incident's number to open it.
- On the incident's details page, click Engage with xMatters.
- Use the Recipients area to add the people or groups you want to notify.
- For groups, this also searches the group description. Multiple search terms are treated as an AND (for example, searching for "database" and "admins" returns the group Database Admins but not Network Admins). Only groups set as active in xMatters are returned.
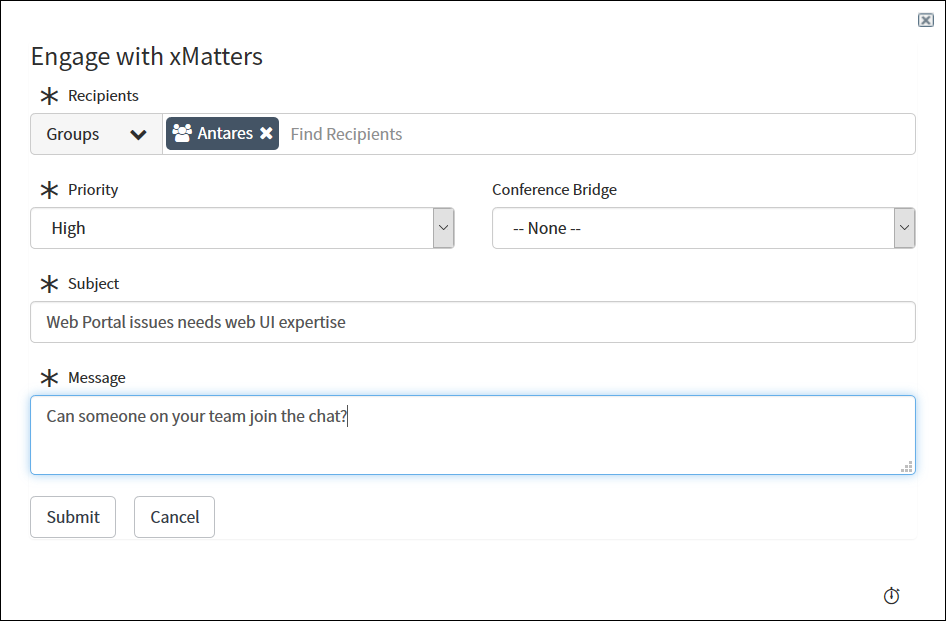
- Enter additional details about the incident in the provided fields.
- Click Submit.
- To add a new user or group, simply add them to the recipients and click Submit. This adds them to the on-going Conference Bridge if one is associated with the incident ID.
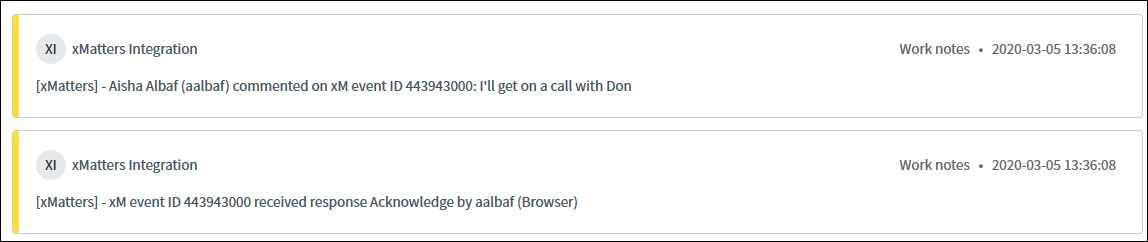
To view responses to Engage with xMatters notifications:
- If you have the Engage with xMatters Related List on your incident records, navigate to the incident and click on the record you want to view in the list.
- If you don't have the Related List, use the ServiceNow Navigator to go to Integration - xMatters > Miscellaneous > Engage with xMatters Records. Click the number of the record you want to view.
Troubleshooting
If you encounter difficulties with the integration and want to view more detailed information, select the Enable Debugging check box on the xMatters Common Configuration page in ServiceNow. This increases the level of detail contained in the log messages for the integration.
To access the xMatters logs in ServiceNow, go to Integration - xMatters > Miscellaneous > xMatters Logs.
You can also find more information in the Activity Stream for each inbound and outbound integration: while on the Integration Builder tab, expand the inbound or outbound section, click the gear icon beside an integration service, and then click Activity Stream. The Activity Stream contains the incoming (and for outbound integrations, the outgoing) request, any logging statements, and the final alert creation messages.
Data sync troubleshooting
One possible cause of data sync errors is a custom user property in xMatters that's been set to required. To work around this, you need to either:
- populate that field with something in ServiceNow so it is included in the data sync, or
- update the property field in xMatters so it isn't required.
Extend your integration
The unofficial/official Integration Research and Development wing of xMatters (those clever elves over at the xMatters Labs) devised a couple of cool ways to extend and enhance this integration:
- ServiceNow Major Incident — Add ServiceNow Major Incident Management into the xMatters notification process.
- ServiceNow Inbound via IntegrationHub — Set up a trigger from any table and table entry in ServiceNow to create an alert in xMatters.
- Engage with xMatters for Problem Management — Extend the Engage with xMatters functionality to the Problem Management module in Service Now.
- Post to Chat — Create a room in a chat application from the Engage with xMatters form.
- ServiceNow Event Log — Log all xMatters alert data (such as alert and delivery statuses) to a table in ServiceNow
- Inform with xMatters — An "add-on" for ad-hoc FYI type notifications from ServiceNow.
- Engage CI Support Groups — An "add-on" for including the upstream and downstream CI groups to the Engage with xMatters form.
- ServiceNow Service Portal On-Call Widget — Get on-call schedules in a widget in ServiceNow's Service Portal.
Check out each of these enhancements at the links provided, and keep an eye out for future improvements, too! The fine print: these features are in-progress or experimental additions to this integration, and as such we can provide only limited support should you choose to implement them.
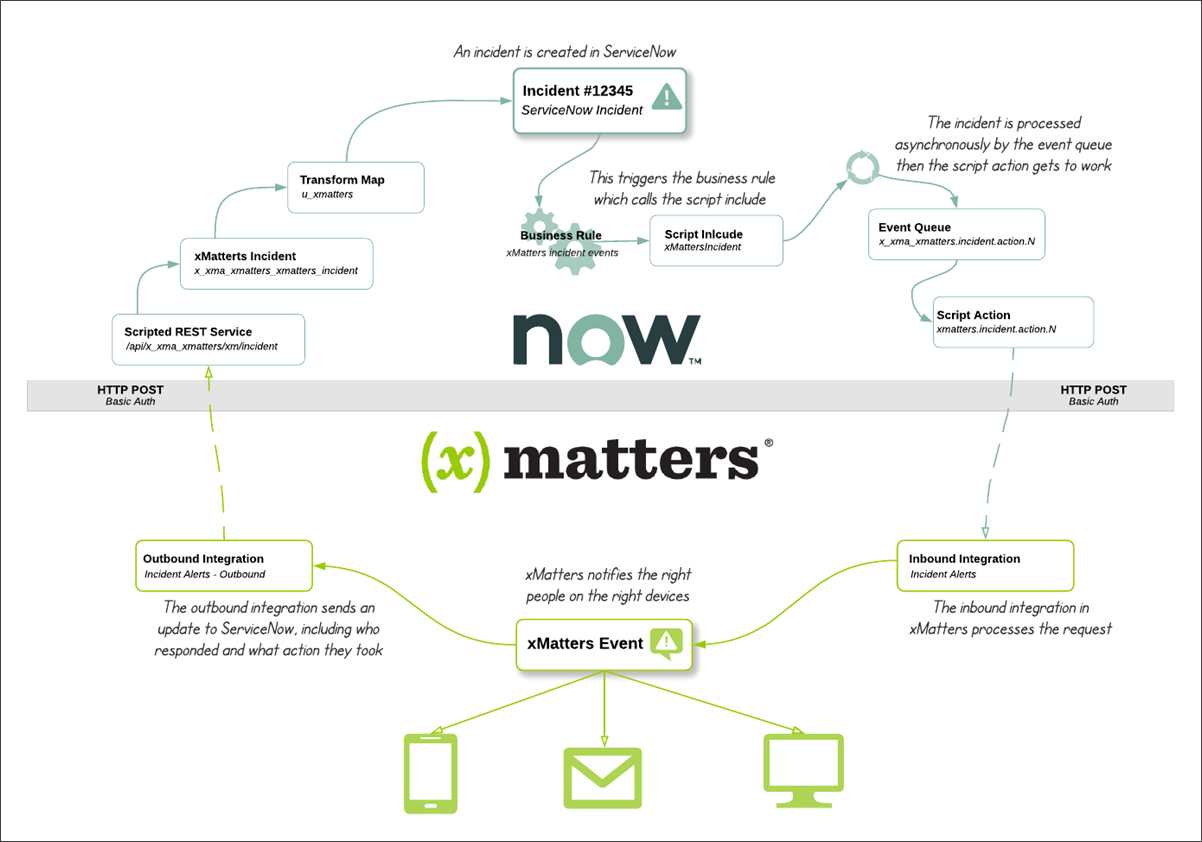
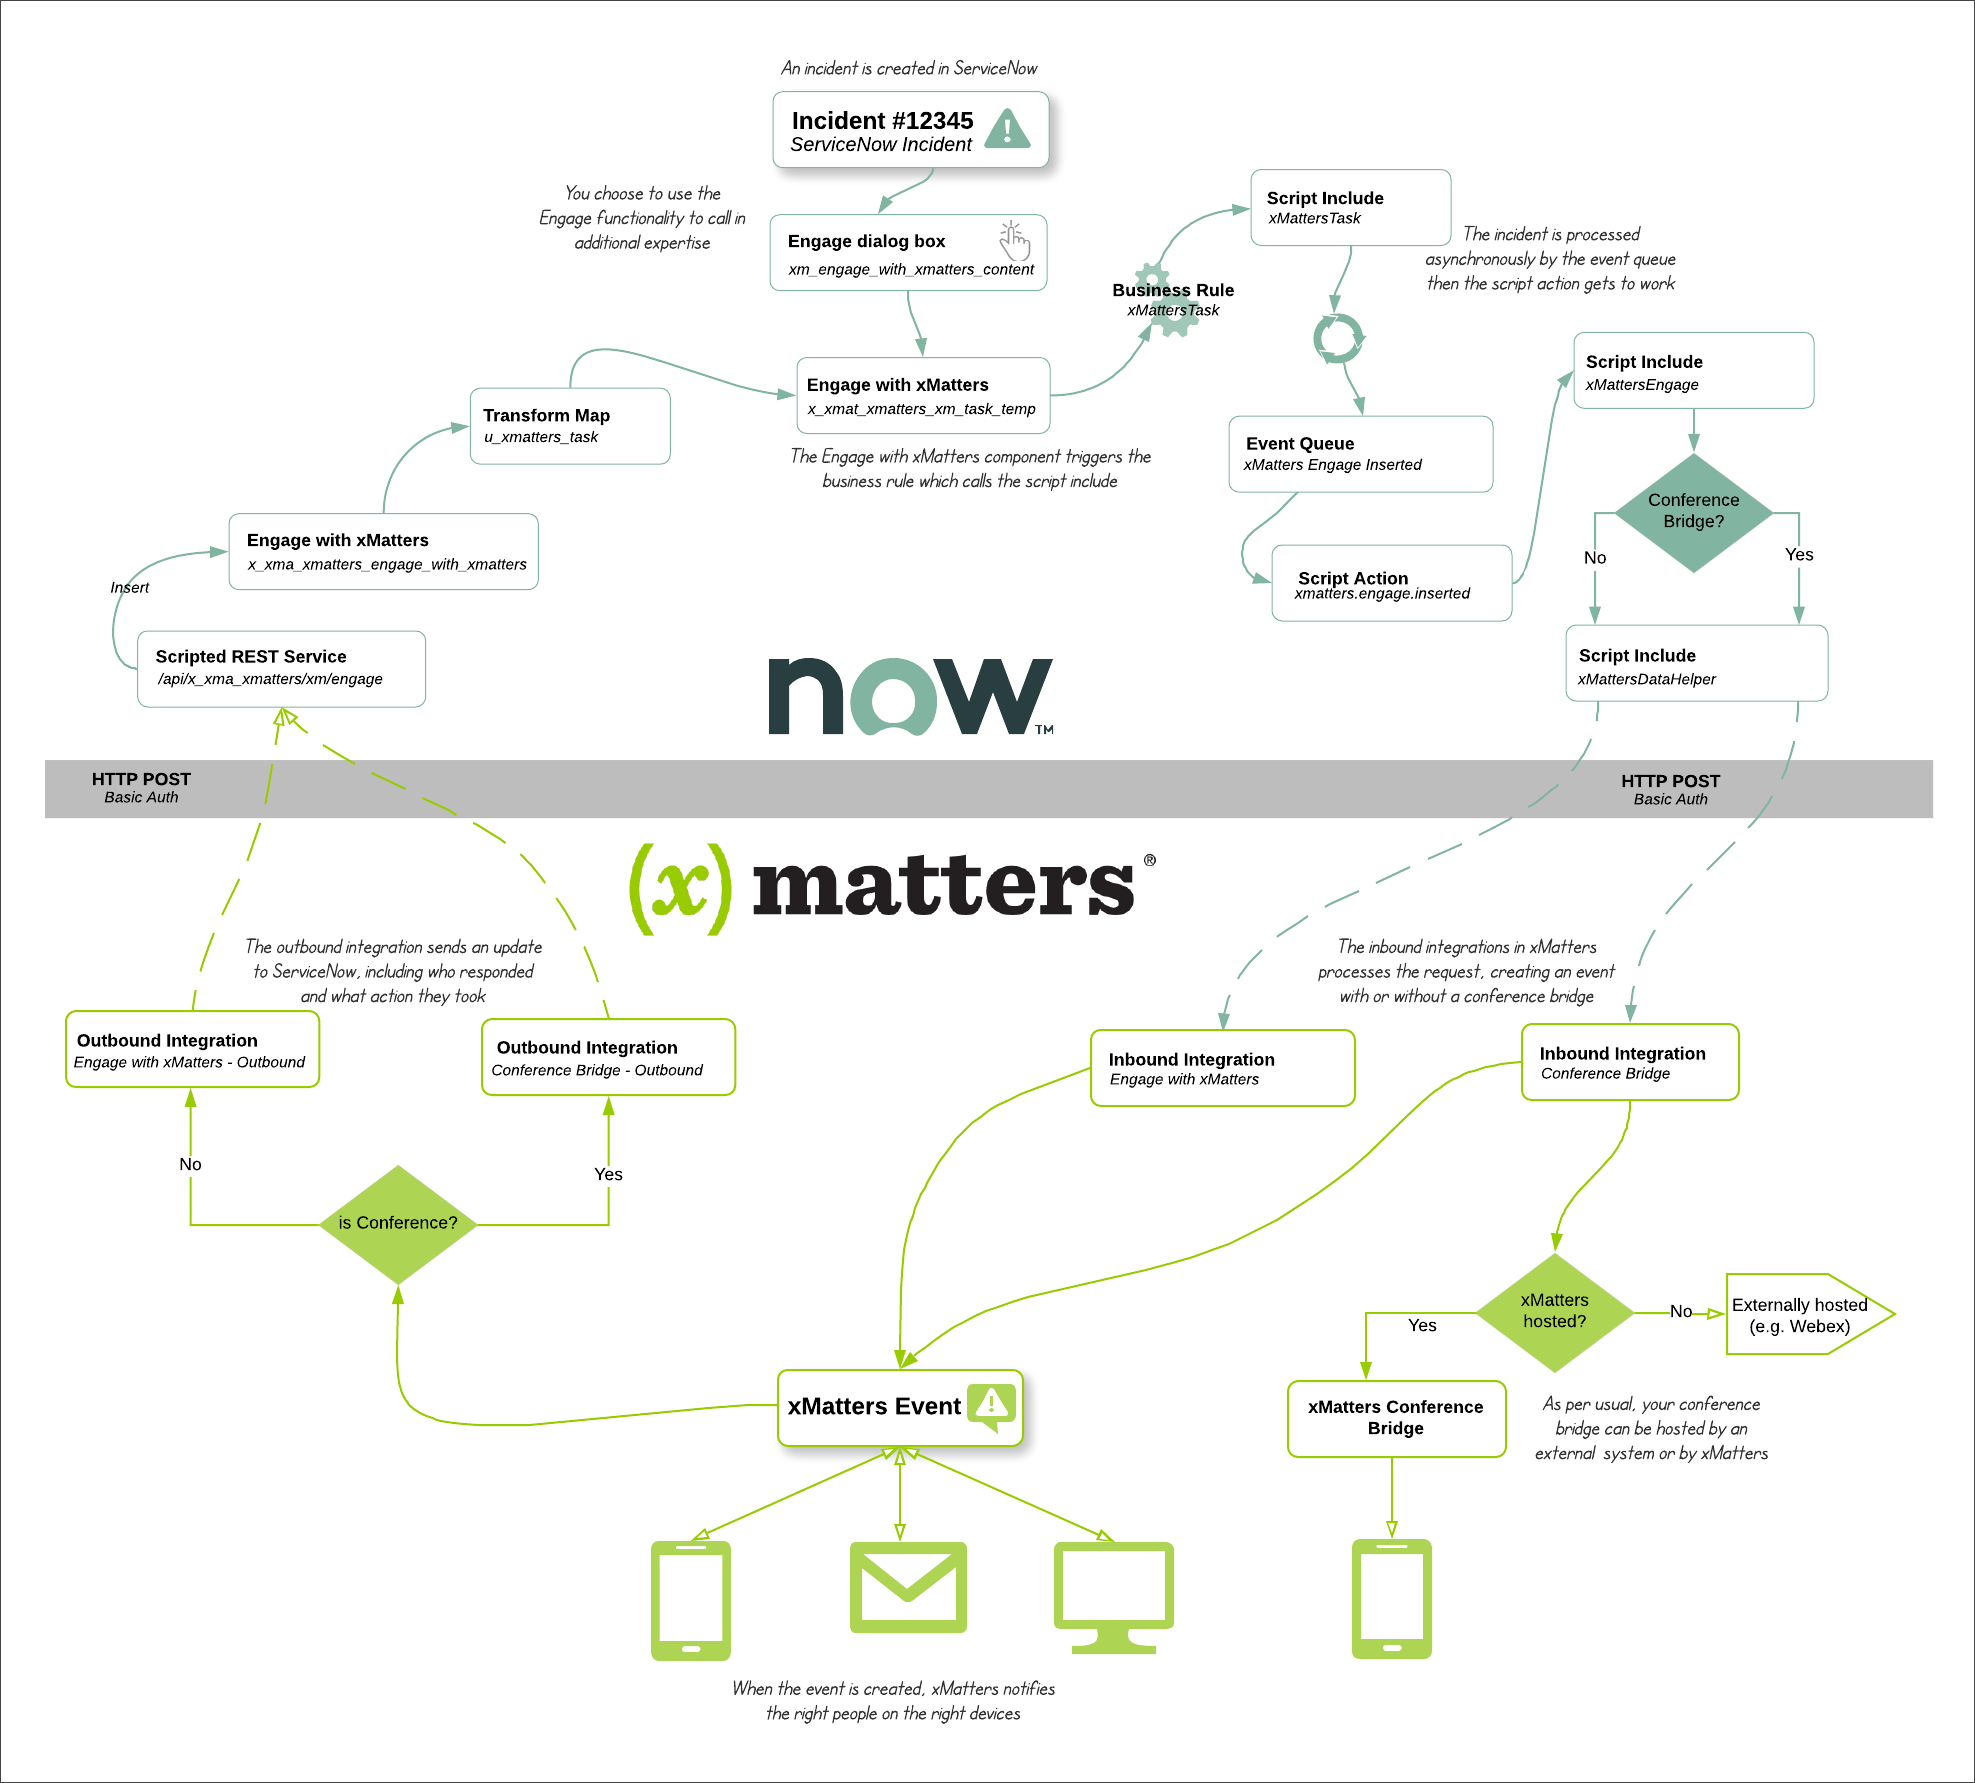
Architecture diagrams: how it works
Each of the components is based on a trigger on a business rule; these triggers are set for Insert, Update, and Delete. After the change has been committed, initial checking within the business rules determines what type of operation has occurred. A call is then made to the script include, which processes the request and runs various rules based on the Incident Notification, Engage with xMatters, and Data Sync Configuration pages to determine what type of action to take.
If the script include determines that an action is to be sent to xMatters, it creates a ServiceNow REST message for incident events or an xMatters API REST message for synchronization requests. ServiceNow REST messages are received by the inbound integrations on the workflow, where the appropriate notification layout is determined based on the target device. xMatters API messages are received by the xMatters REST operations, and devices, users, or groups are added, updated, or deleted appropriately.
If you thrive on detail, we've put together a few diagrams to show you how the various pieces of the integration work together with the nuts and bolts of ServiceNow.
Upgrade your integration
If you already have a working xMatters – ServiceNow integration, use the following steps to upgrade your instance. (If you are installing the integration for the first time, or creating a new integration, head to the Install the xMatters application section).
Upgrading a standard (out-of-box) integration
Notes before you upgrade:
- If you're upgrading from integration version 3.4 (or older), you may find it easier to disable your current integration and install the latest version as a fresh installation.
- If you're upgrading from integration version 3.5, disable the data sync feature before beginning the upgrade process described below.
- If you're upgrading an integration that was originally installed using an update set, there are some extra steps (outlined in this article) that you need to do after you upgrade to continue to insert Engage with xMatters records.
To upgrade your integration:
- Download the latest workflow, and import it into your xMatters instance.
- Make sure your integration user has editor permission to the workflow, and sender permissions on the forms.
- Open the Integration Builder tab in the imported workflow, and set each of the inbound integrations to use Basic Authentication.
- Copy the URL for each inbound integration to a safe place, such as a text file.
- Copy the UUID for each of the response choices on the form to the same text file.
- Log in to ServiceNow and disable the Incident and Engage with xMatters features for your existing integration.
- Update the xMatters application to the latest version from the Applications listing screen in ServiceNow.
- If you installed your integration using an update set, make sure you reach out to the Support team.
- Update the configuration pages with the inbound integration URLs and response UUIDs from your text file.
- Re-enable the Incident and Engage with xMatters features.
After you've upgraded your integration, you can make any changes to the configuration of your xMatters app in ServiceNow.
To make sure you have the latest and greatest version of the page, we recommend doing a hard refresh before configuring settings (for example, CTRL+F5 on Windows or CMD+SHIFT+R on Mac).
Upgrading a customized integration
If you have any customizations (from working with an xMatters consultant or ones you've made yourself), we strongly recommend attempting the upgrade in a non-production or staging environment first. That way you can run the necessary tests to ensure that integration functionality won't be affected.
After you upgrade, review the upgrade history in ServiceNow to see if any script updates were skipped. To review the skipped updates, click the script to view the upgrade details, and then click Resolve Conflicts to bring up the Resolve Conflicts form. From there, you can click the pop-out icon for the Script field and review the differences between the base script and your customizations, upgrading your custom script as needed.
If you encounter any problems or want to get some help before attempting your upgrade, please contact xMatters Customer Support and we can help come up with a migration plan.
The 5.5 workflow contains only minor fixes. This means if you already have a 5.0 workflow in your xMatters instance, you can update that workflow instead of installing and configuring the 5.5 workflow — follow the instructions in this article.
The 5.5 version of the integration introduced some changes that might impact your customizations. You can change the settings when you upgrade to keep using the previous format or functionality.
Version 5.5 changed what happens when the ServiceNow incident state changes to Canceled (8). Previously, this didn't impact the xMatters alert; now the associated alert is terminated. If you want to continue with the previous behavior, see Set what happens when an incident is canceled. Also, if you customized your incident inactive states, you'll need to redo those customizations after you upgrade.
As of version 5.5, the integration can now send payloads using the xMatters REST API format (documented in the REST API help). To use the new format, you'll need to update your custom payloads and enable the option in the Advanced System Properties of the app.
In version 5.3, we moved values from the xMattersConfig Script Include into system properties. To upgrade from a version earlier than 5.3 to the latest, you need to update the system properties to match what is in your customized script include file.
- Backup your xMattersConfig Script Include. You can find this under the Integration – xMatters entry in the Script Includes section of the All Applications list.
- Update your integration, accepting the changes in the latest version.
- Compare the backup of your original xMattersConfig file with the values in Advanced System Properties under Integration – xMatters, using the table below, and update the system properties, if needed, to match the values your customized integration expects.
| Advanced System Property | xMattersConfig Variable |
|---|---|
| Incident - Inactive States | INCIDENT.INACTIVE_STATES |
| Incident - Critical Priority | INCIDENT.CRITICAL_PRIORITY |
| Incident - Event Queue Suffix | INCIDENT.EVENT_QUEUE_BASE |
| Incident - Assignment Trigger | INCIDENT.TRIGGER_RULES.ASSIGNMENT |
| Incident - Priority Upgrade Trigger | INCIDENT.TRIGGER_RULES.PRIORITY_UPGRADE |
| Incident - SLA Alert Trigger | INCIDENT.TRIGGER_RULES.SLA_ALERT |
| Incident - Reopened Trigger | INCIDENT.TRIGGER_RULES.REOPENED |
| Incident - Delete Trigger | INCIDENT.TRIGGER_RULES.DELETE |
| Incident - Send Configuration Item List | INCIDENT.SEND_CONFIGURATION_ITEM_LIST |
| Incident - Suppress Events when Assigning to Self | INCIDENT.SUPPRESS_ASSIGN_SELF |
| Incident - Suppress Events with Empty Recipients | INCIDENT.SUPPRESS_NO_RECIPIENT |
| Incident - Send to Synced Recipients Only | INCIDENT.SEND_TO_SYNCED_ONLY |
| Event - High Priority | PRIORITY.HIGH |
| Event - Medium Priority | PRIORITY.MEDIUM |
| Event - Low Priority | PRIORITY.LOW |
| Event - Maximum Attempts | EVENTS.MAX_ATTEMPTS |
| Event - Maximum Field Length | EVENTS.MAX_FIELD_LENGTH |
| Group - Observed By All | OBSERVEDBYALL |
| Group - Shift Name | SHIFTNAME |
| User - Username Field | USERNAMEFIELD |
| Data Sync - Max User Processes (LEGACY - DO NOT USE) | MAX_USER_PROCESSES |
| Data Sync - Max Calls per Process | MAX_CALLS_PER_PROCESS |
| Data Sync - Calls per User Synced | CALLS_PER_USER |
| Data Sync - Calls per User Deleted | CALLS_PER_USER_DELETE |
| Data Sync - Calls per Group Synced | CALLS_PER_GROUP |
| Data Sync - Calls per Group Member Deleted | CALLS_PER_MEMBER_DELETE |
| Data Sync - Use Progress Workers (LEGACY - DO NOT USE) | USE_PROGRESS_WORKERS |
| Data Sync - Number of Queues | NUM_DATA_SYNC_QUEUES REST |
| Log Level - Normal Mode | REST_LOGLEVEL REST |
| Log Level - Debug Mode | REST_LOGLEVEL |
If there are values in your customized xMattersConfig Script Include that are not in the Advanced System Properties or the new xMattersConfig Script Include, we recommend:
- moving those values into another Script Include (you'll need to update any references to them in other Script Includes).
- not adding them back into the xMattersConfig Script so this file can be updated in future without you having to worry about merging your customizations.
Features and updates in previous releases
See our current features and updates list for additions in the latest release.
The 5.7 version of the integration included the following updates:
- Small changes to settings and batch load pages to better support Polaris UI.
The 5.6 version of the integration included the following updates:
- Added a configuration option called Check Instance URL in the Data Sync settings page that enables you to input a value that must match the ServiceNow instance URL before the data sync from ServiceNow to xMatters is attempted.
The 5.5 version of the integration included the following updates:
- Setting the state of an incident to Canceled now terminates the associated xMatters alert. If you want to use the previous behavior, see Set what happens when an incident is canceled.
- Made a number of improvements to the Engage with xMatters feature: updated the search to only return groups that are set as active in xMatters when searching for group recipients; ensured a consistent experience whenever a user clicks the Engage with xMatters button; and made the columns in the Related List more relevant.
- Added the ability to limit which alerts are automatically terminated by the integration to only those associated with a specific form in the workflow (either the Incident Alerts or the Engage with xMatters form) for actions that previously always terminated all associated alerts. To configure this, set the Event Termination settings on the Incident Notifications configuration page.
- Updated the group data sync processing to support longer group descriptions and make sure customizations to the group schedule in xMatters are maintained.
- Added a setting to the configuration pages to let you set the shift users are added to and the shift created when a new group is added by the data sync.
- Added the option to send payloads using the latest, greatest xMatters REST API format.
- Added the ability to set the Resolution Code and Resolution Notes required by the Incident Management Best Practices plug-in, introduced in the Kingston release.
- Improved the speed when searching for related alerts in xMatters.
- Updated the message templates to match the current ServiceNow branding.
The 5.4 version of the integration included the following updates:
- Version 5.4.1 certified for the New York release of ServiceNow.
- Data sync now properly removes synced groups from xMatters when the group is removed in ServiceNow.
- Updated the Engage with xMatters behavior to make sure corresponding alerts in xMatters are terminated when closing an Engage with xMatters record, and to address an issue that was causing some requests involving Mid-Server to run for a long time.
The 5.3 version of the integration included the following updates:
- Refined the data synchronization scripts to improve performance.
- Moved values from xMattersConfig script include into system properties. If you've customized this script include in the past, there are a few extra steps you'll need to follow as part of the upgrade process.
The 5.2 version of the integration included the following updates:
- Version 5.2.4 certified for the Madrid release of ServiceNow.
- Updated the search behavior to use AND instead of OR when looking for people or groups to target in the Engage with xMatters dialog box.
- Added a new setting in the Engage with xMatters configuration screen that lets you set the maximum number of results to return when searching for recipients to target.
- Addressed issues with dynamic sync functionality when upgrading from a customized 4.x version, incident custom queue load balancing, and errors when syncing groups from ServiceNow for the first time when the group already exists in xMatters.
The 5.1 version of the integration included the following updates:
- Certified for the London release of ServiceNow.
- The group data sync now preserves (instead of overwriting) any supervisors you've set up for a group in xMatters.
- Improvements to the xMatters configuration page in ServiceNow, including showing you if you've already entered a password and accepting xMatters hostnames with an extra backslash at the end. We also cleaned up some unused configuration settings.
The 5.0 version of the integration included the following updates and enhancements:
- Updated Data Sync components to avoid hitting Progress Worker Quota limits introduced in ServiceNow Jakarta.
- Added Initiator to the “Engage with xMatters” form.
- Added targeted recipient and ServiceNow initiator information to the event notification (requires the 5.0 version of the workflow).
- This version also includes all the features and updated added in previous versions of the xMatters integration.
The 4.2 version of this integration includes the following fixes and enhancements:
- Implemented the new Event Comments trigger, which allows the integration to update the ServiceNow ticket with comments added to the event in xMatters (requires the 4.2 version of the workflow).
- Added support for the ServiceNow Compact User Interface.
- Updated the group data sync so any supervisors you've set up for a group in xMatters are preserved in future data syncs.
- Addressed an issue where a new incident was created even if the original incident was deleted before the outbound integrations ran.
- Cleaned up some console errors that were appearing in the Engage with xMatters dialog.
- Updated the response actions on the Engage with xMatters "Acknowledge" response and the Conference Bridge "Join" response so your second line of on-call users aren't notified if the first line responds with either of these options.
The 4.1 version of this integration includes the following fixes and enhancements:
- The data sync feature has been updated to address a minor flaw that could potentially cause the user sync to stop processing if it encountered an error.
- Addressed an issue where dynamically syncing a ServiceNow group with multiple inherited roles would not sync those roles to added users.
The 4.0 version of the integration includes several updates and enhancements:
- The xMatters application is now certified for use with ServiceNow Jakarta (in addition to Helsinki and Istanbul).
- The data sync feature has been updated to preserve roles for existing users. When initiating a sync, the process compares a user’s existing roles in xMatters, and will add any new roles assigned in ServiceNow. (Previously, the sync process would replace a user’s existing roles with whatever roles were indicated in ServiceNow.)
- The configuration pages for the xMatters application now target the inbound integrations on the workflow, rather than the forms. This enables access to enhanced authentication and more customization options in the Integration Builder.
- Logging of xMatters alerts within ServiceNow has been improved, and a new setting on the Common Configuration page allows you to turn debugging-level logging on or off.
- The Engage with xMatters feature now allows you to add users to conference bridges already in progress for the related incident (in addition to creating new hosted or external conference bridges).
- You can now choose to sync group managers from ServiceNow even if they do not have the xMatters sync role (x_xma_xmatter.xmatters). To use this feature, select the Always Sync Group Managers option on the xMatters Configuration - Data Sync page.
- Some minor issues with the data sync process have been addressed, leading to performance and reliability enhancements.
This version also includes all of the features available in the previous version of the integration:
- All web services calls are now REST based. Alerts are injected via the Integration Builder and data sync calls use the xM API.
- Within ServiceNow, all operations happen asynchronously, improving performance by queuing alerts.
- The configuration pages and user interface for the xMatters application within ServiceNow have been redesigned to provide a better user experience.
- Instead of callbacks being passed in from ServiceNow, outbound integration webhooks are now configured in xMatters to allow for ease of use, improved customization, and faster troubleshooting.