Datadog
Datadog is a cloud monitoring solution that brings metrics from all of your apps, tools, and services into one place. When events meet predetermined criteria, this integration with xMatters relays critical insight data to the correct people and systems to help them coordinate and resolve incidents faster.
This workflow lets you send actionable alerts to on-call resources when xMatters gets a signal from Datadog. Responders can initiate an incident with the press of a button, or you can build on the flow to perform automated resolution tasks.
How it works
When an alert is generated in Datadog, it sends a JSON-formatted webhook to xMatters, based on user-defined alert rules. A Datadog Monitor Alert trigger in xMatters parses the webhook and initiates a flow. The webhook includes essential alert data you can use to enrich notifications to users or when building automated tasks.
Install the workflow
The following instructions describe how to install the workflow through the xMatters one-click installation process. If you already installed the previous, built-in version of the integration, you can find instructions here.
- Go to the Workflow Templates page and click the Datadog tile.
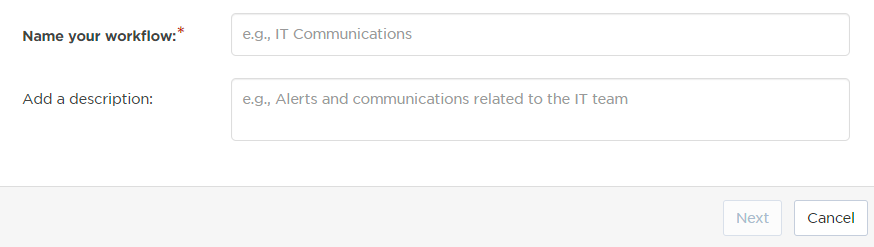
- On the Set up the Workflow tab, give the workflow a name that identifies its purpose (this must be unique in your instance), add an optional description, and set the default incident type (if applicable). Any built-in Initiate Incident steps in the workflow will automatically be set to the selected incident type.
- You can edit these later, if needed.
- You can edit these later, if needed.
- Click Next to set up the connection.
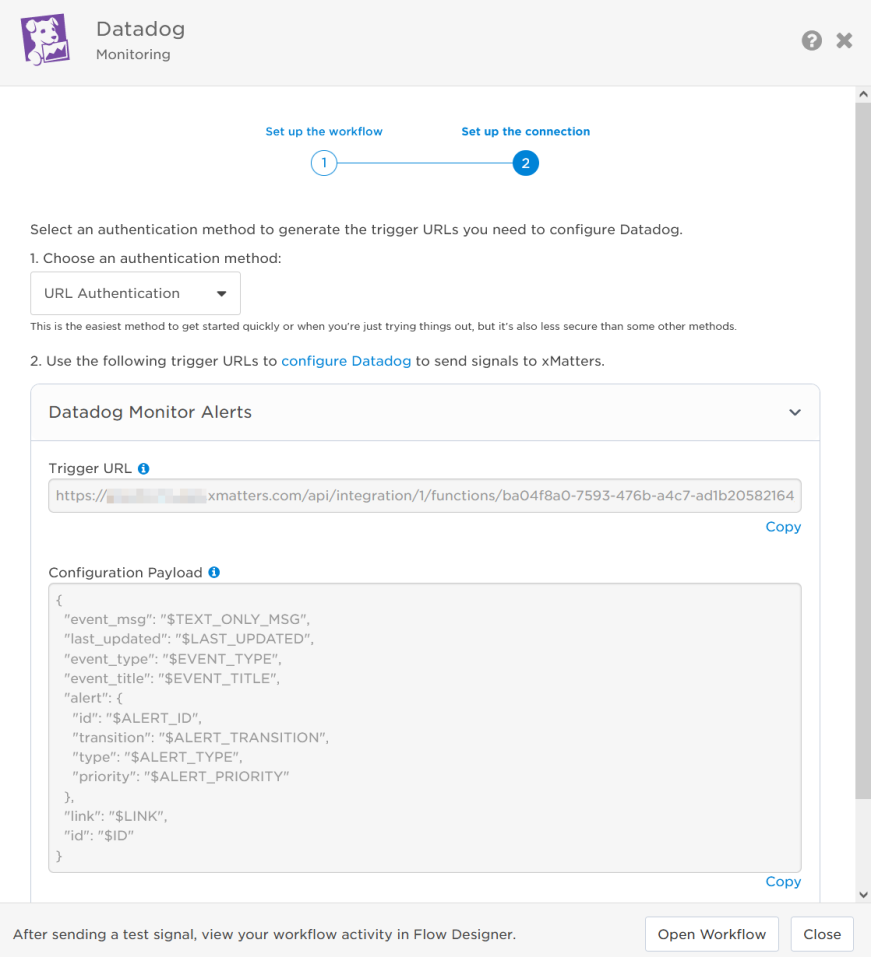
- Choose the authentication method. A trigger URL is generated based on the selected authentication method.
- Copy the trigger URL — you’ll use this to configure the webhook in Datadog.
- The trigger URL includes the recipients parameter, which specifies who should be notified. By default, this parameter is set to notify you (the logged in user), but you can set it to target any user or group you want.
- The trigger URL includes the recipients parameter, which specifies who should be notified. By default, this parameter is set to notify you (the logged in user), but you can set it to target any user or group you want.
- You can copy the Configuration Payload to configure the signal in the source application.
- Send a test signal to the trigger URL to test the connection.
- Click Open Workflow to view and customize the workflow, or Close to return to the Workflows page.
Configure Datadog to send requests to the trigger URL
To have Datadog send alerts to the flow trigger, you need to configure a webhook and set it to use the trigger URL. You also need to create an event monitor to alert the webhook when certain types of events exceed a specified threshold.
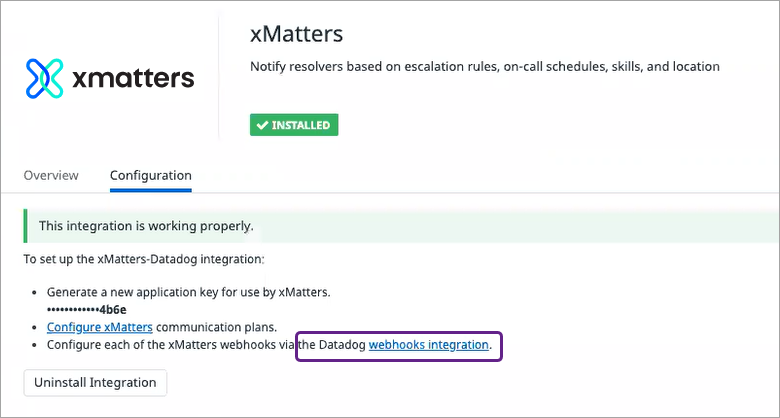
- In Datadog, go to Integrations, locate the xMatters integration, and install it.
- Once installed, open the xMatters integration, go to the Configuration section, and click webhooks integration.
- Add a new webhook.
- Give the webhook a unique name.
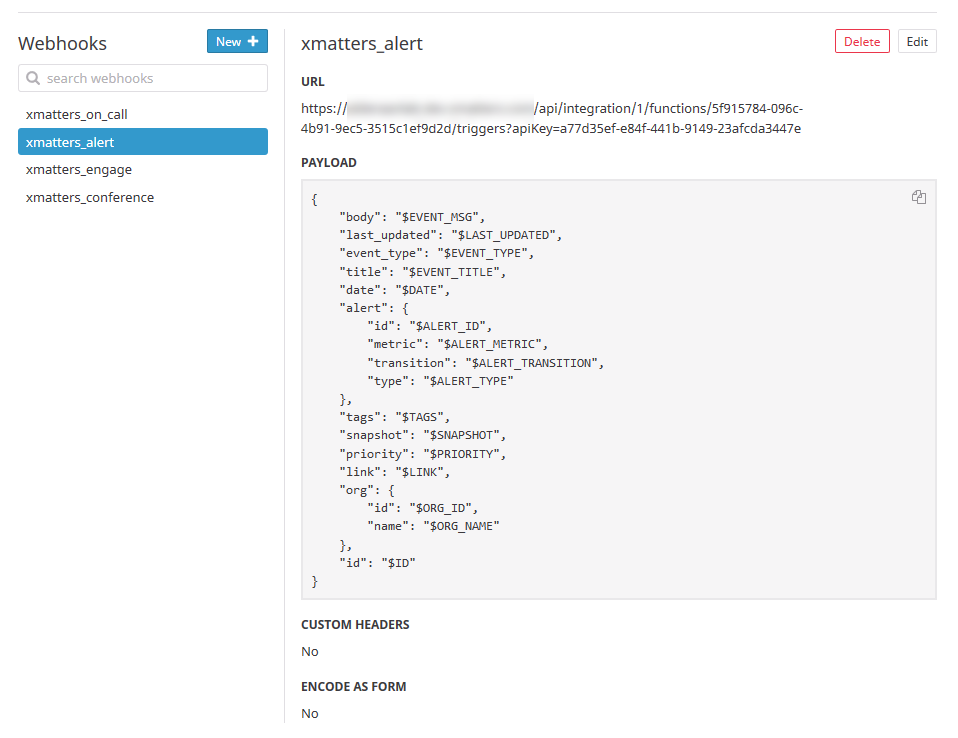
- In the URL field, paste the trigger URL you copied from Flow Designer.
- Add the target names of any recipients you want to notify when the monitor creates an alert.
- For URL authentication, use an ampersand to attach recipients. For example, if you want to notify Emma Pearson and the on-call members in the group responsible for the Antares service, you'd add &recipients=epearson,antares to the end of the URL.
- For other authentication types, use a question mark to attach recipients. For example, if you want to notify Barry Gull and the on-call members in the group responsible for the Cassiopeia service, you'd add ?recipients=bgull,cassiopeia to the end of the URL.
- You must URL-encode any special characters or spaces in the target names.
- Overwrite the default payload with the Configuration Payload you copied from the Datadog trigger.
- Click Save.
- In Datadog, go to Monitors > Manage Monitors.
- Click + New Monitor.
- For the monitor type, select Event.
- In the Select events to count section, specify any criteria you want to use for matching events.
- In the Set alert conditions section, specify threshold conditions for the alert.
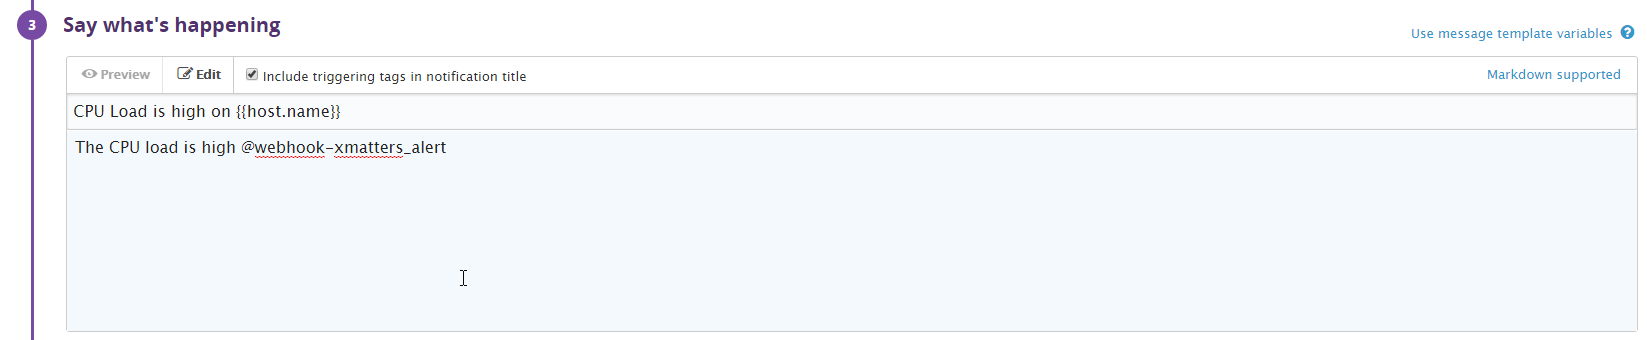
- In the Say what's happening section, add a name for your monitor and type the message you want to send.
- Include the webhook you previously created in the message using the format @name-of-webhook
- Select a priority for your monitor. This value is mapped to a severity level when xMatters initiates the incident.
- P1 (Critical): maps to 'Critical' in xMatters
- P2 (High): maps to 'High' in xMatters
- P3 (Medium): maps to 'Medium' in xMatters
- P4 (Low): maps to 'Low' in xMatters
- P5 (Info): maps to 'Minimal' in xMatters
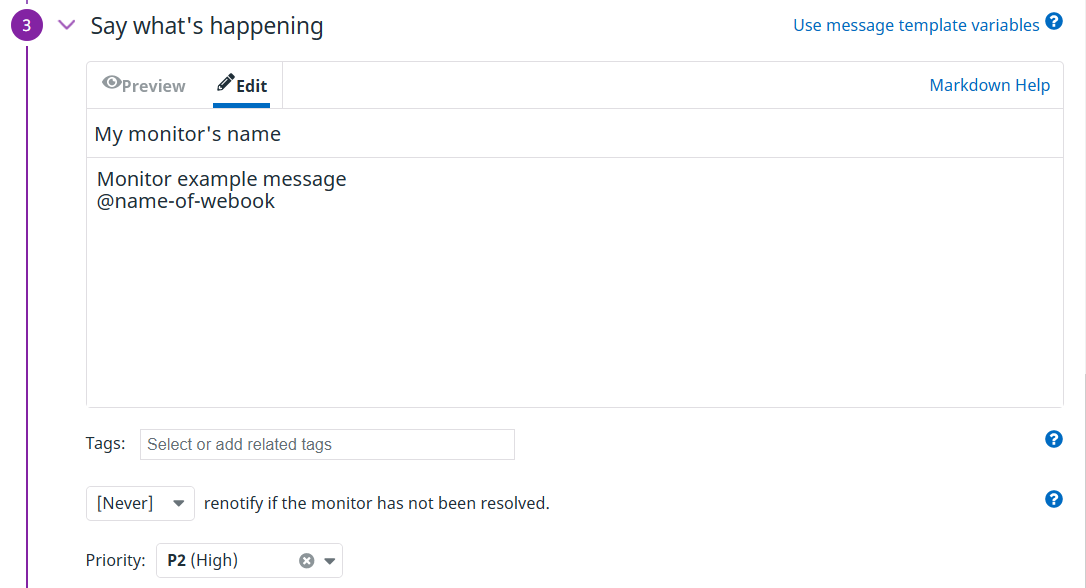
- In the Notify your team section, add your webhook using the format @name-of-webhook. If you entered the name of your webhook in the monitor message, it will automatically be added to this section.
- Click Save.
You're now ready to use the webhook to trigger automated flows, including steps such as sending alerts and initiating incidents, though we always recommend testing before putting things into use.
Set recipients in the trigger URL
The trigger expects the recipients in the trigger URL. When you copy the URL from xMatters, it includes the recipients parameter: recipients=<yourname>. Of course, you don’t want to receive all the alerts.
To change the recipients for alerts from this webhook, swap out your name for the people or groups you want to target.
- For URL authentication, use an ampersand to attach recipients. For example, if you want to notify Emma Pearson and the on-call members in the group responsible for the Antares service, you'd add &recipients=epearson,antares to the URL.
- For other authentication types, use a question mark to attach recipients. For example, if you want to notify Barry Gull and the on-call members in the group responsible for the Cassiopeia service, you'd add ?recipients=bgull,cassiopeia to the URL.
Remember to URL-encode any special characters, including spaces, in your group names.
We recommend using groups so you can take advantage of the xMatters group features — rotations, escalations, and absences — to reach the right on-call people to jump on an issue.
How to use the workflow
When a condition you've set fires, it sends a signal to xMatters, which creates an alert and notifies the individual or the on-call members of the people or groups you set as recipients in the webhook URL. When the trigger receives a signal saying the issue is resolved, it automatically terminates related alerts in xMatters.
The person responding to the notification has the following response options:
- Acknowledge: Acknowledges the notifications and stops escalations.
- Escalate: Immediately escalates the alert to the next on-call resolver in a targeted group.
- Close: Ends the xMatters alert and stops notifying all targeted recipients.
- Initiate Incident: Initiates an incident in xMatters.
Next Steps
Now that you've installed the workflow, you can use it as-is, or customize it to suit your needs better. Here are some examples of things you can add to the workflow to customize it:
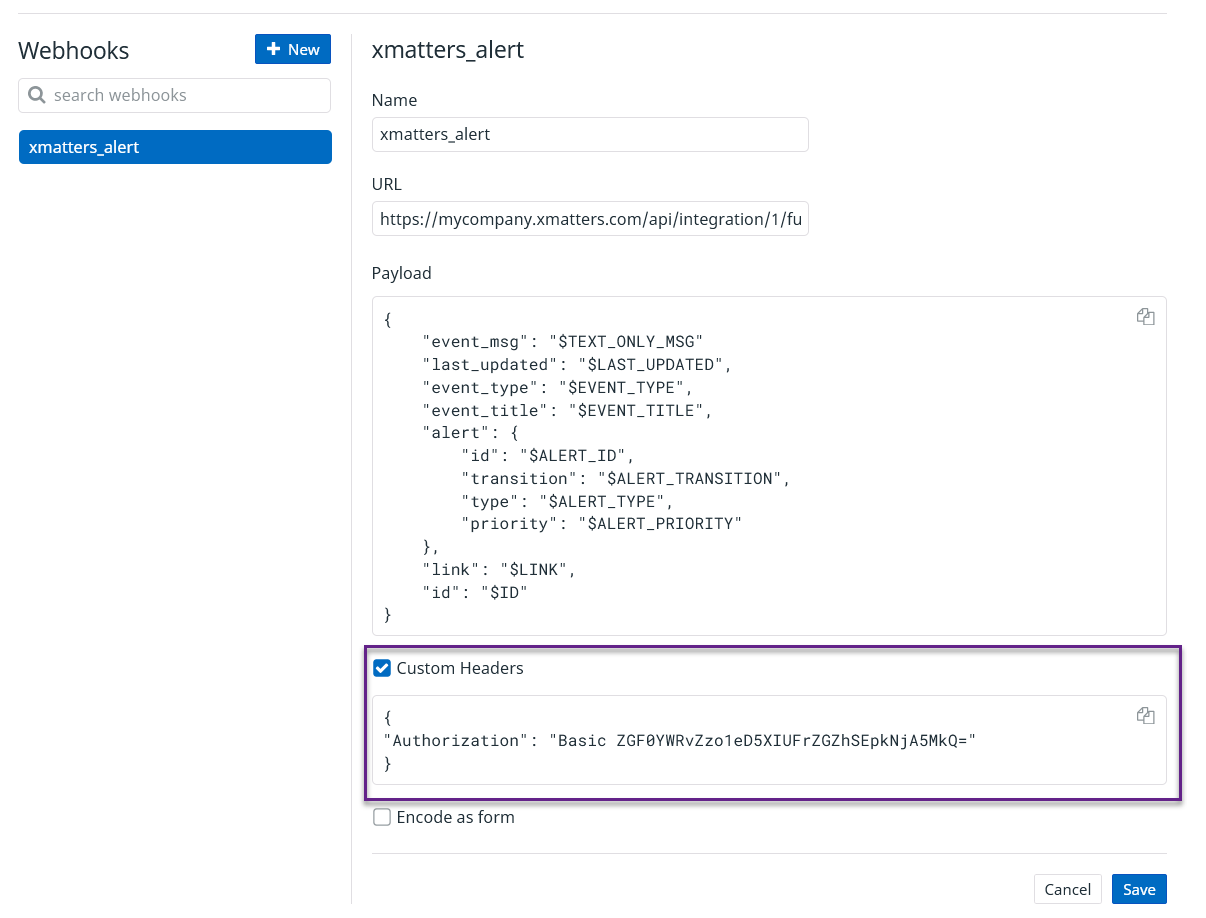
If you choose to use Basic instead of URL authentication, you need to update the webhook in Datadog to include an authorization header with the base64-encoded username and password of an authenticating user or integration user.
You can create this value by following the instructions below:
- Go to https://www.base64encode.org/
- In the “Encode to Base64 format” area, type the username and password separated by a colon (for example, if the username is datadog and the password is 5x>W!AkdfaHJd6092D, you'd enter datadog:5x>W!AkdfaHJd6092D).
- Click Encode, and copy the result.
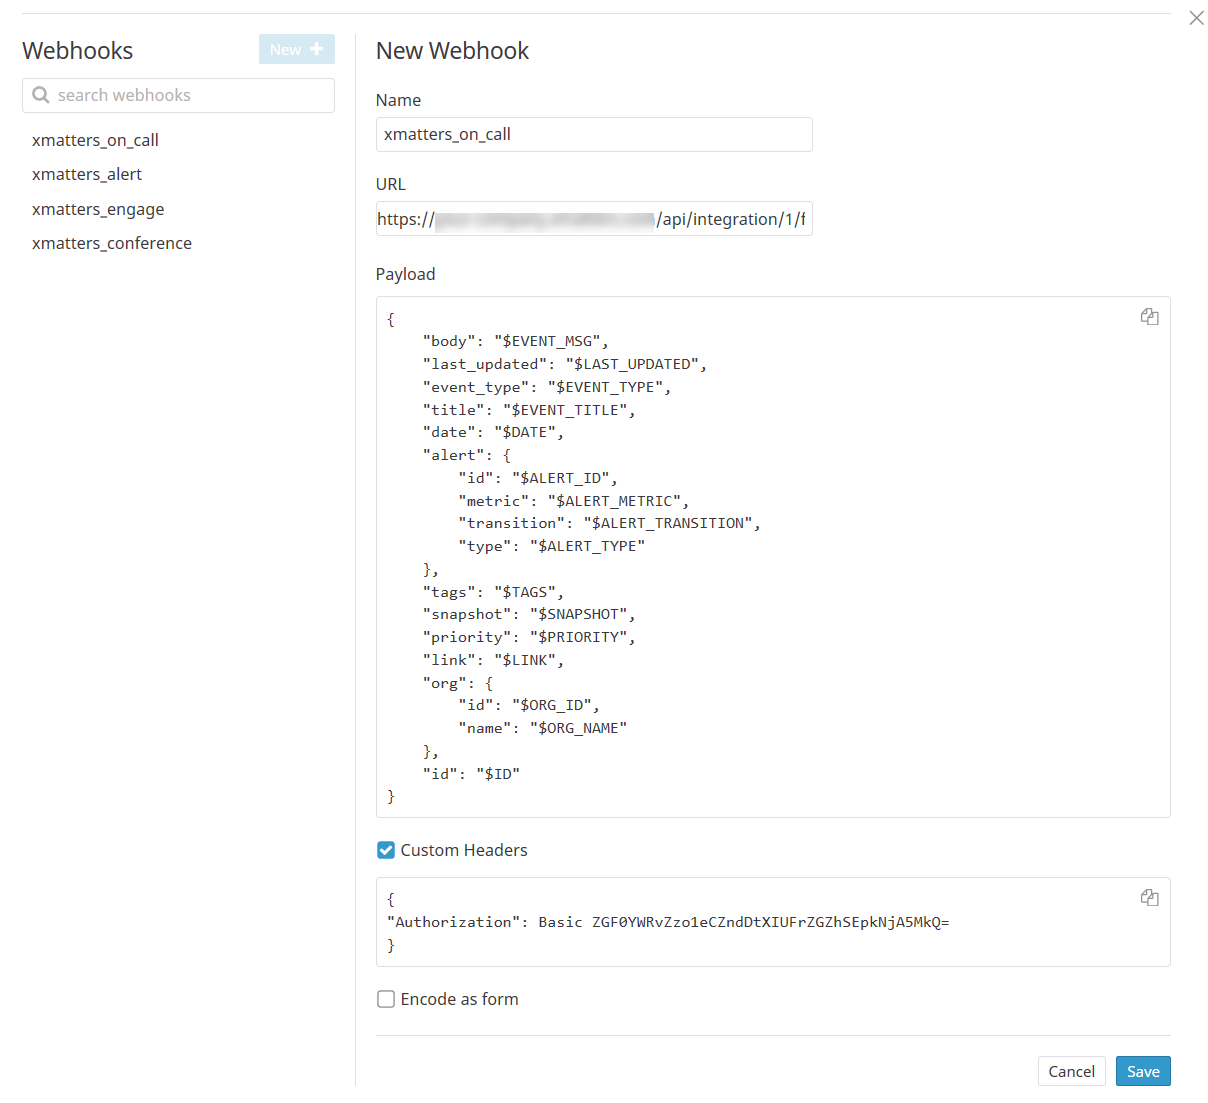
Example: ZGF0YWRvZzo1eD5XIUFrZGZhSEpkNjA5MkQ=
Update your webhook in Datadog by enabling the Custom Headers check box and adding the encoded result from above.
{
"Authorization": "Basic <authentication_header_value>"
}
Example:
- Use Slack, Zoom, and Microsoft Teams steps to add collaboration channels to the flow.
- Change the severity of incidents created when a recipient selects the Initiate Incident response.
- Update the message sent to resolvers to include the information most relevant to your team.
Previous versions
While the previous, built-in version of this integration is no longer available, the instructions for it are included below for anyone who has it installed in their system already.
Datadog is a cloud monitoring solution that brings metrics from all of your apps, tools, and services into one place.
The integration uses custom webhooks in Datadog to automatically identify and notify the on-call resource on a variety of devices. The integration also allows users to mute and claim alerts from Datadog Monitors or to view xMatters shift data directly from their devices.
Do more with this integration
Incorporate this integration into your orchestrated incident resolution workflows with Flow Designer. After you create a configuration, the Flows tab appears. From there, you can build your flows — add new response options, connect to other apps, or even create new xMatters alerts based on activities in the flow — enriching the information injected by this integration along the way.
Get started with Datadog

How to set up a Datadog configuration
After you give your configuration a name and description, type a name to use when sending alerts (so you can easily tell which configuration or integration the alerts are from), select whether you want to disable outbound integration updates (such as device delivery, alert status, and notification responses), and add all of the users and groups you want to be notified.
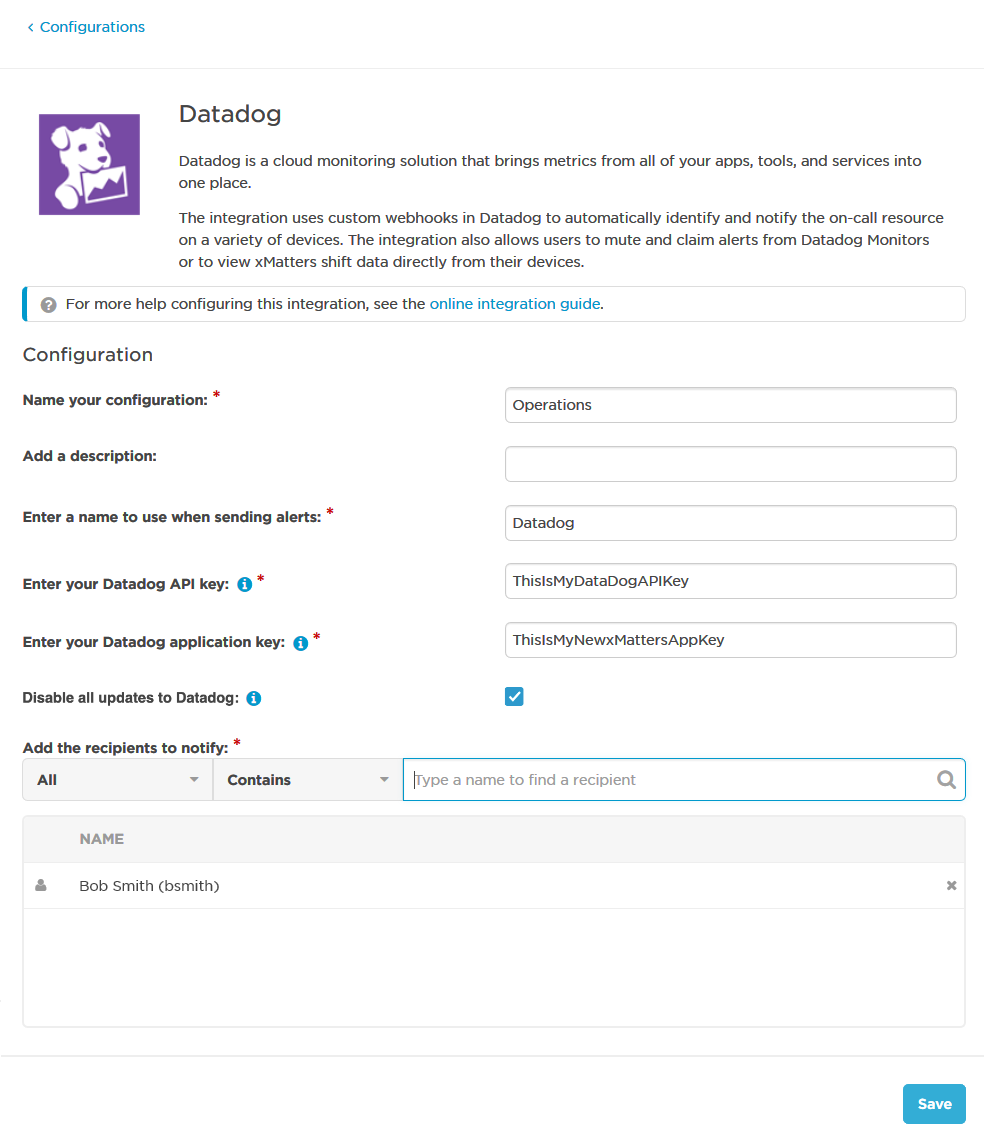
Next, retrieve your API key, and create an application key for xMatters in Datadog.
- Log into Datadog.
- Click Integrations > APIs.
- You can find your API Key in the Key column of the API Keys list.
- To create a new Application Key for xMatters, type a name for the key (for example, "xMatters") in the New application key field, and click Create Application Key.
- You can now copy the application key from the Hash column in the Application Keys list.
Enter the Datadog API key and the xMatters application key in the fields on the configuration page in xMatters, and then click Save.
Once you save the configuration, xMatters displays the URLs and payload you need to configure Datadog:
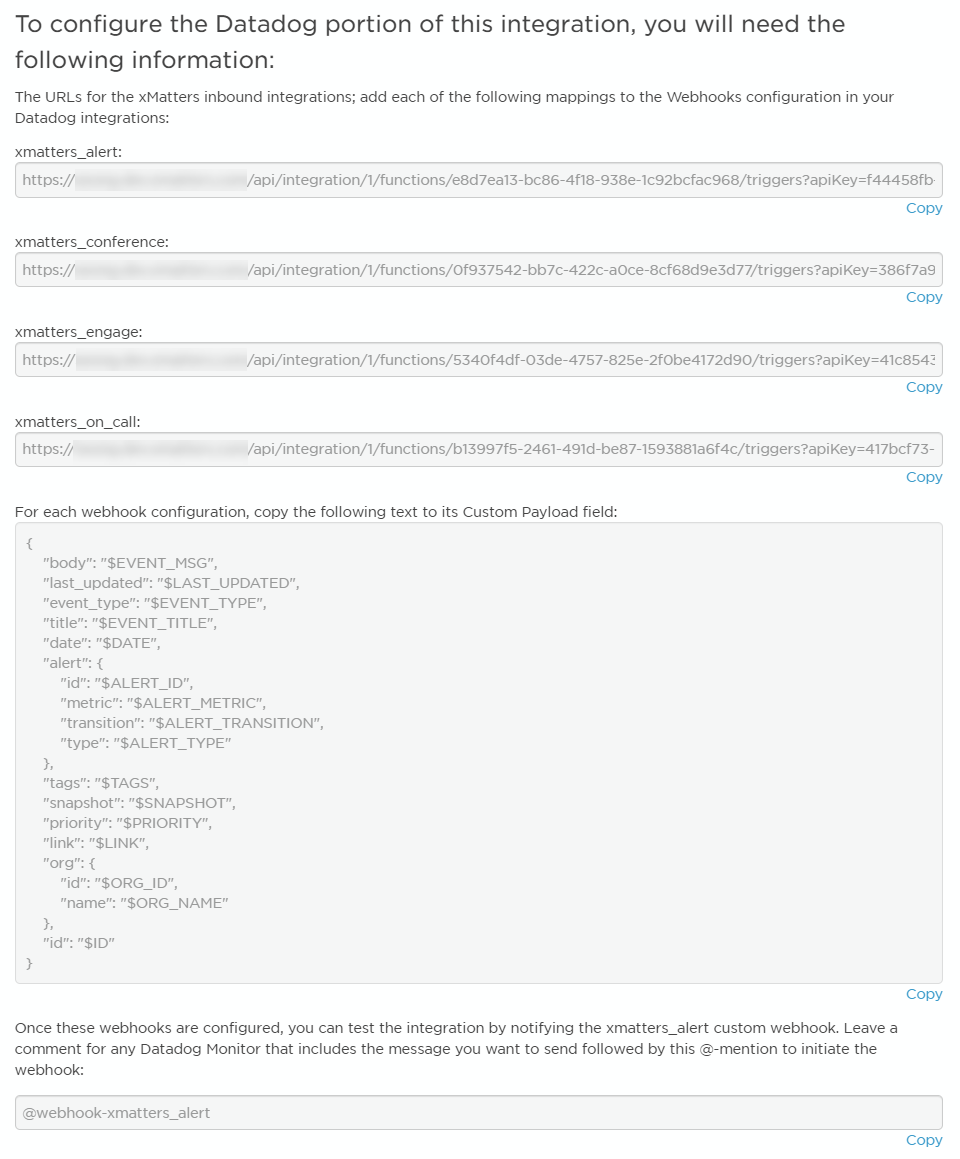
Add each of the mappings to the Webhooks configuration in Datadog.
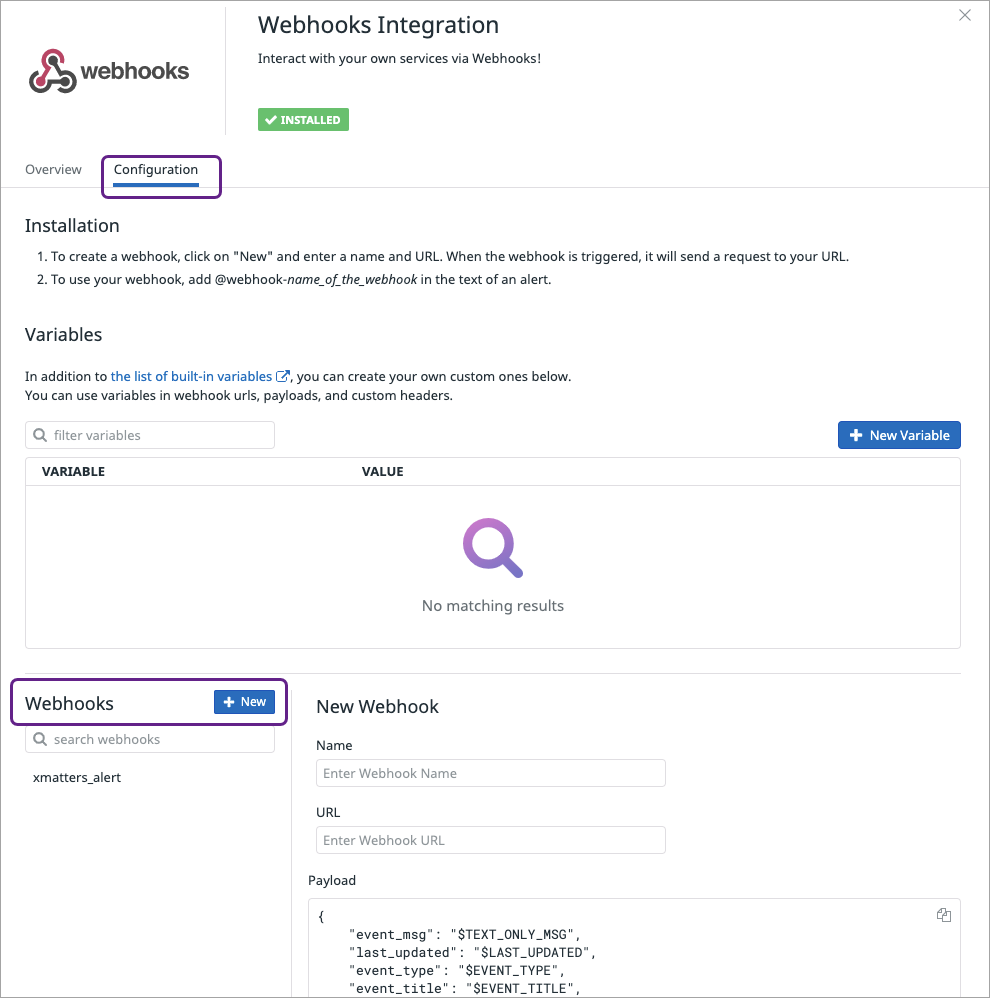
- Log in as an administrator, and then click Integrations > Integrations.
- Locate and click the Webhooks badge.
- On the Configuration tab, click New to create a new webhook.
- In the Name field, type xmatters_alert, then paste the URL for that webhook in the URL field.
- Paste the payload from the integration configuration page in xMatters into the Payload field.
- Click Save.
- Repeat steps 3-6 for the remaining webhooks: xmatters_on_call, xmatters_engage, and xmatters_conference.
- Click Save.
Your integration is now complete!
Use your integration
The integration uses custom webhooks in Datadog that can be @-mentioned in event or monitor alert messages, or even directly in a status update within the event stream. Each webhook sends the same payload to a different xMatters integration, which process the payload to create alerts in xMatters, or send comments back to the original Datadog event.
You can test the Datadog Alerts feature by notifying the xmatters_alert custom webhook when one of your monitors moves into an Alert or Error state.
- Click Monitors > Manage Monitors.
- Click the monitor with alerts you want to send to xMatters, and then click the Edit tab.
- In the Say what's happening section, type the message you want to send, and include the following to initiate the webhook:
@webhook-xmatters_alert
Notes
- Monitor bodies allow you to send different information depending on the transition of the monitor; for example, when transitioning to alert state or recovery state.
- If you do not want to receive alerts when the monitor moves to a "No_Data" state, you may need to wrap the webhook @-mention in is_alert tags; i.e., {{#is_alert}} {{/is_alert}}
- If you want the integration to automatically terminate xMatters alerts for recovered alerts, you will need to also wrap a webhook @-mention in {{#is_recovery}} {{/is_recovery}}
- For more details on message template variables, consult the Datadog documentation.
The Engage with xMatters feature allows users to provide updates, request help, or start a conference bridge with colleagues from other teams to collaborate on alerts, event stream posts or snapshots within Datadog. You can try out the Engage with xMatters feature using the Event Stream or a Snapshot Comment.
To engage with xMatters:
- Click Events.
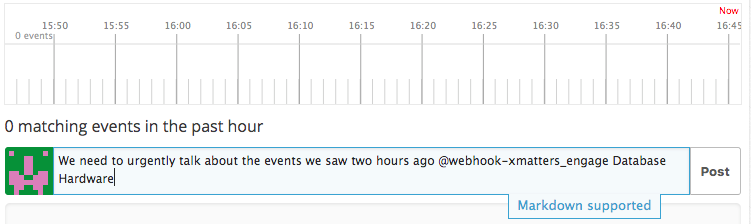
- In the Leave a status update field for an event, use the following format to initiate the webhook (see the Notes below for more syntax information):
<message_text> @webhook-xmatters_engage <recipient>
- Click Post to create the post in Datadog and trigger the alert in xMatters.
- If enabled, outbound integrations for status updates, delivery notifications and response updates will create comments and other updates on the Datadog post.
Notes
Engage with xMatters posts have some important required formatting:
- All text preceding the @-mention is used as the message when sending notifications to the recipients.
- All text after the @-mention must identify the recipients. For example, in the screenshot above, the "Database" and "Hardware" xMatters groups are targeted for notification.
- You can use the same format to initiate the xmatters_conference webhook.
- If you want to specify an external conference bridge for an xmatters_conference webhook, add -bridge <bridge_name>, where <bridge_name> is a valid conference bridge already configured in xMatters. For example:
Please join the conference @webhook-xmatters_conference Database Hardware -bridge "My External Conference"
The Who's On Call feature displays current xMatters shift information within the Datadog event stream - no need to open a new browser window or login to xMatters.
For example, a DevOps team member wants to place a direct call to someone on the database team to confirm a solution. Instead of looking up the team in a company directory or calling a data center and hoping someone picks up, the DevOps person can use the Who's On Call webhook to see who is the right primary on-call person in the database group to contact.
When using the Who's On Call feature, you can use two different post types.
To test the Who's On Call feature:
- Click Events.
- In the Leave a status update field for an event, use the following format to initiate the webhook (see the Notes below for more syntax information):
@webhook-xmatters_on_call <group>
- Click Post.
- xMatters displays the Who's On Call results.
Notes
- Any text after the @-mention determines the type of Who's On Call you want to make.
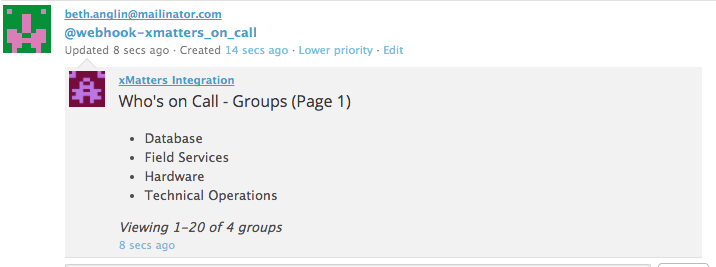
- To get a group listing, leave the text after the @-mention empty or add -page x where x is a positive integer. The xMatters integration will reply with the page of groups for the value of x or, if empty, the first page of groups:
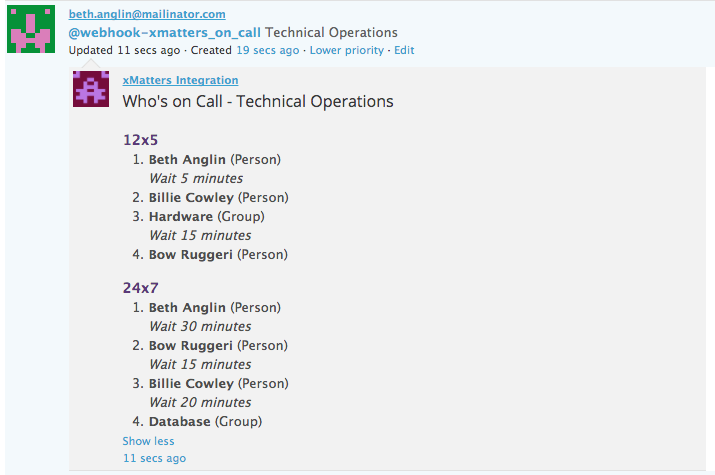
- To get on call shift details for a specific group, enter the name of a valid xMatters group after the @-mention. The xMattersintegration will reply with all active shifts for that group and the team members who are on call:
Troubleshooting
There are several places you can inspect when troubleshooting why a signal is not sent to xMatters.
First, in Datadog, any errors in connecting to the URL encountered by the webhook create new events in the Datadog Event Stream. For example:
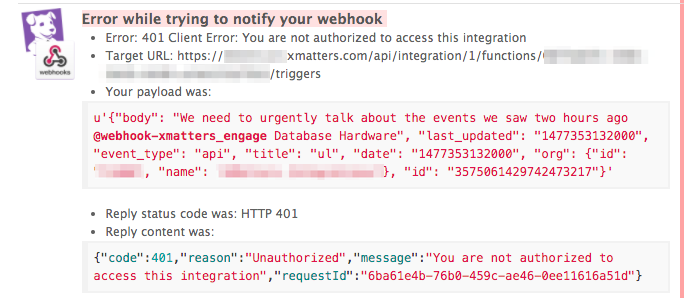
The failing webhook is highlighted in the payload, indicating that you are not authorized to access the @webhook-xmatters_engage feature.
The first place to look is the Activity Stream for the integration (click the gear icon and select Open Activity Stream). If there is an entry here, the request reached xMatters. Inspect the details for any errors.
For the two-way integration from xMatters to Datadog, the activity stream is the primary source of logging.
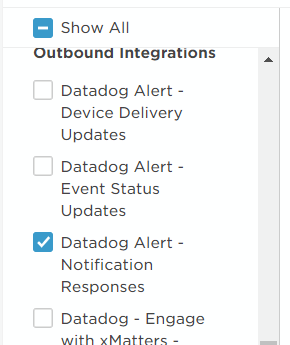
For example, if you are troubleshooting why a ticket was not assigned to a user after they replied with "Assign to me", check the Activity Steam for the notification responses:
Extending your integration
Looking to do more with xMatters and Datadog? If you want to tailor the settings and notifications for the integration, you can convert it to a custom workflow.
After you convert the integration to a custom workflow, you can configure it to use Basic authentication instead of URL authentication. If you switch the authentication from URL to Basic, you need to update the xMatters webhooks in Datadog to include an authorization header with the base64-encoded username and password of the integration user you created above.
You can create this value by following the instructions below:
- Go to https://www.base64encode.org/.
- In the “Encode to Base64 format” area, type the username and password of the integration user, separated by a colon (for example, datadog:5x>W!AkdfaHJd6092D)
- Click Encode, and copy the result.
Example: ZGF0YWRvZzo1eD5XIUFrZGZhSEpkNjA5MkQ=
Update each xMatters webhook in Datadog by adding the following text to the Headers field, replacing <authentication_header_value> with the encoded result from above.
{
"Authorization": "Basic <authentication_header_value>"
}
Example: