
Dynatrace Cloud Automation
Dynatrace Cloud Automation has been deprecated and is no longer supported by its manufacturer. The following instructions are available as a reference for users who already have the workflow installed in their instance.
Dynatrace Cloud Automation is a tool within Dynatrace that helps manage cloud processes such as service-level objectives (SLOs), automated release inventory and version comparison, and lifecycle orchestration. This integration incorporates Cloud Automation events into your xMatters toolchain, letting you add steps to your workflow as part of a Cloud Automation event.
How it works
When Dynatrace Cloud Automation sends a signal, it sends a JSON-formatted webhook to xMatters. A Dynatrace Cloud Automation Event trigger in xMatters parses the webhook and initiates a flow. The webhook includes essential alert data you can use to enrich notifications to users or when building automated tasks.
Install the workflow
The following instructions describe how to install the workflow through the xMatters one-click installation process.
- Go to the Workflow Templates page and click the Dynatrace Cloud Automation tile.
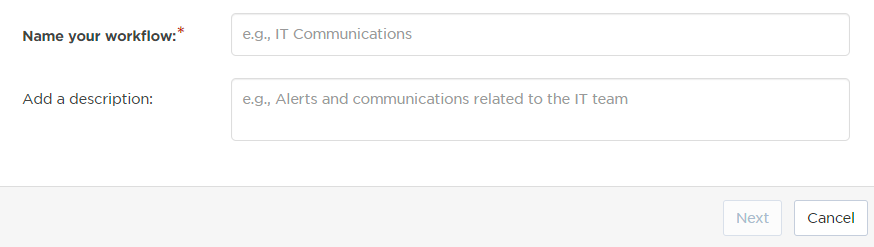
- On the Set up the Workflow tab, give the workflow a name that identifies its purpose (this must be unique in your instance), add an optional description, and set the default incident type (if applicable). Any built-in Initiate Incident steps in the workflow will automatically be set to the selected incident type.
- You can edit these later, if needed.
- You can edit these later, if needed.
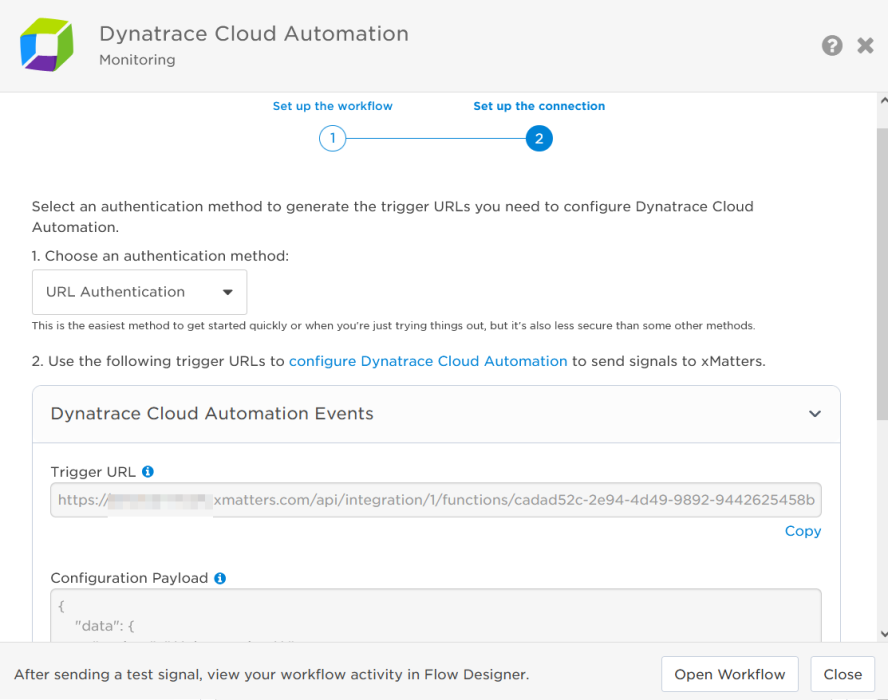
- Click Next to set up the connection.
- Choose the authentication method. A trigger URL is generated based on the selected authentication method.
- Copy the trigger URL — you’ll use this to configure the webhooks in Dynatrace Cloud Automation.
- The trigger URL includes the recipients parameter, which specifies who should be notified. By default, this parameter is set to notify you (the logged in user), but you can set it to target any user or group you want.
- The trigger URL includes the recipients parameter, which specifies who should be notified. By default, this parameter is set to notify you (the logged in user), but you can set it to target any user or group you want.
- You can copy the Configuration Payload to configure the signal in the source application.
- Send a test signal to the trigger URL to test the connection.
- Click Open Workflow to view and customize the workflow, or Close to return to the Workflows page.
Configure Dynatrace Cloud Automation to send requests to the trigger URL
To have Dynatrace Cloud Automation send alerts to the flow trigger, you need to configure a webhook and set it to use the trigger URL.
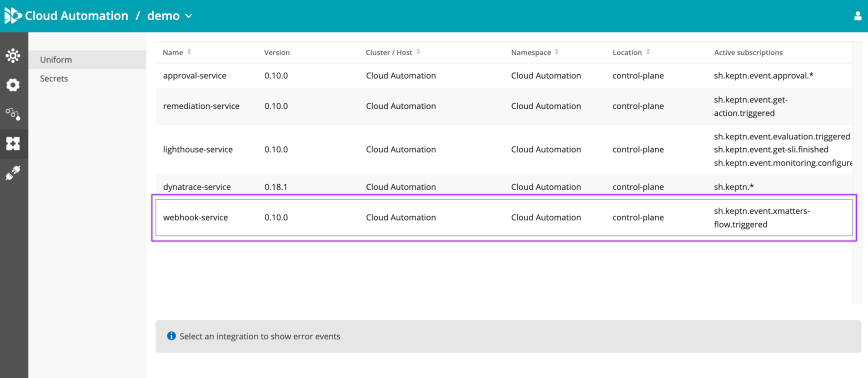
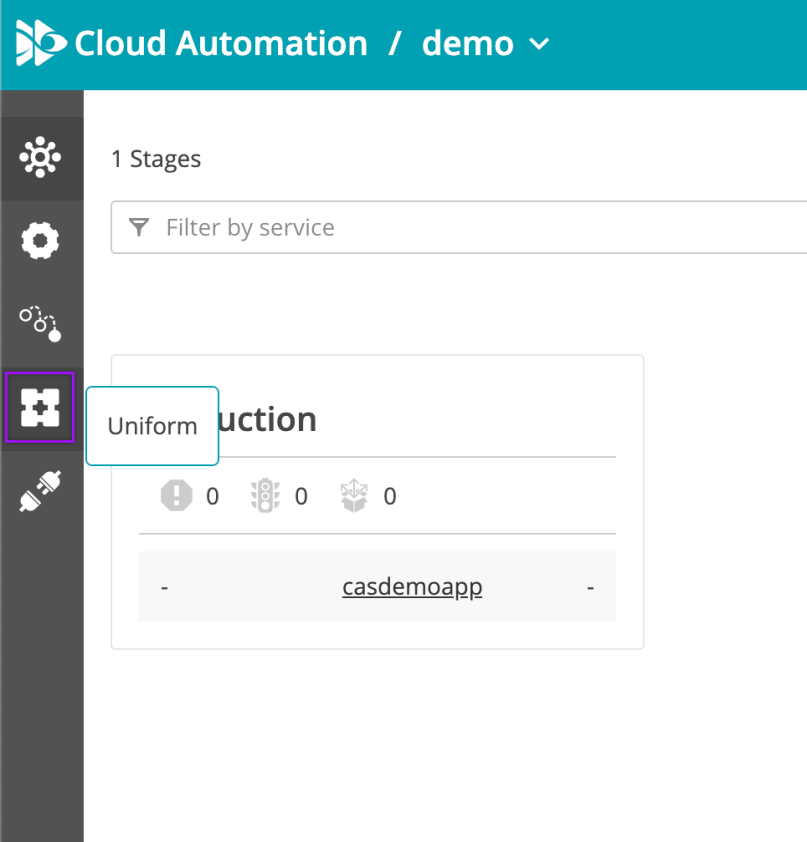
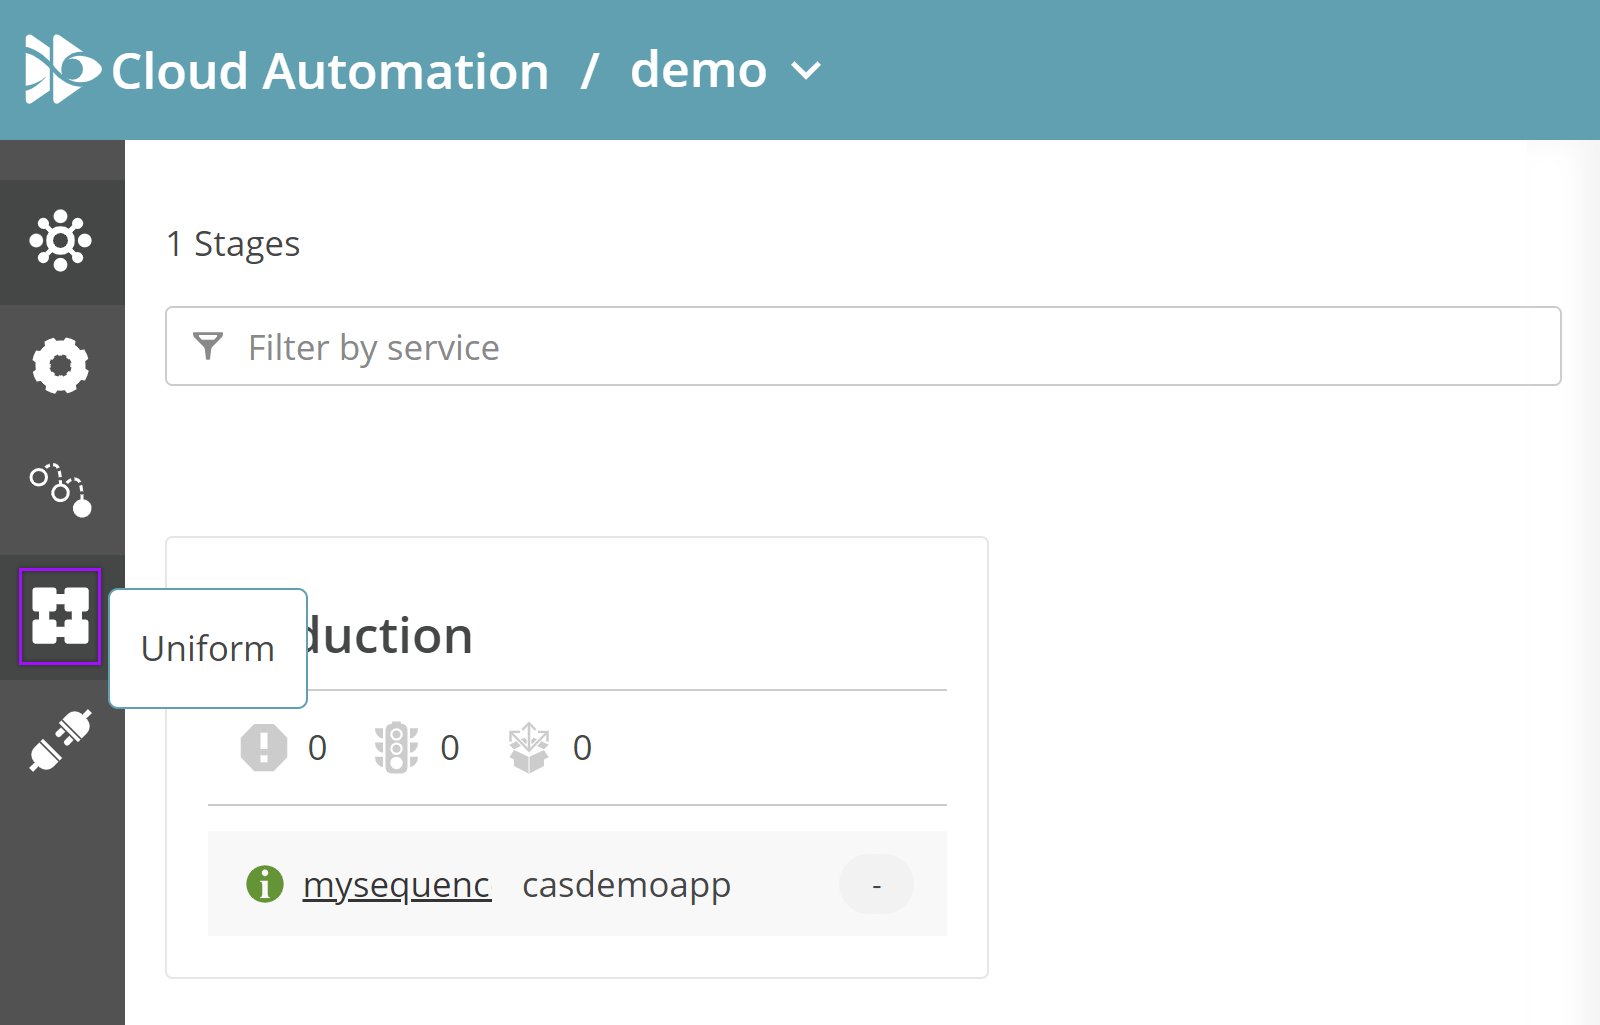
- In Cloud Automation, select Uniform from the left-hand menu.
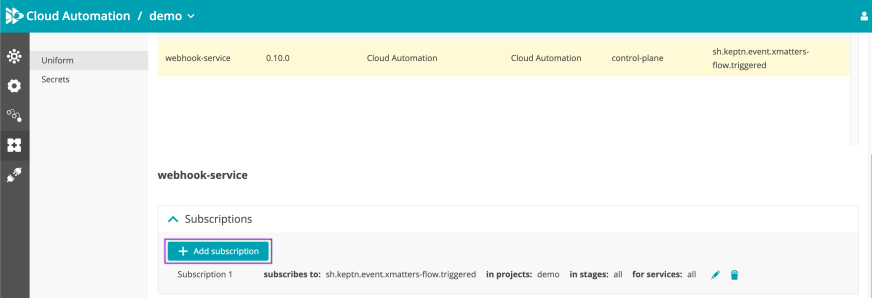
- On the Uniform page, select the webhook-service row.
- Click Add subscription.
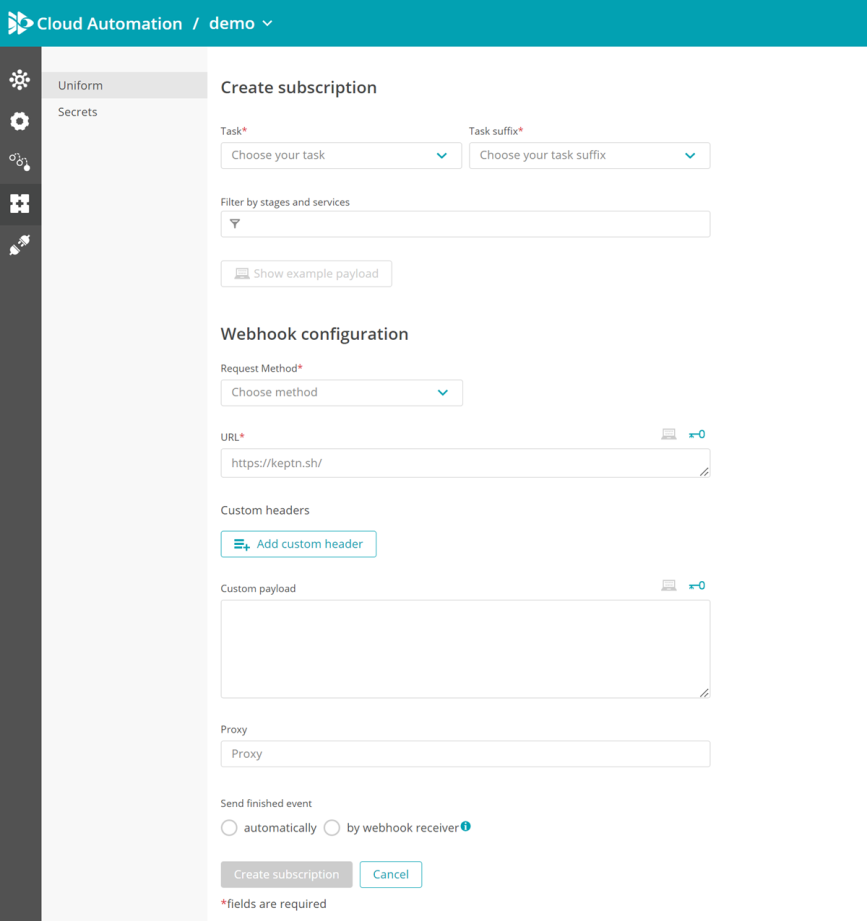
- Fill in the following fields:
- Task:The task that triggers the woebhook.
- Task suffix: The task suffix sets whether the webhook is active or passive. Passive webhooks do not require a response from xMatters before continuing the sequence. Active webhooks stop a sequence from progressing until a response is received from xMatters. We recommend using passive webhooks whenever possible.
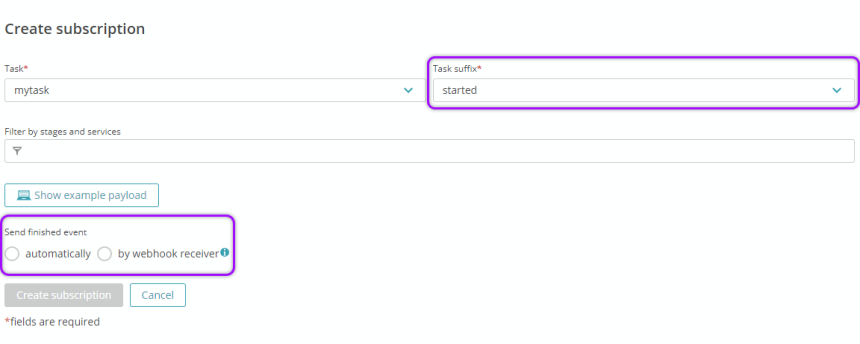
- To create a passive webhook, set the task suffix to started. Selecting started disables the "Send finished event" menu as no response is required to continue the sequence. This is the recommended option to ensure Dynatrace Cloud Automation processes sequences at the expected rate.
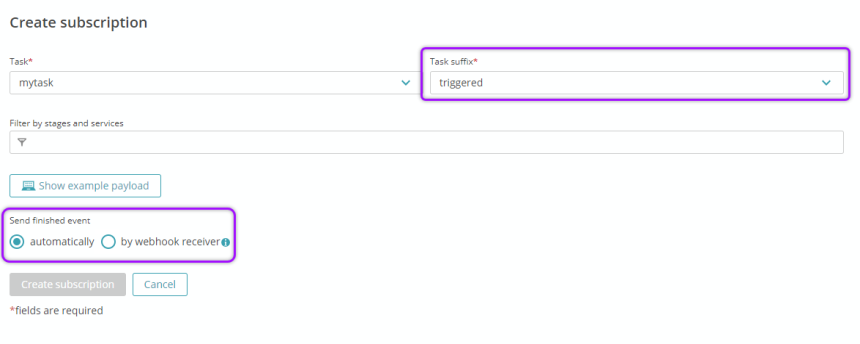
- To create an active webhook, set the task suffix to triggered, then set the Send finished event radio button to either automatically or by webhook receiver.
- If you use automatically, the sequence continues without needing a response from xMatters, which is similar to a passive webhook.
- If you select by webhook receiver, Cloud Automation stops the sequence and waits to receive a response from the xMatters Finish Cloud Automation Event step before continuing.
- To create a passive webhook, set the task suffix to started. Selecting started disables the "Send finished event" menu as no response is required to continue the sequence. This is the recommended option to ensure Dynatrace Cloud Automation processes sequences at the expected rate.
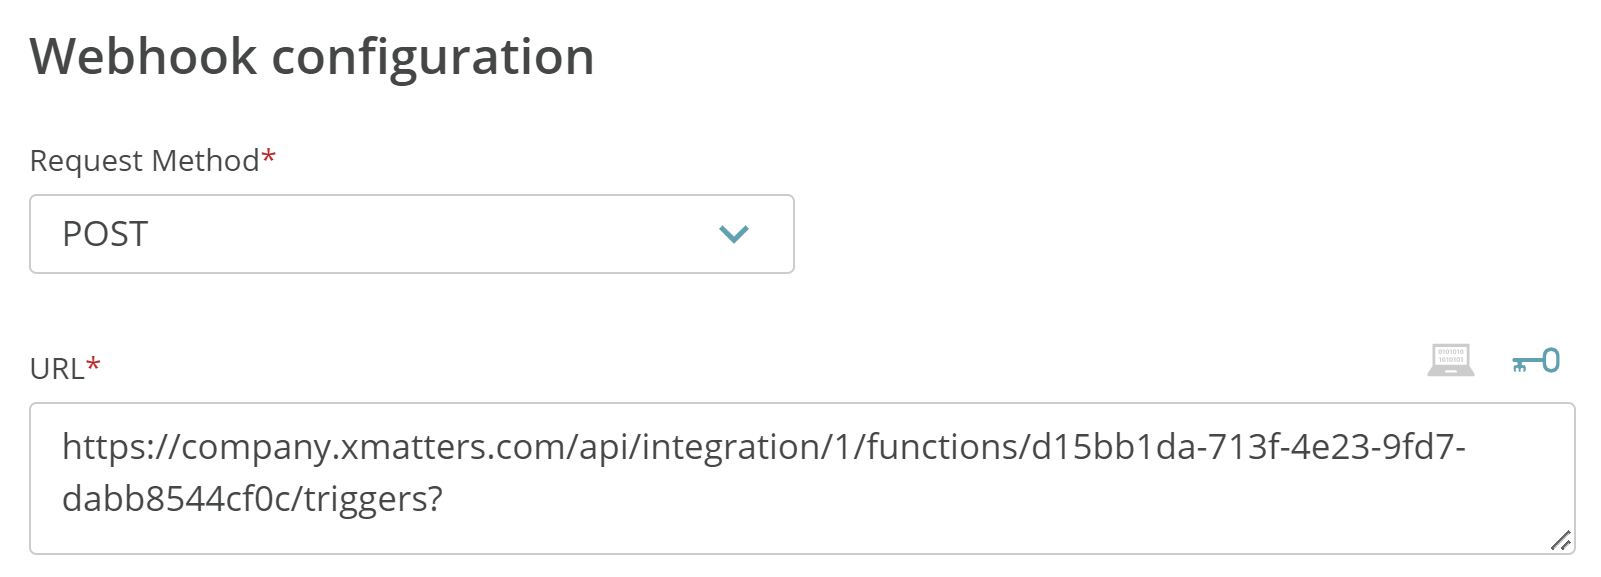
- Request Method: POST
- URL: Paste the trigger URL you copied from the Dynatrace Cloud Automation Event trigger in Flow Designer. Add the target names of any recipients you want xMatters to notify when the alert fires.
- For URL authentication, use an ampersand to attach recipients. For example, if you want to notify Emma Pearson and the on-call members in the group responsible for the Antares service, you'd add &recipients=epearson,antares to the end of the URL.
- For other authentication types, use a question mark to attach recipients. For example, if you want to notify Barry Gull and the on-call members in the group responsible for the Cassiopeia service, you'd add ?recipients=bgull,cassiopeia to the end of the URL.
- You must URL-encode any special characters or spaces in the target names.
- If you want to mask parts of the trigger URL, you can use a Dynatrace secret. For example, if the authentication method is URL Authentication, you can mask the API key in the trigger URL.
- The Filter by stages and services field is optional.
- Click Add custom header and supply the authentication method:
- For URL Authentication:
- Name: Content-Type
- Value: application/json
- For Basic Authentication:
- Name: Authorization
- Value: Basic<Base64_encoded_value>
- For API Key Authentication:
- Name: Authorization
- Value: Basic <Base64_encoded_value>
- Paste the following payload in the Custom payload field:
For Basic and API Key authentication you must Base64 encode the username and password (or API Key and secret) of an xMatters user with permission to access the workflow. You can create a Base64 encoded username and password (or API Key and secret) at https://www.base64encode.org/ or by typing echo “username:password” | base64 into a terminal.
Copy{
"data": {
"project": "{{.data.project}}",
"service": "{{.data.service}}",
"stage": "{{.data.stage}}"
},
"id": "{{.id}}",
"source": "{{.source}}",
"specversion": "{{.specversion}}",
"time": "{{.time}}",
"type": "{{.type}}",
"shkeptncontext": "{{.shkeptncontext}}"
} - Click Create subscription.
The Create subscription window opens.
You're ready to use the webhook to trigger automated flows, including steps such as sending alerts and initiating incidents, though we always recommend testing before putting things into use.
Set recipients in the trigger URL
The trigger expects the recipients in the trigger URL. When you copy the URL from xMatters, it includes the recipients parameter: recipients=<yourname>. Of course, you don’t want to receive all the alerts.
To change the recipients for alerts from this webhook, swap out your name for the people or groups you want to target.
- For URL authentication, use an ampersand to attach recipients. For example, if you want to notify Emma Pearson and the on-call members in the group responsible for the Antares service, you'd add &recipients=epearson,antares to the URL.
- For other authentication types, use a question mark to attach recipients. For example, if you want to notify Barry Gull and the on-call members in the group responsible for the Cassiopeia service, you'd add ?recipients=bgull,cassiopeia to the URL.
Remember to URL-encode any special characters, including spaces, in your group names.
We recommend using groups so you can take advantage of the xMatters group features — rotations, escalations, and absences — to reach the right on-call people to jump on an issue.
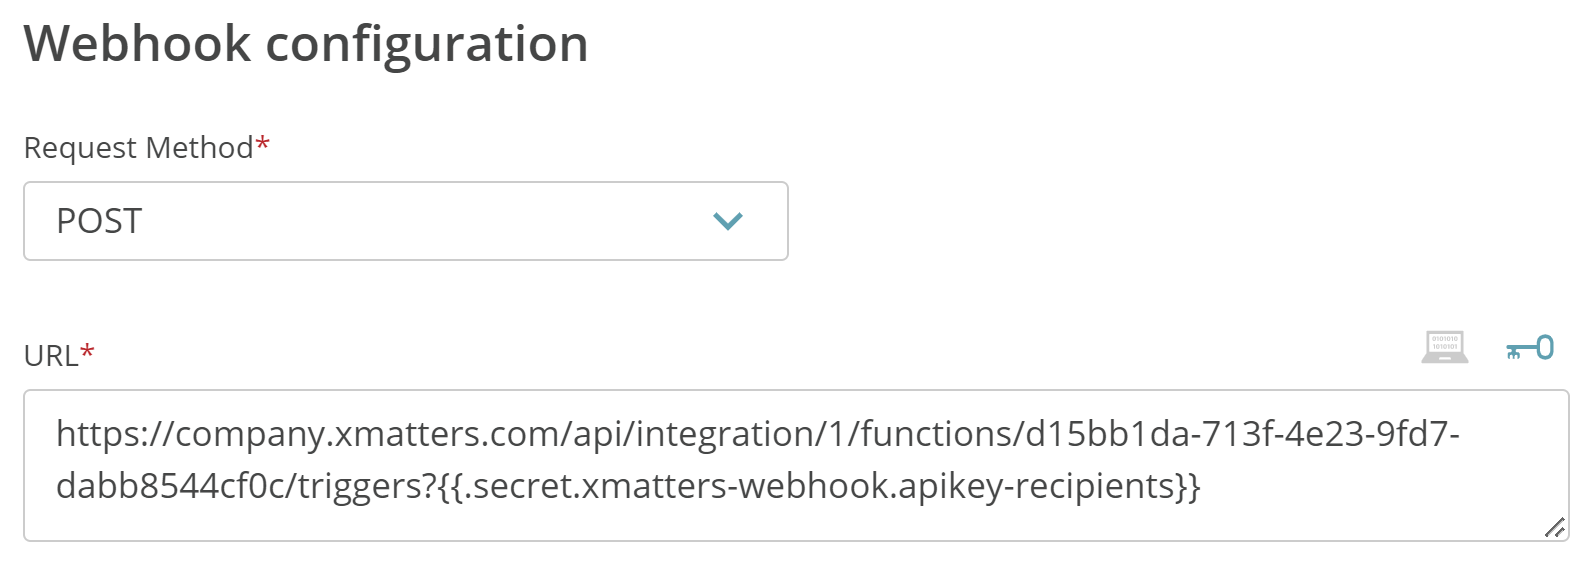
Add Dynatrace secrets
Secrets are a tool within Dynatrace Cloud Automation that allows you to mask parts of a URL that may contain sensitive information. When you configure a Cloud Automation webhook to xMatters, you can use secrets to mask parts of the xMatters trigger URL.
You can mask different parts of the xMatters trigger URL with a secret. The following instructions describe how to create a secret to mask the API key and webhook recipients in this sample URL (bolded section):
https://company.xmatters.com/api/integration/1/functions/d15bb1da-713f-4e23-9fd7-dabb8544cf0c/triggers?apiKey=947d3639-25f2-43f8-824f-26480dee8e4d&recipients=admin
- In Dynatrace Cloud Automation, click Uniform from the left-hand menu.
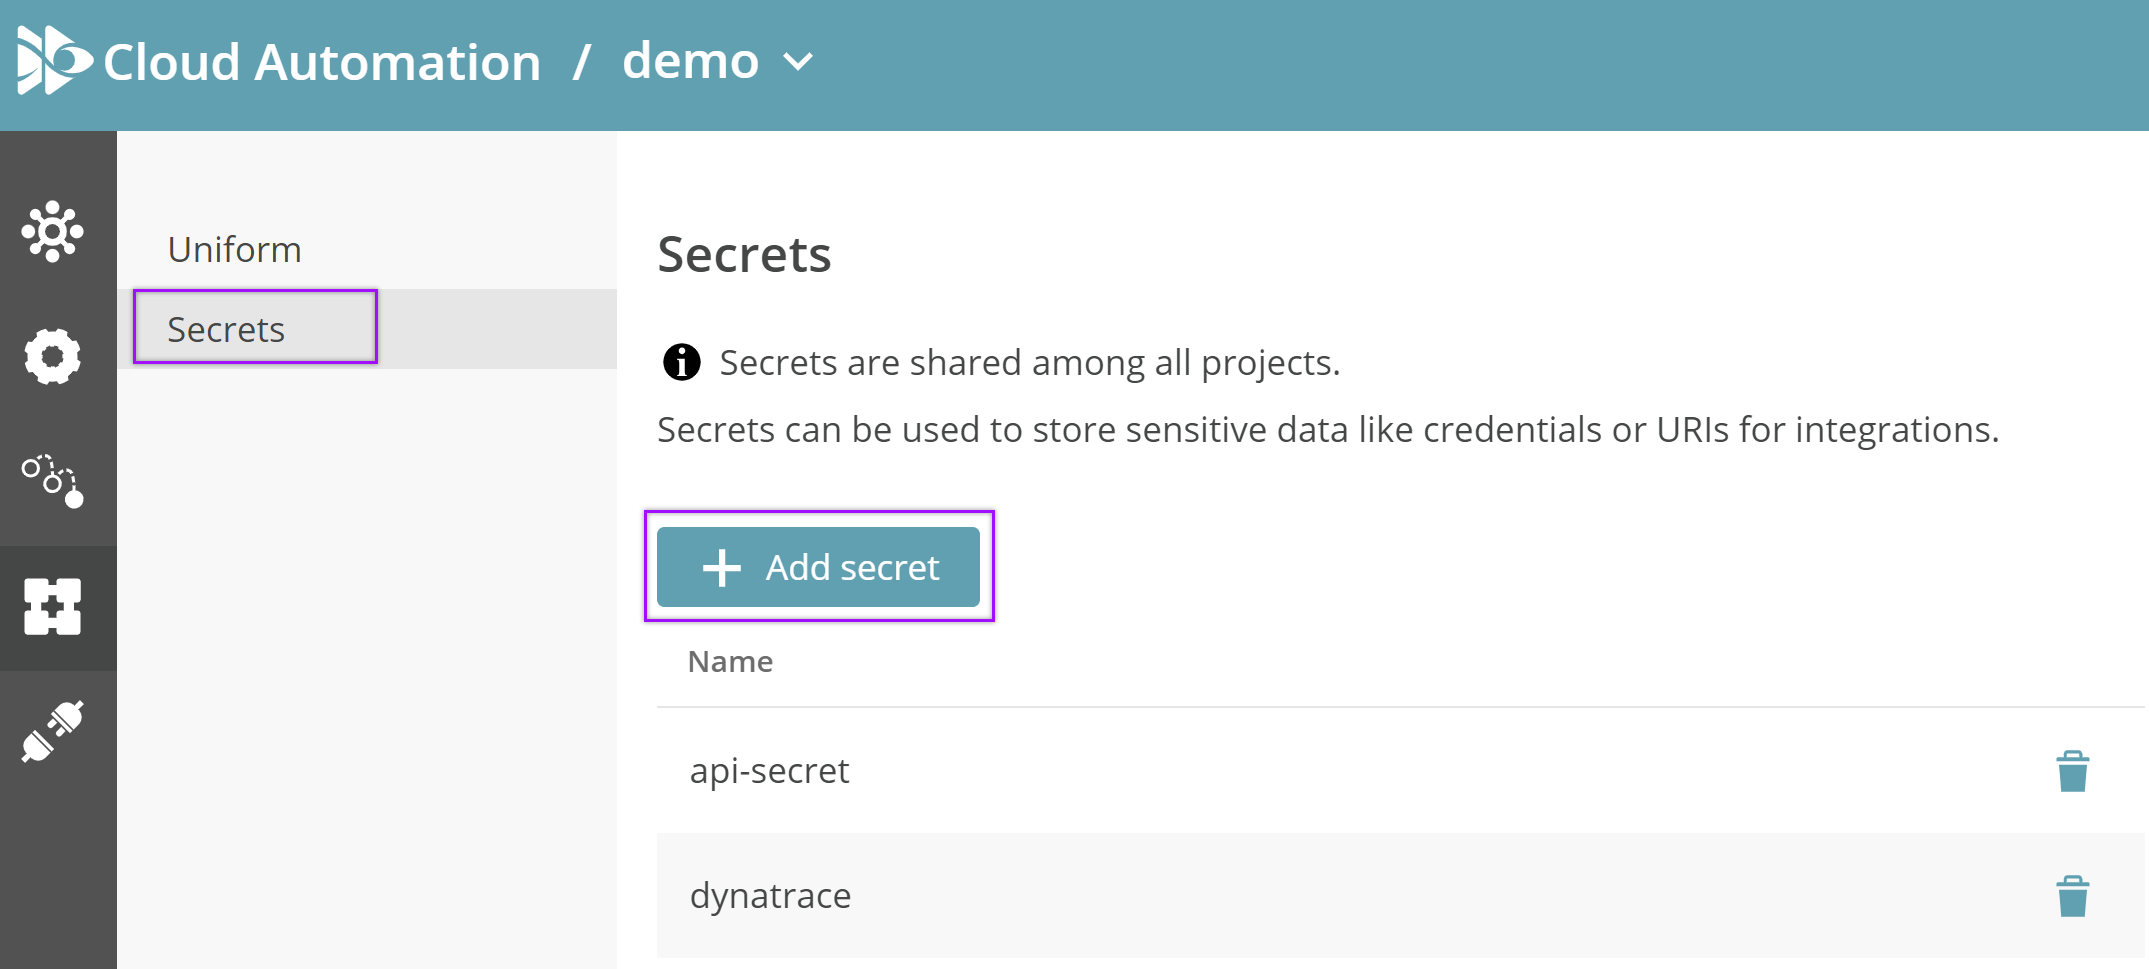
- On the Uniform page, select Secrets, then click Add secret.
- Fill in the following fields:
- Name: Name of your secret or group of secrets.
- Scope: keptn-webhook-service
- Key: Easily identifiable name to represent the key-value pair for the secret. (For this example: 'apikey-recipients')
- Value: The part of the URL you want to mask. (For this example, the part of the URL containing the API Key and recipients information: apiKey=947d3639-25f2-43f8-824f-26480dee8e4d&recipients=admin)
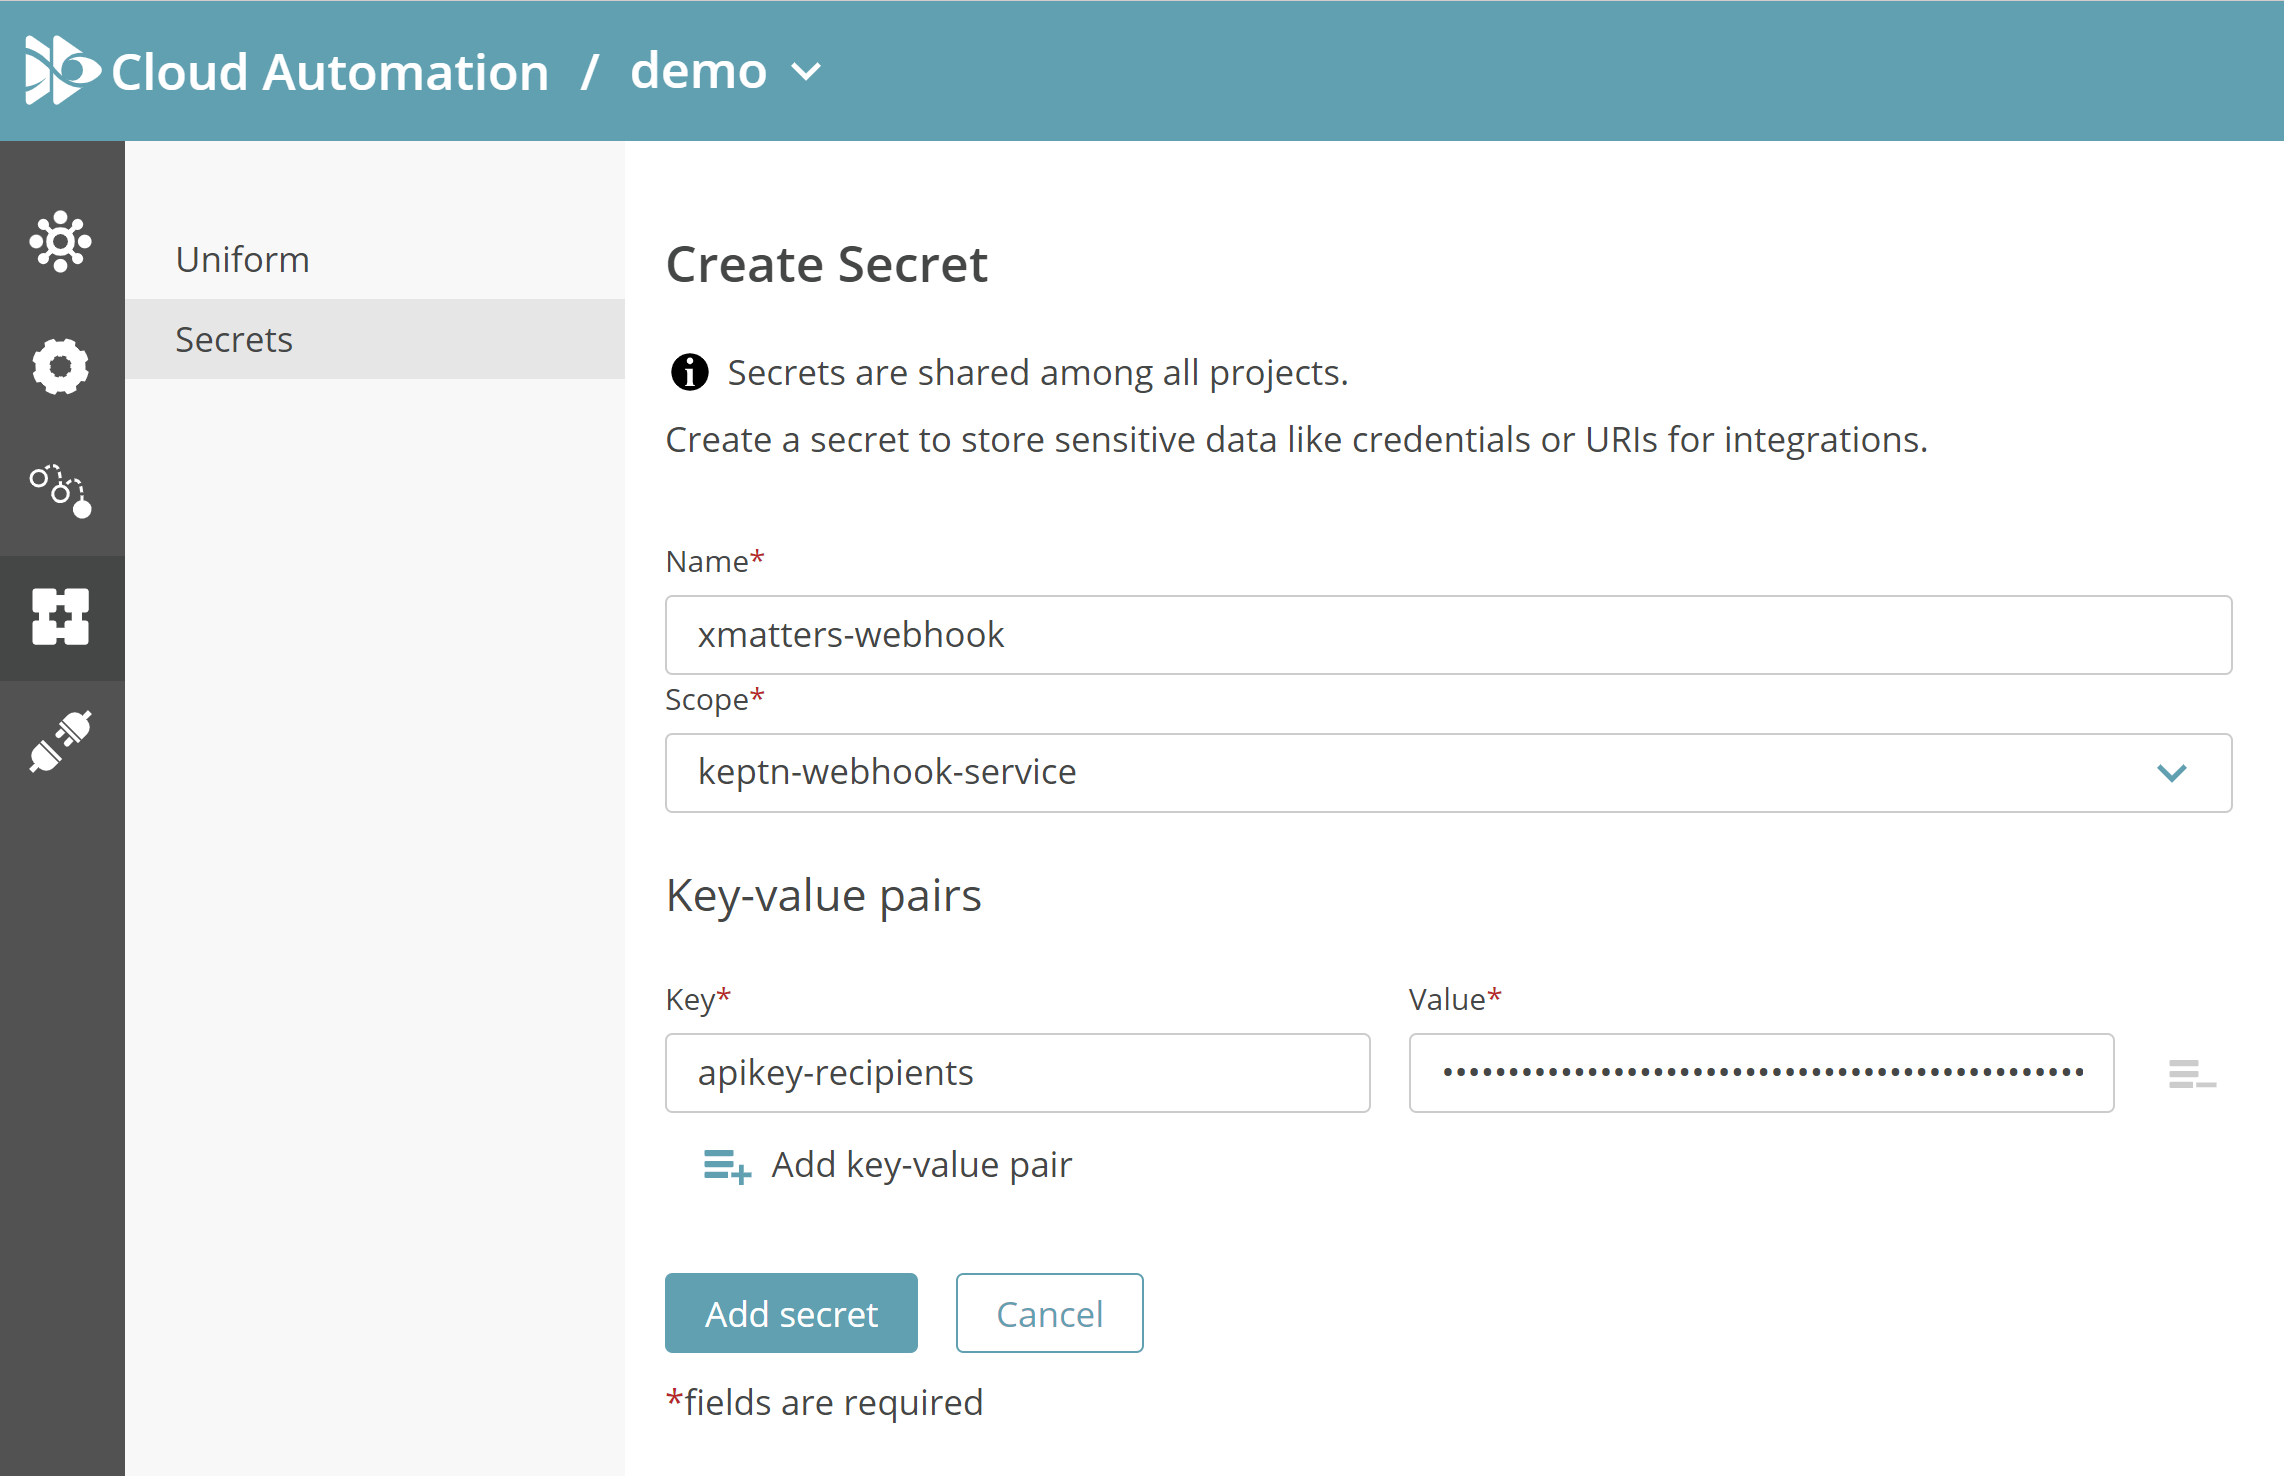
- Click Add secret to save your secret.
Now that you've created the secret, here's how to use it when you configure your webhook:
- Add the trigger URL to the field and remove the part of the URL that you masked with a secret.
- Click the key icon on the upper-right corner of the URL field and choose the secret you created for that URL from the drop-down menu.
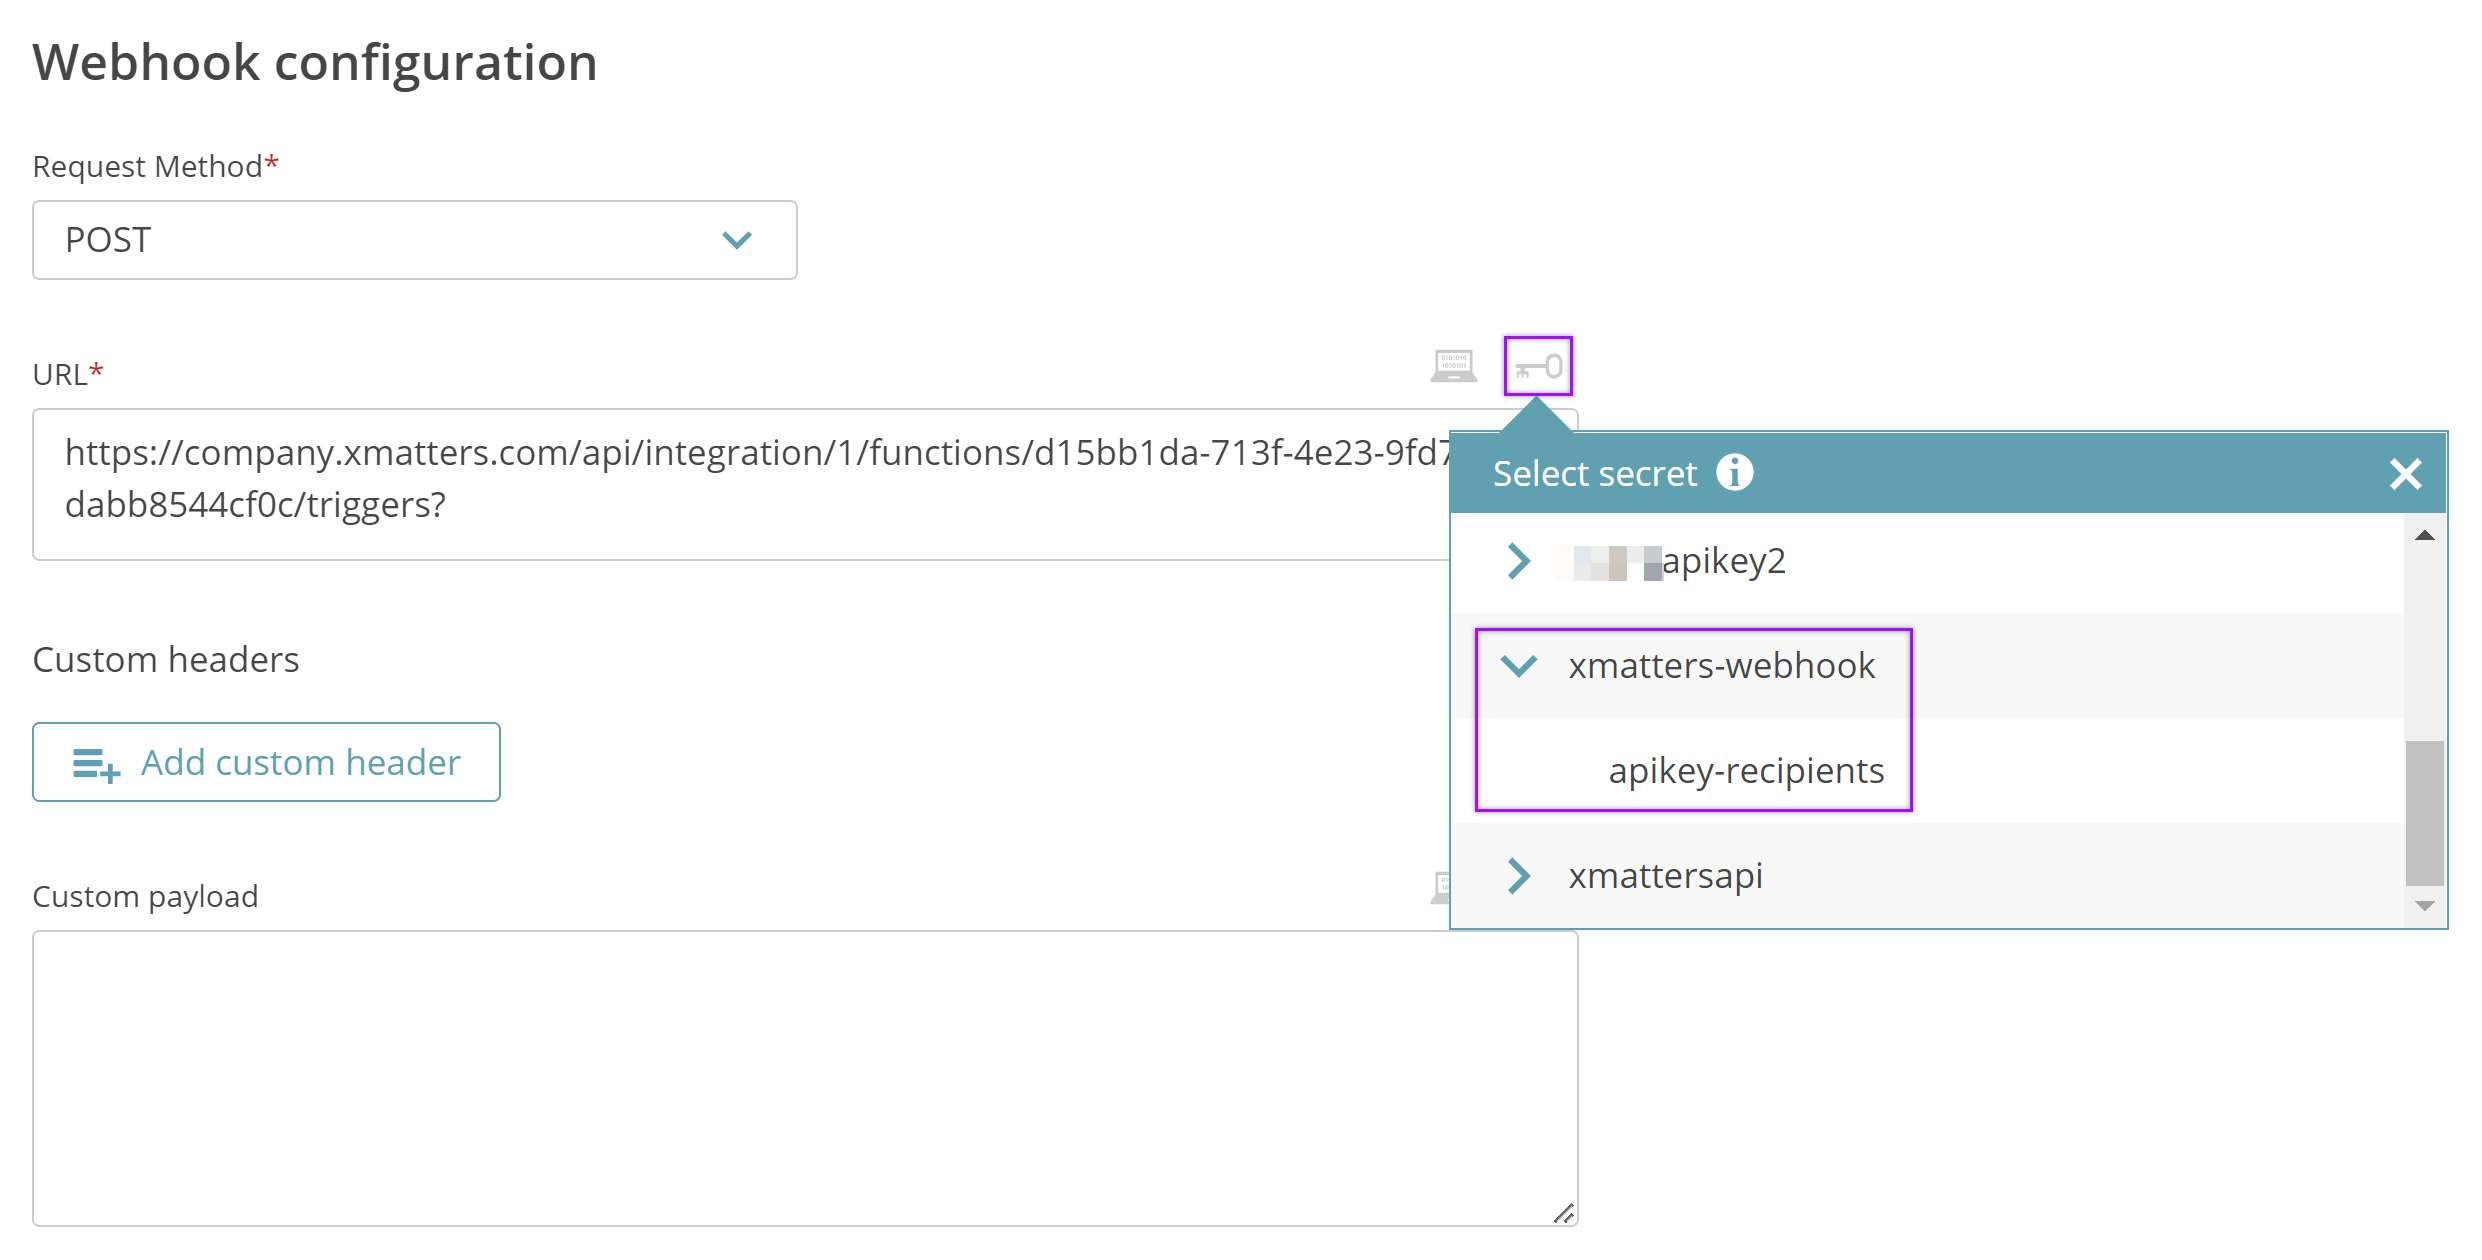
Your xMatters trigger URL should now function correctly, with the API key and recipients information masked by the secret.
How to use the workflow
When a condition you've set fires, it sends a signal to xMatters, which creates an alert and notifies the individual or the on-call members of the people or groups you set as recipients in the webhook URL.
The person responding to the notification has the following response options:
- Acknowledge: Acknowledges the notifications and stops escalations.
- Escalate: Immediately escalates the alert to the next on-call resolver in a targeted group.
- Close: Ends the xMatters alert and stops notifying all targeted recipients.
- Initiate Incident: Initiates an incident in xMatters.
Next Steps
Now that you've installed the workflow, you can use it as-is, or customize it to suit your needs better. Here are some examples of things you can add to the workflow to customize it:
- Use Slack, Zoom, and Microsoft Teams steps to add collaboration channels to the flow.
- Change the severity of incidents created when a recipient selects the Initiate Incident response.
- Update the message sent to resolvers to include the information most relevant to your team.