
Microsoft SCOM
How it works
When an alert is generated in Microsoft SCOM, it sends a JSON-formatted webhook to xMatters, based on user-defined alert rules. A Microsoft SCOM Alert trigger in xMatters parses the webhook and initiates a flow. The webhook includes essential alert data you can use to enrich notifications to users or when building automated tasks.
Prerequisites
All requests between xMatters and Microsoft SCOM must be made through an agent. If you do not already have an agent installed and running, see Download and install the agent.
Install the workflow
The following instructions describe how to install the workflow through the xMatters one-click installation process.
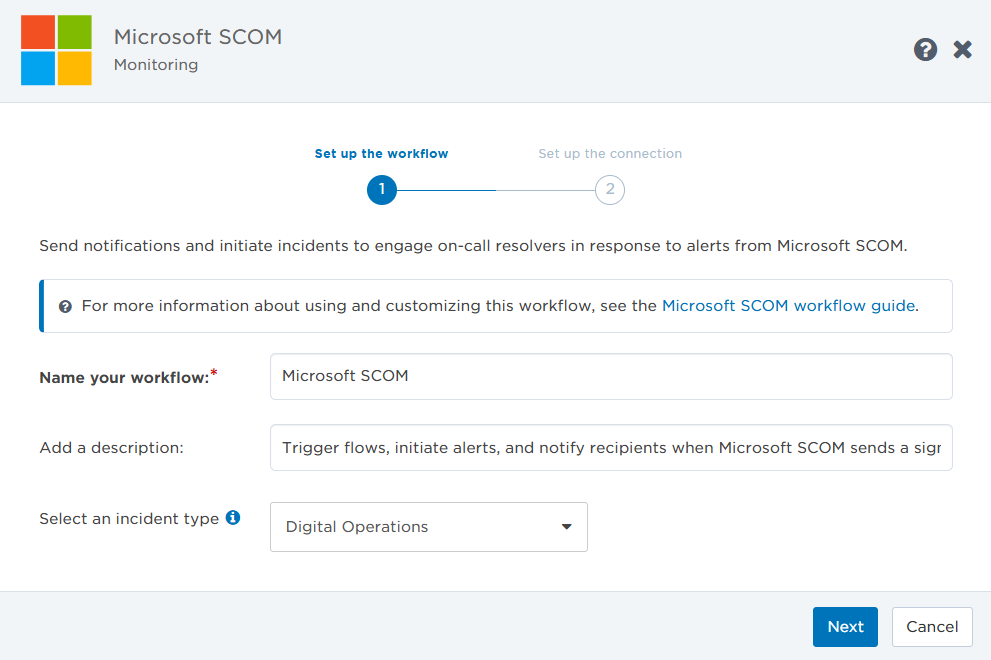
- Go to the Workflow Templates page and click the Microsoft SCOM tile.
- On the Set up the Workflow tab, give the workflow a name that identifies its purpose (this must be unique in your instance), add an optional description, and set the default incident type (if applicable). Any built-in Initiate Incident steps in the workflow will automatically be set to the selected incident type.
- You can edit these later, if needed.
- You can edit these later, if needed.
- Click Next to set up the connection.
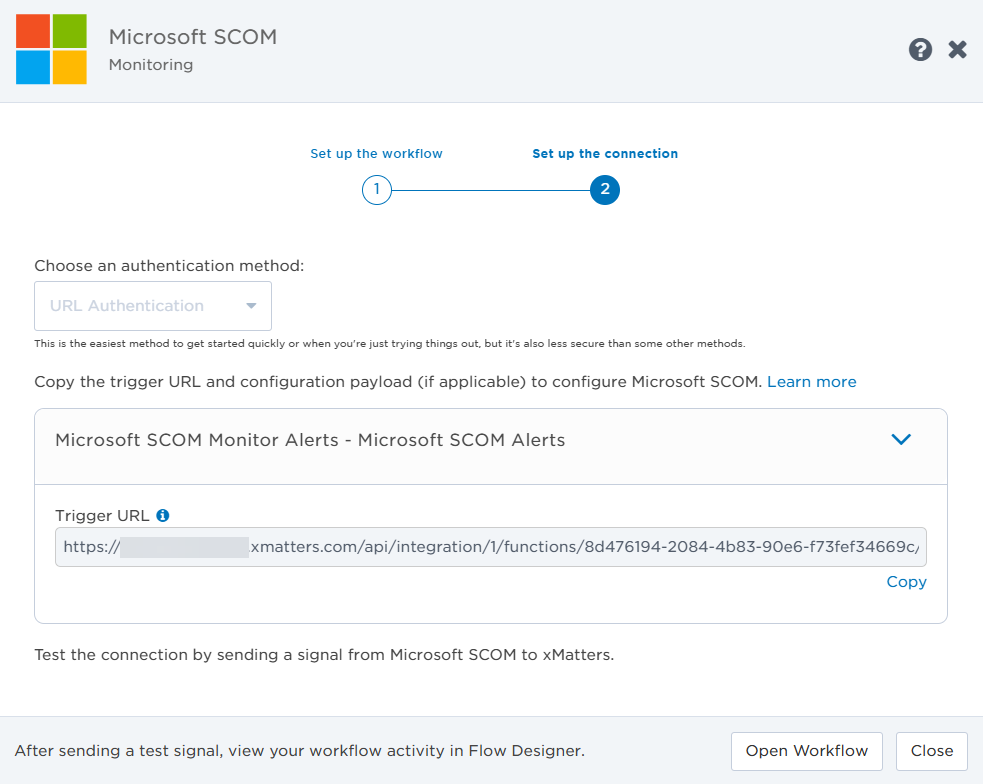
- Copy the trigger URL — you’ll use this when you configure Microsoft SCOM.
Now that the workflow is installed in your system, you'll need to complete the set up tasks for the trigger and steps.
- Click Open Workflow.
- Double-click the Microsoft SCOM Monitor Alerts trigger (or click the pencil icon).
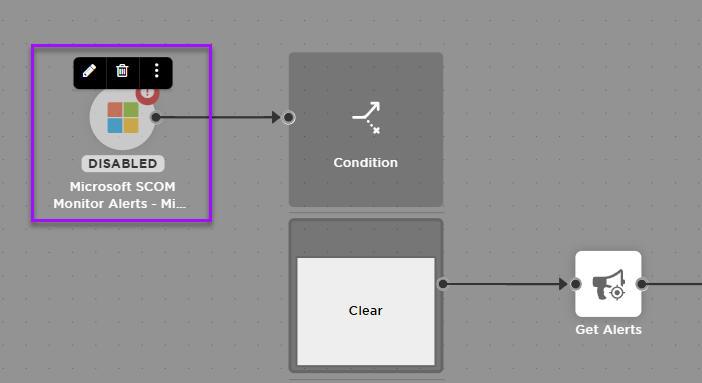
- Click the Run Location tab to select the Agent to use to send requests to Microsoft SCOM.
- Click Done.
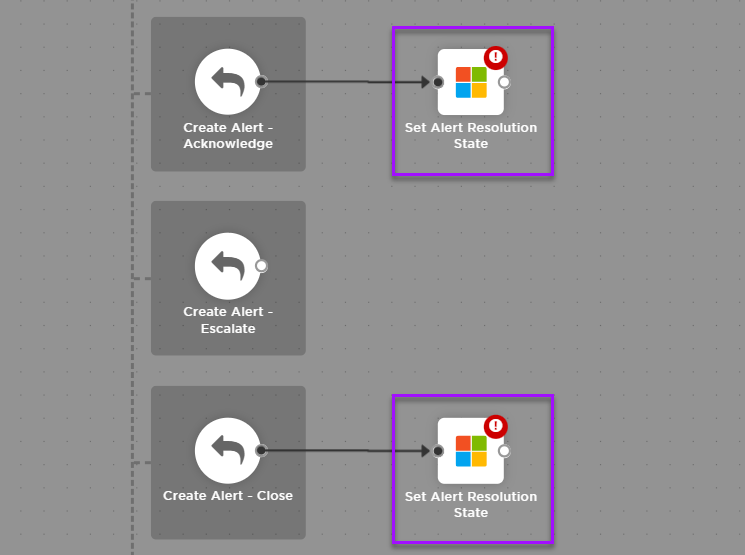
- Repeat steps 2 - 4 for the Set Alert Resolution State steps for Create Alert - Acknowledge and Create Alert - Close.
- Save the workflow.
Configure Microsoft SCOM to send requests to the trigger URL
To have Microsoft SCOM send alerts to the flow trigger, you need to download the command file, then configure notifications, subscriptions, and subscribers to use the trigger URL,
Download the xm_send_alerts.ps1 PowerShell script file to your Microsoft SCOM server. The full path for the script file is required for configuration further in the process.
Notification channels define how Microsoft SCOM delivers the information to xMatters, which alert attributes are sent, and when to remove the alert from xMatters.
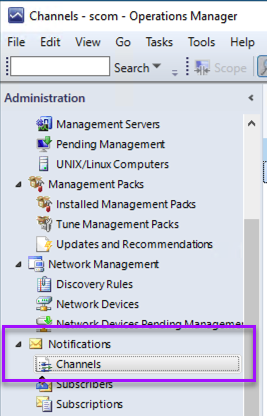
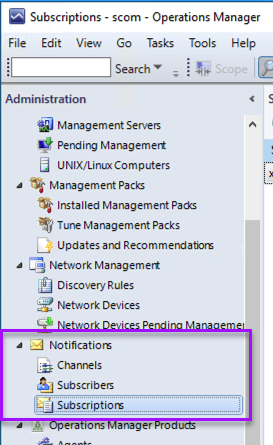
- In the Administration pane in Microsoft SCOM, go to Notifications > Channels.
- Right-click the Channels pane, and then select New Channel. The Command Notification Channel window opens.
- On the Description tab, set the Channel Name to 'Send Alert to xMatters', then click Next.
On the Settings tab, fill in the following fields:
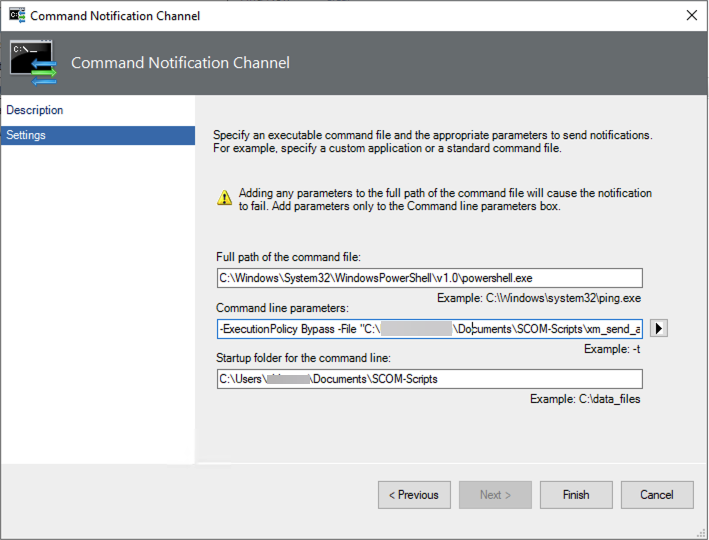
- Full path of the command file: Enter the path to the PowerShell file.
- Command line parameters: Paste the following command:
Copy
-ExecutionPolicy Bypass -File "<FULL_PATH_TO_POWERSHELL_SCRIPT>" "$Data/Context/DataItem/AlertId$" "$MPElement$" "<FLOW_DESIGNER_TRIGGER_URL>" "$Data/Context/DataItem/TimeRaisedLocal$" "$Data/Context/DataItem/TimeRaised$" - Replace the following parts of the command with valid paths:
- FULL_PATH_TO_POWERSHELL_SCRIPT: The entire path to xm_send_alerts.ps1 PowerShell file you downloaded to your Microsoft SCOM server.
- FLOW_DESIGNER_TRIGGER_URL: The URL to the Microsoft SCOM Alerts trigger from Flow Designer.
- In the Startup folder for the command line field, provide the full path to the folder where you want Microsoft SCOM to log all the details of the script execution information.
- The recommended path is: C:\Users\<user>\Documents\SCOM-logs as Microsoft SCOM is unable to create any logs in folders that require elevated write permission.
- Click Finish, then Close.
Microsoft SCOM notification subscribers allow you to specify who should be notified, and on which devices. You must configure subscribers to use the xMatters command channels, and set the xMatters recipient (the target user or group) as the delivery address.
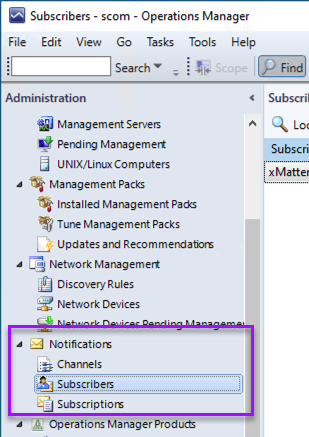
- In the Administration pane go to Notifications > Subscribers.
- Right-click in the Subscribers pane, and then select New Subscriber. The Notification Subscriber Wizard opens.
- On the Description tab, enter the user or group you want to be the notification recipient in xMatters in the Subscriber Name field.
- You can enter multiple recipients in a comma-separated list.

- Click Next.
- On the Schedule tab, select Always send notifications, then click Next.
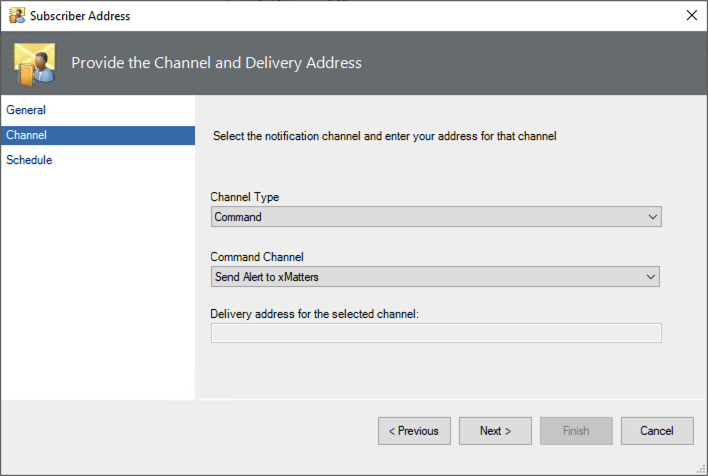
- On the Addresses tab, click Add.
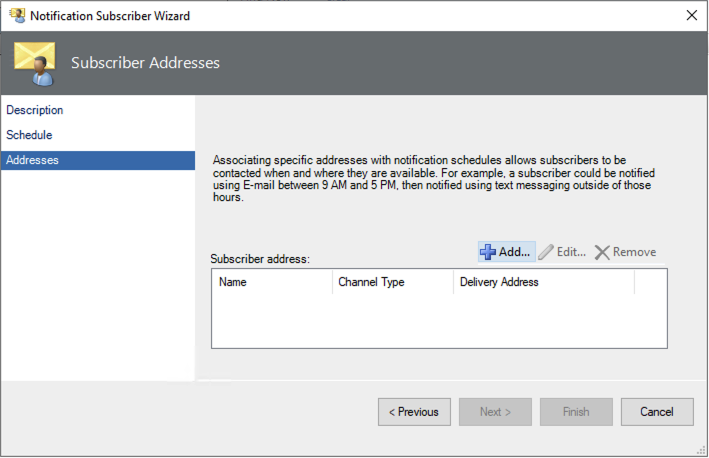
- On the Describe the Subscriber Address page, enter 'xMattersSCOMGroup' in the Address name field, then click Next.
- In the Delivery address for the selected channel field, enter 'xMattersSCOMGroup'.
- In the Channel Type drop-down list, select Command.
- In the Command Channel field, select Send Alert to xMatters, then click Next.
- Click Finish to complete the Schedule Notifications configuration and close the wizard.
- Click Finish, then click Close.
Once you have created the command channel and configured the subscribers, you can set up a subscription to allow xMatters to subscribe to Microsoft SCOM alerts.
While you can create subscriptions for many different kinds of alerts, the following instructions describe how to create a subscription with two criteria, and how to configure a subscription that will delete the corresponding alert in xMatters when an alert is closed.
- In the Administration pane, go to Notifications > Subscriptions.
- Right-click in the Subscriptions pane, and then select New Subscription. The Create Notification Subscription window opens.
- On Description page, enter 'xMattersSubscription' in the Subscription name field, then click Next.
- Click Next to go past the Scope page.
- On the Criteria page, create the following criteria:
- Severity Equals Warning or Critical
- Resolution State Equals Any
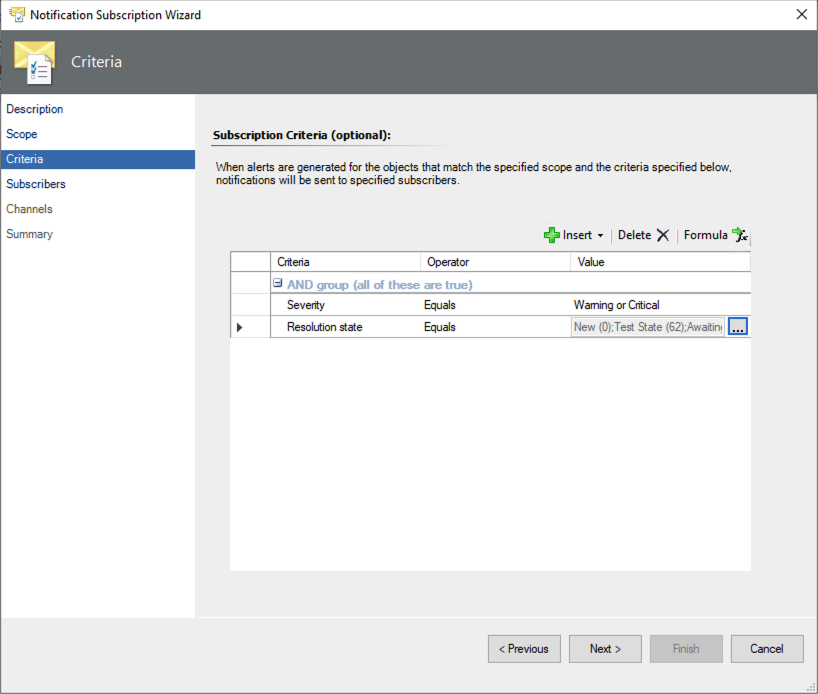
- Click Next.
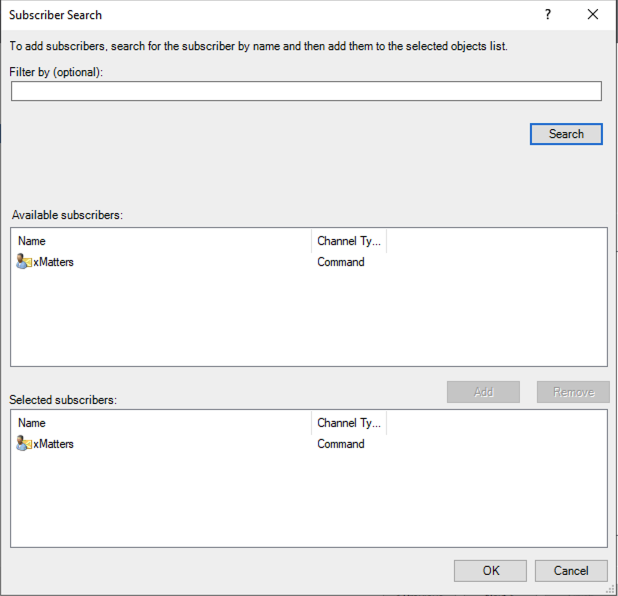
- On the Subscribers page, add the xMatters subscriber you created, then click Next.
- To find the subscriber you created leave the search field blank, and click Search. All subscribers will appear in the Available subscribers field.
- To find the subscriber you created leave the search field blank, and click Search. All subscribers will appear in the Available subscribers field.
- On the Channels page, add the xMatters command channel you created, and then select Send notifications without delay.
- Click Next.
- Click Finish, and then click Close.
Test the configuration by triggering an alert in Microsoft SCOM
- Using the Windows Local Area Connection Properties dialog, force an IP conflict between two computers that Microsoft SCOM is monitoring.
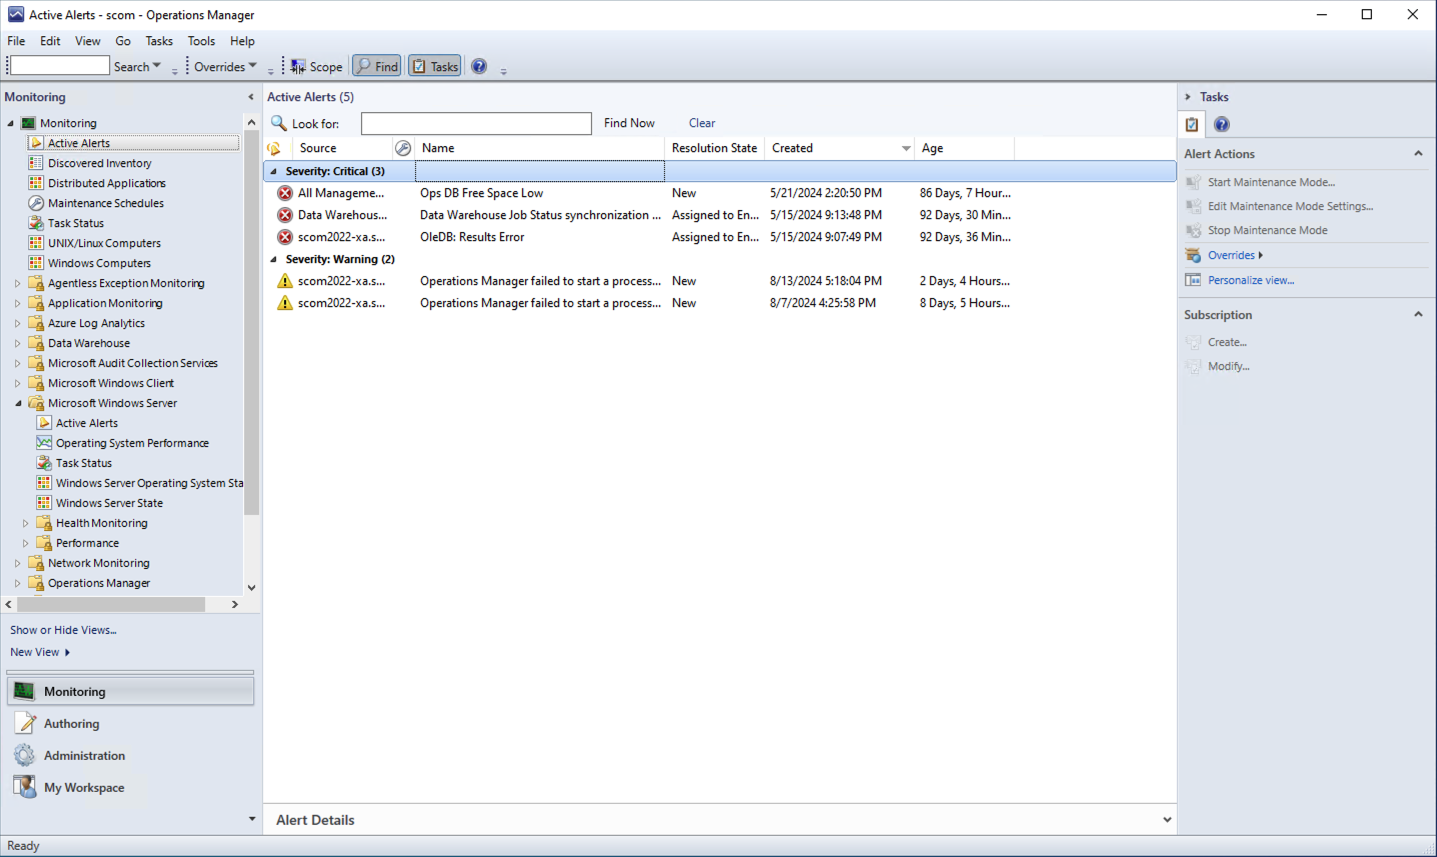
- Go to Monitoring > Active Alerts to see the alert when it is created by Microsoft SCOM.
- Microsoft SCOM passes the alert into xMatters and the alert properties dialog box displays the details for the alert.
How to use the workflow
When a condition you've set fires, it sends a signal to xMatters, which creates an alert and notifies the individual or the on-call members of the people or groups you set as recipients in the webhook URL. When the trigger receives a signal saying the issue is resolved, it automatically terminates related alerts in xMatters.
The person responding to the notification has the following response options:
- Acknowledge: Acknowledges the notifications and stops escalations.
- Escalate: Immediately escalates the alert to the next on-call resolver in a targeted group.
- Close: Ends the xMatters alert and stops notifying all targeted recipients.
- Initiate Incident: Initiates an incident in xMatters.
Next Steps
Now that you've installed the workflow, you can use it as-is, or customize it to suit your needs better. Here are some examples of things you can add to the workflow to customize it:
- Use Slack, Zoom, and Microsoft Teams steps to add collaboration channels to the flow.
- Change the severity of incidents created when a recipient selects the Initiate Incident response.
- Update the message sent to resolvers to include the information most relevant to your team.