BMC TrueSight Pulse (formerly Boundary)
- Introduction
- Configure xMatters
- Install and configure the integration
- Test the integration
- Troubleshooting
- Download resources
Introduction
This article provides installation, configuration, and implementation details for the xMatters integration with TrueSight Pulse.
The integration to TrueSight Pulse:
- Leverages built in Actions
- Can be associated with any trigger
- Relevant details about the alarm are sent to xMatters for easy display in notifications
Configure xMatters
Before configuring anything in TrueSight Pulse, you need to configure xMatters first.
Create an integration user
The first step in configuring xMatters is to create a user to authenticate REST web service calls when injecting signals.
This user needs to be able to work with alerts, but not update administrative settings. The best way to create a user for this integration is to have a dedicated "REST Web Service User" role that includes the permissions and capabilities. If this role does not exist in your deployment, you will need to create it, or ask xMatters Customer Support to create it for you.
In the following example, this role is named "REST Web Service User".
- Log in to the target xMatters system.
- On the Users tab, click the Add New User icon.
- Enter the appropriate information for your new user.
- Assign the user to the REST Web Service User role.
- Click Save.
- On the next page, set the web login ID and password.
- Make a note of these details; you will need them when configuring the TrueSight Pulse side of the integration.
Create users and groups that will receive notifications
Recipients to the TrueSight Pulse alarms are set in the action when it is created in TrueSight Pulse. See below for details.
- To create a new group, see Create a New Group.
- To create a new user, see Add a New User.
You can create multiple groups and users at once using the EPIC feature
Import the workflow
The next step is to import the TrueSight Pulse workflow.
- Download the attached .zip file to your system.
- Browse to the .zip file, or drag it onto the Import Workflow dialog box.
- Click Import Workflow.
- Once the import is finished, the workflow should be automatically enabled. If it isn't, click the Disabled toggle to enable it.
- Click the gear icon beside the workflow, and select Editor Permissions.
- Add the integration user, and then click Save.
- Click the workflow name to open the Forms tab.
- For the CPU Action form, in the Web Service Only dropdown, click Sender Permissions.
- Enter the integration user, and then click Save Changes.
- Repeat steps 7-8 for the Memory Action form.
- To get the web service URL for a form, in the Web Service Only drop-down list, click Access Web Service URL. Copy the highlighted URL at the top of the dialog box.
- You need these URLs when you configure the TrueSight Pulse action.
Install and configure the integration
Now that you've configured xMatters, it's time to configure TrueSight Pulse.
Configure TrueSight Pulse
The xMatters action has already been enabled in TrueSight Pulse.
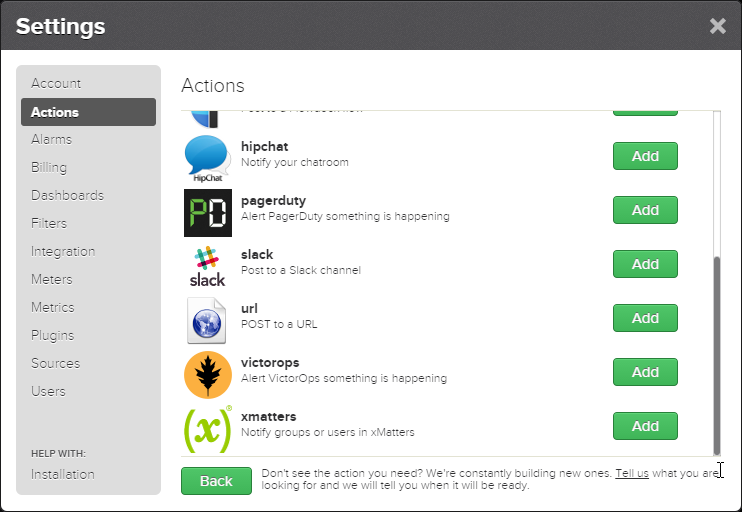
- Click Settings > Actions and locate the xMatters action:

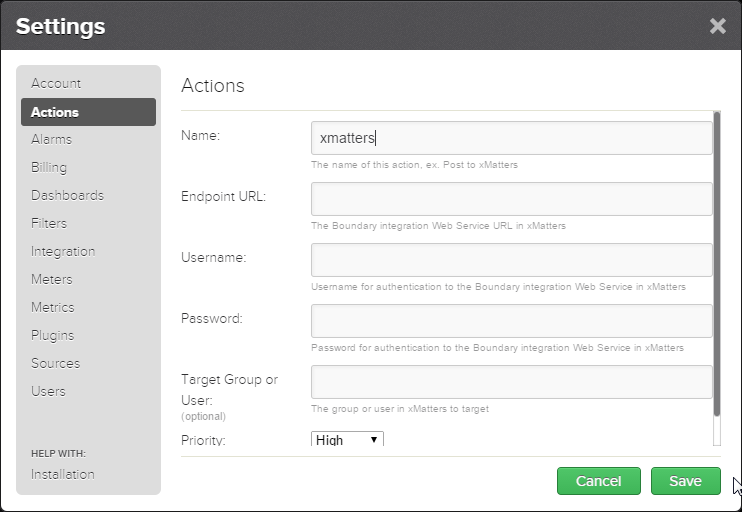
- Click Add to display the Action settings:

- Enter the information in the fields as explained in the following table:
- Click Save.
| Field Name | Description |
|---|---|
| Name | Name of the action; this should be the same as the form name in xMatters. |
| Endpoint URL | The xMatters endpoint. This is the URL copied from the form when you imported the workflow. |
| Username | The username of the integration user used to authenticate into xMatters. |
| Password | The password for the integration user. |
| Target Group or User | The xMatters Group or User this action should target. Note that if you are using a subscription, this is not required. |
| Priority | Determines the message send priority. |
Test the integration
You can test the integration by sending a notification email from within TrueSight Pulse.
Create a new Alarm or open an existing Alarm. Add the newly created Action (CPU Action for example) to the Actions section of the Alarm. Then trigger this alarm. A new alert should be created in xMatters.
Troubleshooting
First, add an email Action to the alarm. Was the email received? If so, check xMatters to see if the alert was created there. If not, verify the conditions of the Alarm to make sure it is actually being triggered.
