
Trigger Alerts by Webhook
The Trigger Alerts by Webhook workflow is a pre-built workflow template designed to help you start notifying users and groups with minimal setup. It lets you create an alert and send notifications by simply sending an HTTP request to xMatters from any application capable of sending a webhook.
Here are some ideas for using this workflow:
- Get your incident management team started with learning how to trigger a notification in xMatters.
- Use it as a jumping-off point for building out your own, fully customized workflow. Change a few labels, update some response choices, modify an endpoint and presto — you have a production-ready workflow that’s customized for you.
- Poke around inside and pick it apart to get an understanding of how workflows are built and how the pieces fit together.
- Use it as a handy reference when building your own workflow from scratch, or for exploring built-in steps that may be available for your organization's applications.
How it works
When an alert is generated in your source application, it sends a JSON-formatted webhook to xMatters, based on the user-defined alert rules. An HTTP trigger in xMatters parses the webhook and initiates a flow. The webhook includes essential alert data you can use to enrich notifications to users or when building automated tasks.
Install the workflow
- Go to the Workflow Templates page and click the Trigger Alerts by Webhook tile.
- On the Set up the workflow dialog, give the workflow a name that identifies its purpose (this must be unique in your instance), add an optional description, and set the default incident type (if applicable). Any built-in Initiate Incident steps in the workflow will automatically be set to the selected incident type.
- You can edit these later, if needed.
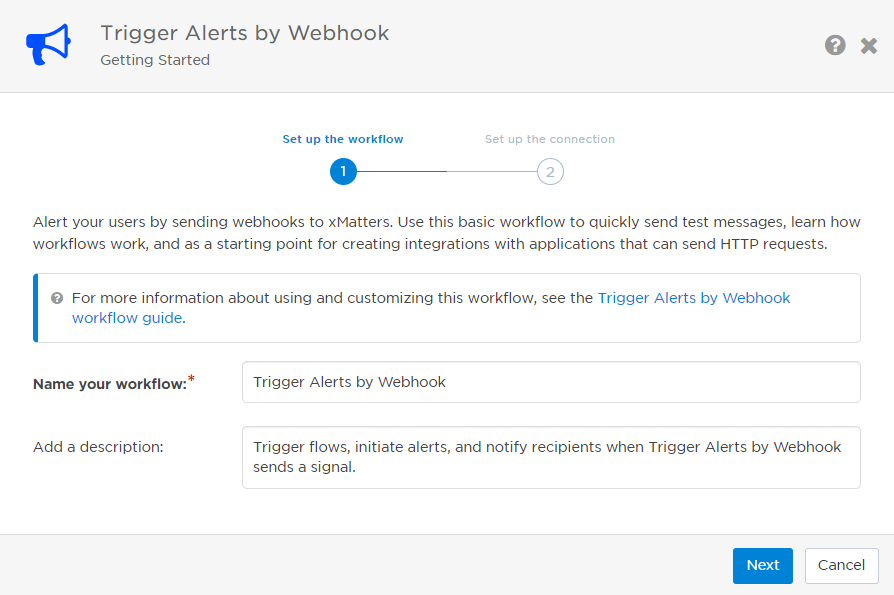
- Click Next to set up the connection.
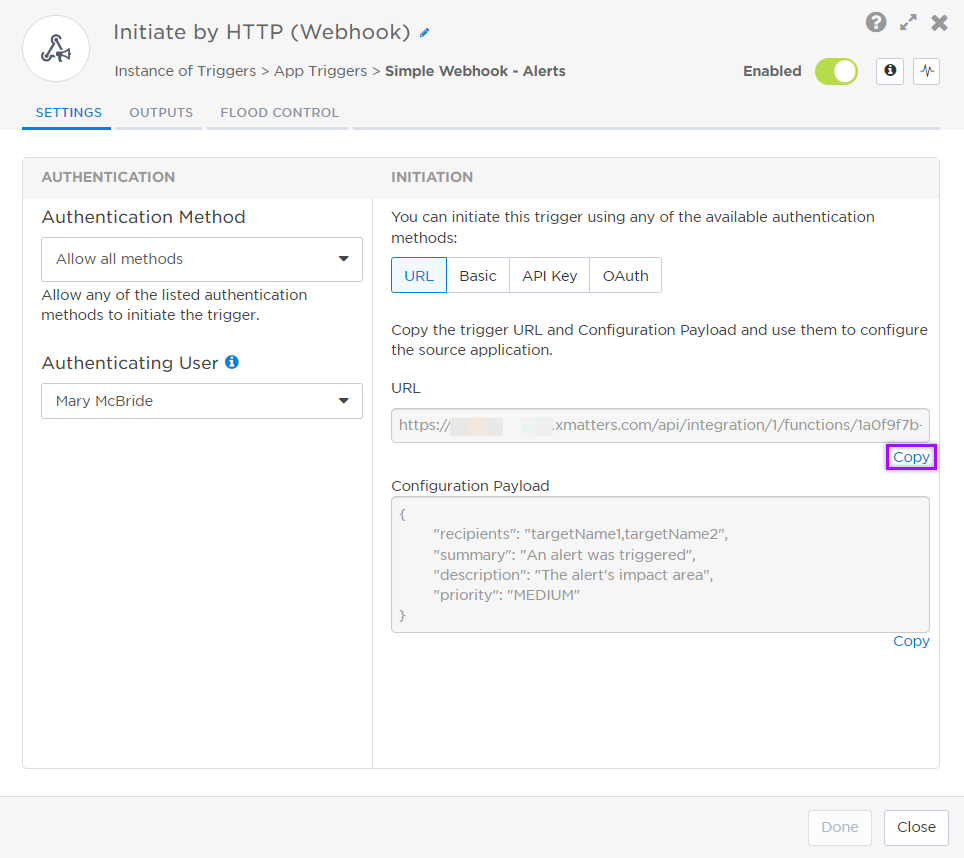
- Choose the authentication method. A trigger URL is generated based on the selected authentication method.
- Copy the trigger URL — you’ll use this to configure the webhook that will initiate your flow.
- The trigger URL includes the recipients parameter, which specifies who should be notified. By default, this parameter is set to notify you (the logged in user), but you can set it to target any user or group you want.
- Copy the Configuration Payload to configure the signal in the source application. The information in the payload will be used to parse the trigger outputs.
- Send a test signal to the trigger URL to test the connection.
- Click Open Workflow to use the workflow or customize its settings, or click Close to return to the Workflows page.

The Trigger Alerts by Webhook notification
Here's an example of the default notification:
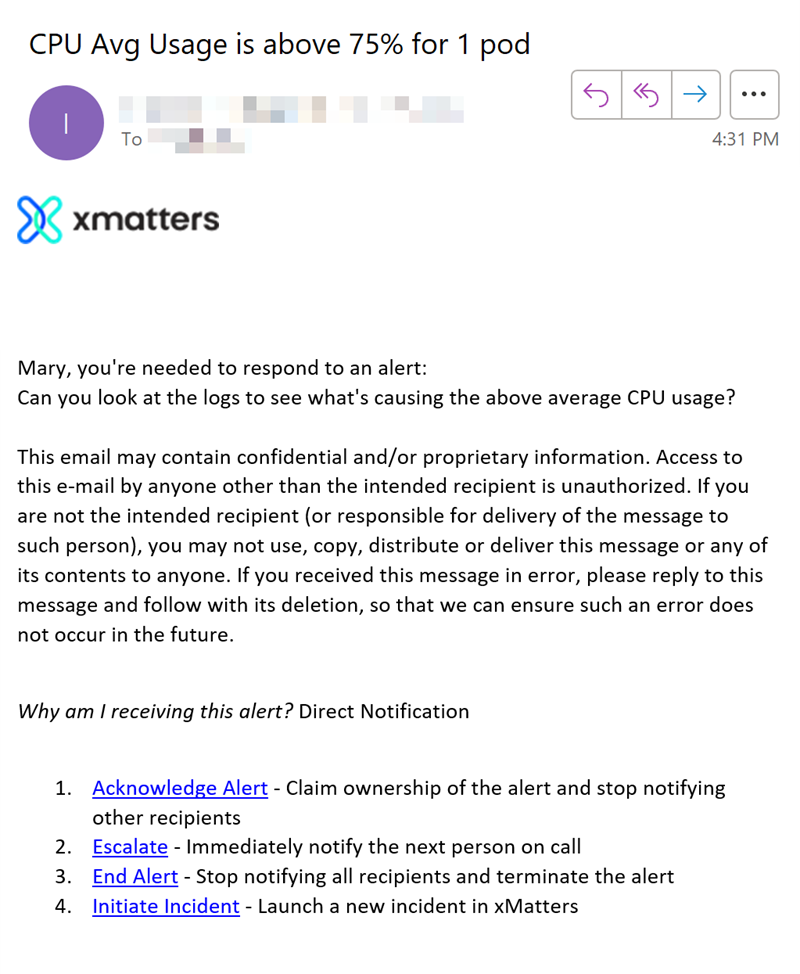
The notification provides the recipient with the following response choices:
- Acknowledge Alert - Claim ownership of the alert and stop notifying other recipients.
- Escalate - Immediately notify the next person on call.
- End Alert - Stop notifying all recipients and terminate the alert.
- Initiate Incident - Launch a new incident in xMatters.
Using the workflow
You can start initiating alerts with the Trigger Alerts by Webhook workflow right away, or you can first customize the HTTP trigger to set the authentication method of the alert.
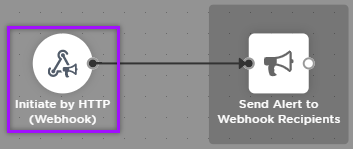
- On the Flow Designer tab of your workflow, click the Trigger Alerts by Webhook canvas.
- On the canvas, double-click the Initiate by HTTP (Webhook) trigger to open it (or hover over it and click the pencil icon).
- You can modify the label of the step by clicking on its name. This could be useful to differentiate between multiple HTTP triggers if you plan to add more onto the canvas.
- Set the authenticating user and then copy the URL — you'll use this to set up the webhook in your application. Alternatively, you can create an integration user to use as the authenticating user.
- Click the Flood Control tab to edit the trigger's default flood control settings. For more information about these settings, see Trigger Flood Control.
- Click Done.
- On the flow canvas, connect the steps you want to run when xMatters receives a request to that URL.
For more information on configuring the HTTP trigger, see <Simple Webhook - Alerts trigger>.
- On the Flow Designer tab of your workflow, click the Trigger Alerts by Webhook canvas.
- On the canvas, double-click the Initiate by HTTP (Webhook) trigger to open it (or hover over it and click the pencil icon).
- In the Initiation section of the Settings tab, click Copy underneath the trigger URL to copy it to your clipboard.
- To initiate the flow, send an HTTP POST request to the URL from your webhook application.
- Include the following parameters in the request body (You can copy the Configuration Payload to get the format needed for the payload from the source application):
- summary: Make sure the body of the request includes the summary, message, and recipients. These become the summary, message, and targeted recipients of the alert.
- message: Enter the details you want to include in the message body. Make sure to escape backslashes and double quotes.
- recipients: Enter the target names of the xMatters users, groups, or dynamic teams you want to notify of the alert. Separate multiple recipients with a comma.
- Open the Activity panel to monitor the progress of your flow.
Sample JSON request body
{"recipients": "teamrigel, mmcbride"
"summary": "Enter the text you want to use as the summary of the alert notification",
"message": "Enter the details you want to include in the message body of the alert notification. \nYou can add special characters, but make sure to escape backslashes \\ and double quotes \" in the message parameter.",
}
Sample URL-encoded string
Summary=Enter+Summary+Here&Message=Enter+Message+Here%0AEncode+reserved+characters&Recipients=teamrigel%2Cmmcbride
Sample query parameters
&Summary=Enter+Summary+Here&Message=Enter+Content+Here%0AEncode+reserved+characters&Recipients=teamrigel%2Cmmcbride
Set recipients in the trigger URL
The trigger expects the recipients in the trigger URL. When you copy the URL from xMatters, it includes the recipients parameter: recipients=<yourname>. Of course, you don’t want to receive all the alerts.
To change the recipients for alerts from this webhook, swap out your name for the people or groups you want to target.
- For URL authentication, use an ampersand to attach recipients. For example, if you want to notify Emma Pearson and the on-call members in the group responsible for the Antares service, you'd add &recipients=epearson,antares to the URL.
- For other authentication types, use a question mark to attach recipients. For example, if you want to notify Barry Gull and the on-call members in the group responsible for the Cassiopeia service, you'd add ?recipients=bgull,cassiopeia to the URL.
Remember to URL-encode any special characters in your group names.
We recommend using groups so you can take advantage of the xMatters group features — rotations, escalations, and absences — to reach the right on-call people to jump on an issue.
Do more
The Trigger Alerts by Webhook workflow gets you creating alerts and sending notifications quickly. There's a lot more you can do if you want to. Here are some ideas:
- Change the message content or layout: The notification sent to users includes a summary and a detailed message (for example, the subject and the body of an email). You can change this by editing the message design.
- Change the response options: You can add or remove response options, or change what happens when a recipient selects a particular response.
- Change the inputs and outputs: If you want to have a different set of inputs and outputs in your flow, replace the existing 'Initiate by HTTP (Webhook)' step on your canvas with a custom HTTP trigger. You can create a new HTTP trigger or copy an existing one, then configure it with your flow's required settings and modify the configuration payload with your desired inputs and outputs.
- Add additional steps to the flow: Use Flow Designer to visually build flows that connect your tools and processes simply by dragging and dropping steps onto a canvas.