Datadog Monitor Alerts
Flow Designer has a Datadog Monitor Alert trigger and built-in Datadog steps to help you integrate Datadog into your alert management and incident response flows.
Datadog Steps
The following steps are available:
- Create Event: create a new event in Datadog, populating it with information from the alert or any previous steps in the flow.
- Add Comment: add a comment to an existing Datadog event.
- Mute Monitor: mute, or partially mute, an entire Datadog monitor.
- Unmute Monitor: unmute, or partially unmute, an entire Datadog monitor.
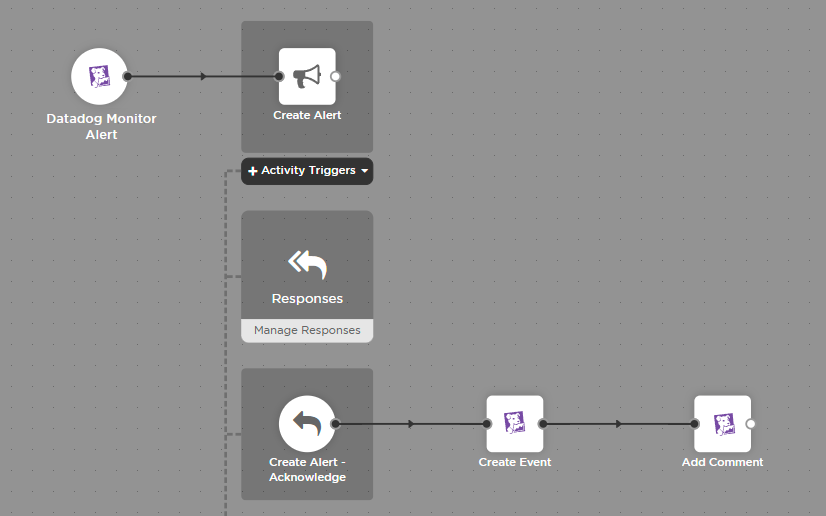
In the example above, the flow creates an xMatters alert when a signal from Datadog comes into xMatters. When a user acknowledges the notification, a Datadog event is created and a comment is added to the event.
To add a Datadog step to your flow:
- Go to the Apps tab of the palette, expand the Datadog section, and drag the step you want onto the canvas.
- For instructions on using the Datadog trigger, see Datadog Monitor Alerts trigger.
- Connect the step to the previous step in the flow. This gives you access to the alert properties and outputs of previous steps when you configure this step's inputs.
- Double-click the step to edit it, and use the Setup tab to configure the inputs. You can use plain text and input variables (or both). See the following section for detailed information on the inputs, including which are required.
- On the Endpoint tab, configure the step to point to your Datadog instance.
- You can select a pre-existing endpoint or configure a new endpoint
Create Event
Use the Create Event step to automatically create a new event in Datadog. Map outputs from previous steps to the inputs; at runtime, the values in the inputs are used to fill in the incident record.
Inputs
Inputs with an asterisk* are required.
|
Label |
Description |
|---|---|
|
API Key* |
Datadog API Key to authenticate the request. |
| Title* | Title of the event. |
| Text* | Body of the event. To use markdown, start text block with "%%% \n" and end text block with "\n %%%". |
| Alert Type | If an alert event is enabled, set its type. Available options are: error, warning, info, success, user_update, recommendation, snapshot. |
| Priority | Priority of the event. Available options are: normal, low. |
| Tags | A comma-separated list of tags to apply to the event. |
| Aggregation Key | User-defined string for event aggregation. Events with the same key are grouped together in the Datadog Event Stream. |
| Related Event ID | ID of the parent event in Datadog. |
Outputs
These outputs are available as inputs to steps further along the flow.
|
Label API mapping |
Description |
|---|---|
|
Event ID id |
Unique ID of the Event in Datadog. |
|
Event URL url |
Direct link to the event in Datadog. |
Add Comment
Use the Add Comment step to automatically add a comment to an existing Datadog event. Map outputs from previous steps to the inputs to create the comment and determine what incident to comment on.
Inputs
Inputs with an asterisk* are required.
|
Label |
Description |
|---|---|
|
API Key* |
Datadog API Key to authenticate the request. |
| Application Key* | Datadog Application Key to authenticate the request. |
| Datadog Event ID* | Unique ID of the event in Datadog. |
| Comment* | Comment to add to the Datadog event. |
Outputs
This step has no outputs.
Mute Monitor
Use the Mute Monitor step to automatically mute an entire Datadog monitor, or partially mute is by setting a scope. Map outputs from previous steps to the inputs; at runtime, the values in the inputs are used to determine the monitor and the scope to apply the mute to.
Inputs
Inputs with an asterisk* are required.
|
Label |
Description |
|---|---|
|
API Key* |
Datadog API Key to authenticate the request. |
| Application Key* | Datadog Application Key to authenticate the request. |
| Monitor ID* | ID of the Datadog monitor. |
| Duration | Length of time to mute the monitor, in minutes. |
| Scope | Scope to apply the mute to, in plain text (for example, if your alert is grouped by host, you might mute host:app1). |
Outputs
This step has no outputs.
Unmute Monitor
Use the Unmute Monitor step to automatically unmute an entire Datadog monitor, or partially unmute is by setting a scope. Map outputs from previous steps to the inputs; at runtime, the values in the inputs are used to determine the monitor and the scope to apply the unmute to.
Inputs
Inputs with an asterisk* are required.
|
Label |
Description |
|---|---|
|
API Key* |
Datadog API Key to authenticate the request. |
| Application Key* | Datadog Application Key to authenticate the request. |
| Monitor ID* | ID of the Datadog monitor. |
| Scope | Scope to apply the unmute to, in plain text (for example, if your alert is grouped by host, you might unmute host:app1). |
Outputs
This step has no outputs.
Datadog Monitor Alert trigger
The built-in Datadog Monitor Alert trigger initiates a flow when it receives a request from a Datadog webhook.
Add the Datadog Monitor Alert trigger to the canvas
- Go to the Triggers tab in the palette, expand the App Triggers section, and drag the trigger onto the canvas.
- Double-click the trigger (or click the pencil icon).
- Set the authenticating user, and then copy the URL and Configuration Payload — you'll use these to set up the webhook in Datadog.
Alternatively, you can create an integration user to use as the authenticating user.

- Click the Flood Control tab to edit the trigger's default flood control settings. For more information about these settings, see Trigger Flood Control.
- Click Done.
- On the flow canvas, connect the steps you want to run when xMatters receives a request to that URL.
You're now ready to configure Datadog to target the trigger.
Configure Datadog to send requests to the trigger URL
To have Datadog send alerts to the flow trigger, you need to configure a webhook and set it to use the trigger URL. You also need to create an event monitor to alert the webhook when certain types of events exceed a specified threshold.
- In Datadog, go to Integrations, locate the xMatters integration, and install it.
- Once installed, open the xMatters integration, go to the Configuration section, and click webhooks integration.

- Add a new webhook.

- Give the webhook a unique name.
- In the URL field, paste the trigger URL you copied from Flow Designer.
- Add the target names of any recipients you want to notify when the monitor creates an alert.
- For URL authentication, use an ampersand to attach recipients. For example, if you want to notify Emma Pearson and the on-call members in the group responsible for the Antares service, you'd add &recipients=epearson,antares to the end of the URL.
- For other authentication types, use a question mark to attach recipients. For example, if you want to notify Barry Gull and the on-call members in the group responsible for the Cassiopeia service, you'd add ?recipients=bgull,cassiopeia to the end of the URL.
- You must URL-encode any special characters or spaces in the target names.
- Overwrite the default payload with the Configuration Payload you copied from the Datadog trigger.
- Click Save.
- In Datadog, go to Monitors > Manage Monitors.
- Click + New Monitor.
- For the monitor type, select Event.
- In the Select events to count section, specify any criteria you want to use for matching events.
- In the Set alert conditions section, specify threshold conditions for the alert.
- In the Say what's happening section, add a name for your monitor and type the message you want to send.
- Include the webhook you previously created in the message using the format @name-of-webhook
- Select a priority for your monitor. This value is mapped to a severity level when xMatters initiates the incident.
- P1 (Critical): maps to 'Critical' in xMatters
- P2 (High): maps to 'High' in xMatters
- P3 (Medium): maps to 'Medium' in xMatters
- P4 (Low): maps to 'Low' in xMatters
- P5 (Info): maps to 'Minimal' in xMatters

- In the Notify your team section, add your webhook using the format @name-of-webhook. If you entered the name of your webhook in the monitor message, it will automatically be added to this section.
- Click Save.
You're now ready to use the webhook to trigger automated flows, including steps such as sending alerts and initiating incidents, though we always recommend testing before putting things into use.
Outputs
The trigger has the following outputs you can use as inputs to steps further along the flow.
|
Label |
Description |
|---|---|
|
Recipients |
List of targeted recipients. Recipients are set by adding a recipients query parameter to the trigger URL when you configure the webhook in Datadog. See the instructions for configuring the webhook for details. |
| Signal Mode | Determines the path the flow will take, based on the value of Alert Transition parameter. |
| Signal ID | Key or identifier used to terminate or correlate signals. |
| Event URL | Direct link to the event in Datadog. |
| Event Priority | Priority of the event. |
| Event ID | Unique ID of the event. |
| Event Title | Title of the event. |
| Full Message | Full text of the event message without markdown. |
| Short Message | Shortened version of the event message. |
| Event Type | Type of event. |
| Last Updated | Date the event was last updated in epoch format. |
| Alert ID | Unique ID of the alert, or the ID of the Datadog Monitor that generated the alert. |
| Alert Transition | Status of the alert. |
| Alert Type | Type of alert. |
| Raw Request | JSON representation of the request. You can parse the raw request if you need additional details beyond the standard outputs. |