HTTP endpoints
Each application you want to integrate with is represented by an HTTP endpoint. An endpoint provides a simple way to define the base URL and authentication credentials to use when making HTTP requests from a transformation script in the Integration Builder or a step in Flow Designer. For more information on using endpoints in Flow Designer, see Flow components.
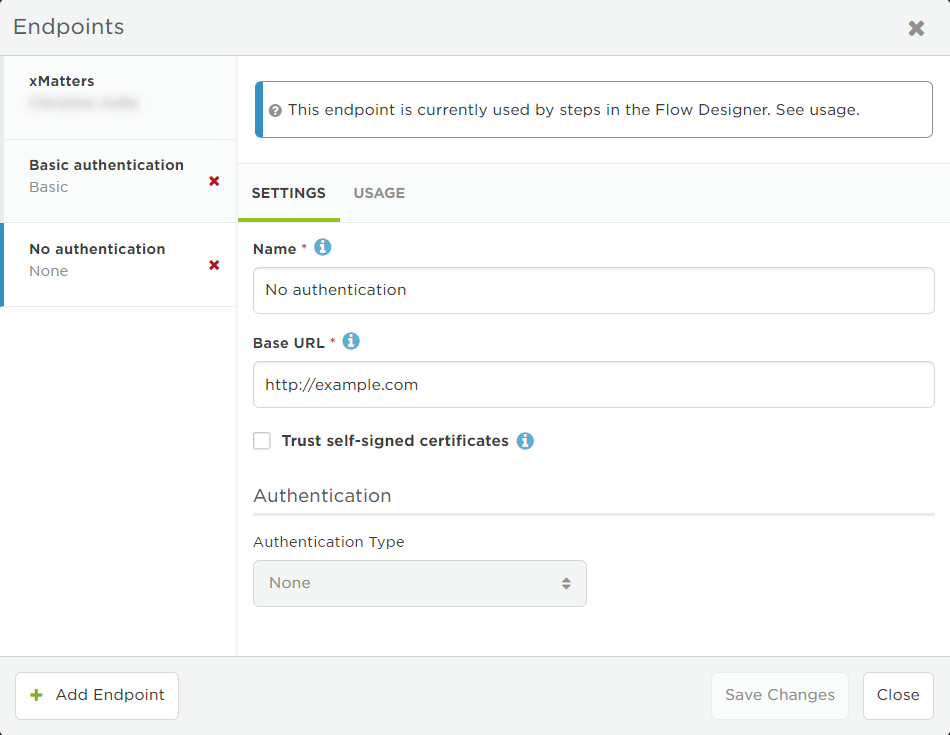
If you are sending requests to an HTTPS endpoint, you must select the option to Trust self-signed certificates when configuring an endpoint.
Configure HTTP endpoints
By configuring endpoints separately, you can quickly modify all references to an endpoint across a workflow rather than editing each instance of the target URL in each script.
Endpoints should refer to the base IP address and port, or hostname of the target system; an additional parameter within the scripts can append any necessary paths, and allow you to target different locations at the same endpoint.
Steps use the xMatters endpoint to access your xMatters deployment, including the xMatters API. The Base URL shows the targeted hostname.
Built-in steps made to target xMatters use this endpoint to look up information in xMatters without you having to select it (for example, certain steps in the Tools tab). When you create a custom step, you can also set the endpoint type to xMatters to have that step target your xMatters deployment.
The authentication of the request is based on the credentials of the user triggering the flow. For a step using the xMatters endpoint to run successfully, that user needs to have appropriate permissions to make the requests associated with the step. Here are a couple of examples:
- If Ali Samara sends an email to an Email trigger with a Find User step connected to it, the find user request to xMatters uses Ali's credentials. This returns only the information for users Ali has permission to view.
- If you create a specific user to interact with xMatters on behalf of an application (for example, a Jira Integration user) and assign that user the REST Web Service User role, any steps in a flow initiated by this user (for example, an inbound HTTP request from that application) have all the permissions associated with the REST Web Service User Role.
You cannot delete or rename the xMatters endpoint. However, when creating a new custom step, you can assign a label to the endpoint, which you can use to reference the endpoint in the script for the step.
Legacy authentication methods
Some older integrations required a specific user account to authenticate web service requests from within transformation scripts. This authentication method has been deprecated.
These deprecated unauthenticated integrations used the credentials of the user assigned to the xMatters endpoint to authenticate web service requests. The Assign Endpoint section only applies to support the transition of existing legacy integrations to current authentication methods.
You can configure additional endpoints to use different authentication details, or to target a different URL than that of the default xMatters endpoint.
- Create a new endpoint. There are a couple of ways to do this depending on where you're working:
- To configure a new endpoint from the Integration Builder tab, click Edit Endpoints. On the Endpoints page, click Add Endpoint.
- To configure a new endpoint when working in the script editor of an inbound or outbound integration, click Edit beside Endpoints in the list of available objects. On the Endpoints page, click Add Endpoint.
- To configure a new endpoint when adding a step to a flow in Flow Designer, click the Components drop-down menu from either the canvas, or the Flows tab.
- Enter the following information:
- Name: Type a name that will identify your endpoint within the scripts. (If the name you choose has special characters or spaces, it will need to be escaped within the JavaScript.)
- Base URL: Type the base URL, including the http:// or https:// protocol, of the target system. You can append additional paths within the scripts.
- Trust self-signed certificates: This optional setting allows you to target HTTPS endpoints secured using self-signed certificates when testing integrations. The base URL of your endpoint must match the common name specified in the certificate. If the certificate is not valid the integration will throw a security exception and fail. Details of the exception will be reported in the Activity Stream.
- Authentication: Provide the required credentials. For more information, see Endpoint authentication.
- Click Save Changes.
- After you save the endpoint, you won't be able to change the authentication type.
The trust self-signed certificates setting is returned to a default state of disabled when you export a workflow.
- Click Edit Endpoints in the Integration Builder tab to open the Endpoints page.
- If an endpoint is used in a flow, the Usage tab appears beside the Settings tab. Check this to see the places your change might impact.
- Click the name of the endpoint you want to edit, and then modify its details.
- You can't change the authentication type of an endpoint after it is created.
- Click Save Changes to apply the new settings to all instances of the endpoint within the workflow.
- Click Close to return to the Integration Builder.
- Click Edit Endpoints in the Integration Builder tab to open the Endpoints page.
- If an endpoint is used in a flow, the Usage tab appears beside the Settings tab. Before you delete the endpoint, you need to remove references to it from those steps.
- Click the X beside the name of the endpoint you want to delete, and then click Delete Endpoint to confirm.
Endpoint authentication
Integration endpoints can be defined to support basic and OAuth 2.0 authentication. Customized OAuth 2.0 endpoints are available for BMC Remedy, Microsoft Graph API, Salesforce, ServiceNow, and Slack.
Configuring an endpoint with the required configuration and credentials for OAuth 2.0 authentication simplifies the transformation script for making HTTP requests to an API secured with OAuth 2.0. When using an OAuth 2.0 endpoint, the transformation script does not need to include reference to the access token URL, or any of the OAuth 2.0 fields associated with the endpoint.
Exported workflows do not include any OAuth information; all authorization content is cleared, and endpoints are set to "No Authorization".
Select this option when authorization is not required to send requests to the URL.
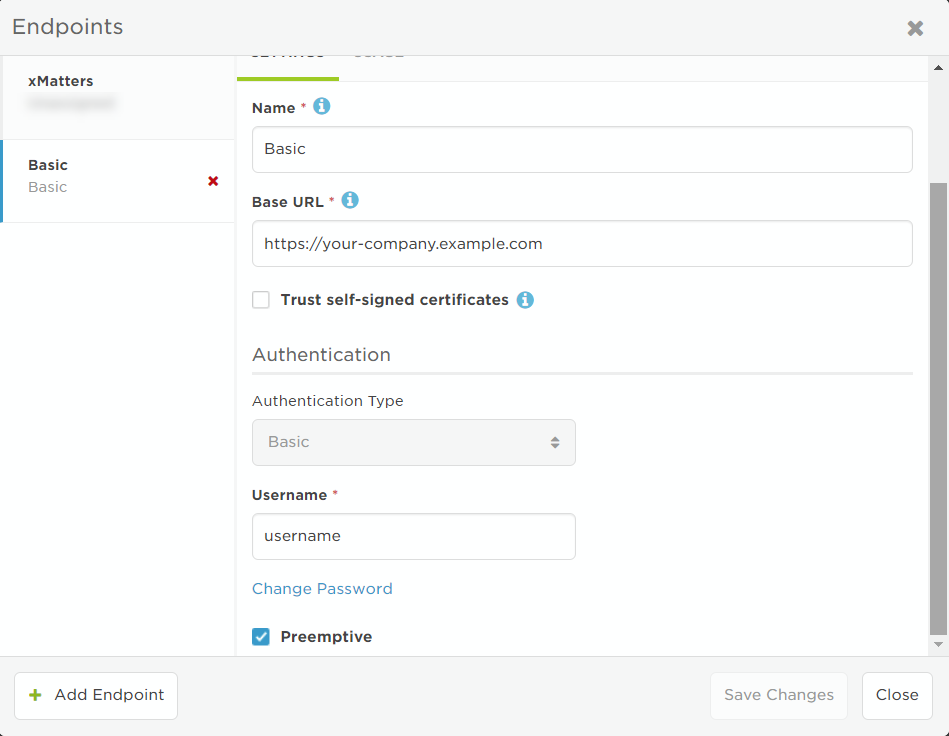
For basic authentication, the user's authentication credentials are used only at the time the endpoint is configured. The password value is not stored and does not need to be updated if the user changes their password at a later time.
- Select Basic from the Authentication list.
- If you accessed the Endpoints page from Flow Designer, this might already be selected because the authentication options are set when the step is defined.
- Supply a Username and Password credentials for a user with permission to execute API requests on the target system.
- Clear the Preemptive check box if you don't want to use preemptive HTTP authentication.
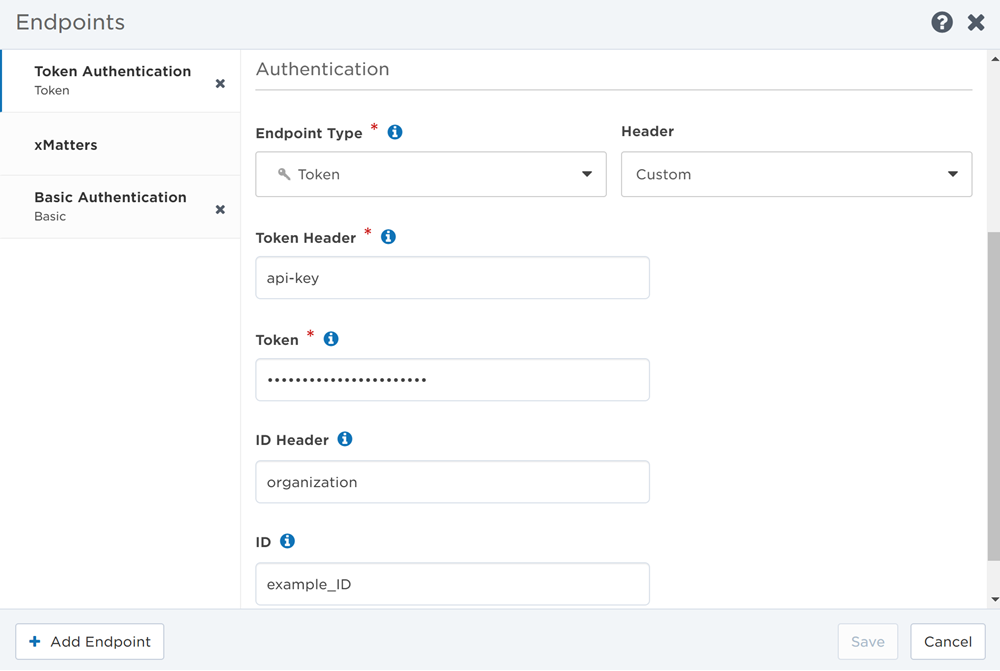
Token authentication is used for tools in Flow Designer that only support using tokens or API keys that should be passed in headers. Without the token authentication type, you have to pass tokens/API keys in a step input or store it in a constant, which isn't secure because the token or key is visible to everyone. This endpoint is also useful because you only have to configure the token/API key once for all the steps connected to your tool.
- Select Token from the Authentication Type drop-down list.
- If you accessed the Endpoints page from Flow Designer, this might already be selected because the authentication options are set when the step is defined.
- Select a Header: Authorization or Custom.
If you select Authorization as your header:
- Specify the Token Prefix as needed for your application, with the default being 'Bearer'.
- Enter the Token value to pass in the header.

If you select Custom as your header:
- Provide the name of your Token Header for token transmission.
- Enter the Token value to pass in the token header.
- If required, provide the name of the ID Header for ID transmission.
- Enter the ID value to pass in the ID header.
The BMC Remedy Token authentication type is used by the BMC Helix ITSM workflow. When the endpoint is used, it checks that the authenticating user has permission to perform the required requests in BMC Helix.
- Select Remedy Token from the Authentication Type drop-down list.
- If you accessed the Endpoints page from Flow Designer, this might already be selected.
- Supply the Username and Password of a BMC Helix ITSM user that has the appropriate permission settings.
- Similar to BMC Remedy we recommend creating a user specifically for this integration.

- Once your setup has been successfully verified, click Save Changes.
The BMC Remedy authentication type is used by BMC Remedy steps in Flow Designer and by the BMC Remedy workflow. When the endpoint is used, it makes a request to the Remedy API for the access token of the user provided in the Authentication settings.
- Select Remedy Token from the Authentication Type drop-down list.
- If you accessed the Endpoints page from Flow Designer, this might already be selected because the authentication options are set when the step is defined.
- Supply the Username and Password of a BMC Remedy user that is a Support Staff member with 'Incident Master', 'Incident User' or 'Incident Submitter' permissions.
- Because of Remedy's assignment rules, we recommend creating a user specifically for this integration.
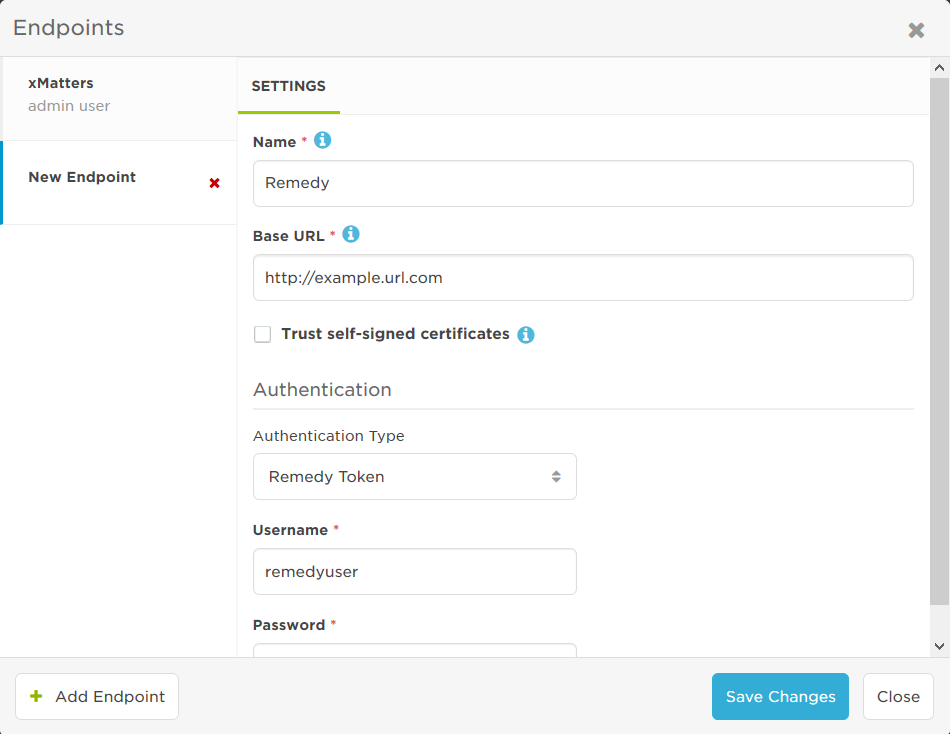
- Once your setup has been successfully verified, click Save Changes.
To allow flow steps to create channels and post messages to Teams, you need to configure a Microsoft Graph API endpoint. Selecting the Microsoft Graph API authentication method lets you initiate the OAuth 2.0 process to authorize access to Teams. Some of the permissions the endpoint needs require admin approval, which you can request during setup if you're not an admin.
Set up the Graph API authentication
- Select Microsoft Graph API from the Authentication Type drop-down list.
- If you opened the dialog from the step configuration, this is already selected.
- Click Connect.
- A new browser window connects to Teams and starts the connection process. If you're asked to sign in, enter your Microsoft credentials.
- Accept the permissions (if you're an administrator) or request approval (if you're not).
- If you're an administrator, review the permissions, select the check box to accept the permissions on behalf of your organization then click Accept.
- If you're not an administrator, enter the reason why you're requesting approval (for example, "xMatters is essential to streamlined incident resolution") and click Request Approval. You should get an email when your Microsoft administrator has reviewed the request.
If you're an administrator
The xMatters endpoint connects to an Azure application called Flow Designer Connector. The Flow Designer Connector is not visible in the app store until the Microsoft Graph API endpoint is authenticated in Flow Designer.
If a user in your organization sets up a Microsoft Graph API endpoint in xMatters, you'll receive an Admin Consent Request. You can review the request details, including who requested the connection and why. Once you've reviewed the request, click Review permissions and consent. See the Azure documentation to review and take action on admin requests for details. For general information on managing access on a more granular level, see the Azure documentation to manage consent to applications and evaluate consent requests.
If users have made requests, but you do not see any Admin Consent requests, ensure you have the Admin Consent Request workflow configured.
The endpoint requests the following OAuth scopes with delegated permissions:
- ChannelMessage.Read.All
- Directory.ReadWrite.All
- Group.ReadWrite.All
- offline_access
- OnlineMeetings.ReadWrite
- Openid
- Profile
- User.Read
For more information on the requested Graph API scopes, see the Graph API documentation.
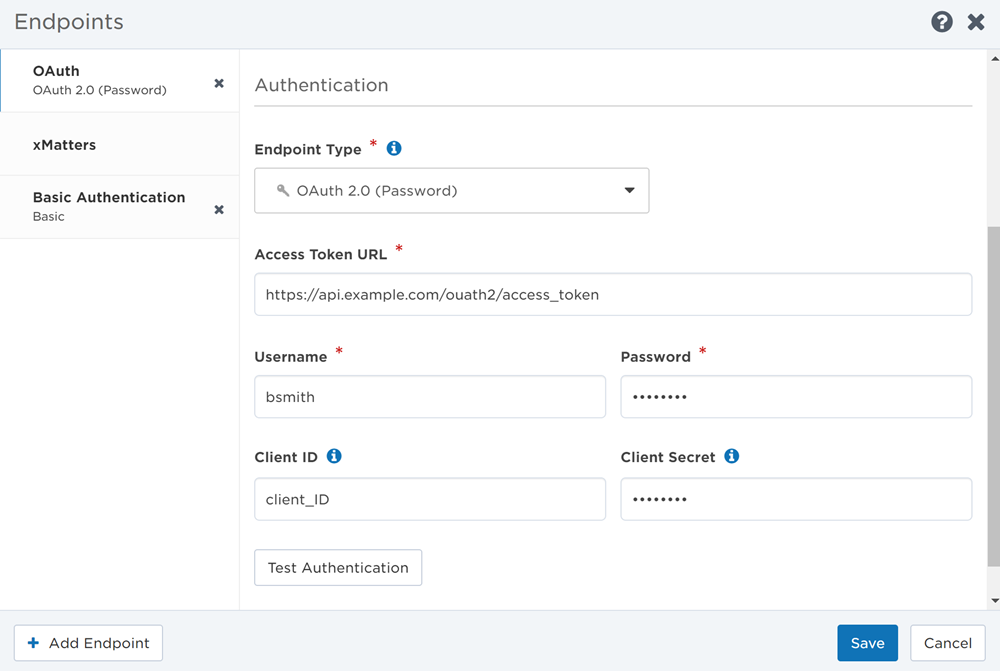
- Select OAuth 2.0 (Password) from the Endpoint Type drop-down list.
- If you accessed the Endpoints page from Flow Designer, this might already be selected because the authentication options are set when the step is defined.
- Enter the Access Token URL for the application.
- Provide the credentials required by the OAuth 2.0 server being targeted, which may include: Username, Password, Client ID, or Client Secret.
- Click Test Authentication to send a test request using your credentials to the target Access Token URL.
- If your credentials are correct, the Endpoints page displays a success message. If the request failed, the page displays the error details returned by the target system.
- Once your credentials have been successfully verified, click Save.
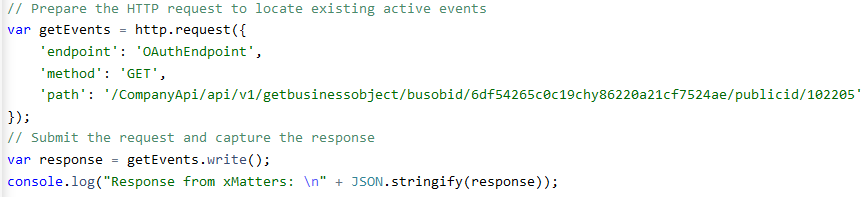
You can use the Test Authentication feature to verify your credentials, or run the integration or flow the endpoint is used in and check the output in the Activity panel to determine if the OAuth 2.0 endpoint is configured correctly. The following example demonstrates how an OAuth 2.0 endpoint would be used to query for a protected resource, and print out the response received:
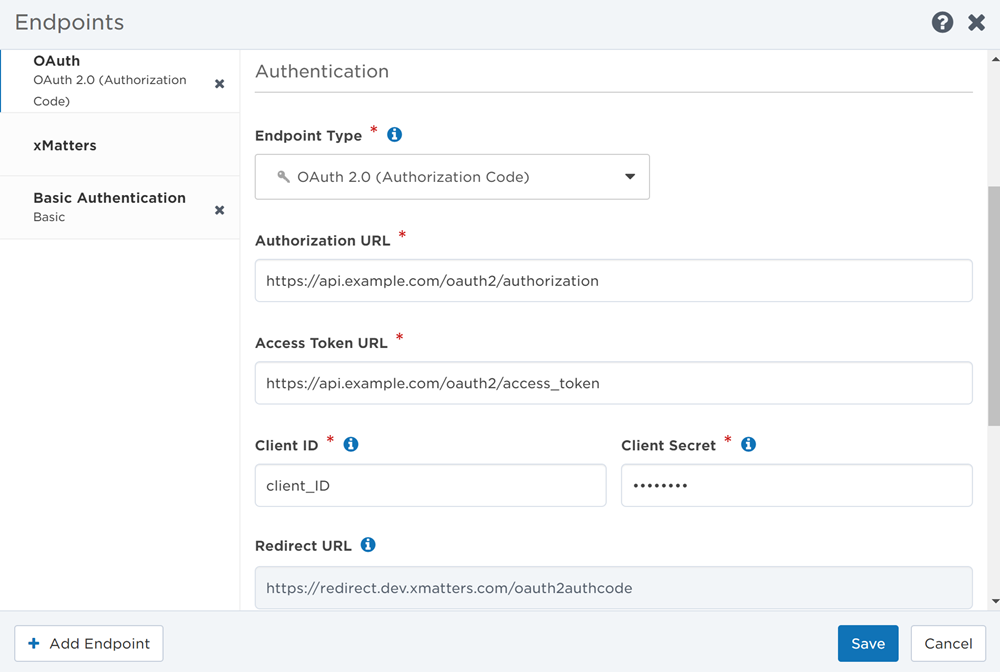
- Select OAuth 2.0 (Authorization Code) from the Endpoint Type drop-down list.
- If you accessed the Endpoints page from Flow Designer, this might already be selected because the authentication options are set when the step is defined.
- Enter the Authorization URL for the application.
- Enter the Access Token URL for the application.
- Provide the credentials required by the OAuth 2.0 server being targeted, which includes the Client ID, and Client Secret.
- If needed, copy the Redirect URL the application will send the user to after they authorize xMatters.
- If applicable, enter a Token Prefix to add before the token.
- If applicable, enter a list of scope values in the Endpoint Scope field to determine endpoint access. The scope values must be delimited according to your application's format requirements.
- The OAuth 2.0 (Authorization Code) endpoint type requires a refresh token, and some applications require a scope permission to be included in the request in order to receive a refresh token. For example, Microsoft Graph API requires the 'offline_access' scope permission, so you must enter it as a scope value if you're requesting access to this application.
- Click Connect to open a new browser window where your application prompts you to allow the connection. You may first need to sign in to your application if you aren't logged in already.
- If your credentials are correct, the Endpoints page will show that you have successfully connected (the Save button is not necessary and will be disabled–you only need to save your changes when you update the endpoint).
- Select OAuth 2.0 (Client Credentials) from the Endpoint Type drop-down list.
- If you accessed the Endpoints page from Flow Designer, this might already be selected because the authentication options are set when the step is defined.
- Enter the Access Token URL for the application.
- Provide the credentials required by the OAuth 2.0 server being targeted, which includes the Client ID, and Client Secret.
- If applicable, enter a Token Prefix to add before the token.
- If applicable, enter a list of scope values in the Endpoint Scope field to determine endpoint access. The scope values must be delimited according to your application's format requirements.
- Click Test Authentication to send a request using the client ID and client secret you provided.
- Once your setup has been successfully verified, click Save.

For force.com integrations, the authentication response contains an instance_url parameter that is part of the hostname on which the access token is valid; for example, "https://na34.force.com". This portion of the URL is not known in advance, and is therefore unavailable when configuring your endpoint. To support these integrations, an OAuth2 (Salesforce) endpoint dynamically changes the URL assigned to the endpoint during execution of the step so it matches the instance_url property returned in the authentication response.
Set up a Connected App
Connected Apps are used to integrate xMatters with Salesforce. External Client Apps are currently not supported.
To use the OAuth2 (Salesforce) endpoint, you first need to set up xMatters as a Connected App on the target system.
- Create a new Connected App with the following settings:
- Connected App Name and API Name: Choose a name that indicates what this Connected App is used for (for example, xMatters).
- Contact Email: Enter a valid email address for a user in the target system.
- Enable OAuth Settings: Select this check box.
- Enable for Device Flow: Select this check box.
- Callback URL: Enter the URL of your xMatters instance.
- Selected OAuth Scopes:
- Access the identity URL service (id, profile, email, address, phone)
- Manage user date via APIs (api)
- Perform requests at any time (refresh_token, offline_access)
- Require Secret for Web Server Flow: Select this check box.
Other options can be left as their defaults.
- After you save the Connected App, you should be taken to a screen where you can obtain your secret and ID (or Key). Make note of these so you can use them when you configure the endpoint in xMatters.
- Finally, edit the Connected App and change the OAuth policies settings.
- Permitted Users: Select "All users may self-authorize".
- IP Relaxation: Select "Relax IP restrictions". If you don't select this option, you might need to append the user's security token to the password when configuring the endpoint.
- Refresh Token Policy: Select "Refresh token is valid until revoked".
- Password Grant Type: Enable "Allow OAuth Username-Password Flows".
Other options can be left as their defaults.
See the documentation of the target system for details on creating a new Connected App. When editing a Connected App, note that updates may take a while to be applied.
Configure the endpoint
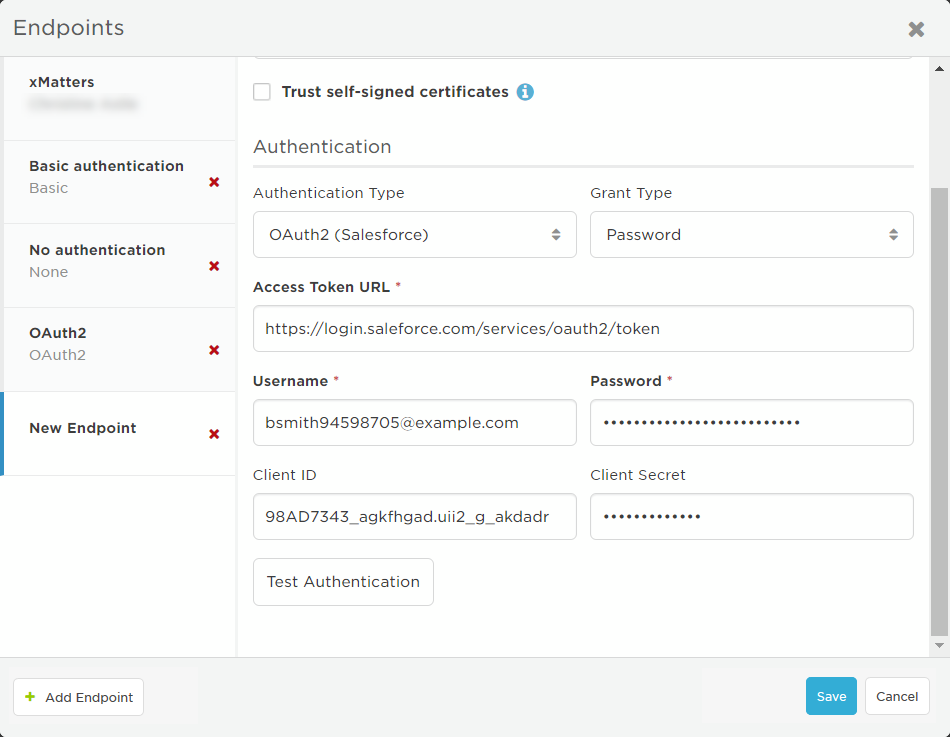
- In the Authentication section, select OAuth2 (Salesforce) from the Authentication Type drop-down list if it's not already selected.
- Grant Type is set to Password because OAuth2 support is currently limited to the Password (or resource owner password credentials) authorization flow.
- Enter the Access Token URL for the application.
- Production environments: https://login.salesforce.com/services/oauth2/token
- Non-production environments: https://test.salesforce.com/services/oauth2/token
- Provide the credentials required by the target OAuth2 server, which may include: Username, Password, Client ID, or Client Secret. Depending on your settings in the target application, you might need to append the user's security token to the password.
- Click Test Authentication to send a test request using your credentials to the target Access Token URL.
- If your credentials are correct, the Endpoints page displays a success message. If the request failed, the page displays the error details returned by the target system.
- Once your credentials have been successfully verified, click Save.
More details on accepted domains and endpoints are available in the Salesforce help documentation.
For outbound integrations to Slack, users are not required to enter an access token URL, client ID, or client secret. Selecting the Slack authentication method lets you initiate the OAuth 2.0 process to authorize access to your Slack team, using the credentials you enter. The Slack endpoint requests the following OAuth scopes:
- channels:history
- channels:manage
- channels:read
- chat:write
- chat:write.customize
- chat:write.public
- groups:read
- groups:write
- pins:read
- pins:write
- team:read
- usergroups:read
- users:read
For the full list of available Slack scopes, see https://api.slack.com/docs/oauth-scopes
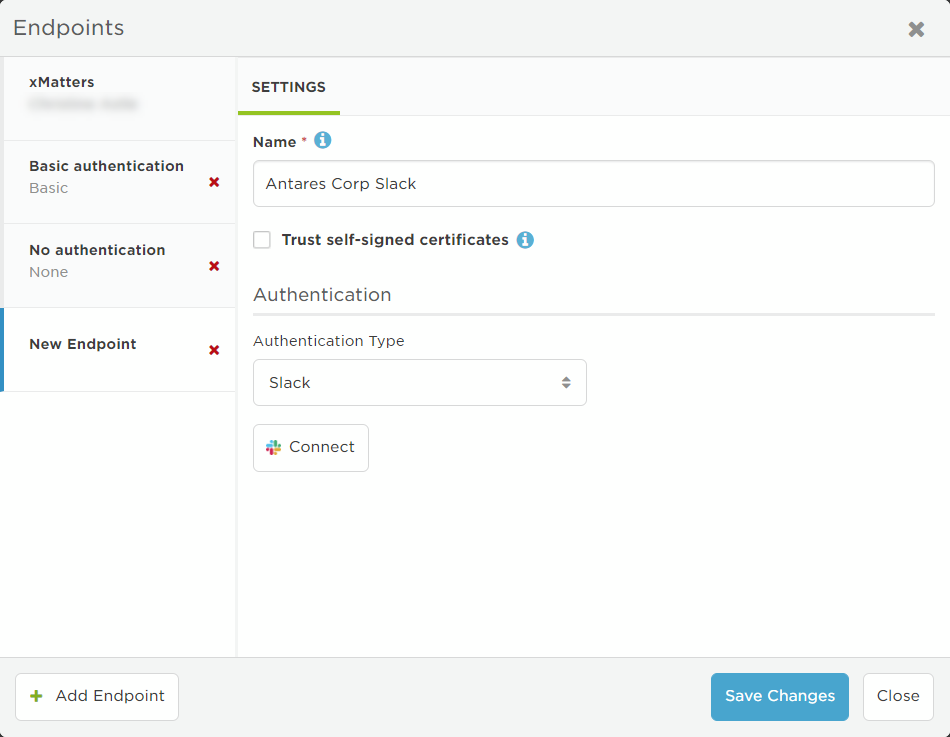
- Select Slack from the Authentication Type drop-down list.
- If you accessed the Endpoints page from Flow Designer, this might already be selected because the authentication options are set when the step is defined.
- Click Connect.
- A new browser window opens to slack.com to authorize access to your Slack account.
- Select or sign into the Slack team that you want to authorize xMatters to access.
- Click Authorize.
Pop-ups must be enabled in your browser to open the Slack authorization page.
Adding the Slack token to API requests
When calling a Slack endpoint in an HTTP request, you must explicitly add a function call to add the Slack token to your API request, or the endpoint will not authenticate.
To add the authentication token, use the following syntax in the relevant portion of your script:
http.authenticate( '<SlackEndpointName' )
For example:
// Prepare the HTTP request
var slackRequest = http.request({'endpoint': 'Slack',
'method': 'POST',
'path': 'channels.create?token=' + http.authenticate( 'Slack' ) + '&name=' + channelName
});
var slackResponse = slackRequest.write();
var slackBody = JSON.parse( slackResponse.body );
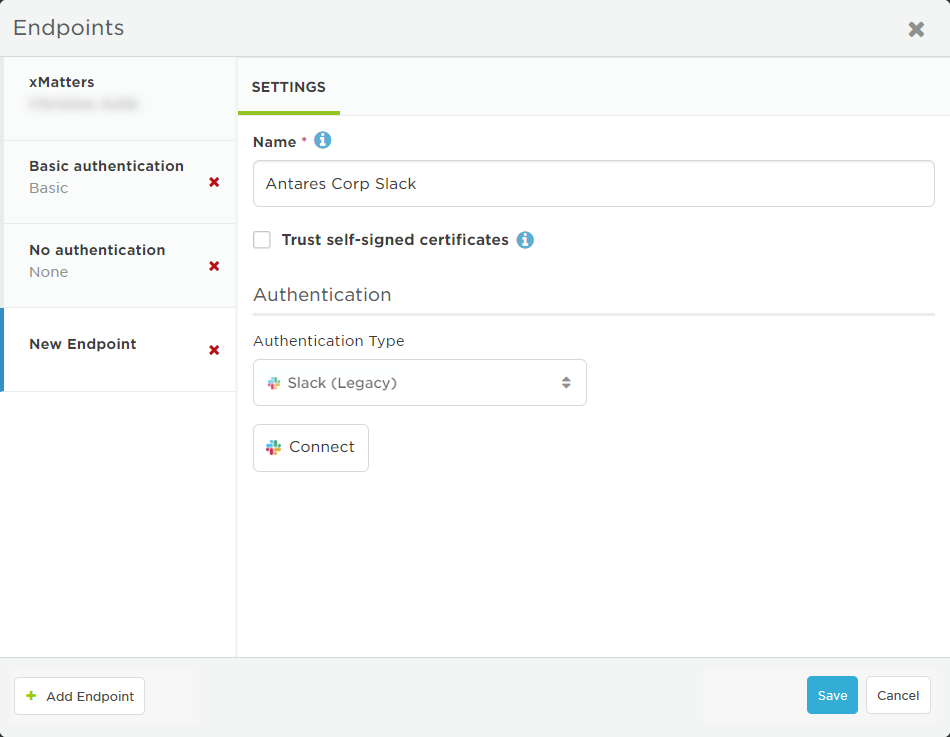
In June 2021, we released a new Slack endpoint and renamed our previous endpoint "Slack (Legacy)". Although we continue to support custom scripts and steps using the legacy endpoint, we recommend updating to the newer version of the Slack endpoint to take advantage of new functionality.
For outbound integrations to Slack, users are not required to enter an access token URL, client ID, or client secret. Selecting the Slack authentication method lets you initiate the OAuth2 process to authorize access to your Slack team, using the credentials you enter. The Slack endpoint requests the following OAuth scopes:
- users:read
- team:read
- channels:history
- channels:write
- channels:read
- chat:write:bot
- chat:write:user
For the full list of available Slack scopes, see https://api.slack.com/docs/oauth-scopes
- Select Slack {Legacy) from the Authentication Type drop-down list.
- This might already be selected because the authentication options are set when the step is defined.
- Click Connect.
- A new browser window opens to slack.com to authorize access to your Slack account.
- Select or sign into the Slack team that you want to authorize xMatters to access.
- Click Authorize.
Pop-ups must be enabled in your browser to open the Slack authorization page.
Adding the Slack token to API requests
When calling a Slack endpoint in an HTTP request, you must explicitly add a function call to add the Slack token to your API request, or the endpoint will not authenticate.
To add the authentication token, use the following syntax in the relevant portion of your script:
http.authenticate( '<SlackEndpointName' )
For example:
// Prepare the HTTP request
var slackRequest = http.request({'endpoint': 'Slack',
'method': 'POST',
'path': 'channels.create?token=' + http.authenticate( 'Slack' ) + '&name=' + channelName
});
var slackResponse = slackRequest.write();
var slackBody = JSON.parse( slackResponse.body );
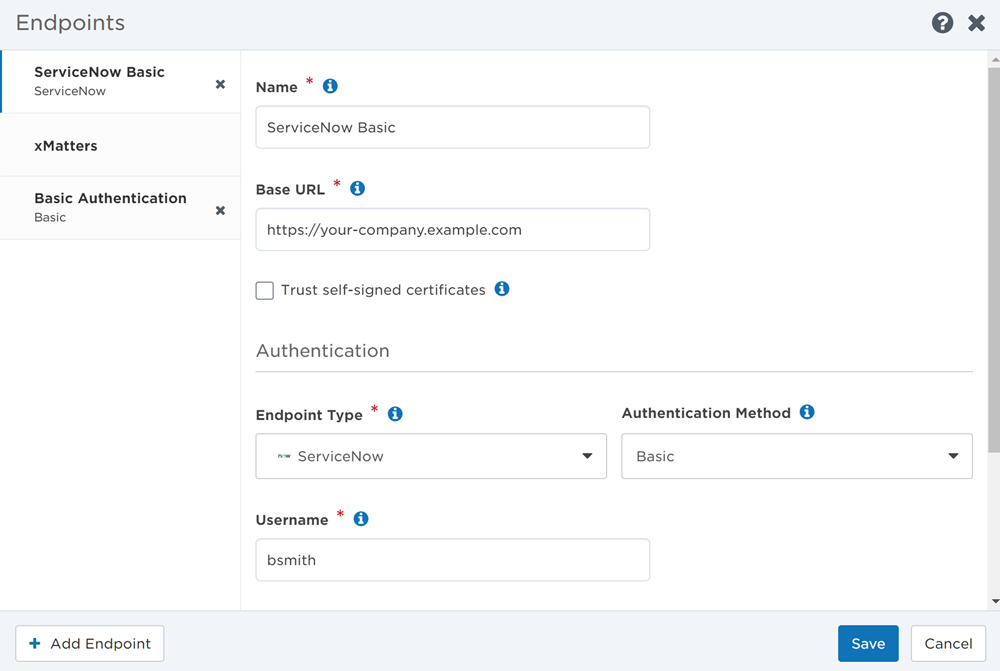
The ServiceNow authentication type is used by ServiceNow steps in Flow Designer and by the ServiceNow workflows.
- Select ServiceNow from the Endpoint Type drop-down list.
- If you accessed the Endpoints page from Flow Designer, this might already be selected because the authentication options are set when the step is defined.
- Select an Authentication Method: Basic, OAuth 2.0 (Authorization Code), or OAuth 2.0 (Client Credentials).
If you select Basic to authenticate the ServiceNow endpoint:
- Supply the Username and Password of a ServiceNow user with the itil role.
- Click Test Authentication to send a request using the username and password to the ServiceNow instance you entered in the Base URL field.
- Once your setup has been successfully verified, click Save.
If you select OAuth 2.0 (Authorization Code) to authenticate the ServiceNow endpoint:
- Enter the Authorization URL for ServiceNow. https://{ServiceNow instance base URL}/oauth_auth.do
- Enter the Access Token URL for ServiceNow. https://{ServiceNow instance base URL}/oauth_token.do
- Provide the credentials required by the OAuth 2.0 server being targeted, which includes the Client ID, and Client Secret.
- If needed, copy the Redirect URL ServiceNow will send the user to after they authorize xMatters.
- If applicable, enter a Token Prefix to add before the token.
- If applicable, enter a list of scope values in the Endpoint Scope field to determine endpoint access. The scope values must be delimited according to ServiceNow's format requirements.
- Click Connect to open a new ServiceNow browser window prompting you to allow the connection, then click Allow. You may first need to sign in to your application if you aren't logged in already.
- If your credentials are correct, the Endpoints page will show that you have successfully connected (the Save button is not necessary and will be disabled–you only need to save your changes when you update the endpoint).

If you select OAuth 2.0 (Client Credentials) to authenticate the ServiceNow endpoint:
- Enter the Access Token URL for ServiceNow. https://{ServiceNow instance base URL}/oauth_token.do
- Provide the credentials required by the OAuth 2.0 server being targeted, which includes the Client ID, and Client Secret.
- If applicable, enter a Token Prefix to add before the token.
- If applicable, enter a list of scope values in the Endpoint Scope field to determine endpoint access. The scope values must be delimited according to ServiceNow's format requirements.
- Click Test Authentication to send a request using the client ID and client secret you provided.
- Once your setup has been successfully verified, click Save.

For more information on how to create an OAuth endpoint for ServiceNow, view their documentation.
The Zoom Server-to-Server OAuth authentication type is used by the Zoom Create Meeting step in Flow Designer. Each endpoint of this type is associated with a Zoom Server-to-Server OAuth app that enables you to securely integrate with Zoom APIs.
- Create a Zoom Server-to-Server OAuth app with the scope: View and manage all user meetings ("meeting:write:admin").
- Keep the Client ID and Client Secret from this app handy, as you'll need them to configure the endpoint in Flow Designer.
- In Flow Designer, select Zoom Server-to-Server from the Endpoint Type drop-down list.
- This might already be selected because the authentication options are set when the step is defined.
- Supply the Account ID from your organization's Zoom account.
- Supply the unique Client ID from the Server-to-Server OAuth app created specifically for this endpoint and its corresponding Client Secret.
- Click Save.
You must create a Zoom Server-to-Server OAuth app for each Zoom Server-to-Server endpoint.