Jenkins
Flow Designer has a Jenkins Events trigger and built-in Jenkins steps to help you integrate Jenkins into your alert management and incident response flows.
Jenkins steps
- To add a Jenkins step to your flow, go to the Apps panel in the palette, expand the Jenkins section and drag the step onto the canvas.
- Connect the step to the previous step in the flow. This lets you access any alert properties and outputs of previous steps when configuring the inputs.
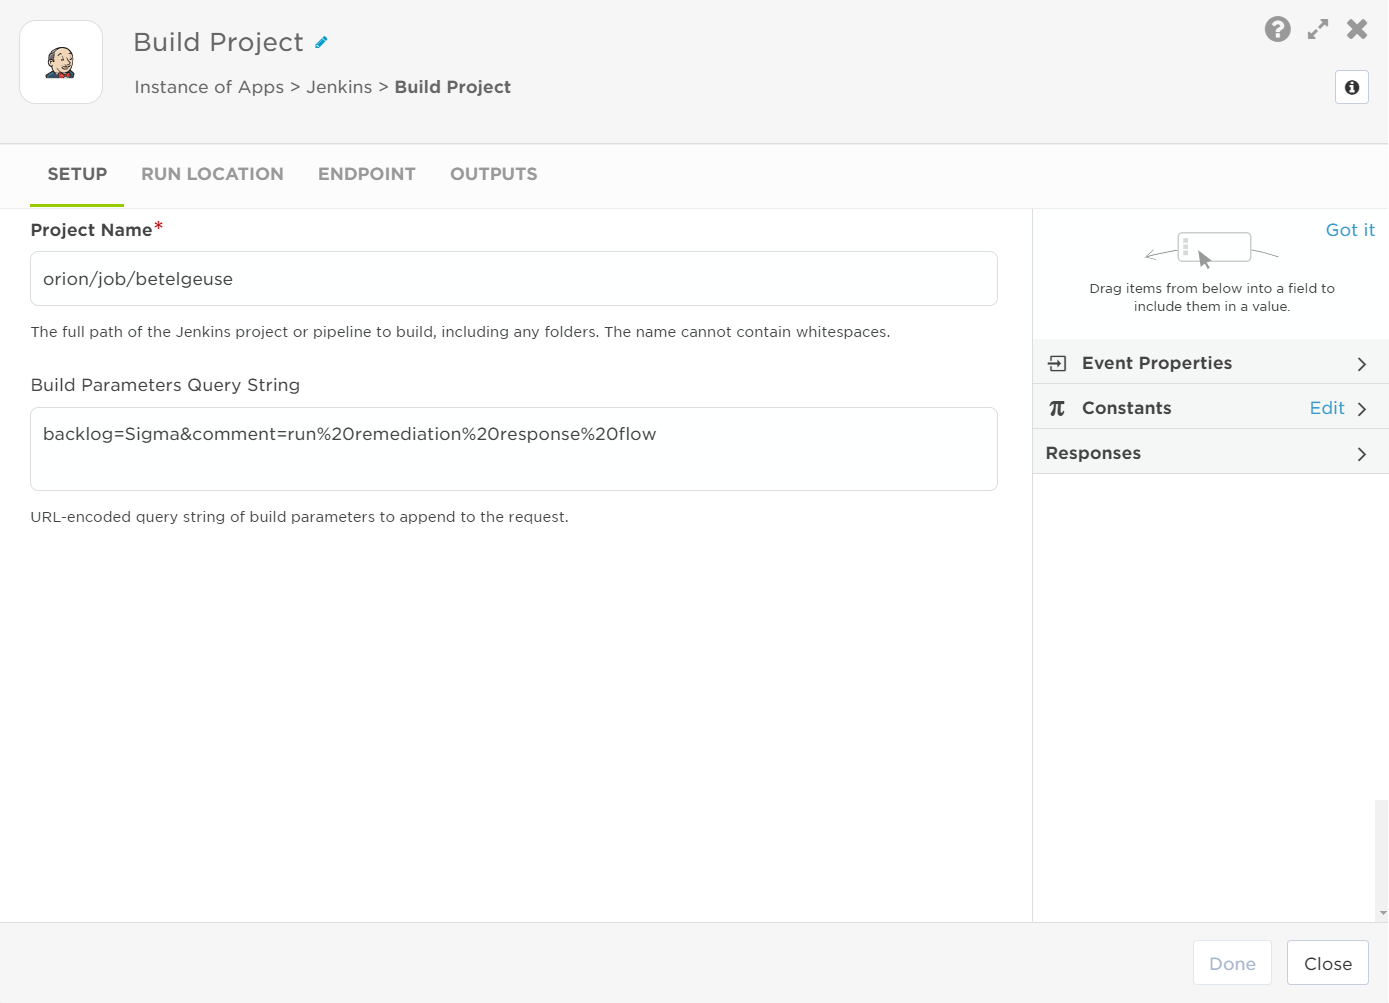
- Double-click the step to edit it, and use the Setup tab to configure the inputs. You can use plain text, input variables, or a combination of both. See the sections below for detailed information on the inputs.
- If you include request parameters in the Build Parameters Query String input, make sure you URL-encode the string.

- On the Run Location tab, set where you want the step to run: in the cloud or on an xMatters Agent installed behind your firewall.
- On the Endpoint tab, configure an endpoint that points to your Jenkins instance (or, if you already have one, select it from the list).
- To configure a new endpoint:
- Enter the base URL of your Jenkins instance (for example, https://jenkins.example.com).
- In Authentication, add the credentials of a user with permissions to build the project: enter their Jenkins username in the Username field and an API token created for that user in Jenkins in the Password field. You must use an API token as the password; using the user's Jenkins login password will result in errors. If you want to authenticate using the login password, check out the Jenkins step over on xMatters Labs.
- Make sure Preemptive is selected before saving the endpoint configuration.
Build Project
Use the Build Project step to automatically start a build in Jenkins in response to previous steps in the flow. You can map outputs from previous steps to the inputs to dynamically set the values at runtime.
Inputs
Inputs with an asterisk* are required.
|
Label API mapping |
Description |
|---|---|
|
Project Name* |
The absolute path to the project or pipeline to build (for example, orion/job/betelgeuse/). The path cannot contain spaces; if it does, Jenkins will return an error when the step runs. |
|
Build Parameters Query String |
Add any build parameters you want to append to the request as a single string, making sure you URL encode the string (for example, delay=10s&message=for%20Antares). Confirm that your project expects build parameters; if you include parameters and the project does not expect them, Jenkins will throw an error when the step runs. |
Outputs
This step has no outputs.
Jenkins Events Trigger
- Go to the Triggers panel in the palette, expand the App Triggers section and drag the trigger onto the canvas.
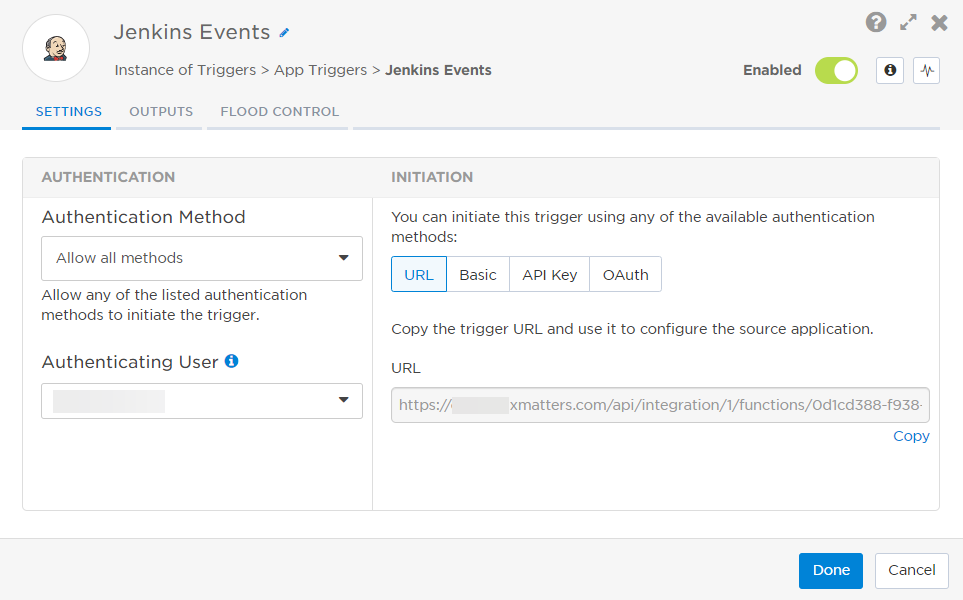
- Double-click the trigger (or click the pencil icon).
- Set the authentication method and authenticating user. Alternatively, you can create an integration user to use as the authenticating user.
- Copy the URL — you'll use this to set up the webhook in Jenkins.

- Click the Flood Control tab to edit the trigger's default flood control settings. For more information about these settings, see Trigger Flood Control.
- Click Done.
- On the flow canvas, connect the steps you want to run when xMatters receives a request to that URL.
Configure Jenkins to send requests to the trigger URL
To have Jenkins send alerts to the flow trigger, you need to install a notification plug-in and set it to use the trigger URL.
- Go to the Jenkins website and download the Notification plug-in. This adds the Job Notification tab to your Jenkins page.
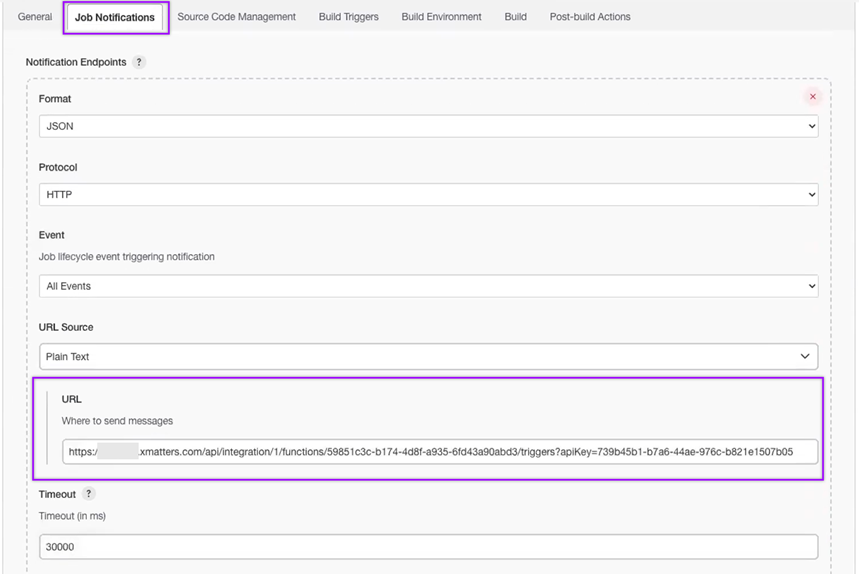
- Once installed, go to the Job Notifications tab.
- In the URL field, paste the trigger URL you copied from Flow Designer.

- Add the target names of any recipients you want to notify when the monitor creates an alert.
- For URL authentication, use an ampersand to attach recipients. For example, if you want to notify Emma Pearson and the on-call members in the group responsible for the Antares service, you'd add &recipients=epearson,antares to the end of the URL.
- For other authentication types, use a question mark to attach recipients. For example, if you want to notify Barry Gull and the on-call members in the group responsible for the Cassiopeia service, you'd add ?recipients=bgull,cassiopeia to the end of the URL.
- You must URL-encode any special characters or spaces in the target names.
- Click Save.
You're now ready to use the webhook to trigger automated flows, including steps such as sending alerts and initiating incidents, though we always recommend testing before putting things into use.
Outputs
The Jenkins Events trigger has the following outputs you can use as inputs to steps further along the flow.
|
Label |
Description |
|---|---|
| Recipients | List of targeted recipients. Recipients are set by adding a recipients query parameter to the trigger URL when you configure the webhook in Jenkins. |
| Build Link | Direct link to the Jenkins job. |
| Build Number | Build number of the Jenkins job. |
| Change Type | Type of change taking place in Jenkins. |
| Job Event Type |
Type of Jenkins job event. Available values are:
|
| Job Name | Name of the Jenkins job. |
| Repository Link | Direct link to the repository used in the Jenkins job. |
| Repository Branch | Repository branch used in Jenkins job. |
| Status | Status of the job event in Jenkins. |
| Timestamp | Timestamp of when the job event occurred. |
| Raw Request | JSON representation of the request that can be parsed separately to get additional context on outputs. |