Flow Designer 101
Flow Designer lets you build multi-step processes simply by dragging, dropping, and connecting steps.
In this overview, we go over the parts of Flow Designer and the pieces you can use to create your flows. That might be all you need to get started if you're the type who likes to dump out the blocks and start building.
If you're the type who learns by example, we walk through designing a flow from concept to test, and all the steps in-between. In that topic, we go into how to use the various types of steps — triggers, built-in apps and custom steps, and tools — to build a flow. In other topics in this section, we delve deeper into troubleshooting runtime issues, how to use the ready-made apps, and creating your own custom steps.
Before you start building
With the drag-and-drop, drag-and-connect interface, it's easy to get started, but there are a couple of things you need before you can build flows and put them to work.
- First, you need a way to trigger the flows you create. This can be a signal sent from a connected application, by email, or via HTTP request.
- If you want to compose notifications for multiple languages, count responses, and use features like subscriptions and scenarios, then you'll want to create a Messaging form.
- Next, you'll need to create a canvas. You can add a canvas to an existing workflow or create a new workflow and add a canvas to it.
- If you created a messaging form, a canvas with the same name is added to the Flow Designer tab. Otherwise, you can simply create a new flow canvas from the Flow Designer tab of your workflow.
Now you're ready to build. Have fun!
How to get to Flow Designer
Access to Flow Designer is controlled by the workflow — whoever has permission to edit the workflow can access its flows.
Access it from the Workflows page:
- Click the Workflows tab.
- If it's not already selected, click Workflows from the menu on the left.
- Click the name of the workflow that you want to build flows for and click the Flow Designer tab.
- Click the name of the canvas you want to create or edit flows for (or Create Flow Canvas if you don't have one yet).
Access it from within a workflow:
- If you're already in the workflow, click the Flow Designer tab.
- Click the name of the canvas you want to create or edit flows for (or Create Flow Canvas if you don't have one yet).
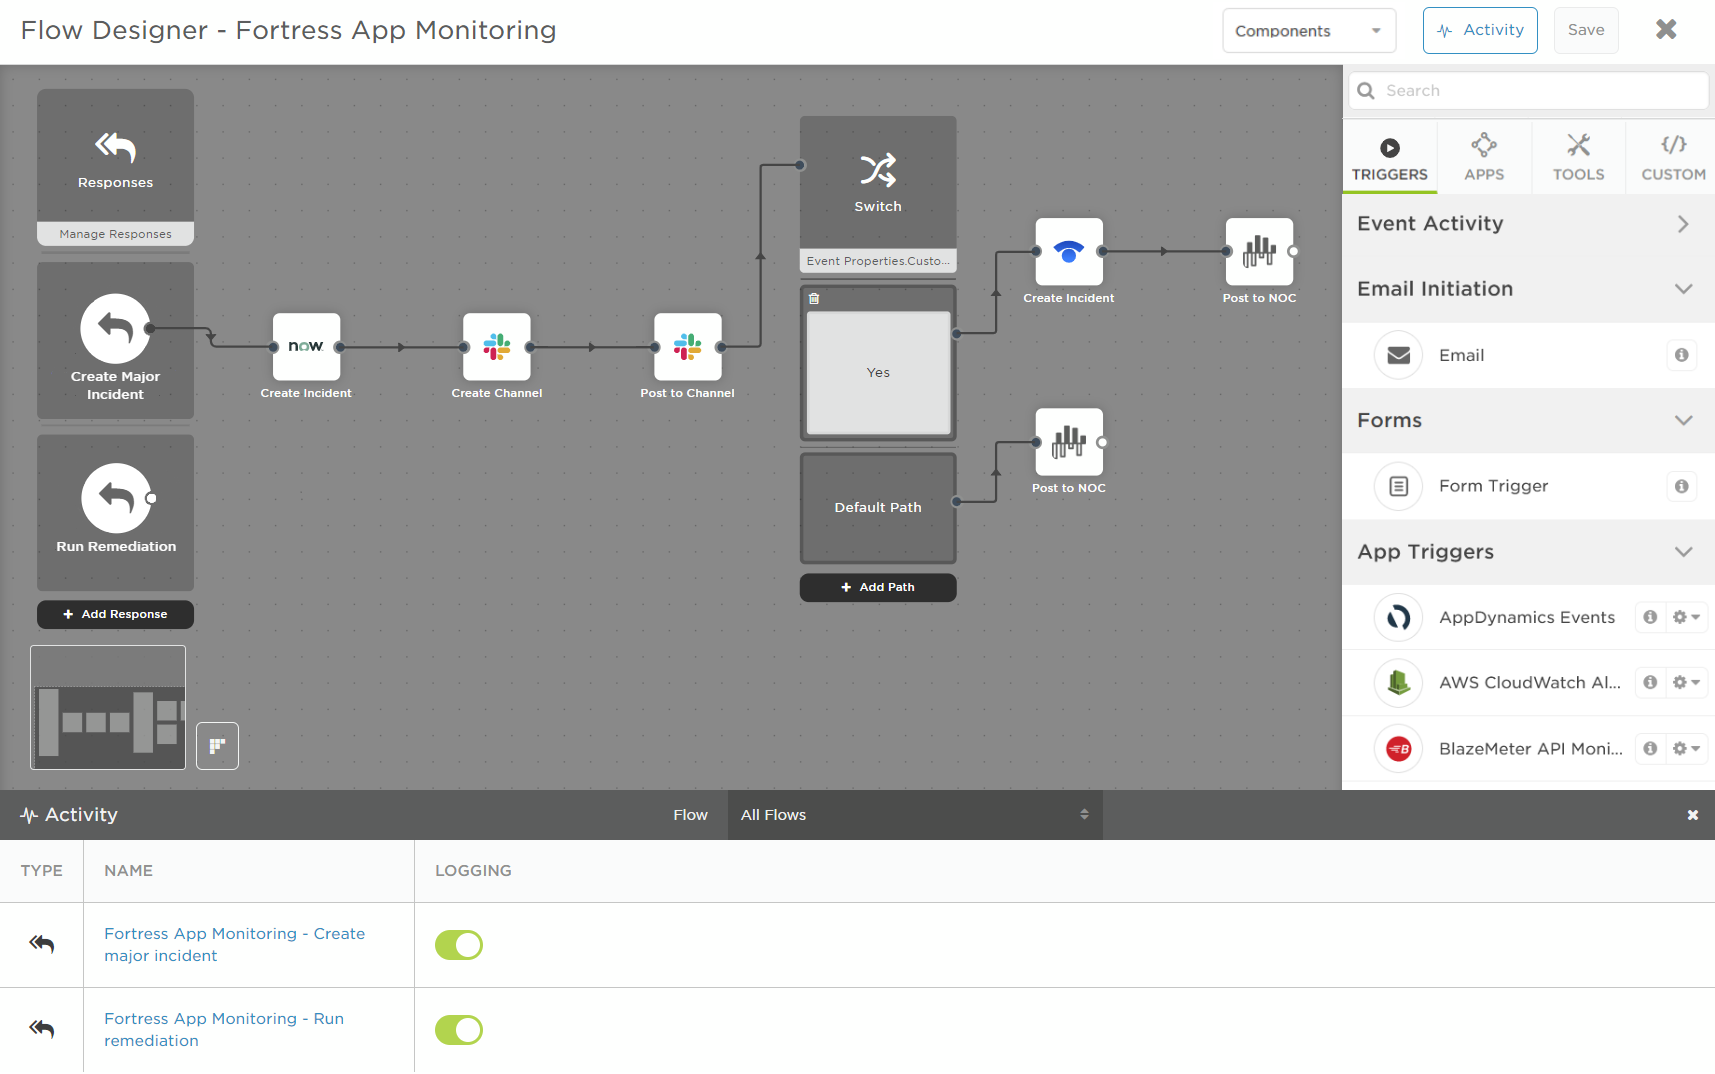
Get to know Flow Designer
The Flow Designer tab in a workflow lists all the canvases associated with that workflow. A canvas is home to a logical grouping of flows, and can be created in different ways — manually by clicking Create Flow Canvas, or automatically when you add a messaging form to your workflow or when we migrate a legacy Integration Builder integration not associated with a canvas.
The canvas has three main areas — the large, central canvas where you build your flows, the palette on the right that holds the building blocks you can use in your flows, and the Activity panel that lets you check the runtime state of the flows. You can also access flow components (endpoints, constants, and libraries) from the Components menu.
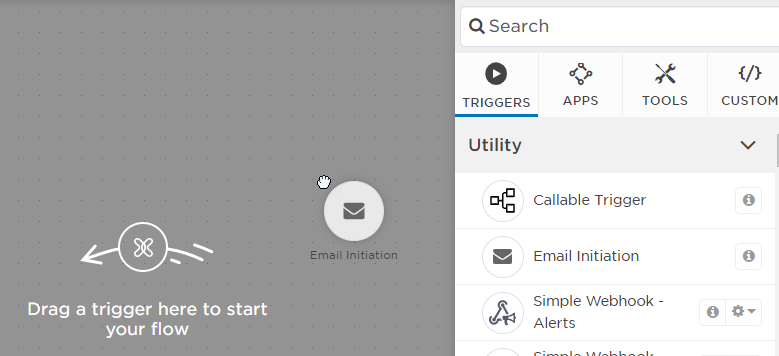
The palette
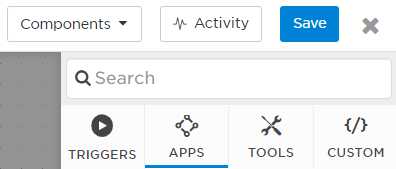
The palette is where you find the steps and tools you can use to build flows by dragging them onto the canvas. The different tabs in the palette organize the steps into categories. You can use search to locate steps on a tab with keywords in their name.
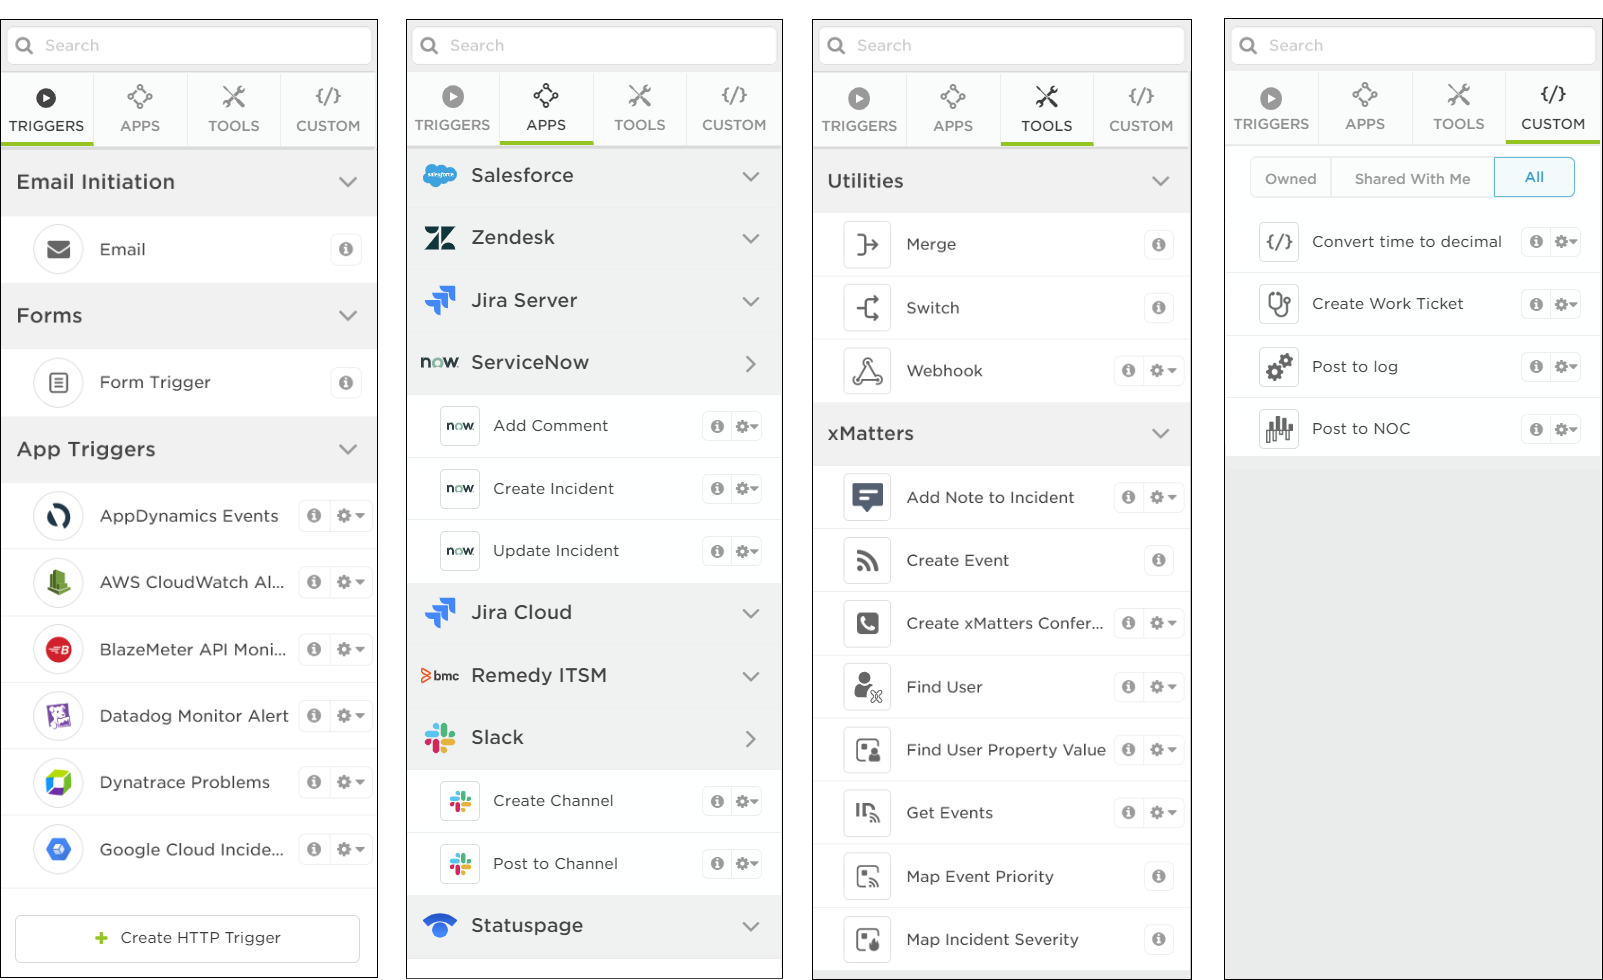
- Triggers: Triggers are special steps that kick off a flow when information is injected into Flow Designer by an incoming signal (like an HTTP request or email)
- Apps: Apps are steps we've created for common actions in popular applications to help you create flows quickly. Simply drag, connect, and configure some basic settings, and you're ready to get started. (Keep an eye on the Apps panel as we add more ready-made steps for other applications.)
- Tools: Tools are, well, tools that let you create richer and more nuanced flows. For example, you can use a switch step to split a flow onto different paths (for example, use path A if a problem is customer-impacting but use path B if it's not), use a webhook step to check and return the status of another application in your toolchain, or use a merge step to combine two parts of a flow that will need to run the same steps.
- Custom: Custom steps are steps you or someone in your organization has added. Maybe you want to trigger a flashing light to go off when a ticket is created — since we don't have a built-in step for your proprietary flashing light software, you need to create that yourself. Using a custom step in your flow is the same as any other step: drag it onto the canvas, connect it, and configure any required inputs.
There are also some existing components that you'll use to build out your flows.
- Endpoints: Endpoints define which application you want to send a request to (like Everbridge or Slack or a help desk ticketing system). You can add endpoints as you add steps in your flow, or through the Components drop-down menu.
- Constants: Constants represent unchanging bits of information that can be used as inputs in your steps. For example, you could use a constant to represent a time zone when posting dates to help desk ticket, or as the "from" name when posting to a chat client. You can define constants using the Components menu.
- Libraries: Libraries house shareable pieces of code you can reference in any custom step.
The canvas
Flows are what it's all about, linking together the tools you use every day into a single, seamless process, and the canvas is the backdrop for building your flows. Drag steps onto the canvas and connect them to automatically send information from one system to another, transforming it along the way if needed.
You can manually create canvases by clicking Create Flow Canvas on the Flow Designer tab of your workflow. Canvases also get created automatically when you add messaging forms to your workflow, or when we migrate Integration Builder integrations into Flow Designer (you can change the default canvas details).
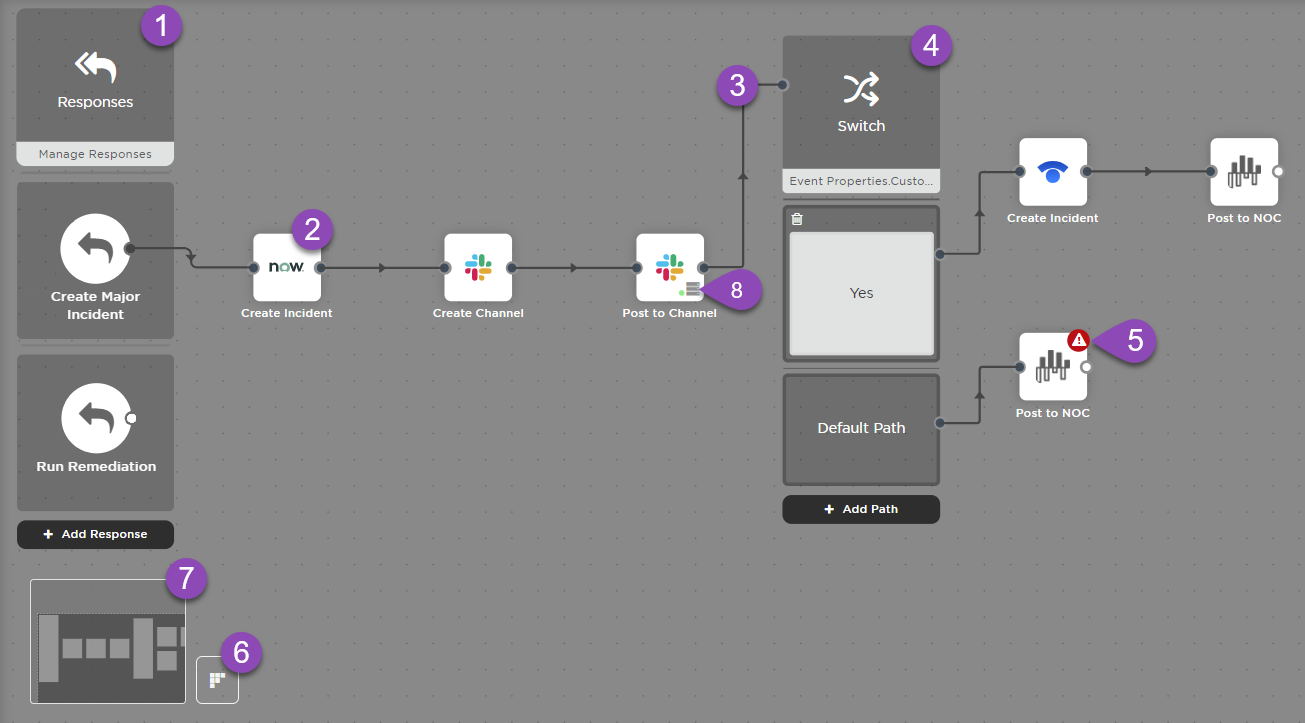
- Triggers: Each flow starts with a trigger that kicks off the rest of the flow. Find your available triggers in the first panel on the palette.
- Steps: Steps are the building blocks of your flows. They can be triggers, actions in systems you use every day, or tools such as switches that let you fine-tune your flow. Whether built-in apps or custom creations, steps take outputs from the trigger and previous steps as inputs, use and transform that information, and then pass it to steps further downstream.
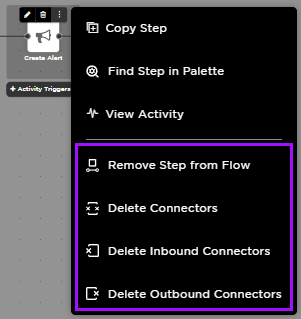
- Connectors & Ports: Connectors are the lines you draw between steps to link them into a flow. You draw these lines between the output port (the little circle on the right) of one step and the input port (the circle on the left) of another. This lets information flow from one step to the next. You can delete connectors by hovering over the step and selecting one of the following from the options menu (some options are not available for Switch steps
- Remove Step from Flow to move steps with both inbound and outbound connections out of the flow, and reroute any inbound connections to the selected step's outbound connection.
- Delete Connectors to remove the selected step's inbound and outbound connections.
- Delete Inbound Connectors to remove the selected step's inbound connections.
- Delete Outbound Connectors to remove the selected step's outbound connections.
- Tools: Tools let you build richer and more nuanced flows tailored to your needs. You can use them to change the path a flow takes
- Step status indicators: There are a few ways we let you know when something isn't quite right, either during configuration or while troubleshooting issues during runtime (for example, a warning badge on a step icon).
- Auto Layout: The Auto Layout button lets you bring order to chaos (if you so choose) by spacing out and aligning your steps into a grid. It also fits the canvas to the window if you've zoomed in.
- Mini-map: The mini-map helps you orient yourself on the canvas. If you get creative in building flows and adding steps, or you zoom in, you might end up with a canvas that doesn't fit on the screen. The mini-map not only shows you where you are as you move around the canvas, you can also drag on the mini-map to pan around the canvas.
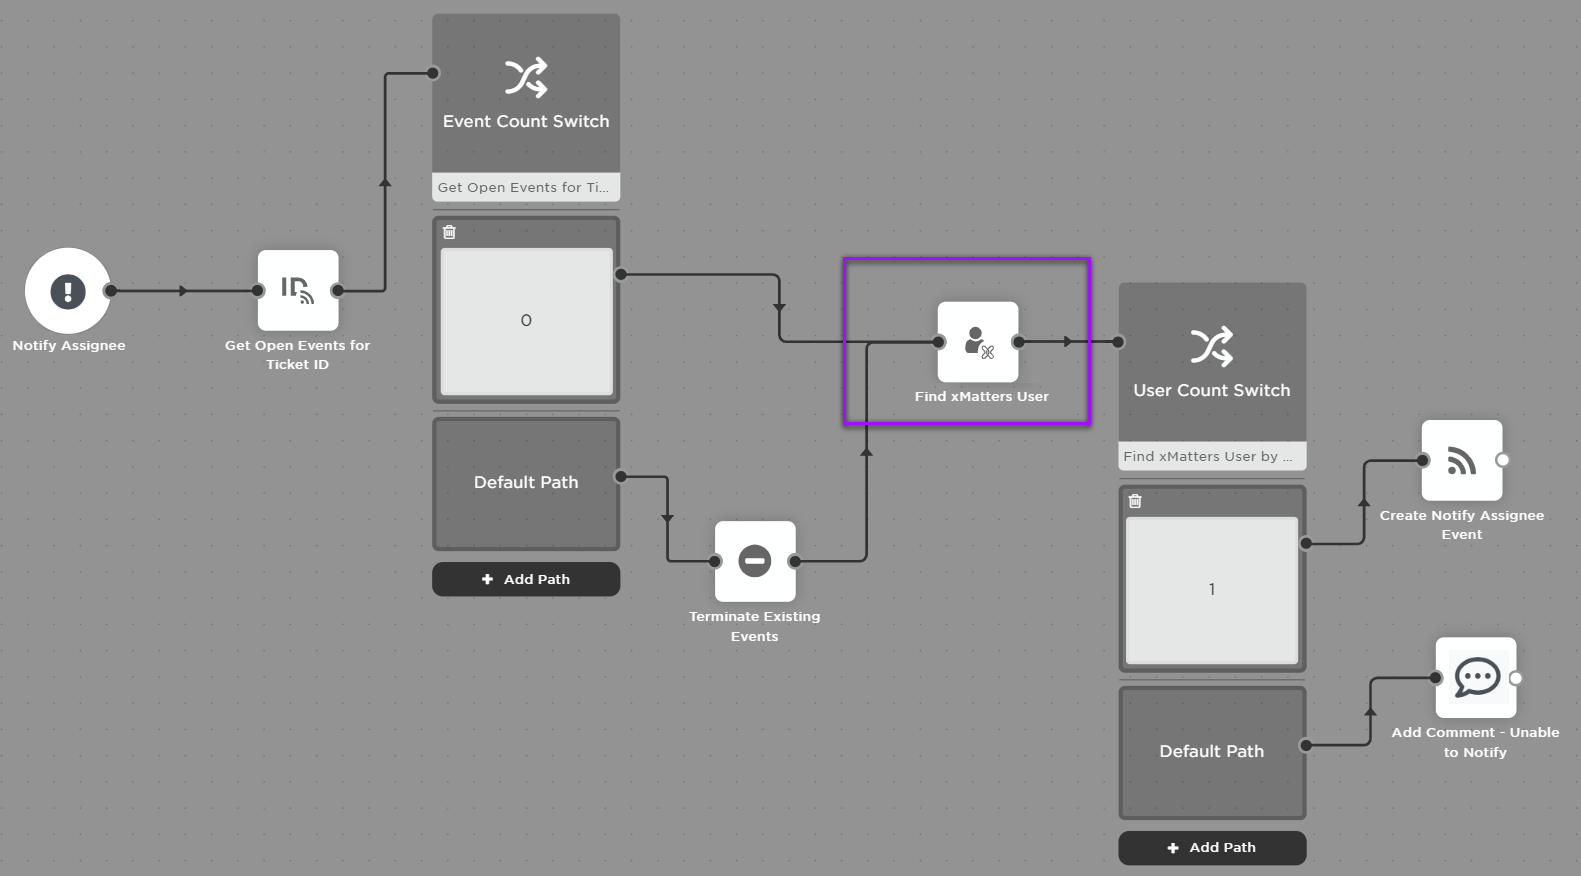
- xMatters Agent indicator: The agent icon indicates that this step is set up to run using the xMatters Agent. It also provides the status of the assigned agents (green means one or more of the assigned agents is connected while red indicates that none of the assigned agents are connected).
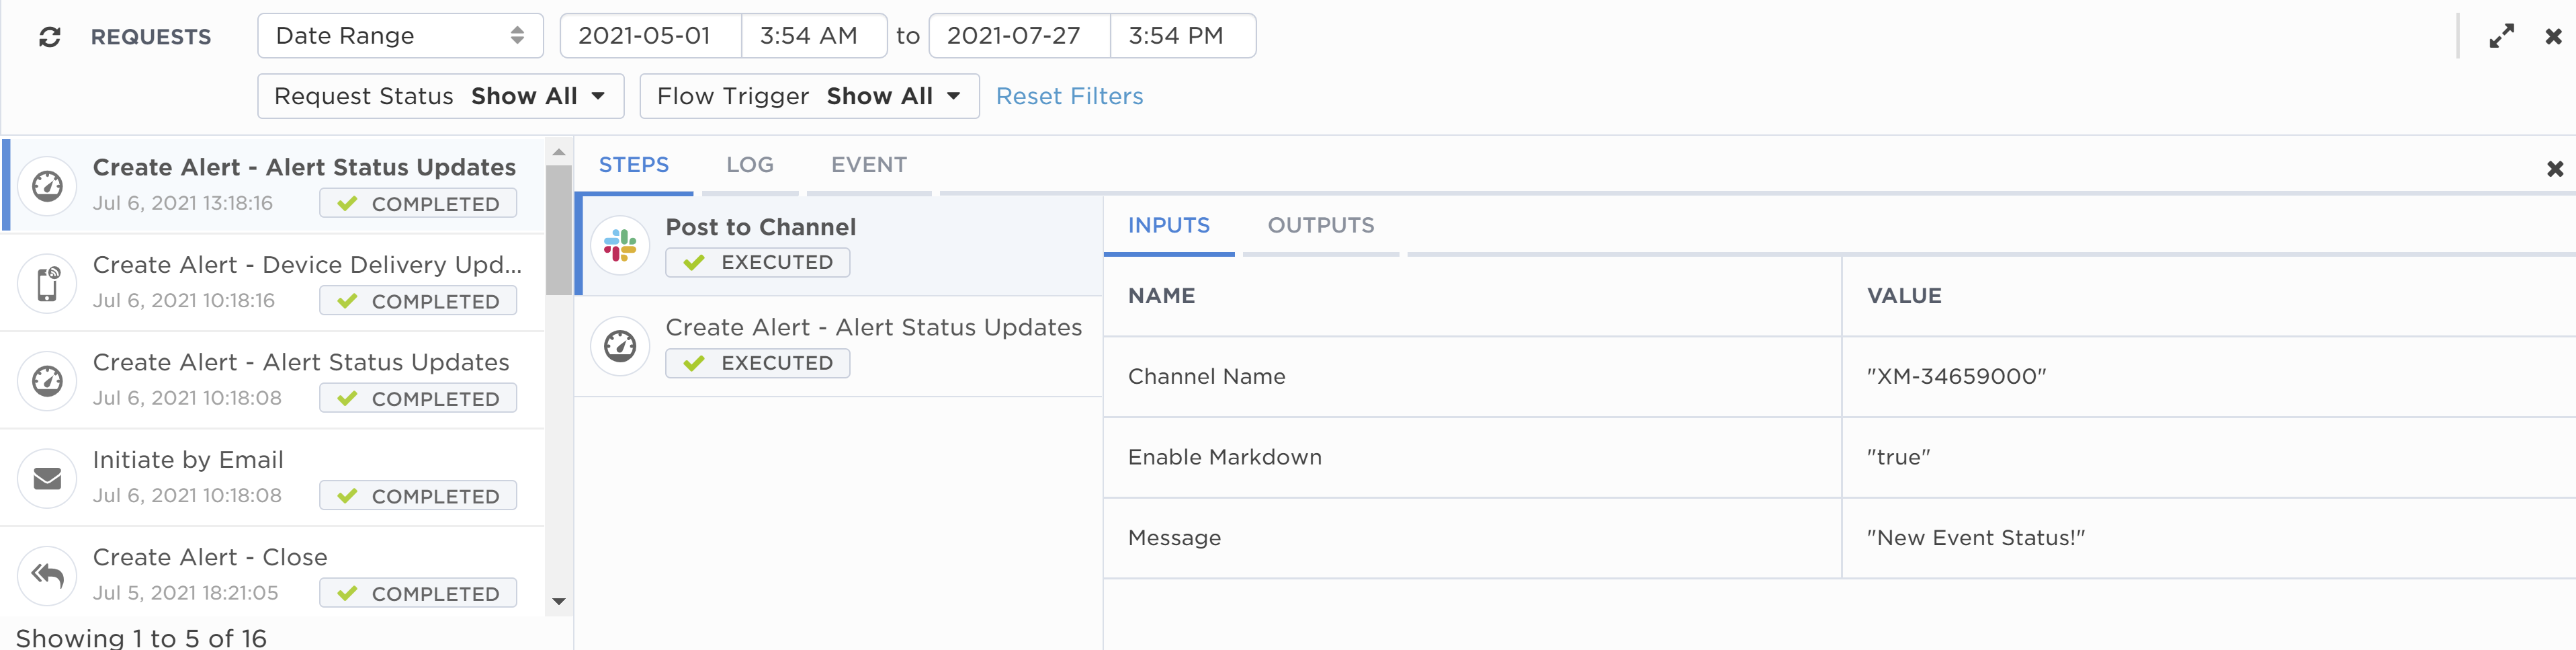
The Activity panel
The Activity panel is the command center for identifying and troubleshooting any issues with your flows. It's where to find details from the signal that triggered the flow, the inputs and outputs that were passed from step to step, which steps completed, and if the flow stopped, where that happened and what might have gone wrong.
Drag, connect, configure
We go into details on creating a new flow in our Create a flow instructions, including the different trigger types and when you might use one over the other, how to configure switch steps, and setting up endpoints. But if you just want to jump in and start building, here are the basics — it really can be as simple as drag, connect, and configure.
Add a step
Simply drag a step from the palette to add it to the canvas. Once you drop the step on the canvas, it's ready to connect to a flow.
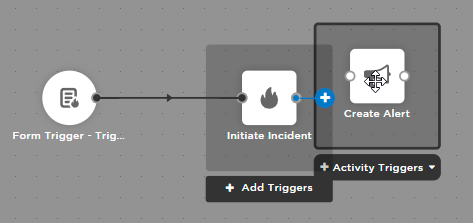
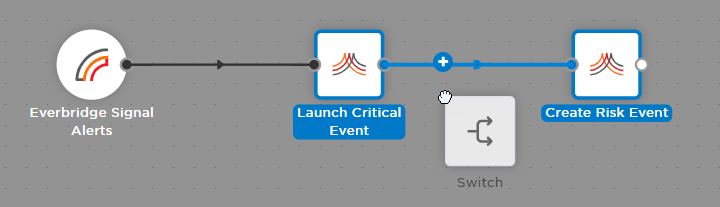
To add a new step to the end of an existing flow, drag the step near to the last step you want to connect it to. When a blue + icon appears, release the step to add it to the end of the flow.
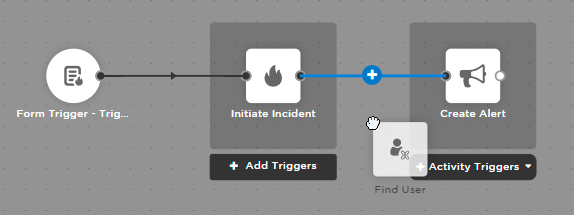
If you want to add a new step in-between two existing steps, drag the new step near the connector you want to connect it to. When a blue + icon appears, release the step to add it to the flow.
You might want to disable the flow until you have it built. To do that, double-click the trigger and click the Enabled toggle to turn it off.

Connect individual steps
To connect two steps, draw a connector between them by dragging from the output port (the little circle or node on the right) of one step to the input port (the little circle on the left) of the next. Once the steps are connected, outputs from the trigger and any previous steps in the flow are available as inputs to this step.
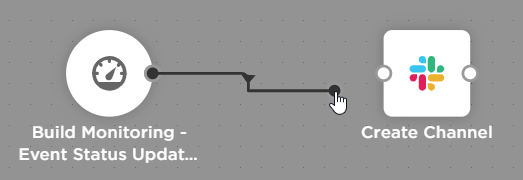
At this point, you can do any setup that's required (you'll see a little configuration status indicator if there's something you need to do). Then you're ready to test it out.
Make sure you connect a step to a flow before you configure it. This lets you leverage the trigger properties and the outputs of any previous steps when setting up the inputs for this step.
Merge flow paths
You can connect multiple paths of your flow to the input port of a single step. This is useful for when different segments of your flow follow the same series of steps. By merging them to a common path, you reduce duplicate configuration and simplify the layout of your canvas.
When you connect multiple paths to the input port of a step, only constants and the outputs of individual steps common to all joined flow paths are available as inputs to this step.
Other tips & tricks
Some steps are a little bit different, like
Double-click a step or click the pencil icon that appears when you move the pointer over it to view or configure the step's description and available inputs, endpoint, outputs, originating steps, and version information.
Copy a step on your canvas to save time configuring it if you want to use it again in another flow on your canvas.
As you build and refine flows, we recommend saving as you go, since the changes you make — either configuring steps or dropping new ones in — aren't saved until you click Save.
Remember to go back and enable the trigger if you turned it off!
- Zoom in and out using the scroll wheel on your mouse, and drag the canvas to move it around if you want to focus on another area.
- Drag steps to move them around the canvas. To move all the steps in a flow, select them all (holding the shift key) and then drag. Or use the auto-layout button to organize everything in a nice, neat grid.

- Use the mini-map to move around the canvas: simply click and drag the mini-map box so it highlights the area you want to show on-screen.
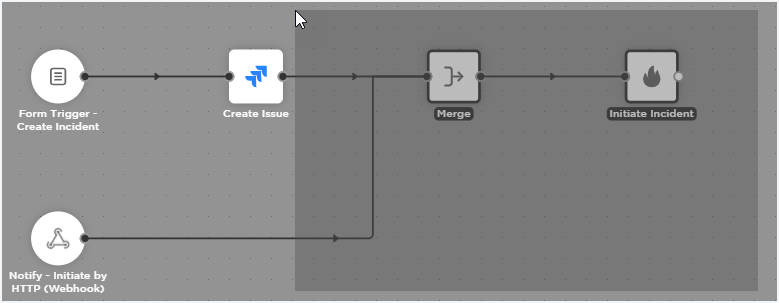
- Select steps within a region by holding Shift and dragging left:
Or, select steps both in and touching a region by holding Shift and dragging right: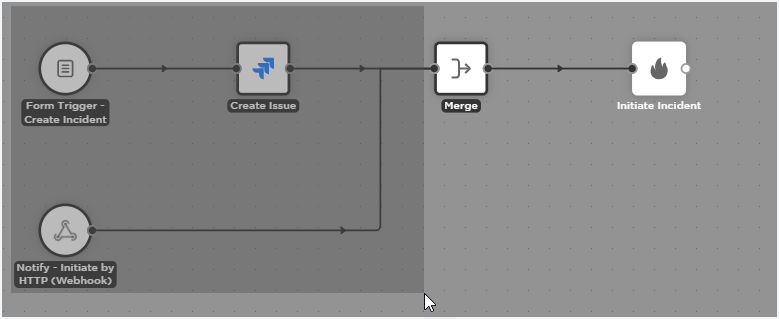
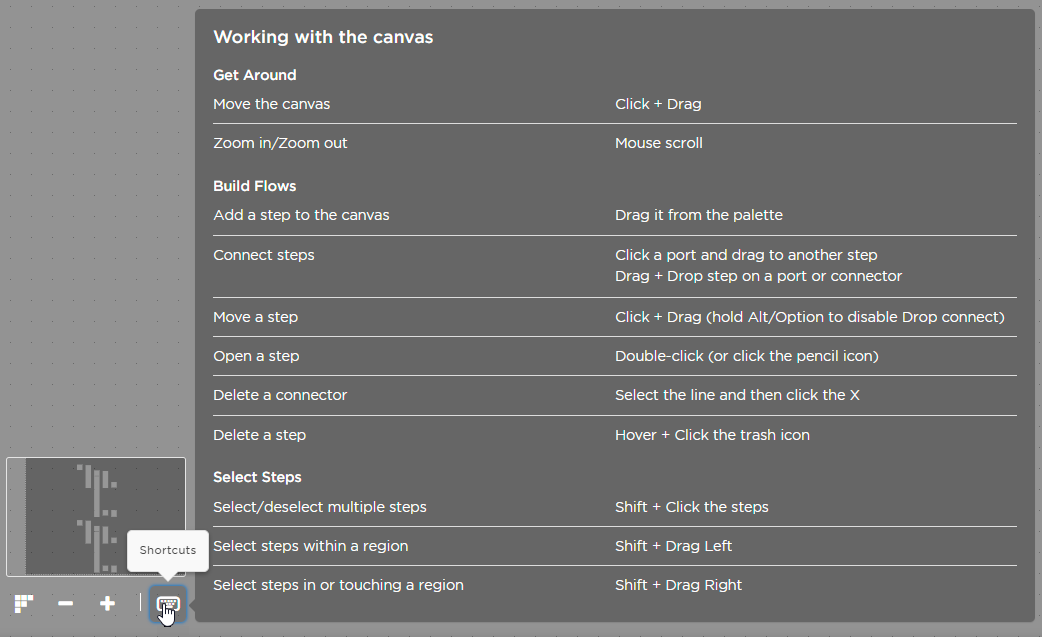
- You can also use the keyboard shortcuts to quickly move around the canvas or modify steps. Click the keyboard icon below the mini-map to view the available shortcuts:
For instructions on renaming and deleting the canvas, see Managing flow canvases.
Deleting most elements is as simple as selecting or moving your pointer over them and clicking the delete icon (the trash can) that appears. Keep in mind that this might orphan steps further down the flow and disconnect the source that they're using to populate inputs.
- Delete a step: Move the pointer over the step and click the delete icon.
- Delete a switch step (and all its paths)
- Delete a single path from a switch step: Click the delete icon on the corner of the path definition.
- Delete a single response option: Double-click the parent Responses trigger and click the x beside the response you want to remove. This removes it from the flow and from the form.
- Delete a connector: Select the connector and click the x that appears on the line.
Ready to get started?
Follow along as we walk through designing a flow for major incident management (MIM), where a sequence of automated actions are run as a result of a person selecting a single response to an alert from a monitoring tool.