Design forms
A form defines the information that can be included in messages or incidents when the form is submitted. The Forms tab of the workflow editor allows you to create forms, build out form content, configure message delivery options, and define who has permission to use it. Once you have created a form, you must deploy it before it can be used to send notifications or initiate incidents.
Formless alerting: You can notify users without a form by adding a Create Alert step to your automated flows.
There are two types of forms:
- Messaging forms: Used to send notifications to targeted recipients and any subscribers. They give you the ability to craft the messages that are sent and configure responses. They also create an associated canvas in Flow Designer.
- Once created, message senders can access the form from the Messaging page or from a dashboard widget. You can also configure a Create Alert Using a Form step in a flow to use the form.
- Flow trigger forms: Support incident resolution workflows. Used in conjunction with a Incident Initiation trigger, Incident Automation trigger, or Stakeholder Update trigger in Flow Designer, flow trigger forms allow users to trigger a flow by submitting a form. For more information, see Flow trigger forms.
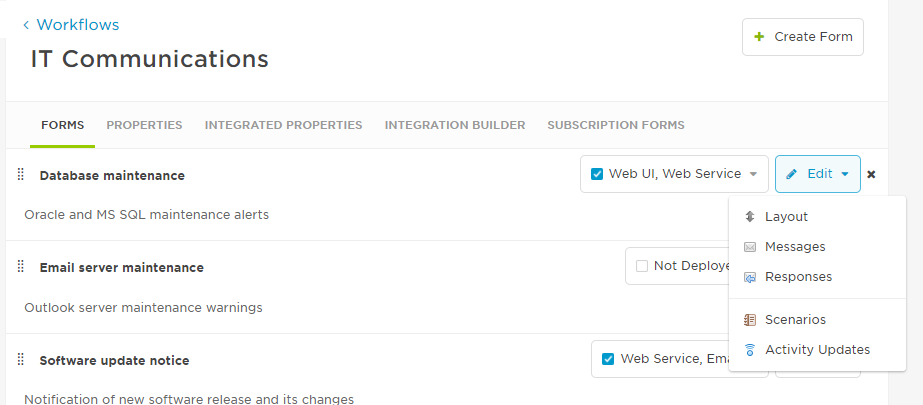
The Forms tab allows you to create an empty form and add it to the workflow.
- On the Forms tab, click Create Form.
- In the Create a New Form dialog box, specify a Name and optional Description.
- For messaging forms, the name you give the form also becomes the default name of the Flow Designer canvas associated with the form.
- Select the type of form you want to create.
- Messaging form: Intended to send notifications, it also creates a canvas to house related flows.
- Flow trigger form: Intended to trigger flows in Flow Designer. For more information about the types of triggers that use these forms, see Flow trigger forms.
- Click Create.
Once you have created an empty form, you can build out the form content, configure delivery options and permissions, create flows, and deploy the form. For an overview of the steps required to build out your form, see Building and deploying forms.
When you delete a form, any flows, subscription forms, or subscriptions that are based off the form are also deleted. If the form is associated with an active alert then you will no longer be able to view the message content from the xMatters web user interface or mobile apps.
To delete a form:
- Locate the form on the Forms tab.
- Click the X icon next to the form name.
By giving forms accurate names and descriptions you can easily locate and manage them. The order of forms within each workflow on the Messaging tab is the same as their order on the Forms tab. The order of automations on the Automation section of the Incident Console is also the same as the order of their associated forms on the Forms tab when sorted by 'Default'.
- To rename a form, click the form name and then type a new name when the cursor appears.
- To edit the form description, click the description and then type a new description when the cursor appears.
- To reorder the forms on the page, click the form's handle icon and drag it to a new position.
If you need to create several forms with similar layouts and don't want to start from scratch each time, you can copy a form's layout and settings to a new form which you can then modify without affecting the original form.
To copy a form:
- Locate the form you want to duplicate on the Forms tab.
- Click the Edit drop down menu next to the form name.
- Select Copy Form.

- In the Copy Form window, type a new name and optional description.
- Click Copy Form.
Once copied, the new form retains the same settings as the original form, however any deployment options are disabled. To deploy the form, click the drop-down list beside the form name and select the deployment options that you want to enable.
Building and deploying forms
Once you've created an empty form, you still have some work to do. The following sections provide an overview of the steps you'll need to take to create the message content, define who has permission to send messages using the form, and configure advanced notification and handling options.
Create form content and delivery options
Once you have created an empty form, you can create the content of the messages and define message delivery options using the following tabs:
- Layout: The form's Layout tab allows you to configure the default recipients and handling options and specify which properties are available to be included in messages, incidents, or in the associate flow. Form elements and properties can be added and rearranged using drag-and-drop, and sections can be removed with one click. This tab also defines whether sending the form initiates a conference bridge (for messaging forms). For more information about working with the form layout, see Design the form layout.
- Messages (messaging forms only): The Messages tab is where you define the content of the email, SMS (text), and voice notifications. You can include properties in the messages if the properties are included on the form's Layout tab. Messages that do not contain any content or response options are considered empty notifications. They are not sent to the targeted devices and are logged as failed notifications. For more information about creating message content for email, SMS (text) and voice notifications, see Define message content.
- Responses (messaging forms only): The Responses tab lets you define the response choices that are presented to message recipients and set the action xMatters takes when each response is selected. These actions may include escalating the alert, terminating the alert, or connecting the recipient to a conference bridge. For more information about defining response choices, see Define response options.
Configure flows
Each messaging form creates an associated flow canvas where you can use Flow Designer to build drag-and-drop flows, connecting the tools you use into orchestrated, fully automated toolchains to help you reduce the complexity of your incident management workflows.
Each flow trigger form can be associated with an Incident Initiation trigger or an Incident Automation trigger to initiate the connected flow whenever the form is submitted.
Configure permissions
For the form and its scenarios to be accessible to other users, you must configure permissions.
Initially, only the user who created the form can use it (whether it's a messaging form used to sent notifications or a flow trigger form used to initiate incidents). You can give other users permission to use the form, either individually or to all users with certain roles (for example, Developers, Full Access Users). Note that the form must also be enabled before it can be used.
The Form Permission page also allows you to grant form senders the ability to create, edit, delete, and set scenario permissions for all scenarios associated with a form (to learn more about scenarios, see Define scenarios).
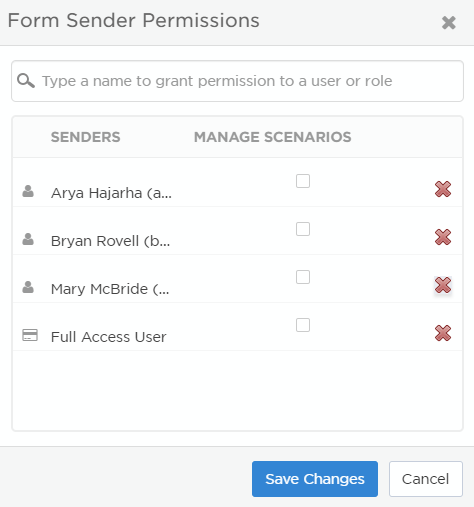
- On the Forms tab of the Workflows details page, click the menu beside the form name and select Sender Permissions.
- For flow trigger forms, you can also configure sender permissions on the associated Incident Initiation trigger or Incident Automation trigger.

- Start typing the name of a user or role in the search field and then click the user or role when it appears in the drop-down results list.
- Repeat this step until you have added all of the users and roles that should have permission to send this form.
- If you want to remove a user or role, click its red X icon.
- If you want the sender to have the ability to create, edit, and delete scenarios, select the associated check box in the Manage Scenarios column.
- Click Save Changes.
Configure scenarios (optional)
You can make it easier for message senders to quickly send notifications by creating pre-populated forms called scenarios. By anticipating common situations and creating scenarios that are already filled in with the appropriate values, you can reduce the number of choices a message sender must make when sending an urgent notification. For more information about creating scenarios, see Define scenarios.
Allow users to self-subscribe to the form (optional)
If you would like to allow users to voluntarily receive notifications even when they aren't targeted by the alert, you can create a subscription form. Subscription notifications can be configured so that they are "information-only" and do not include the ability to respond or take ownership of the alert. Then can also be configures so that they are generated after an alert has been open for a certain length of time.
For more information about creating subscription forms, see Subscription forms.
Configure status updates (optional)
For messaging forms, you can notify specific users or groups when an alert based off the form is initiated or concluded.
The following types of recipients can be added:
- Users
- Roles
- Groups
- Devices
Additionally, granular settings are available to configure which devices recipients receive notifications on. For example, you could specify that users in the system who have the Group Supervisor role should be notified on their Work Email devices when a given form is initiated.
- On the Forms tab of the Workflow Details page, click Edit beside the messaging form, and select Activity Updates.
- Start typing in the All Recipients search field and press Enter or click a result to add it to the list.
- If you want to narrow down your search results, click All Recipients and specify the category you want to search.
- After you have added the required recipients, select Initiation or Conclusion or both to specify when to notify the recipient.
- In the Devices to Notify area, do one of the following:
- Select All Devices to notify recipients on all of their available devices.
- Select specific device types on which to notify recipients (click the arrows to display additional device names within each type).
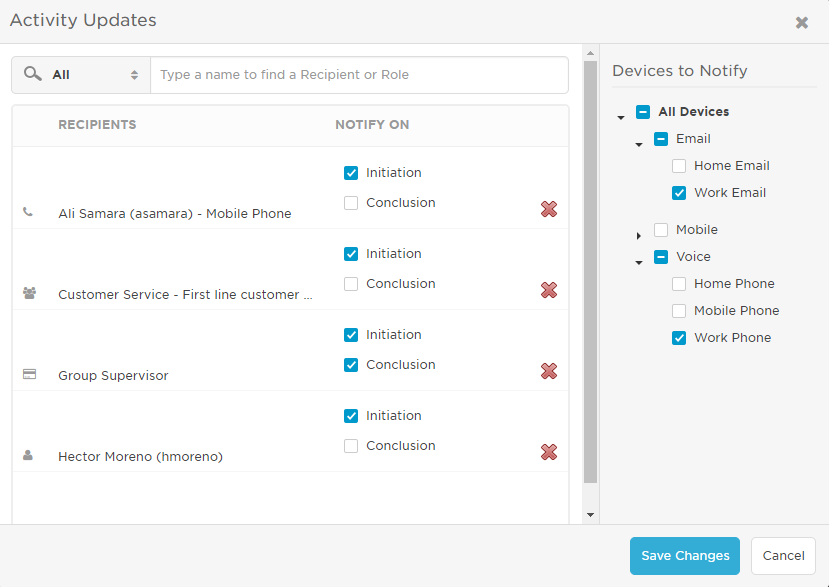
- Click Save Changes.
Deploy the form
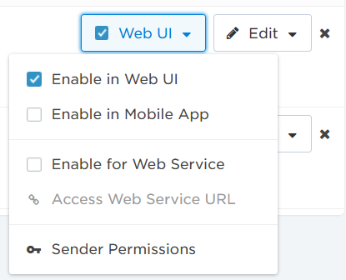
Before you can send notifications with your form, you must deploy it. Deploying a form makes it available for use. Depending on how you deploy a form, it may be available from the web user interface, xMatters mobile apps, the REST API, or a combination of those. If a form is not deployed, it cannot be used to send notifications and any associated flows won't run.
It is a best practice to deploy forms only to the locations where message senders need to access them; for example, deploy forms to the mobile app if message senders need to use them when they are on the go. Deploy a form to web services only when you want to initiate that form from another application.
For flow trigger forms, you can also set the deployment option on the associated Incident Initiation trigger or Incident Automation trigger.
- Click the drop-down list beside the form name. (The label for this list varies depending on the options selected.)
 s
s
- Select the deployment options that you want to enable:
- Enable in Web UI: Displays the form on the Messaging tab of the web user interface.
- Enable in Mobile App: Enables the form in mobile apps.
- This setting also controls if flow trigger forms are available to initiate incidents from the xMatters bot in Slack and Microsoft Teams).
- Enable for Web Service: Allows the form to be accessed by the REST API. For more information about using the REST API to initiate alerts, see the REST API help.
- Enable in Incident Console & Service Maps: Allows you to run automations on the Incident Console and on an incident service dependencies map. This deployment option is only available when you associate a flow trigger form with an Incident Automation trigger.