
Jira Data Center & Jira Server
We've certified our existing Jira Server integration for Jira Data Center. As of February 15, 2024 PT, Jira Server products will reach the end of support by Atlassian.
Use xMatters to keep track of your important issues in Jira Server, and automatically notify the right people whenever an issue needs attention. This closed-loop integration lets you target xMatters users or groups from Jira issues and automatically assigns the issue to the user who acknowledges the alert. Alert information is added to the Comments tab in Jira, and you can use the Engage with xMatters feature to call in assistance from multiple users and groups and create ad-hoc conference bridges to get to a solution quickly, all from within Jira.
This integration is built specifically for your self-hosted Jira Server. If you're using Jira Cloud, you'll want to use this integration.
Do more with this integration
Incorporate this integration into your orchestrated incident resolution workflows with Flow Designer. After you create a configuration, the Flows tab appears. From there, you can build your flows — add new response options, connect to other apps, or even create new xMatters alerts based on activities in the flow — enriching the information injected by this integration along the way.
Get started with Jira Server
To install this integration in xMatters, simply go to Workflow Templates on the Workflows tab and start typing the name of the integration you're looking for to filter the list. Once you find it, click its tile then click Next to get to the configuration screen.
How to set up a Jira configuration
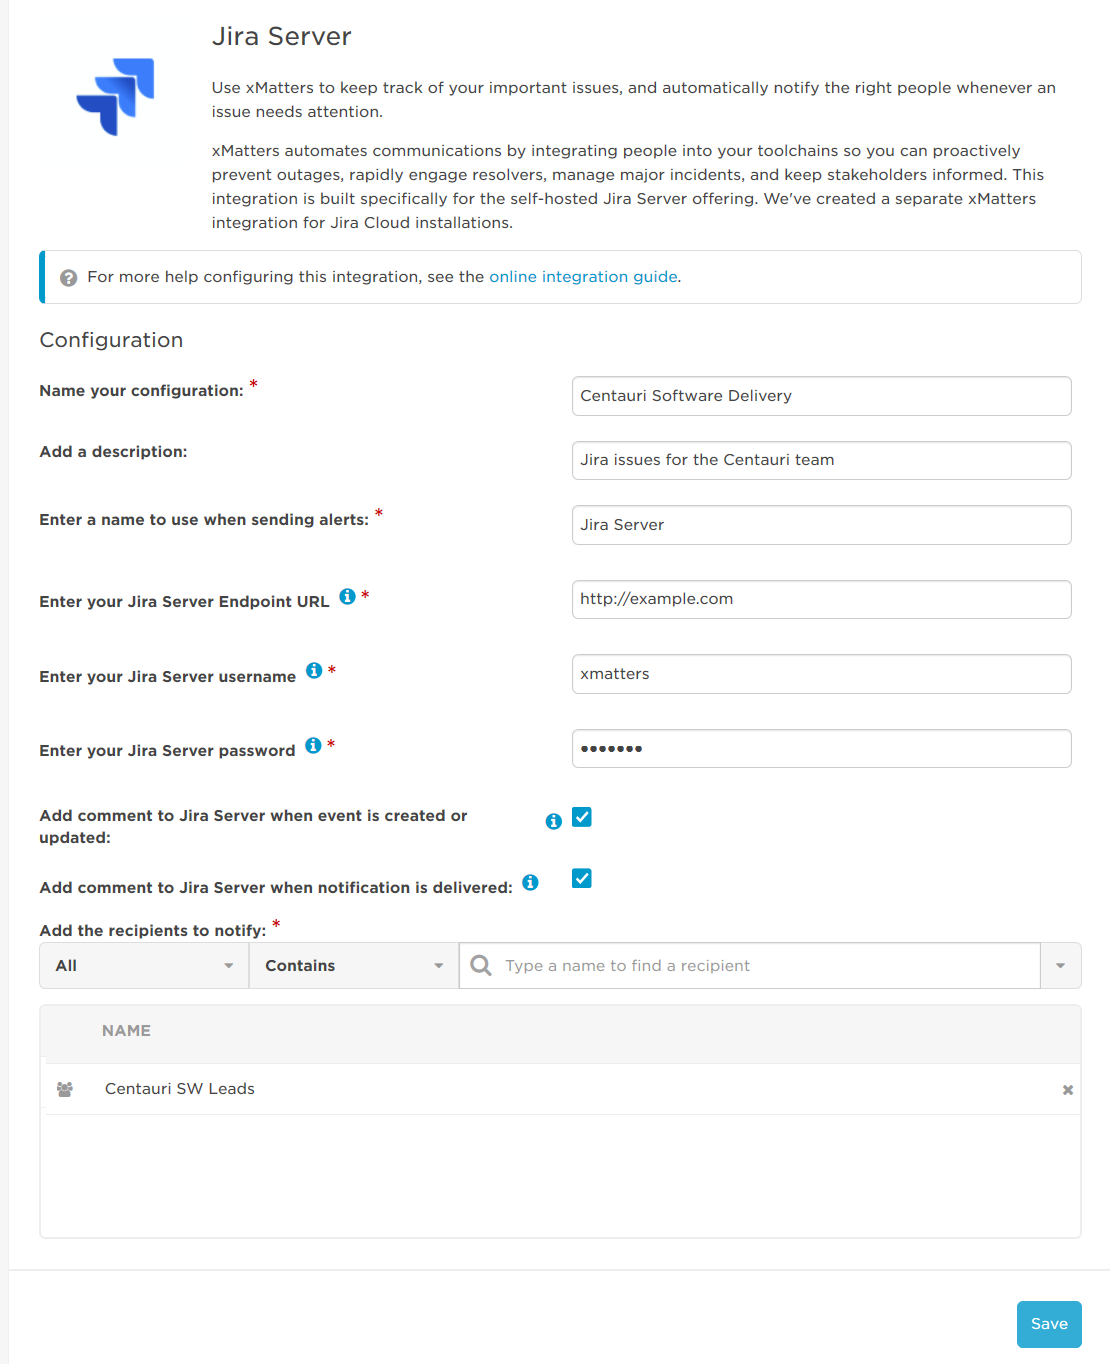
Give your configuration a name and description to help you differentiate it from any other Jira Server configurations. Add a name for the integration to use when sending alerts (so you can easily tell which configuration or integration the alerts are from).
Enter your Jira Server endpoint URL (for example, https://acmeco.com/Jira). This URL needs to be accessible from the cloud. If it isn't, you can convert to this integration to a custom workflow and use an xMatters Agent.
Enter your Jira Server username and password. We recommend that you create a user in Jira specific to xMatters.
To allow xMatters to make updates to the Jira issues, you need to create an xMatters user in Jira.
When you create the user:
- Make the username xmatters.
- Make sure you give the user application access to both Jira Service Desk and Jira Software in the Create new user dialog. The email address entered is not used, so it doesn't not need to actually exist.
- Add the user to the projects you want the xMatters integration to work with, adding the user with the Service Desk Team role.
- Make note of password - you'll need this and the username when you configure xMatters.
Set whether you want to update the Comments tab for the Jira issue with updates when the alert is created or updated and notifications are delivered to users devices.
Finally, add the default recipients for this configuration. These recipients are targeted if xMatters can't match the assignee in Jira with an xMatters user. See How issue assignment works for details.
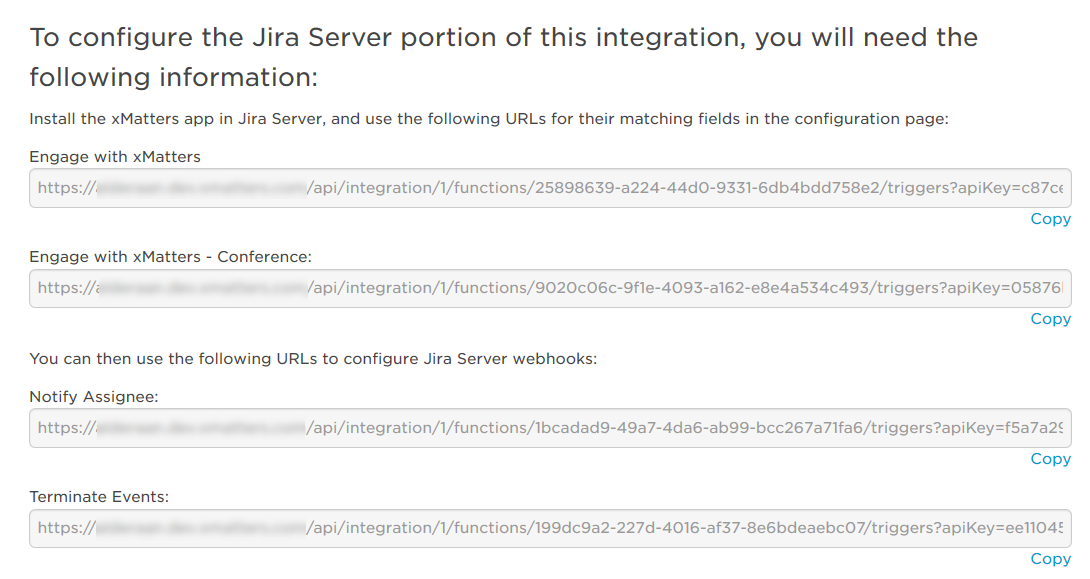
Once you save the configuration, xMatters displays the URLs you need to complete the setup in Jira:
You can now install and configure the xMatters add-on in Jira Server.
- Log into your Jira instance as an admin, then click the gear icon to view the admin dropdown and select Add-ons.
- Use the Search field to find xMatters.
- If you have any issues finding the app, try installing it from the Atlassian Marketplace.
- Click Install to download and install the app.
- After the installation completes, click Close.
- Navigate to Add-ons, and go to xMatters Configuration.
- Fill in the following fields:
- Endpoint: The Engage with xMatters URL you copied from the configuration page in xMatters.
- Conference Endpoint: The Engage with xMatters - Conference URL you copied from the configuration page in xMatters.
- Username: The username to use for authenticating when retrieving the groups and users for the Engage with xMatters dialog. (Enter the xMatters Web Login for a user with permission to access the recipients you want to engage.)
- Password: The password for the user above.
- Show Group Description: select this to show the description of the group from xMatters in addition to the group name, when you search for a group in the Engage with xMatters dialog.
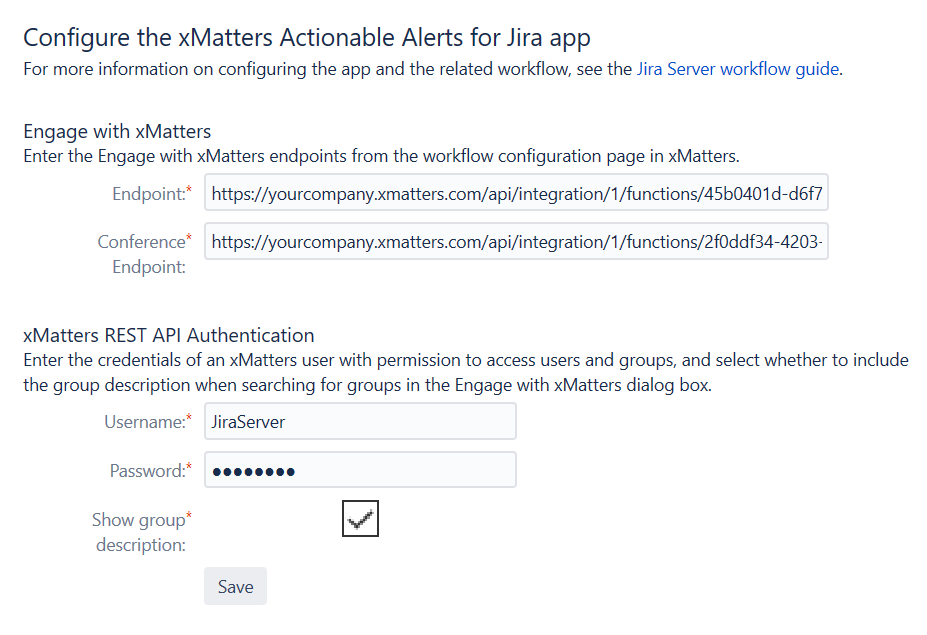
- Click Save to finish configuring the add-on.
To complete the integration, configure the webhooks for different actions in Jira.
- Click the admin dropdown then select System.
- In the System settings menu, under Advanced, click Webhooks.
- For each trigger listed below, click Create a Webhook then:
- Give the webhook a name and description that are useful to you
- Set the status to Enabled
- Paste the appropriate URL you copied from the configuration page in xMatters as needed for your organization (see examples in the table below).
- Fill in the Events sections as needed for your organization (see examples in the table below).
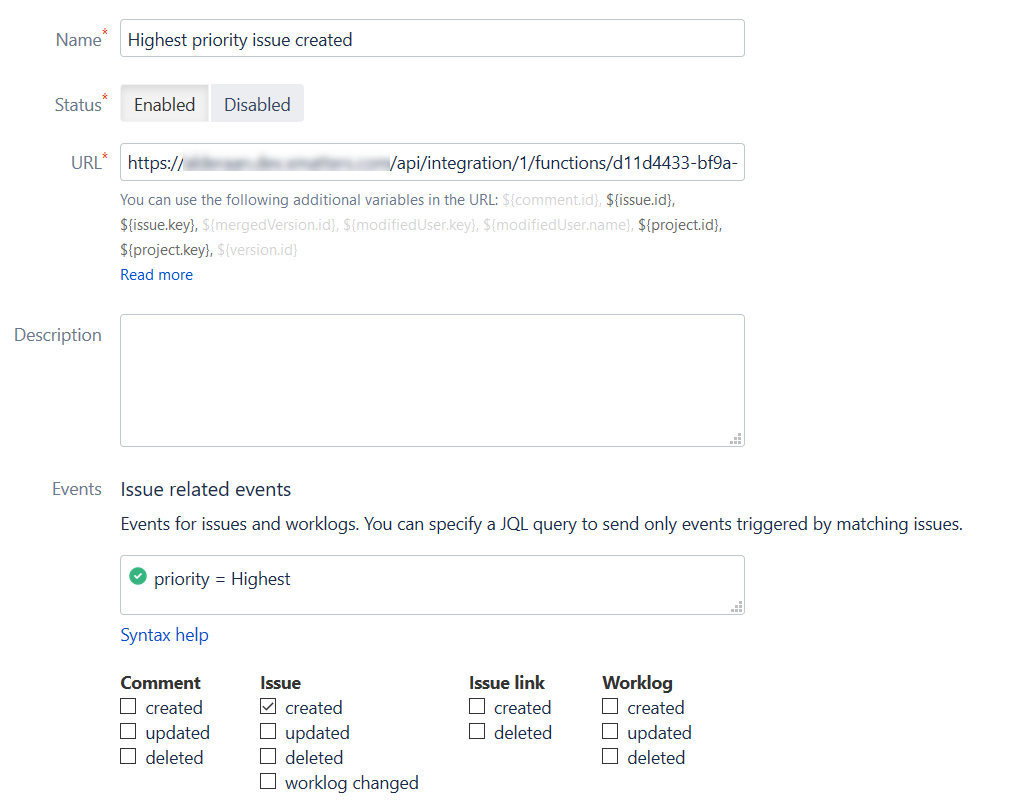
- When you're done, click Create.
The webhooks we show below are a basic example to get you started, but you can customize these if you need to.
| Webhook | URL from xMatters | Events |
|---|---|---|
| Trigger 1: Highest priority issue created | Notify Assignee |
|
| Trigger 2: Issue moved to highest priority | Notify Assignee |
|
| Trigger 3: Terminate alerts | Terminate Alerts |
|
| Trigger 4: Terminate alerts if issue priority moved to Low | Terminate Alerts |
|
| Trigger 5: Terminate alerts if issue delete | Terminate Alerts |
|
Your integration is now complete!
How to use your integration
To use the integration, create a new issue or incident in Jira that matches the rules contained within the webhooks. Jira builds a payload and sends it to xMatters. xMatters automatically sends a notification to the recipients you defined in the configuration settings.
A note about comments...
By default, all alert changes (alert creation, status updates, device delivery updates) are posted to the Comments tab in Jira, and are viewable by all users. You can use the configuration page in xMatters to turn on/off comments. (If you want more granular control of what gets posted, you can also convert your integration to a custom workflow and enable/disable the outbound integrations).
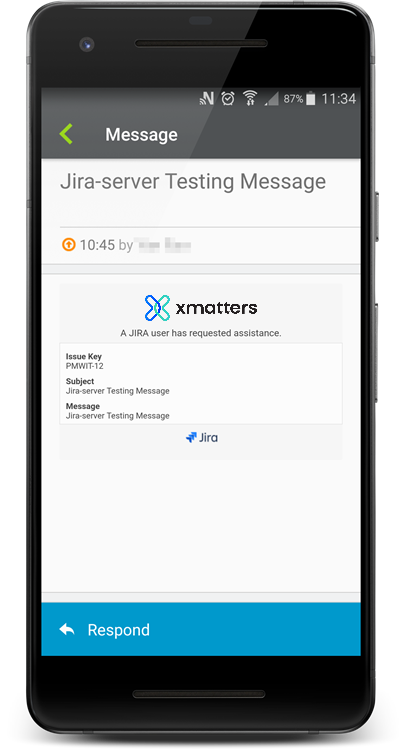
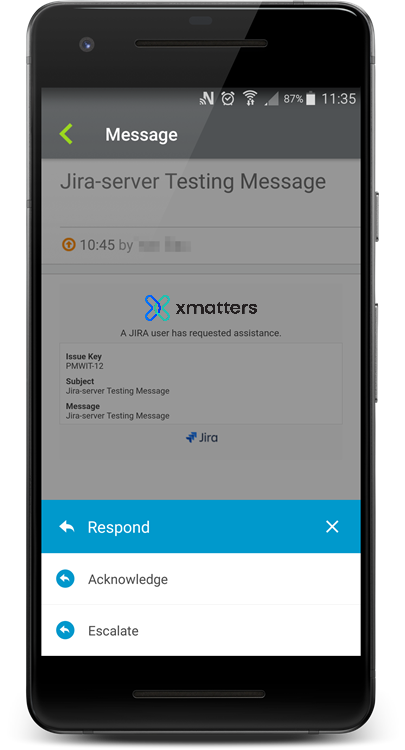
Check out the screenshots at the top of this page to see what the notifications would look like in the xMatters mobile app.
- Create a new issue that meets the criteria you defined for the Notify Assignee webhook.
- Target a user with a device you can access (so you can respond to the notification when it arrives) and who exists in both Jira and xMatters. Once you save the issue, xMatters sends a notification to the user targeted in Jira. If it can't find that user, it targets the groups or users you specified in the configuration settings.
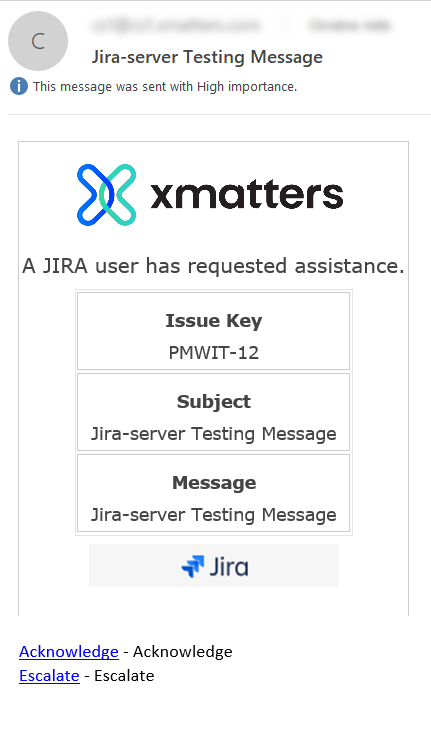
- When you get the notification from xMatters, there are two response options:
- Acknowledge: assigns the issue to you (the responder), updating the issue in Jira and adding a note to the Comments tab.
- Escalate: immediately escalates the issue to the next recipient in the escalation path.
You can launch the Engage with xMatters workflow from within the Jira View Issue screen. Updates are added to the Comments tab in Jira when the Engage alert is created and as users respond.
To use the Engage with xMatters feature:
- Click the Engage button on the top right side of the issue details to display the Engage with xMatters dialog.
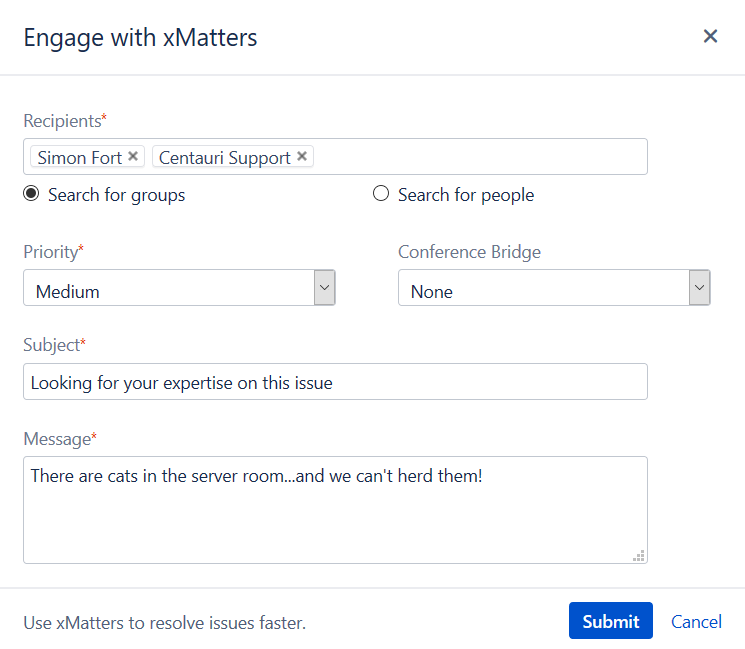
- Start typing in the Recipients field to see a list of users or groups, and then select one or more recipients.
- Select the priority of the alert in xMatters.
- If you want to start a conference bridge, select the type from the drop-down list.
- Enter the subject and a message, and then click Submit.
This generates a new alert targeting the recipients listed and delivers notifications across the users' devices. If a conference bridge was selected, the user is invited to join the conference bridge, or they can escalate to the next person in line.
The integration creates alerts in xMatters and sends notifications to the appropriate recipients when issues are created or updated in Jira. The integration transforms the payload into an xMatters alert, and queries xMatters for the assignee (if one is populated) based on the Jira username. If the user is found, xMatters sets them as a recipient and creates the alert. If they are not found, xMatters targets the default recipients set in the configuration.
When a user responds with "Accept", the integration assigns the responder to the ticket in Jira and makes a note in the Comments section of the ticket. To do this, the Jira username needs to match the user ID (targetName) in xMatters, or be stored in the Jira Username custom field. This user also needs to have access to the project in Jira and have the Assignable User permission. If the Jira Username custom field does not exist in xMatters, the integration tries to use the User ID (targetName) in xMatters instead.
In some instances, the user ID in xMatters may not match the user ID in Jira. In this case, you can store the Jira username in a custom user property in xMatters. Follow the steps for creating a custom user property, making sure you name the property "JIRA Username". This name is important as the code relies on this specific text to find the username.
Extending your integration
Looking to do more with xMatters and Jira Server? If you want to tailor the settings and notifications for the integration, you can convert it to a custom workflow.
After you convert the integration to a custom workflow, you can configure it to use Basic authentication instead of URL authentication.
To use Basic authentication, you need to:
- Convert your integration to a custom workflow.
- Switch the authentication method for the inbound integrations to Basic.
- Update the xMatters webhooks in Jira and make sure the REST API authentication credentials on the xMatters add-on configuration page in Jira match a user with sender permissions on the inbound integrations in xMatters.