
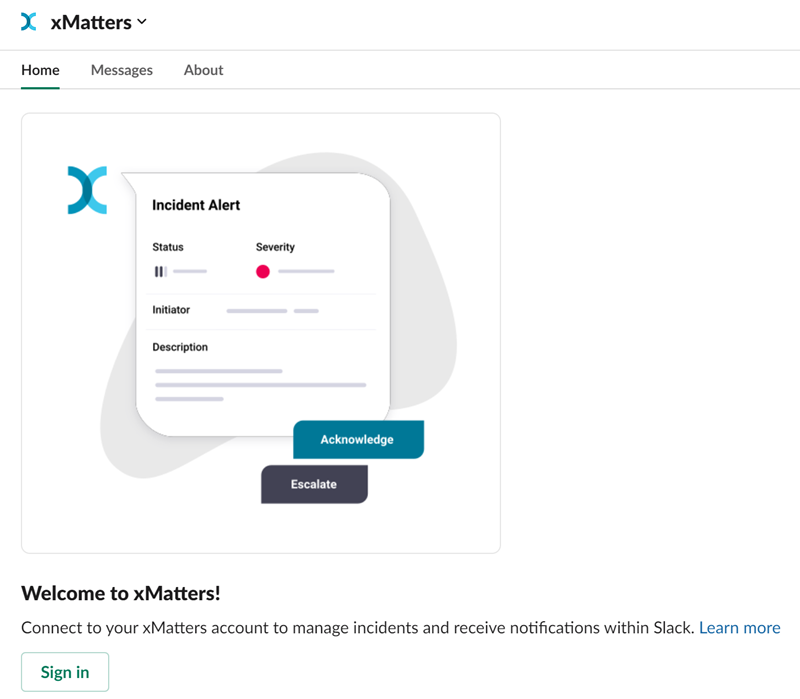
Slack
Slack is a popular team communication tool that helps enable real-time collaboration. This integration adds an xMatters bot to your Slack workspace that lets you:
- Look up xMatters on-call groups, broadcast groups, and services. You can see who's on call (if applicable) and instantly invite them to a Slack channel using an xMatters notification to their preferred devices. Learn more
- Use slash commands to initiate incidents in xMatters right from Slack. Learn more
- Register your Slack account as an xMatters device, which enables you to receive and respond to incident notifications and other alerts right in your Slack workspace. Learn more
Do more with this integration
Incorporate this integration into your orchestrated incident resolution workflows with Flow Designer. After you create a configuration, the Flows tab appears. From there, you can build your flows — add new response options, connect to other apps, or even create new xMatters alerts based on activities in the flow — enriching the information injected by this integration along the way.
v2 now available!
The new and improved xMatters bot for Slack is now available. If you're still using v1 or aren't sure if your bot is up-to-date, follow these instructions to check your current version and upgrade as soon as you can to take advantage of all the new and improved functionality.
Are you looking to integrate Slack into your automated toolchain using steps in Flow Designer? Check out these instructions instead.
Get started with Slack
How to set up an integration for Slack
How you set up the integration can vary, depending on what you want to do with it. If you want to be able to use all the xMatters bot features (for example, look up who's on call, invite on-call members of a group to a channel, and initiate incidents), you need the xMatters bot installed in Slack and a Slack workflow in xMatters. The easiest way to get this is to install the workflow and add the bot from there. However, if you just want to get started using /slash commands to initiate incidents, you can install the app from the Slack App Directory (you can always install the workflow later and connect it to an existing bot if you want to start using the other features).
- Go to Workflow Templates on the Workflows tab and start typing "Slack" to filter the list.
- Once you find it, click its tile then click Next to get to the configuration screen.
- Give your integration a name and description.
- Enter a name to use when sending alerts. This name is used when xMatters lets someone know that they've been invited to a channel in Slack (for example, by sending them an email or pinging them in the xMatters mobile app).
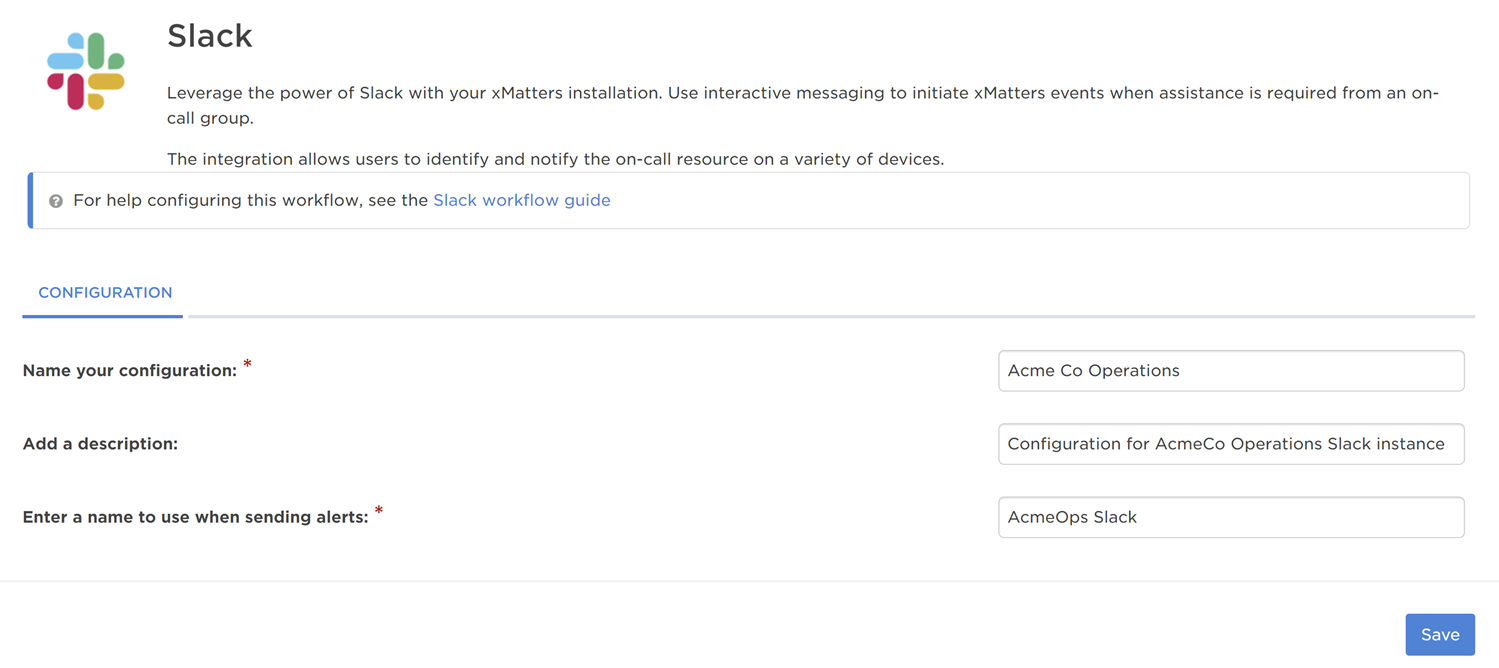
- Save your workflow. After you save, the Add to Slack button appears.
- Click this button to open a Slack authorization window, where you can pick the Slack instance you want to connect to and view what permissions xMatters needs in your Slack environment.

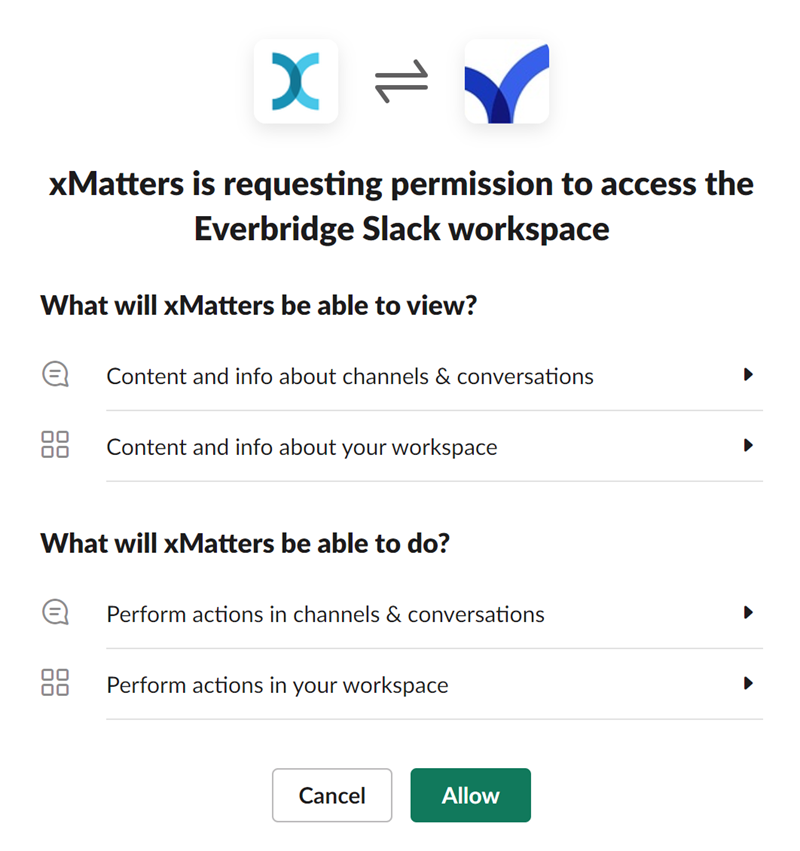
- Click Allow to approve. You should see a success message saying you've successfully connected to Slack. The bot is automatically added to your Slack workspace.
You can only connect one workflow to a Slack workspace. If you try to connect to a workspace that already has the xMatters bot installed, a dialog appears asking you to confirm that you want to overwrite the existing integration. It's a good idea to check with your organization to make sure no one else is already connected to the workspace. Also, if you want to use the xMatters bot in multiple Slack workspaces, you need to set up a separate workflow for each one.
Once you get the message that you're successfully connected, you can close the window and return to xMatters, which shows your configuration is now connected. The xMatters bot shows up in your list of apps in your Slack workspace and you can invite it to public channels (our bot doesn't get involved in direct messages or private channels just yet).
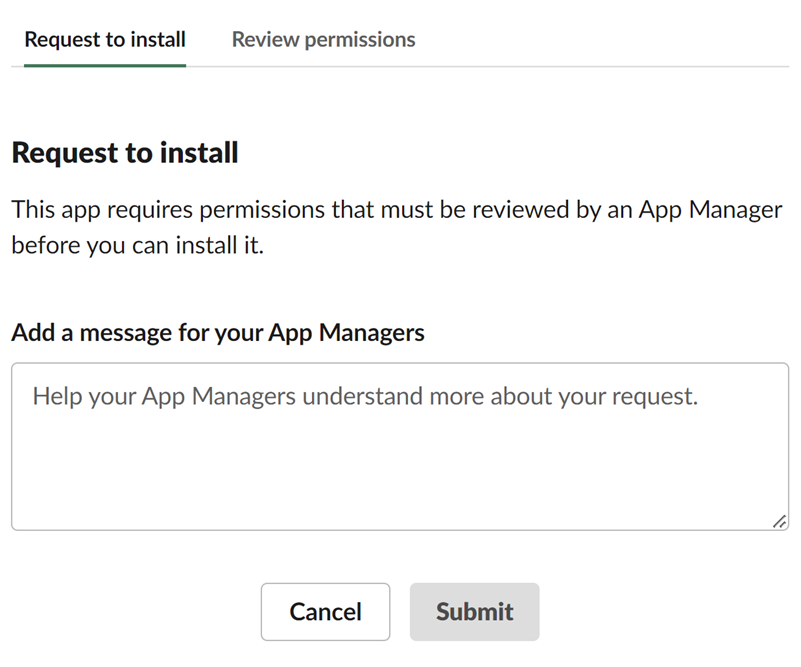
Request to install the xMatters app
Your organization's Slack app manager may have set up policies that require the xMatters app to be reviewed by an app manager before you can install it. If your organization has this restriction, the Slack authorization window will have a Request to install tab where you can send your app manager a message requesting permission to install the xMatters app.
Installing the bot without a workflow lets you quickly start using /slash commands to initiate incidents in xMatters from Slack. If, at a later date, you want to use the @ commands, you'll need to install a workflow.
- Open the Slack App Directory and search for xMatters.
- Click Add to open the app page.
- Click Add to Slack. You're requested to allow xMatters to access your Slack workspace.
- Click Allow.
After you complete the authentication, you're ready to initiate incidents from Slack.
Connecting an existing bot to a workflow
If you want to connect the bot to a workflow down the line so you can make use of the @ commands, simply go back and add the workflow in xMatters. When you click Add to Slack, it connects the workflow to your existing app. If you get a warning that you're going to overwrite someone's configuration, another person in your Slack workspace might have already done this — ask around to make sure you don't overwrite a configuration that is in active use.
The xMatters bot for Slack v2 takes advantage of the latest permissioning models in Slack and offers a number of upgrades to existing features. Also, if you're not using the bot in an instance anymore, it's a good idea to remove it, just in case.
To check your current bot version:
- Log into Slack as an admin user and under Apps, select the xMatters app.
- On the Home tab, look for a message indicating that the permissions are out of date.
- If you don't see it, you're all good!
- If your bot is out of date, click the Add to Slack button to install the latest version.
To remove the bot:
- Log into Slack as an admin user and under Apps, select the xMatters app.
- On the About tab, click Configuration to open the configuration settings in a browser.
- At the bottom of the page that opens in the browser window, click Remove App
Mention commands in Slack
The bot's @ commands let you look up on-call groups and services, see who's on call, and quickly invite on-call members to a discussion in Slack. You can also look up broadcast groups and invite their members to public channels.
The first thing you need to do is invite the xMatters bot to your channel. Simply type @xMatters hello and hit Enter, and our bot will drop in and say hello.
You can enter @xmatters help to see what our bot can do — but here's the list anyway:
- @xmatters hello: Say hello to our bot!
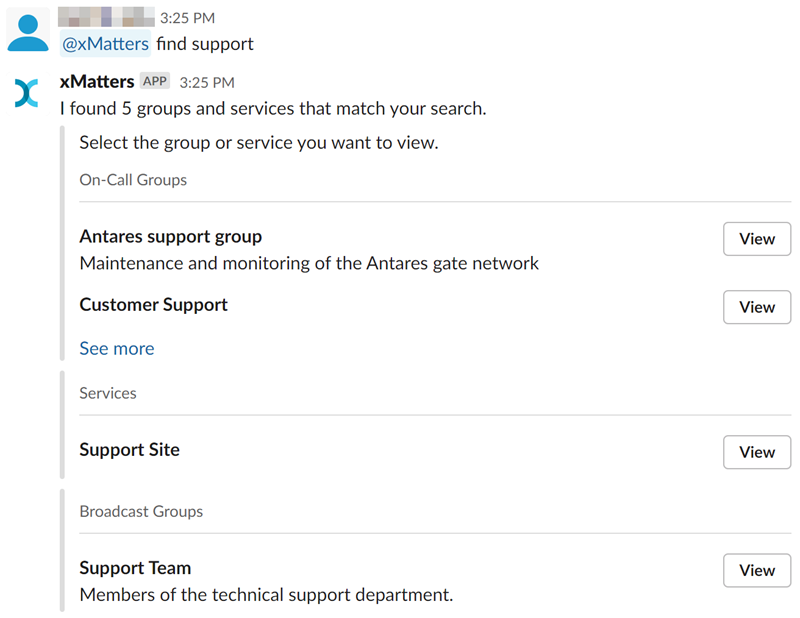
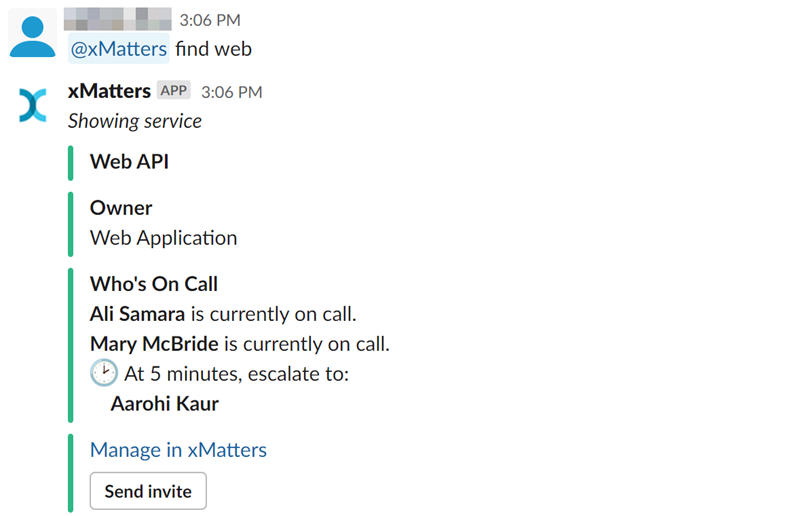
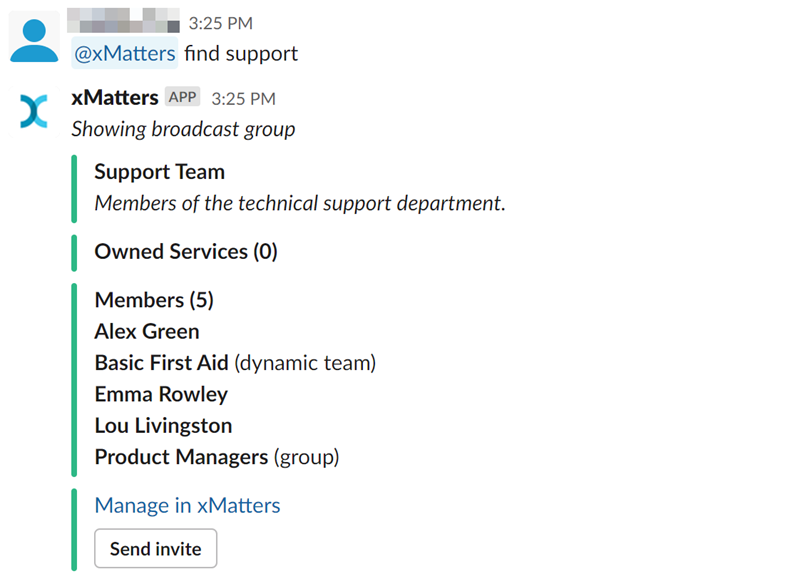
- @xmatters find + a keyword: Find on-call groups, services, and broadcast groups that match the keyword (or partial keyword — typing 'adm' finds 'System Admins' and 'Database Admins'). Pick your group or service from the list (if there's more than one) and click View to see more information about your selection.
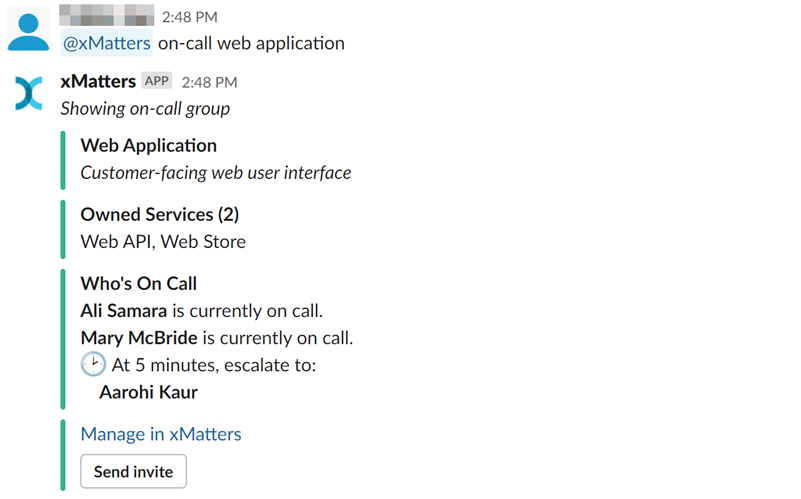
When you select an on-call group, you can view the group's name, description, and owned services. You can also view who's on call in the group, and you have the option to invite the on-call members to the channel if it's public (we can't invite people to a private channel because it's, well, private). To view and manage the on-call group directly in xMatters, click Manage in xMatters.
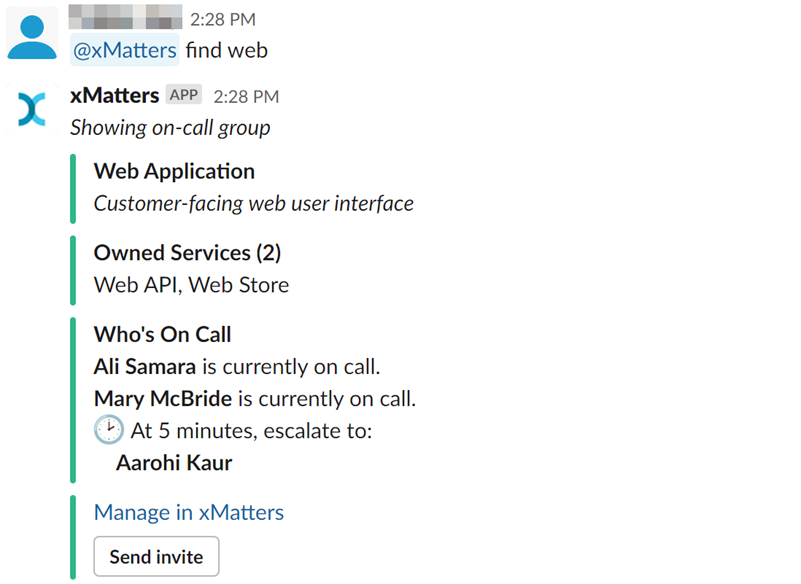
When you select a service, you can view the service's name, description, and its owner. You can also view the on-call members of the group that owns the service, and you have the option to invite them to the channel if it's public. To view and manage the service directly in xMatters, click Manage in xMatters.
When you select a broadcast group, you can view the broadcast group's name, description, and owned services. You can also view the members of the group, and you have the option to invite them to the channel if it's public. To view and manage the broadcast group directly in xMatters, click Manage in xMatters.
- @xmatters on-call + a group or service name: Type the full name of an on-call group or service to view who's on call in that group (or the group that owns the service) and see the escalation path (if someone is absent, their replacement is shown or, if there's no replacement, it shows the next person in the escalation). When our bot shows you who's on call in the group, it also gives you the option to invite them to the channel if it's public (again, we can't invite people to a private channel). If you type the name of a broadcast group, you can still view its members and invite them to the channel. By the way, the bot also understands @xmatters oncall.
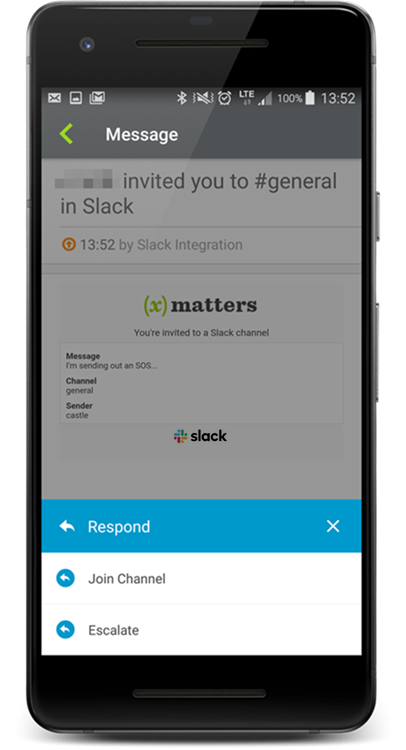
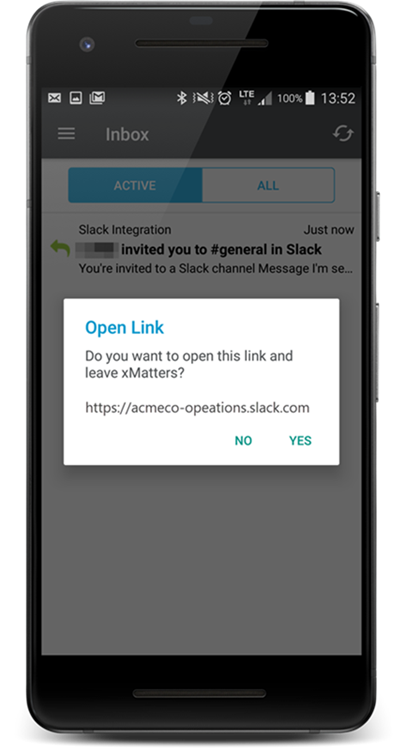
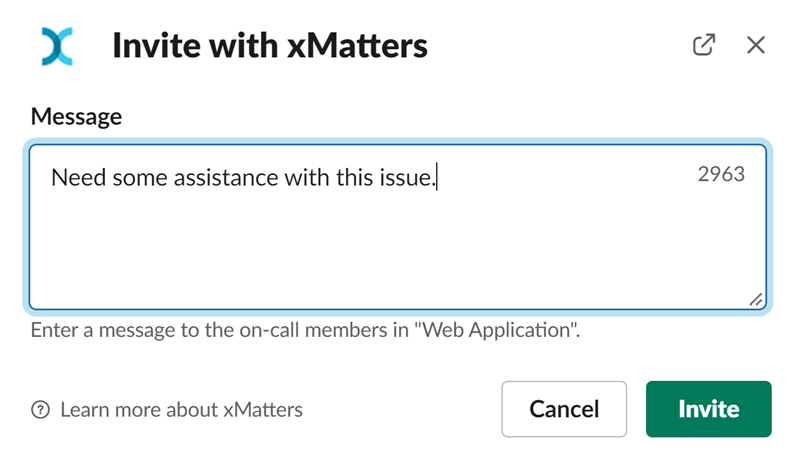
- @xmatters invite + a group or service name: Use xMatters notifications to invite the on-call members in a group to the channel (make sure it's a public channel - we can't invite people to a private channel). Type the full name of an on-call group or service to view on-call members in that group (or the group that owns the service). Press Send invite to open a modal where you can send them a notification on their preferred devices (including a link to the channel, if supported — we can't send a link in a voice message). If they get the alert via email or the xMatters mobile app, they can click the link right in the notification to join the channel. (Again, always trying to be helpful, our bot also understands @xmatters engage and @xmatters page.)
We use @xMatters in the examples above, but you can change the @ command in the App settings in Slack.
Slash commands in Slack
The slash commands let you look up on-call groups and services, see who's on call, and launch incidents in xMatters right from within Slack. Unlike the mention commands, where replies are posted to the channel, slash command responses are displayed in ephemeral messages only you can see. You can then choose whether to share the ephemeral message with the channel.
To use the slash commands, the bot needs to be installed in Slack, but you don't need a Slack workflow installed in xMatters unless you also want to use the @ commands to look up who's on call and invite them to a channel. Once it's installed, you can connect to xMatters with your account to launch incidents. If you use slash commands to initiate an incident in a public channel, that channel automatically gets added to the incident as a collaboration channel, allowing resolvers to join the conversation by clicking the link.
- /xmatters connect: Connect Slack to your xMatters account.
- /xmatters disconnect: Disconnect Slack from your xMatters account.
- /xmatters find: Find groups or services in xMatters
- /xmatters launch: Initiate an incident in xMatters.
- /xmatters invite: Invite a group or service to the Slack channel
- /xmatters help: See a list of what you can do with the slash commands
- /xmatters oncall: Find who’s currently on call for the group
- /xmatters note: Add a note to an existing xMatters incident.
Slack as an xMatters device
When you register your Slack account as an xMatters device, you can receive incident notifications and other alerts directly in your Slack workspace. Notifications come in the form of a direct message in your chat with the xMatters bot. You can respond to these notifications right in the chat, whether you want to simply acknowledge the alert, escalate an incident, join a huddle, or other response actions you can customize to your organization's needs.
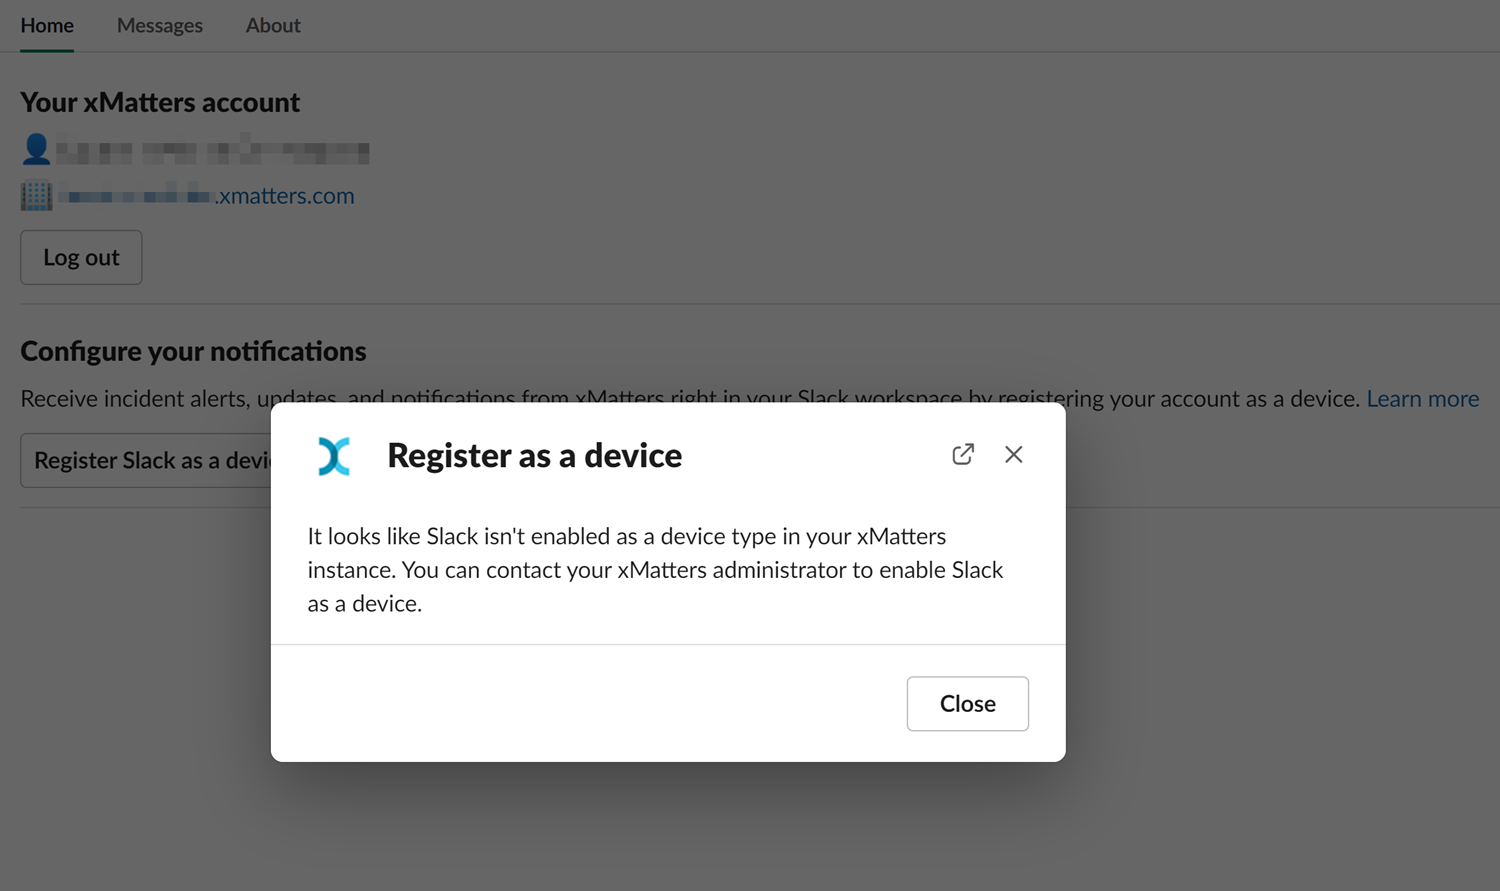
You need to be in the Slack interface to register your Slack account as an xMatters device. When you try to add Slack as a device from the xMatters Devices page, you will see a dialog box with the following registration instructions:
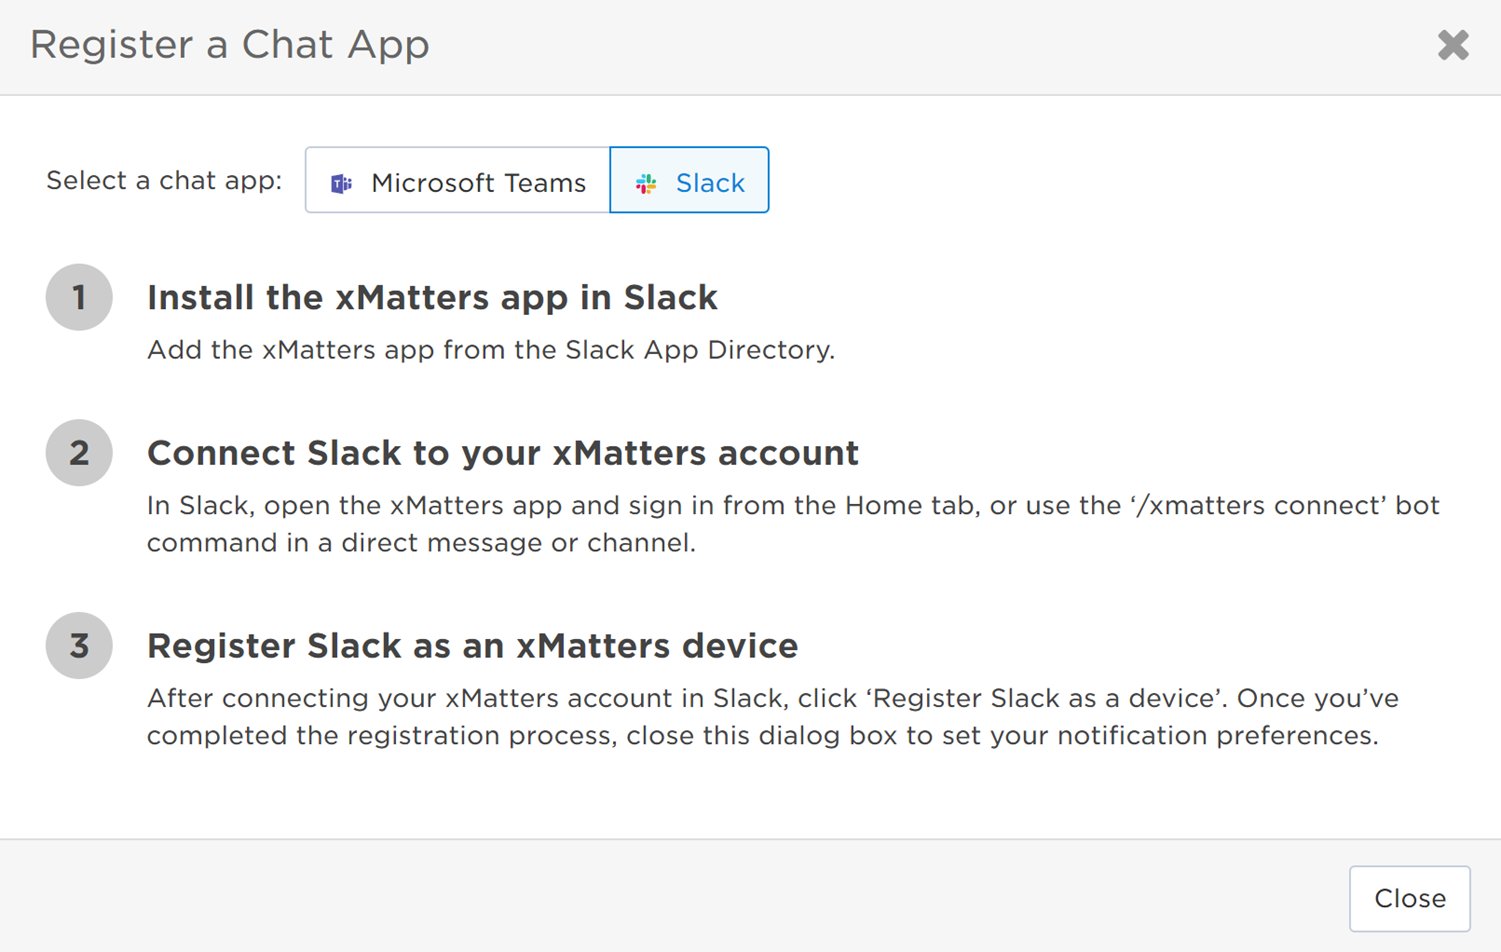
Register Slack as a device in your Slack workspace
You need to connect Slack to your xMatters account before you can register your Slack account as a device. If you aren't logged in, you can click Sign in from the Home tab of the xMatters bot or use the /xmatters connect bot command.
After you sign in, click Register Slack as a device on the xMatters bot Home tab.

A dialog box will pop up if your xMatters instance doesn't have any Slack device names. If your organization has an Advanced plan with xMatters, contact your company supervisor to add Slack device names to your xMatters instance. If your organization has a different xMatters plan, contact xMatters support to add Slack device names to your instance.
If you only have one device name in xMatters configured for Slack, your Slack account will automatically be registered as an xMatters device.
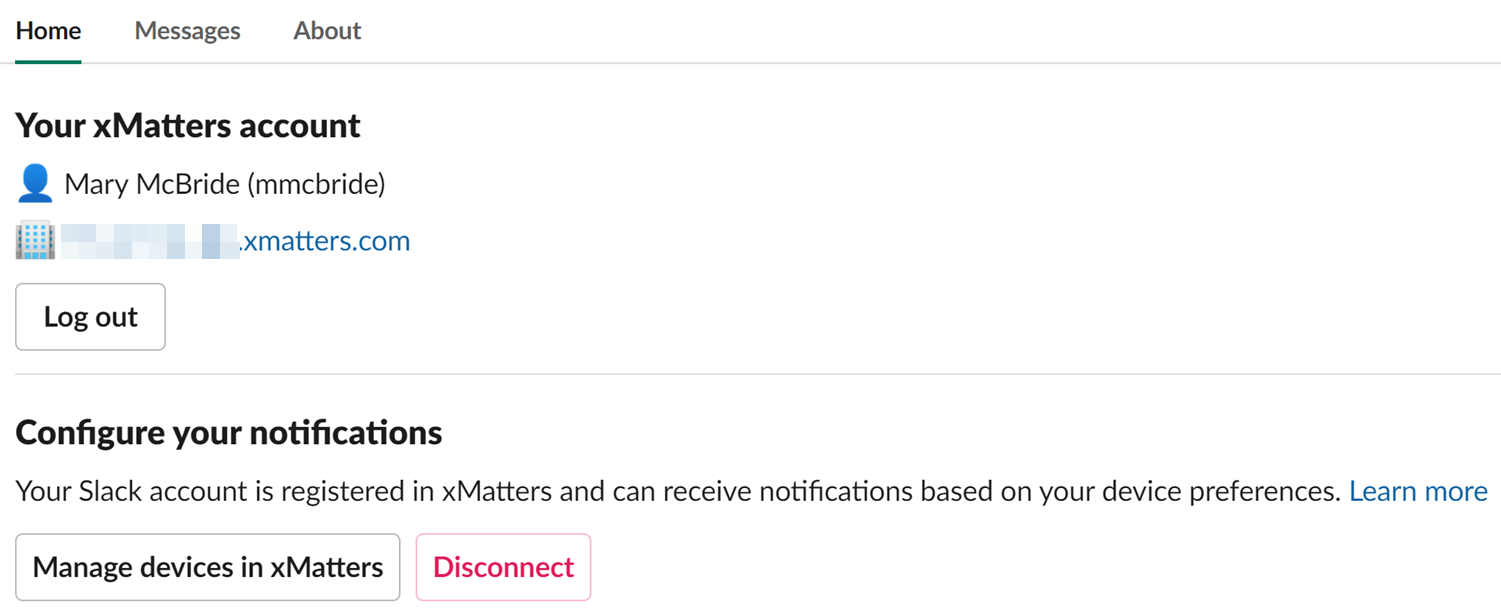
Click Manage devices in xMatters to open the xMattersDevices page. Your Slack account should appear at the end of the list as the most recently added device.
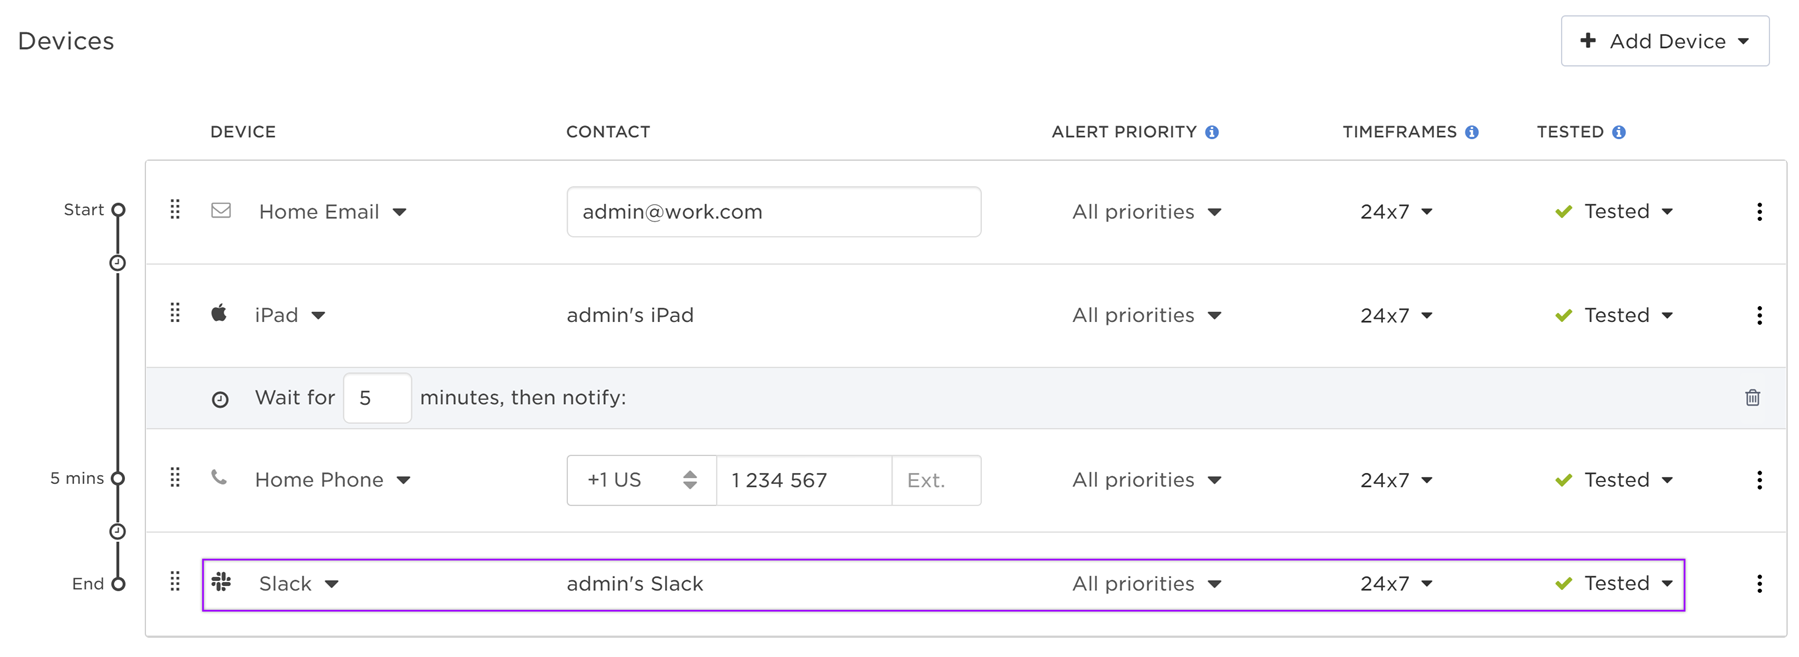
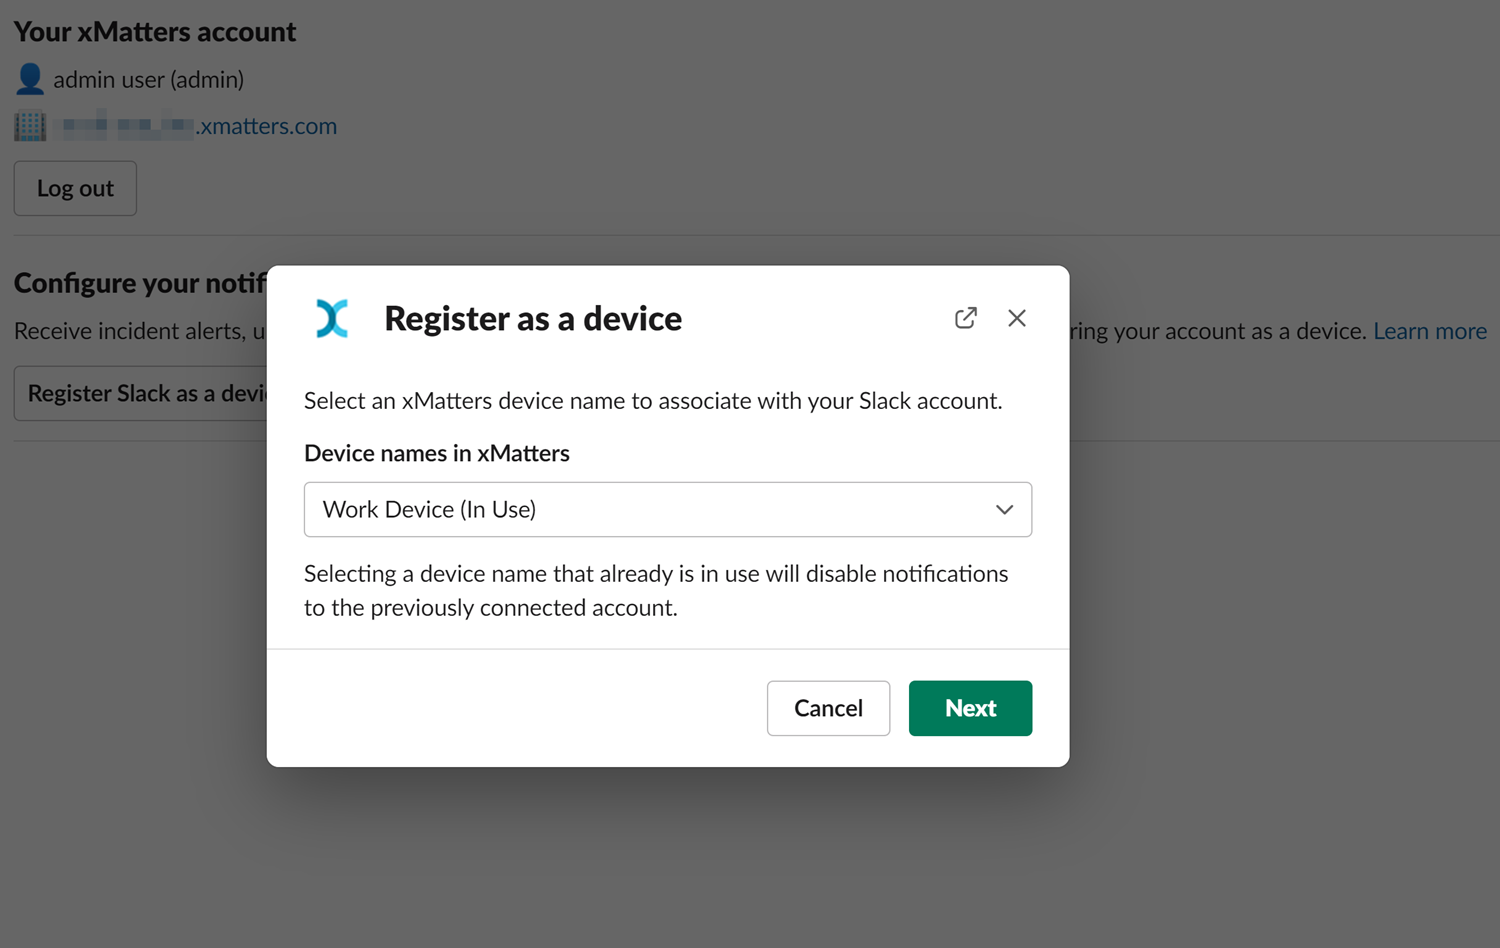
If you have multiple Slack device names configured in xMatters, you will be prompted to choose which device name you want to associate with your Slack account.
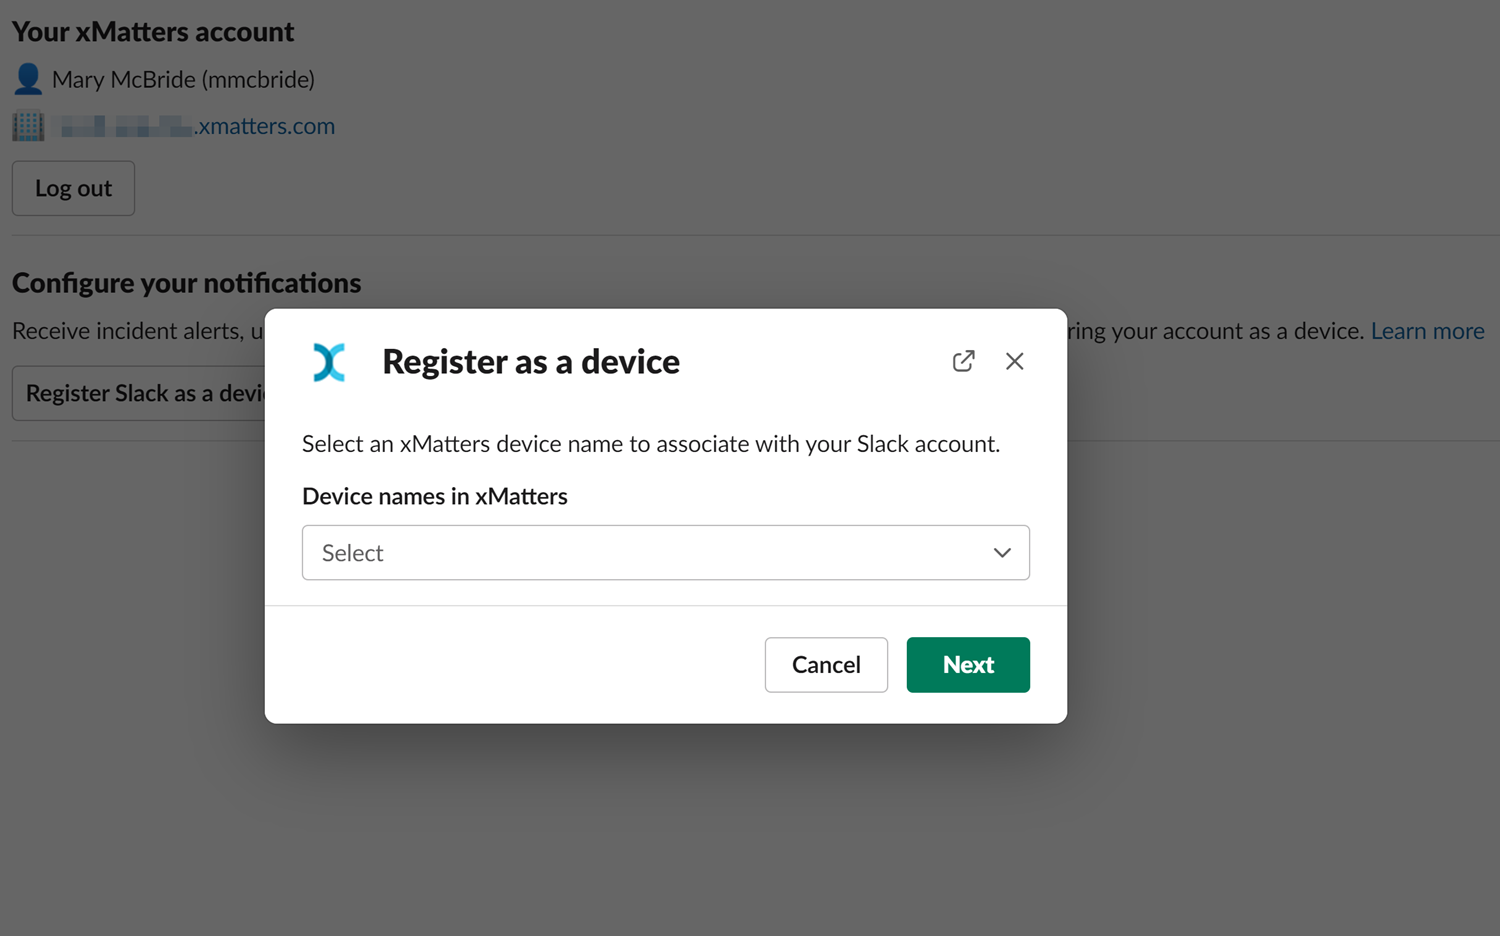
If you select a device name that is already associated with another Slack account, registering your current Slack account with that device will disconnect the previous account, and it will no longer receive xMatters notifications. Device names that are already connected to another Slack account will be marked as In Use.
There are several ways to remove your Slack account as an xMatters device:
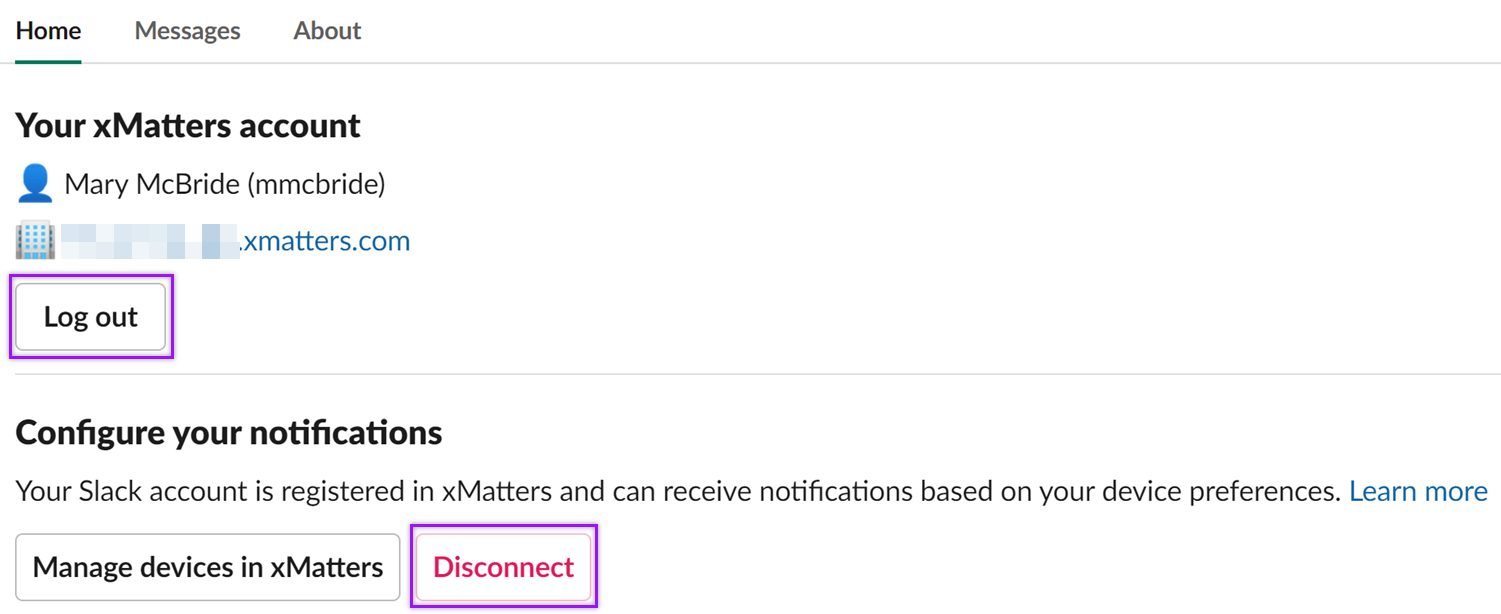
xMatters bot Home tab
In the xMatters bot Home tab, click Disconnect under the Configure your notifications section. You can also sign out of your personal connection to xMatters by clicking Log out, which will automatically remove your Slack account from your xMatters devices.
xMatters bot
Use the /xmatters disconnect command to disconnect Slack from your xMatters account. This will automatically remove your Slack account from your xMatters devices.
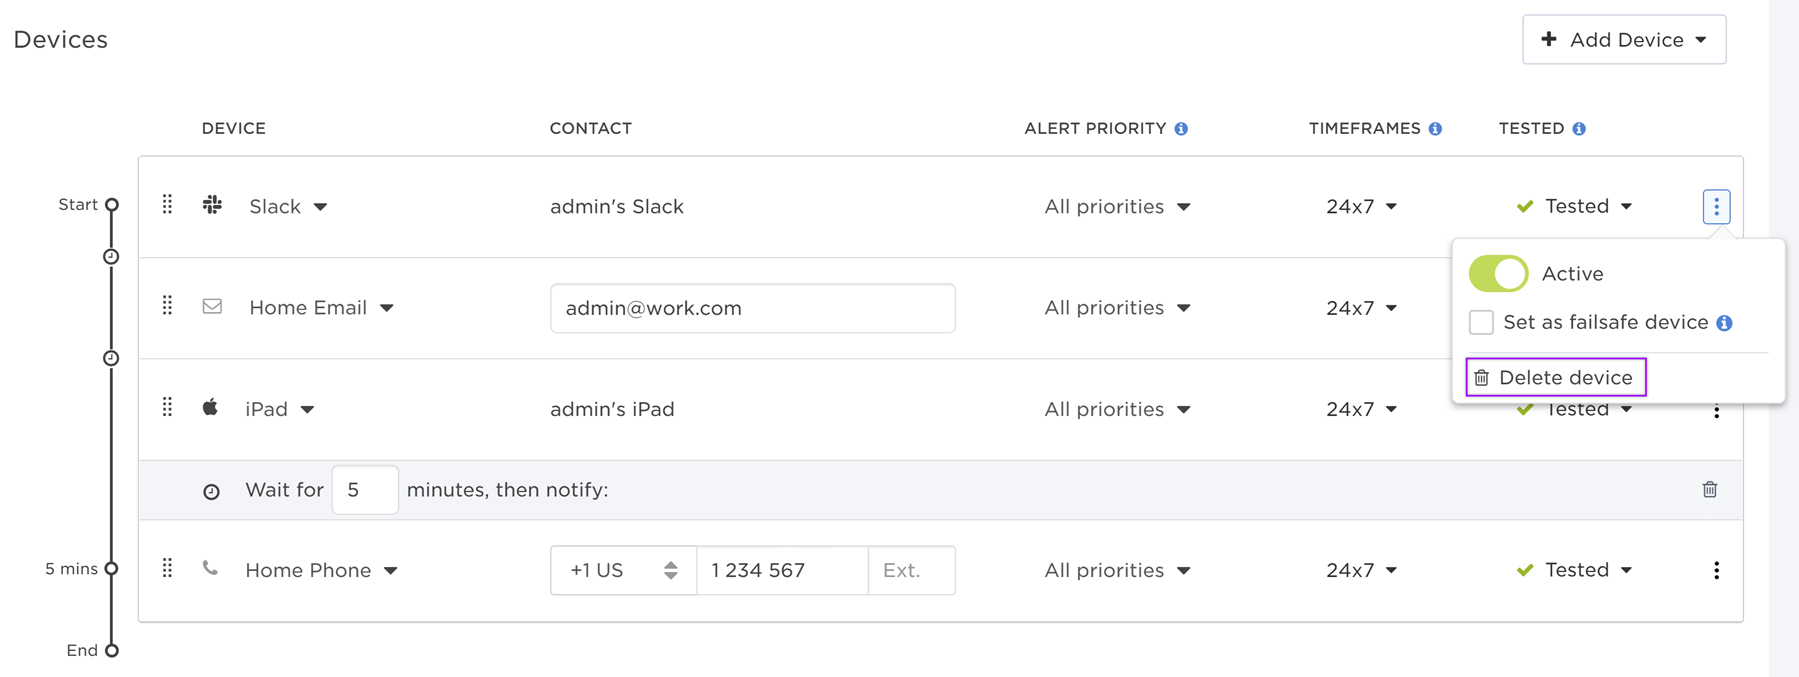
xMatters interface
On your xMattersDevices page, locate the Slack device you want to remove, click on the More Options menu (the three vertical dots at the far right of a device row) and select Delete device.
After you register your Slack account as an xMatters device, it functions the same way as the other devices in your xMatters account. If you have your Slack account configured to receive xMatters notifications, you will receive them as a direct message in the Messages tab of the xMatters app in Slack.
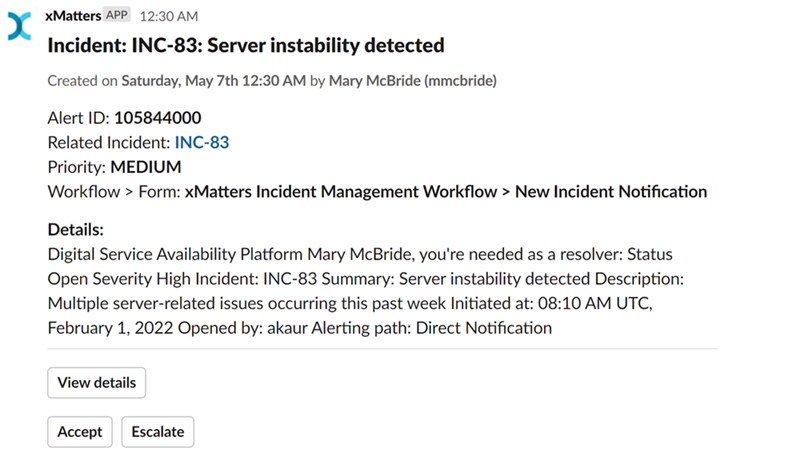
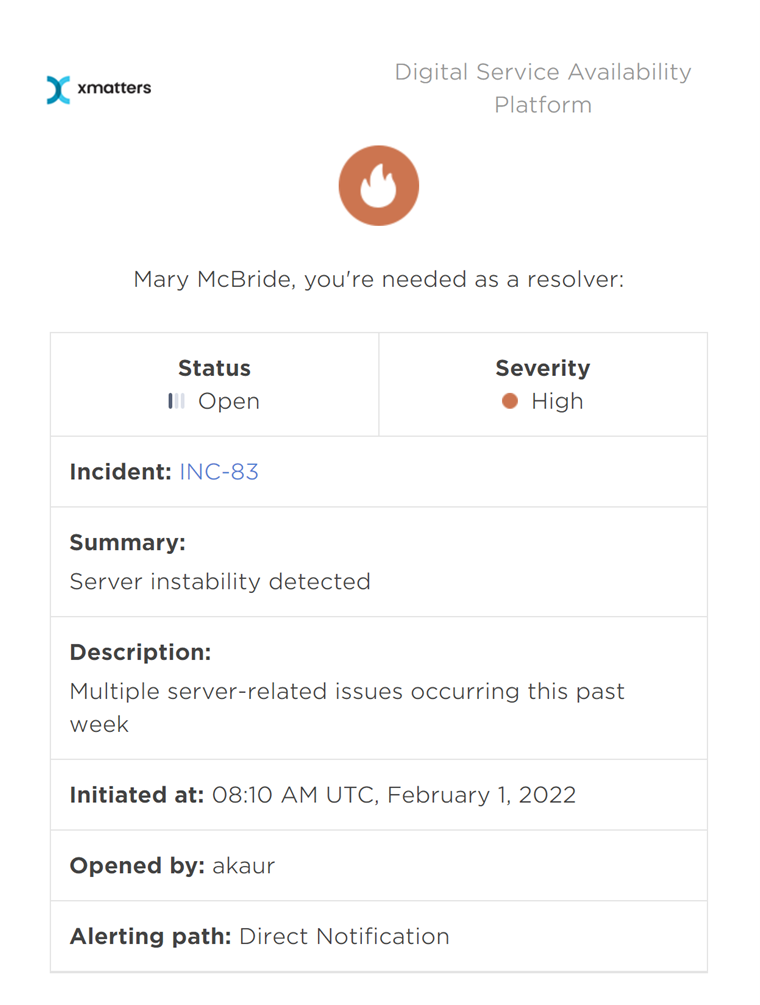
Each notification contains the following information:
- Message Subject: The name of the alert in xMatters. This appears as the title of the Slack message.
- Date Started: The date and time the alert was initiated in xMatters. This is located below the Slack message title.
- Initiator: The user that initiated the alert in xMatters. This is located below the Slack message title.
- Alert ID: The unique identifier of the alert in xMatters.
- Related Incident: The xMatters incident where the alert was initiated, if applicable.
- Priority: The alert priority in xMatters.
- Workflow > Form: The name of the xMatters form that was used to send the alert, and the workflow where the form is located.
- Details: The details of the alert, including its description (if provided by the user who initiated the alert). Clicking on View details opens a new tab displaying the notification in xMatters email format.
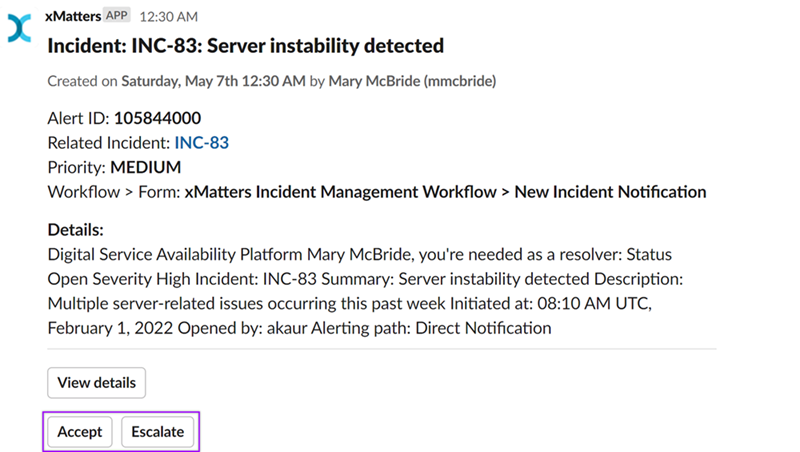
- Responses: The responses available to the alert, if applicable. They appear as buttons at the bottom of the notification.
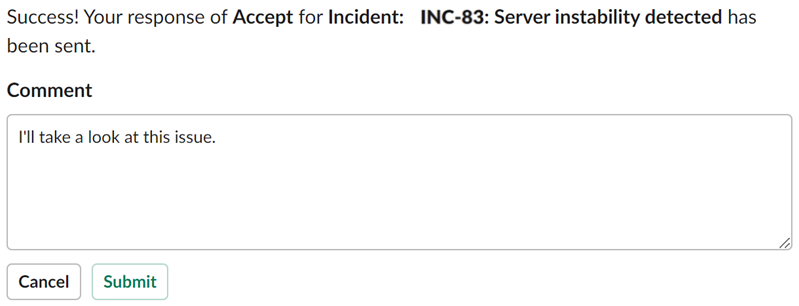
When you select a response, you will receive a new Slack message with the alert's response status. If your response was sent, the original alert notification will be updated with your selected response. You can also change your response if needed.
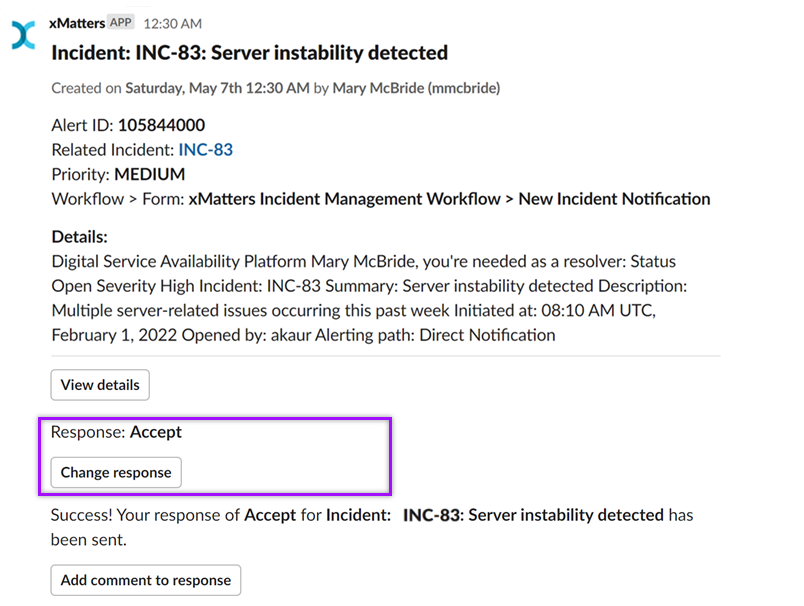
If applicable, the original notification will also be updated with the option to add a comment to your response, which you can type up and submit right on Slack.
Make your incident resolution process even more efficient by following the links below for in-depth guides to managing your Slack account as an xMatters device.
Enable Slack as a Chat App device type in xMatters
Before you can register your Slack account as an xMatters device and start receiving notifications, you need to enable Slack as device type and add device names.
Manage your device preferences in xMatters
Decide when and how you want your Slack account to receive xMatters notifications by configuring your xMatters devices and organizing them to your schedule.
Customize your notification responses in xMatters
Want to add a custom alert response such as 'Join Slack channel'? Or do you want to enable comments for specific alerts? xMatters lets you configure your response options to do that and so much more.
Initiate an incident from Slack
Using the /xmatters initiate slash command, you can initiate an incident in xMatters right from a conversation in Slack, as long as you have access to the default xMatters Incident Management workflow or another custom incident resolution workflow.
- Enter /xmatters initiate (if you're not connected, a dialog appears asking you to connect).
- In the Initiate Incident dialog box, select an incident submission form to use.
- You won't get an option to select a form if you only have access to one form, such as the 'Trigger an Incident' form in the default xMatters Incident Management workflow.
For a custom incident resolution workflow form to appear as an option in the list, it must be enabled for the mobile app.
- Type a summary and description for the incident, and select a severity.
- These populate the incident details. The status defaults to "Open", and the xMatters user you log in as is set as the owner, initiator, and resolver.
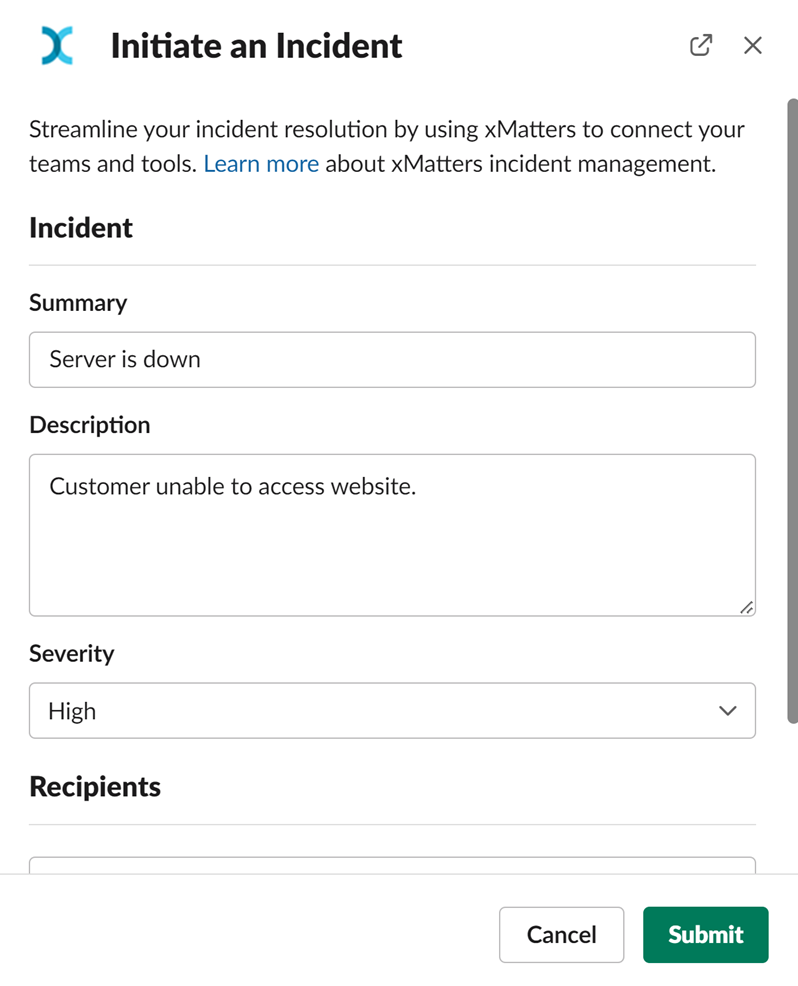
- Provide values for any additional fields in the incident submission form.
- Select the conversation where you want incident details posted after the incident is created (this defaults to where you used the command).
- Click Submit.
- Close the message that appears to let you know we're working on it and watch for the message to appear in Slack. Clicking View All Incidents opens the xMatters Incidents page, where you can also view the new incident once it's created.
- If something goes wrong, we'll also post a message to you in Slack.
Once the incident is initiated, a success dialog box gives you the option to view the incident in xMatters, and a message with the incident details is posted in the conversation you selected in Slack. You can also click the Incident ID in this message to link to the incident in xMatters.
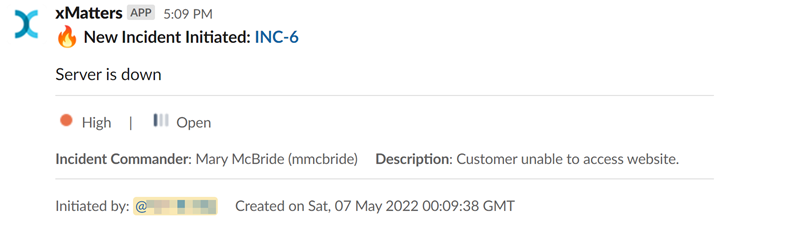
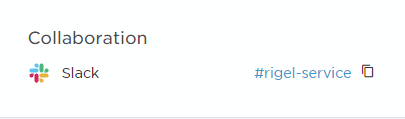
If you initiate an incident from a public channel, a collaboration channel is automatically created and added to the incident in xMatters, allowing resolvers to join the conversation by clicking a link in xMatters.
Because private channels are private, and conversations between you and another person are just between you, we don't add collaboration channels in these scenarios.
Here are the most common issues you might experience. You get a message saying:
- You don't have access to the workflow: You don't have permission to use the default xMatters Incident Management workflow; contact your xMatters administrator to get access to the workflow.
- You're not connected: Use the /xmatters connect command to connect Slack to your xMatters account.
- You should try again, and contact support if that doesn't work: It might be an intermittent glitch somewhere along the line, so try again. If it still doesn't work, contact support — we'll help you dig into it.
For more information on working with incidents in xMatters, see Incident Management.