Incident Resolution
The Incident Resolution workflow is an installable workflow template designed to help you tailor xMatters Incident Management to your incident resolution process. It starts as the same workflow used by default for the Incident Management feature, but lets you adapt how incidents are created, what happens when they're created, and the notifications that are sent to resolvers when the incident is initiated and when you notify additional resolvers to engage.
This customizable workflow allows you to do the following:
- Add collaboration channels to incidents.
- Include automated steps in the incident resolution flow to create incidents or send incident information to other systems.
- Customize the settings for new incidents.
- Tailor notifications sent about the incident when it is initiated, including information from other tools that might help resolvers triage and address the issue.
- Tailor notifications sent about the incident when you notify additional resolvers to engage, including current details about the incident like its collaboration channels and file attachments.
- Allow your team or your tools to initiate incidents using email or an HTTP trigger.
- Control who can initiate incidents with the workflow.
For more information on initiating and working incidents, see our help on the Incidents list and Incident Console.
- Click the Incident Resolution tile on the Workflows Templates page.
- On the Set up the workflow dialog, give the workflow a name that identifies its purpose (this must be unique in your instance), add an optional description, and set the default incident type (if applicable). Any built-in Initiate Incident steps in the workflow will automatically be set to the selected incident type.
- You can edit these later, if needed.
- Click Next to follow steps to initiate an incident in this workflow.
- Click Open Workflow.

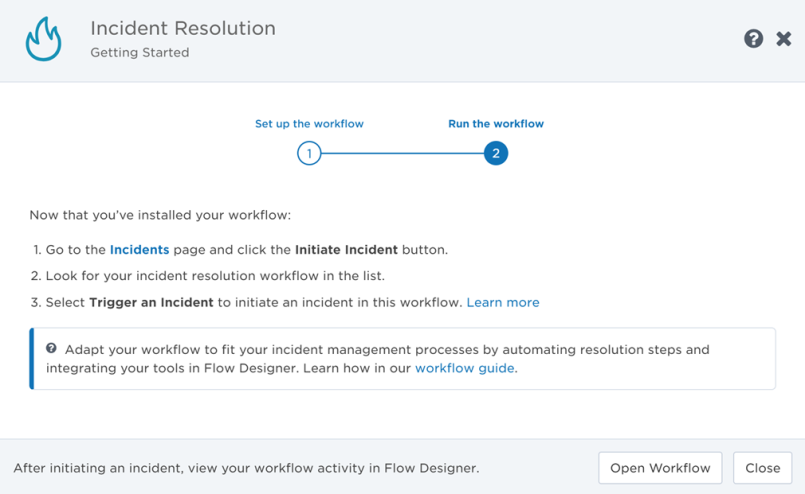
You're now ready to initiate incidents with the workflow or tailor it to your incident resolution processes by adding collaboration channels and connecting your other tools.
Use the workflow
After you install the workflow, anyone you give sender permissions to the flow trigger form can use it to initiate incidents from the Incident Console and the Initiate Incident dashboard widget. If you enable the flow trigger form in the mobile app, it will also appear as an option for initiating incidents in the xMatters mobile app. If you have the Slack integration set up, you can initiate incidents using the /xmatters initiate command. If you have the Microsoft Teams integration set up, you can initiate incidents within a chat or Teams channel.
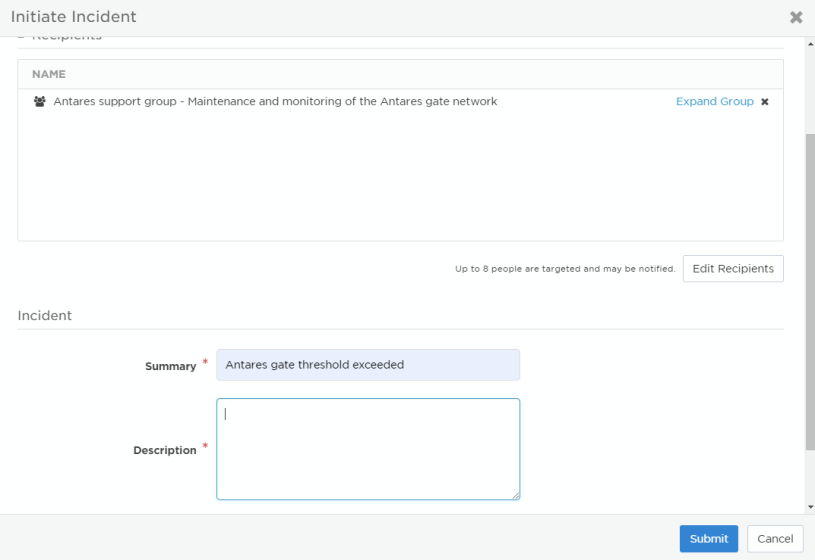
Once you select the incident you want to initiate, a form appears where you can fill in the incident details. Here's what this looks like in the Incident Console:
Learn more in our topic on initiating incidents in the web user interface, or learn about changing the trigger for automatic incident initiation.
Configure the default workflow
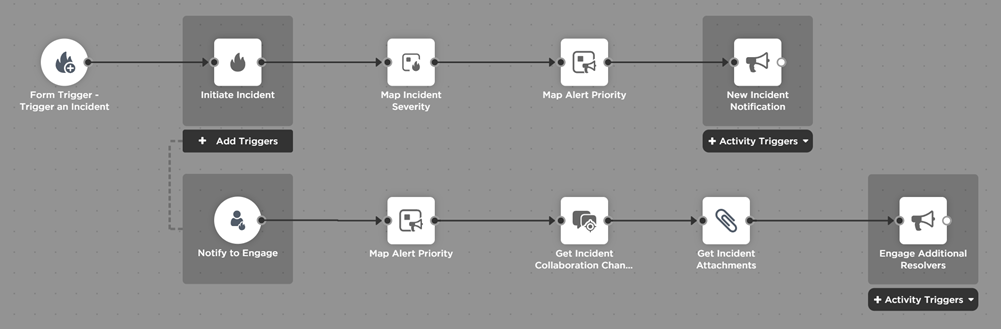
The default workflow allows you to make customizations to the xMatters Incident Management workflow.
The workflow includes a flow trigger form that lets you initiate an incident by submitting the form. The only modifications you can make to the flow trigger form are whether it's enabled and who has permission to use it.
You can customize the 'New Incident Notification' Create Alert step to modify the notifications sent to resolvers when the incident is initiated. You can also customize the 'Engage Additional Resolvers' Create Alert step associated with the Notify to Engage trigger to modify the notifications sent when you 'Notify to Engage' resolvers from the Resolvers section of the Incident Console or a service info card in the console or incident service dependencies map.
The workflow includes steps that map the incident severity level to alert priority levels in xMatters. You can modify which severity levels correspond to each alert priority. The workflow also includes a step to retrieve the details of any collaboration channels that were created for the incident, as well as files that are attached to the incident. You can include these details in your messages to resolvers when you notify them to engage in the incident.
The following sections walk through the changes you can make to these steps. Depending on your incident resolution process, you might do one, some, or all of the steps below. For instructions on adding collaboration channels, see the following instructions dedicated to that.
When you first install the workflow, you're the only person with permission to edit or use it. To allow other users to initiate incidents, you need to set Sender Permissions on the form trigger in the flow. Having control over who can initiate incidents in your system is one of the benefits of customizing your incident resolution workflow process.
- Open the Trigger an Incident canvas on the Flow Designer tab.
- Double-click the Form Trigger (or hover and click the pencil icon).
- Form triggers are now known as Incident Initiation triggers, but existing triggers (or ones included in existing workflow templates) will retain the old name until they are updated or changed.
- Make sure the Web UI toggle is set to Enabled. This sets whether the incident form appears as an option for the Initiate Incident button or the widget. If you want users to be able to initiate incidents from the mobile app, Slack, or Microsoft Teams, set Mobile App to Enabled.
- Click Edit Permissions.
- Add the users or roles you want to have permission to initiate incidents for this workflow (type two spaces to see the list of options you can select).
- For example, if you select an "Incident Manager" role, anyone with that role can initiate incidents using this form.
- Click Save.
- Click Close, and then click Save on the canvas and close it.
By default, the flow trigger form users submit to initiate an incident includes the following sections:
- Incident Overview: The incident's summary, severity, and description.
- Services: Existing services in the catalog that are impacted by the incident, or new services that will be added as suggested services when you initiate the incident.
- Recipients: Users, groups, and services you'd like to initially invite as resolvers.
If you'd like people to include additional information or context when they initiate an incident, you can create and add properties to the flow trigger form layout. These properties will appear as fields in the Initiate Incident form, which users can provide values for when they submit the form. This information is available as outputs of the trigger and can be used in inputs of steps further downstream, such as incident and resolver notifications.
For example, you could include a 'region' property in a custom section on your form so users can select which region is affected by the incident. For full instructions on creating properties and adding them to the form layout, see Define form properties.
To customize the settings for new incidents, update the inputs in the Initiate Incident step.
- Double-click the Initiate Incident step (or hover and click the pencil icon).
- Update the inputs to fit with your incident processes.
- You can populate the inputs with text, outputs from previous steps, or constants; however, at runtime, the severity needs to be one of the following: Critical, High, Medium, Low, or Minimal.
- Click Done, and then click Save on the canvas.
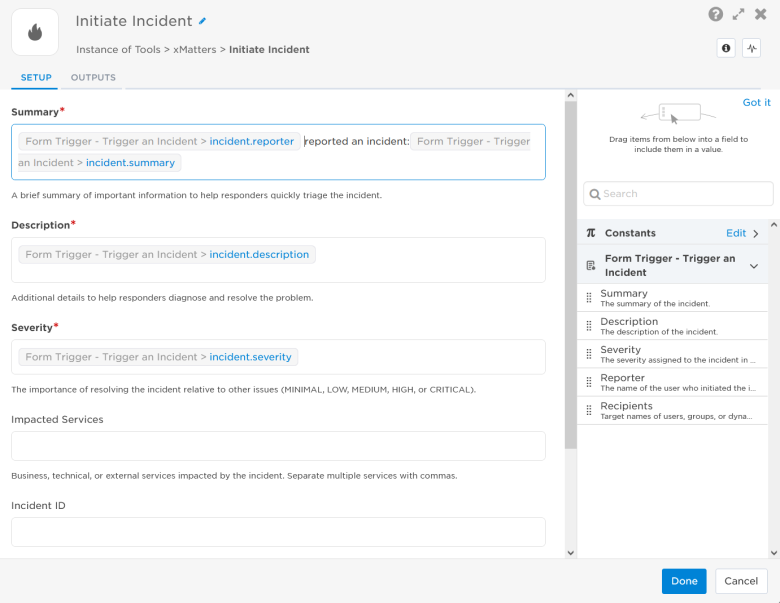
In this example, we've added the reporter to the summary:
In a more complex workflow, you could set the severity based on the path in a switch step, map the severity levels from an external system to xMatters with a Map Incident Severity Step, or use the outputs of an HTTP trigger to populate the details, including setting the incident ID to match that in another system. For more information on adding the Initiate Incident step to other workflows, see the step instructions.
You can change the content of the notifications which are sent when the incident is first initiated.
- Open the New Incident Notification Create Alert step.
- On the Setup tab, make sure the Recipients field includes the 'Recipients' output from the Form Trigger. This sets any recipients added when the incident form is used as resolvers and sends them notifications.
- You can add additional recipients to the field if you always want an individual, group, or service involved in the incident resolution process (for example, an incident review team, the support team, or a particular service). In this example, we've added the 'Antares support group' to the recipients since we always want someone from that team involved in our incident resolution.
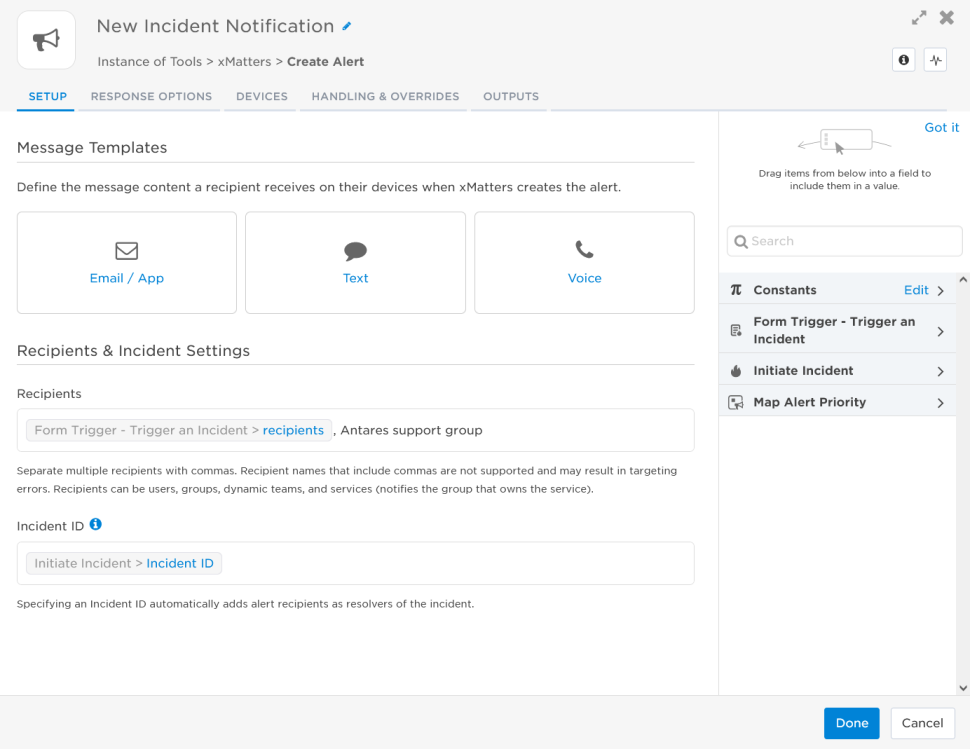
- Make sure the Incident ID field is mapped to the "Incident ID" output of the Initiate Incident step — this associates the alert with the incident.
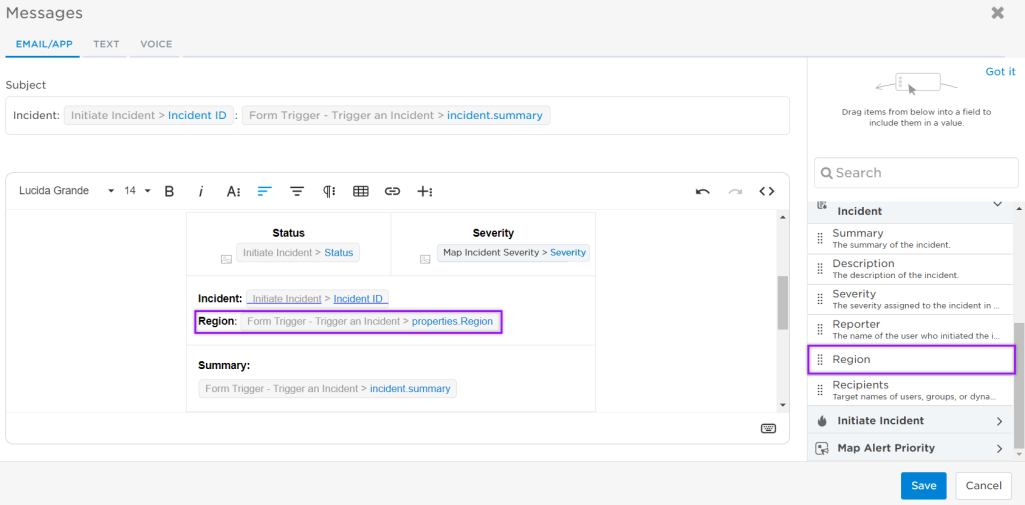
- Open the Email / App, Text, or Voice message templates to edit the message content a recipient receives on each device type when xMatters creates the alert. For example, we added the value from a 'Region' custom property included on our flow trigger form to the content of the email message.
- Update the Response Options, Devices, and Handling & Overrides tabs if required. See the step instructions for details.
- Click Done, and then click Save on the canvas.
If you decide to modify the response choices presented to users, only responses with Positive response contribution values will show the responder as "Engaged" in the Incident Console and add them as a resolver to the incident. None, Neutral, and Negative contribution values do not affect the resolver status.
You can change the content of the notifications that are sent when someone selects 'Notify to Engage' to add resolvers to an existing incident.
- Double-click the Engage Additional Resolvers Create Alert step (or hover and click the pencil icon).
- Make sure the Recipients field includes the 'Resolvers' output from the Initiate Incident step. This sets the recipients selected when someone selects 'Notify to Engage' as resolvers and send them notifications.
- Make sure the Incident ID field is mapped to the "Incident ID" output of the Initiate Incident step — this associates the alert with the incident.
- Open the Email / App, Text, or Voice message templates to edit the message content a recipient receives on each device type when xMatters creates the alert.
- Update the Response Options, Devices, and Handling & Overrides tabs if required. See the step instructions for details.
- Click Done, and then click Save on the canvas.
If you decide to modify the response choices presented to users, only responses with Positive response contribution values will show the responder as "Engaged" in the Incident Console and add them as a resolver to the incident. None, Neutral, and Negative contribution values do not affect the resolver status.
The Incident Resolution workflow includes Map Alert Priority steps to set the priority of the 'New Incident Notification' and 'Notify Additional Resolvers' alerts based on the severity of the incident. If the provided severity value of an incident does not map to an alert priority level, it defaults to 'High' priority. The following table displays the default mappings of incident severity to alert priorities.
| Incident Severity | Alert Priority |
|---|---|
| Critical, High | High |
| Medium | Medium |
| Low, Minimal | Low |
You can modify the mapping for either Map Alert Priority step in the workflow. For example, you could configure alerts for all incident severity levels be 'High' priority.
- Double-click the Map Alert Priority step you want to modify (or hover and click the pencil icon).
- Use the Default Priority drop-down to select the default priority level if the runtime value does not map to an xMatters priority level.
- Use the High, Medium, and Low fields to specify which incident severity levels map to each priority level.
- Click Done.
Since it's always a good idea to test what you develop, initiate a test incident after you make changes to the workflow to check that the incident that gets created meets the needs of your incident resolution framework.
Add collaboration channels
One of the most common — and most useful — additions to the basic workflow is to automatically create collaboration channels when you initiate an incident.
Communication amongst your team and with stakeholders is key to resolving an incident efficiently and preventing similar incidents from happening in future. But setting up collaboration channels can easily fall through the cracks when you're dumped in the middle of an incident.
By adding steps to the initiate incident flow, the channels that suit your incident resolution framework get created and associated with the incident automatically. For example, you can create separate chats with different purposes (such as one for cross-team communication, one for the Ops team, and one for the team communicating about the issue to customers) or create different channels depending on the severity of the incident (critical incidents get all the channels while medium ones just get a single chat).
If you add additional steps to enrich and automate the resolution process, you can feed information from those steps into chat channels.
Add collaboration channels to an incident resolution workflow
To automatically add a collaboration channel to an incident, add and configure one of the following steps in your flow:
- Slack Create Channel
- Microsoft Teams Create Channel
- Microsoft Teams Create Online Meeting
- Zoom Create Meeting
- Create xMatters Conference
If your resolution team prefers a channel not listed above, you can use the following step to add any type of channel that has a URL:
- Add Collaboration Channel to Incident to add any type of collaboration channel with a URL
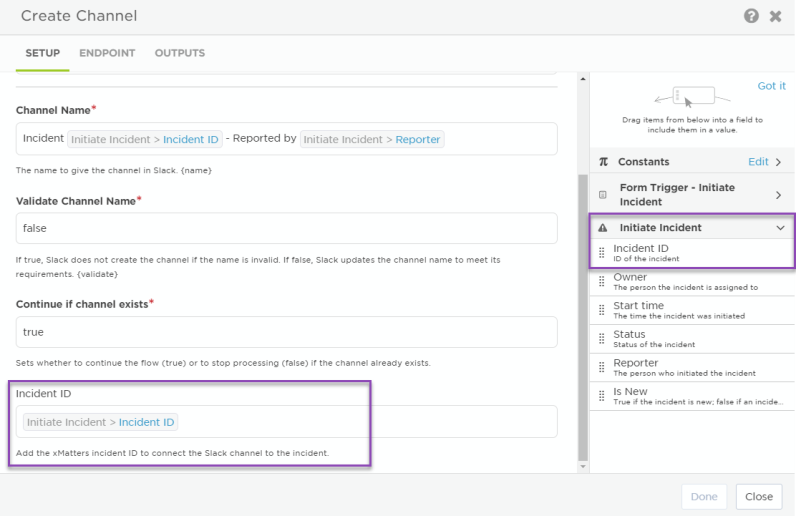
When configuring the steps, make sure to drag the Incident ID variable from the Initiate Incident step into the Incident ID field — this associates the channel with the incident:
You can add the incident details to Slack and Teams channels using the associated Post to Channel step, or invite bots you use in your incident discussions using the Invite to Channel step: see our topics on configuring Slack steps or configuring Teams steps for more information.
Since it's always a good idea to test what you develop, initiate a test incident after you've added your collaboration channels to make sure they get created and appear in the Collaboration section in the Incident Console.
Automate and enrich
Collaboration steps aren't the only steps you can add to the flow — the flexibility of Flow Designer lets you connect to all the tools in your toolchain to automate resolution and enrich incident notifications.
Change the trigger
If you want to initiate incidents in ways that don't require users to fill in a form, you can change the trigger for the flow, allowing the workflow to initiate an incident by HTTP trigger or email, or when a user selects a specific response to a notification.
- Swap out the form trigger for an HTTP trigger to automatically initiate an incident when xMatters receives an alert.
- Use an Email trigger to initiate incidents via an email to xMatters.
- Connect the Initiate Incident step to a Response trigger to let your people create an incident at the touch of a button.
In this example, a monitoring system sends an alert to xMatters, which triggers an alert. This sends a notification to the on-call member of the Stellar App support team, Ali Samara. When Ali reviews the details of the issue, she realizes this is a major incident and selects the "SEV-1" response option, launching the organization's major incident response process.
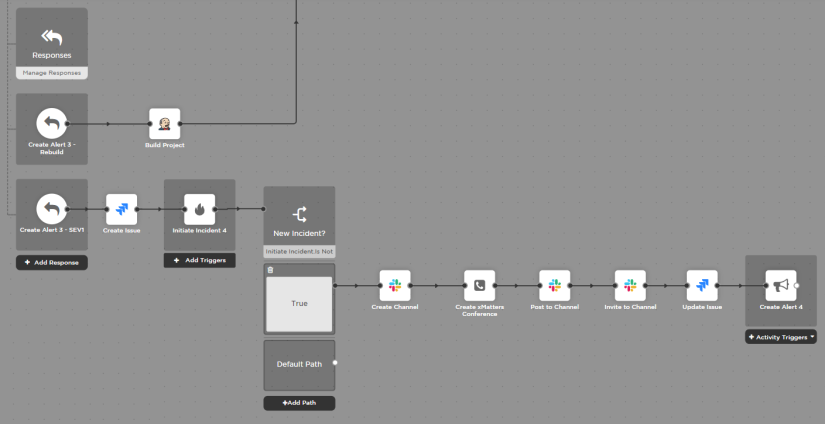
Selecting that response option runs a flow that initiates an incident, creates a Jira ticket with the details, creates a Slack channel for the team working the incident to collaborate in (and invites their scribe bot to the channel), creates a conference call for the customer liaison team to plan their response, and adds the details about the incident and the Jira ticket to the channel.
If you trust the machine, you can also initiate an incident directly via HTTP trigger, without a human making the decision — just connect an Initiate Incident step to the HTTP trigger.
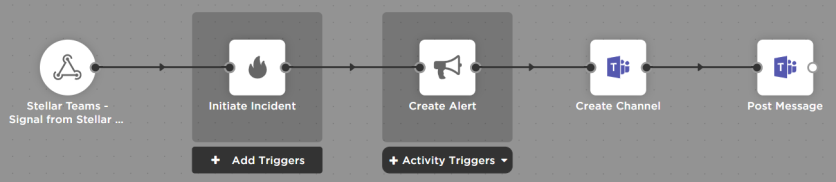
When a signal is received from the monitoring tool that it's noticed a problem, an incident is initiated, a notification is sent to the service team, and a channel is created in Teams with a message about the incident.
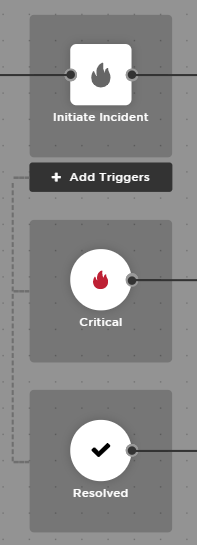
The Initiate Incident step includes Status Change and Severity Change triggers that you can use to build flows when an incident's status or severity changes to a particular value.
Add additional steps to gather information from or take action in other systems
Some steps you might add before the Initiate Incident step are:
- Create issues in other systems such as Jira or ServiceNow and add that information to the incident summary or description.
- Set the Incident ID or severity to match a value passed in from another system. For example, you can drag the issue ID or incident ID output from a create issue step into the Incident ID field in the Initiate Incident step.
- Run a playbook or rebuild a Jenkins job, and then use a switch step to only create the incident if that didn't solve the problem.
After the Initiate Incident step, you could add steps to:
- Update issues in other systems. For example, add a comment to that Jira or ServiceNow issue you created before the initiate incident step to update playbooks with any lessons learned from the incident.
- Update records in the signal source. For example, if the incident was created because of an incident in ServiceNow, you can update the ServiceNow record with information about the xMatters incident.
- Post a message to a status page to let people know you're aware of the issue and are working on it.
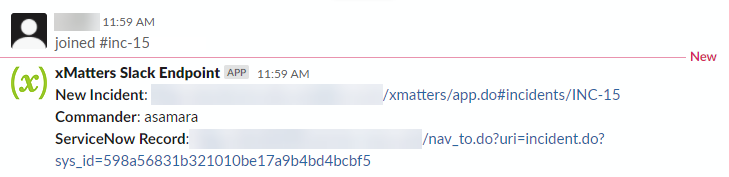
In this example, we add a step to automatically create an incident in ServiceNow when an incident is initiated in xMatters:
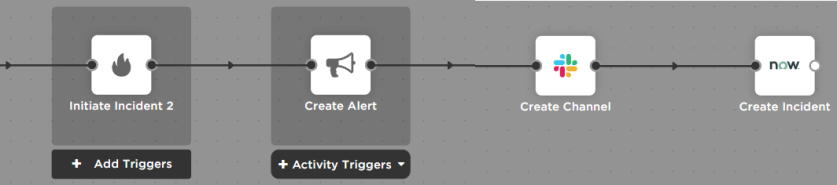
Then we add a Post to Channel step and set the message to include a link to both the ServiceNow record and the xMatters incident, with the addition of a few constants to hold the initial portion of the URLs.

Here's the message posted to the channel: