Legacy email integrations in Flow Designer
We've introduced a new Email Initiation trigger in Flow Designer that allows you to easily initiate workflows by sending an email to xMatters. As part of the migration of the to Flow Designer, we converted any existing email integrations built using our "Email form initiation" feature to flows.
In Flow Designer, xMatters does not create a new alert when an Email Initiation trigger is initiated. This lets you create alerts at any point in your flow using a Create Alert Using a Form step. This means when you open a workflow with a form configured for email integration, you'll see that the email integration is now an Email Initiation trigger plus a create alert step on the flow associated with the form.
The email integration should continue to function as before. Only how you access it and edit the settings have changed.
How to find your email integration
Instead of clicking the menu beside the form, you need to open the associated flow.
- In the workflow the email integration belongs to, click the Flows tab.
- Open the flow for the form the email integration is associated with (for example, if your email integration was for the Incident Triage form, click the Incident Triage flow). If there's an Email Initiation trigger on the canvas, you'll see the email icon in the list of icons beside the flow name.
- Locate the Email Initiation trigger. It's labeled <form name> - Email Initiation Settings.
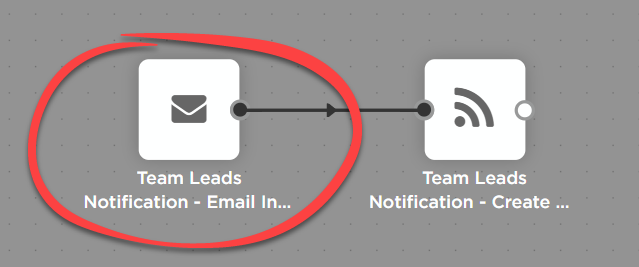
Notice the two steps that make up the migrated email integration: the Email Initiation trigger and the Create Alert Using a Form step.
Email Initiation trigger settings
- The Email Initiation trigger is configured to only accept emails sent from valid email devices in your xMatters instance, matching the legacy email integration functionality. You can change this so the Email Initiation trigger accepts emails from any address; this means anyone with the trigger's email address can initiate the trigger and create the alert.
- The address you send emails to remains the same, with the same ability to target different users and groups in xMatters by replacing the portion before the @ with an xMatters target name.
- To enable and disable the email integration, open the trigger and click the enabled/disabled toggle.
See Email Initiation trigger for more information on Email Initiation trigger authentication, outputs, and addresses.
Create Alert Using a Form settings
- The email recipients (the target names before the @) become the recipients in the alert step, matching the functionality of your legacy email integration.
- The subject, body, and email sender are mapped as the content of the alert, based on the settings of your legacy email integration -- if you had "Body" set to "HTML Body", the Body input in the step is mapped to the htmlBody output of the Email Initiation trigger.
Take it a step further
The move to Flow Designer lets you build flows around your email integration, either by adding steps between the trigger and the create event step or after the alert is created.
For example, you could send an email to first create a ServiceNow incident and start a Slack channel using our built-in apps, then add the incident information and chat room link to the message in the alert so they're included in the notification.
You can connect steps after the create event step to pass information about the alert into other systems further along in the flow. For example, you might want to post the conference bridge number for the alert into the chat room you created in a previous step.
You also have the ability to see if anything goes wrong after the email reaches xMatters using the Activity panel.