Cherwell Incidents steps
Flow Designer has a Cherwell Incidents trigger and built-in Cherwell steps to help you integrate Cherwell into your event management and incident response flows.
Cherwell steps
The following steps are available:
- Create Incident: automatically create a new incident in Cherwell, populating it with information from the trigger or previous steps in the flow.
- Update Incident: automatically update an existing incident as it changes or information becomes available.
- Add Note: automatically add a note to the Journal that contains new information from other steps in the flow.
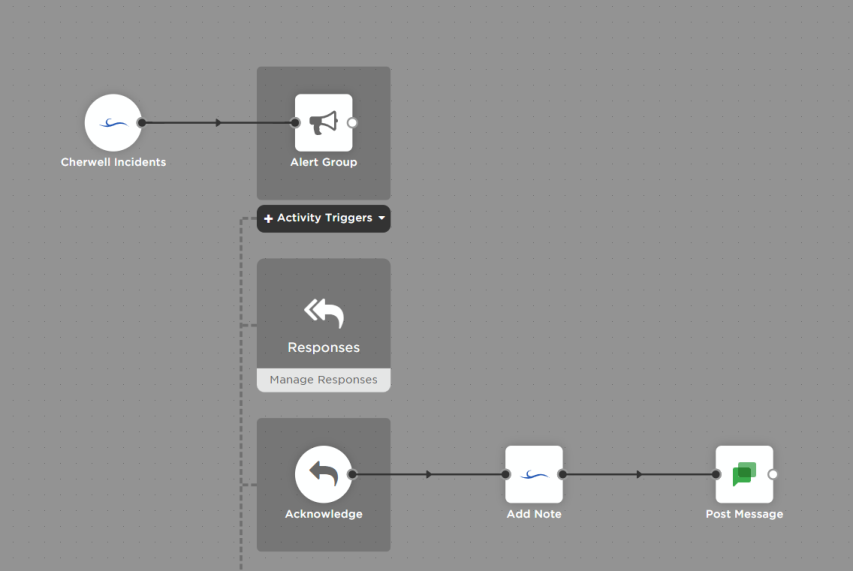
In the example above, the flow receives a signal from Cherwell and alerts the appropriate Cherwell team. When a member of the team acknowledges the notification, their comment is added to the Journal for the Cherwell Incident through the Add Note step.
To add a Cherwell step to your flow:
- Go to the Apps in the palette, expand Cherwell, and drag the step you want to add onto the canvas.
- For instructions on using the Cherwell trigger, see Cherwell Incidents trigger.
- Connect the step to the previous step in the flow. This gives you access to the
- Double-click the step to edit it, and use the Setup tab to configure the inputs. You can use plain text and input variables (or both). See the following sections for detailed information on the inputs for each step, including which are required.
- On the Endpoint tab, configure the step to point to your Cherwell instance.
- You can select a pre-existing endpoint or create a new endpoint.
Create Incident
Use the Create Incident step to automatically create a new incident in Cherwell. Map outputs from previous steps to the inputs to complete the incident details.
Inputs
Inputs with an asterisk* are required.
|
Label |
Description |
|---|---|
|
Service* |
Name of the Cherwell service the incident will impact. Use with Category and Subcategory to specify the service. |
|
Category* |
Category of the Cherwell service the incident will impact. Use with Service and Subcategory to specify the service. |
|
Subcategory* |
Subcategory of the Cherwell service the incident will impact. Use with Service and Category to specify the service. |
|
Call Source* |
Source of the incident in Cherwell. Available options include:
|
|
Customer Display Name* |
Name of the Cherwell customer impacted by the incident. |
|
Description * |
Description of the incident. |
|
Priority* |
Priority level of the Cherwell incident. Available values are 1 - 6, where 1 represents the highest priority and 6 represents the lowest. |
Outputs
These outputs are available as inputs to steps further along the flow.
|
Label |
Description |
|---|---|
|
Business Object Record ID |
Business Object Record ID for the incident. |
|
Cherwell Incident ID |
Unique ID for the incident in Cherwell. |
Update Incident
Use the Update Incident step to automatically update the information on an existing incident. Map outputs of previous steps to the inputs to determine which ticket to update and what details to change.
Inputs
Inputs with an asterisk* are required.
|
Label |
Description |
|---|---|
|
Cherwell Incident ID* |
Unique ID of the ticket in Cherwell. |
|
Service |
Name of the Cherwell service the incident will impact. Use with Category and Subcategory to specify the service. |
|
Category |
Category of the Cherwell service the incident will impact. Use with Service and Subcategory to specify the service. |
|
Subcategory |
Subcategory of the Cherwell service the incident will impact. Use with Service and Category to specify the service. |
|
Call Source |
Source of the incident in Cherwell. Available options include:
|
|
Customer Display Name |
Name of the Cherwell customer impacted by the incident. |
|
Description |
Description of the incident. |
|
Priority |
Priority level of the Cherwell incident. Available values are 1 - 6, where 1 represents the highest priority and 6 represents the lowest. |
|
Status |
Status of the incident in Cherwell. Available options are:
|
Outputs
|
Label |
Description |
|---|---|
|
Business Object Record ID |
Updated Business Object Record ID for the incident. |
Add Note
Use the Add Note step to automatically add an internal note or public reply to an existing ticket. Map outputs of previous steps to the inputs to create the comment and determine which ticket to comment on.
Inputs
Inputs with an asterisk* are required.
|
Label |
Description |
|---|---|
|
Cherwell Incident ID* |
Unique ID of the ticket in Cherwell. |
|
Details* |
Contents of the note to add to the Journal. |
|
Relationship ID* |
Unique ID that links the note with the incident in the Journal. |
Outputs
There are no outputs for this step.
Cherwell Incidents trigger
Flow Designer includes a built-in Cherwell Incidents trigger that initiates a flow when it receives a request from Cherwell. You can configure a Cherwell target to send the request when your configured conditions are met.
- Go to the Triggers tab in the palette, expand the App Triggers section and drag the trigger onto the canvas.
- Double-click the trigger (or click the pencil icon).
- Set the authenticating user and copy the URL — you'll use this to configure Cherwell.
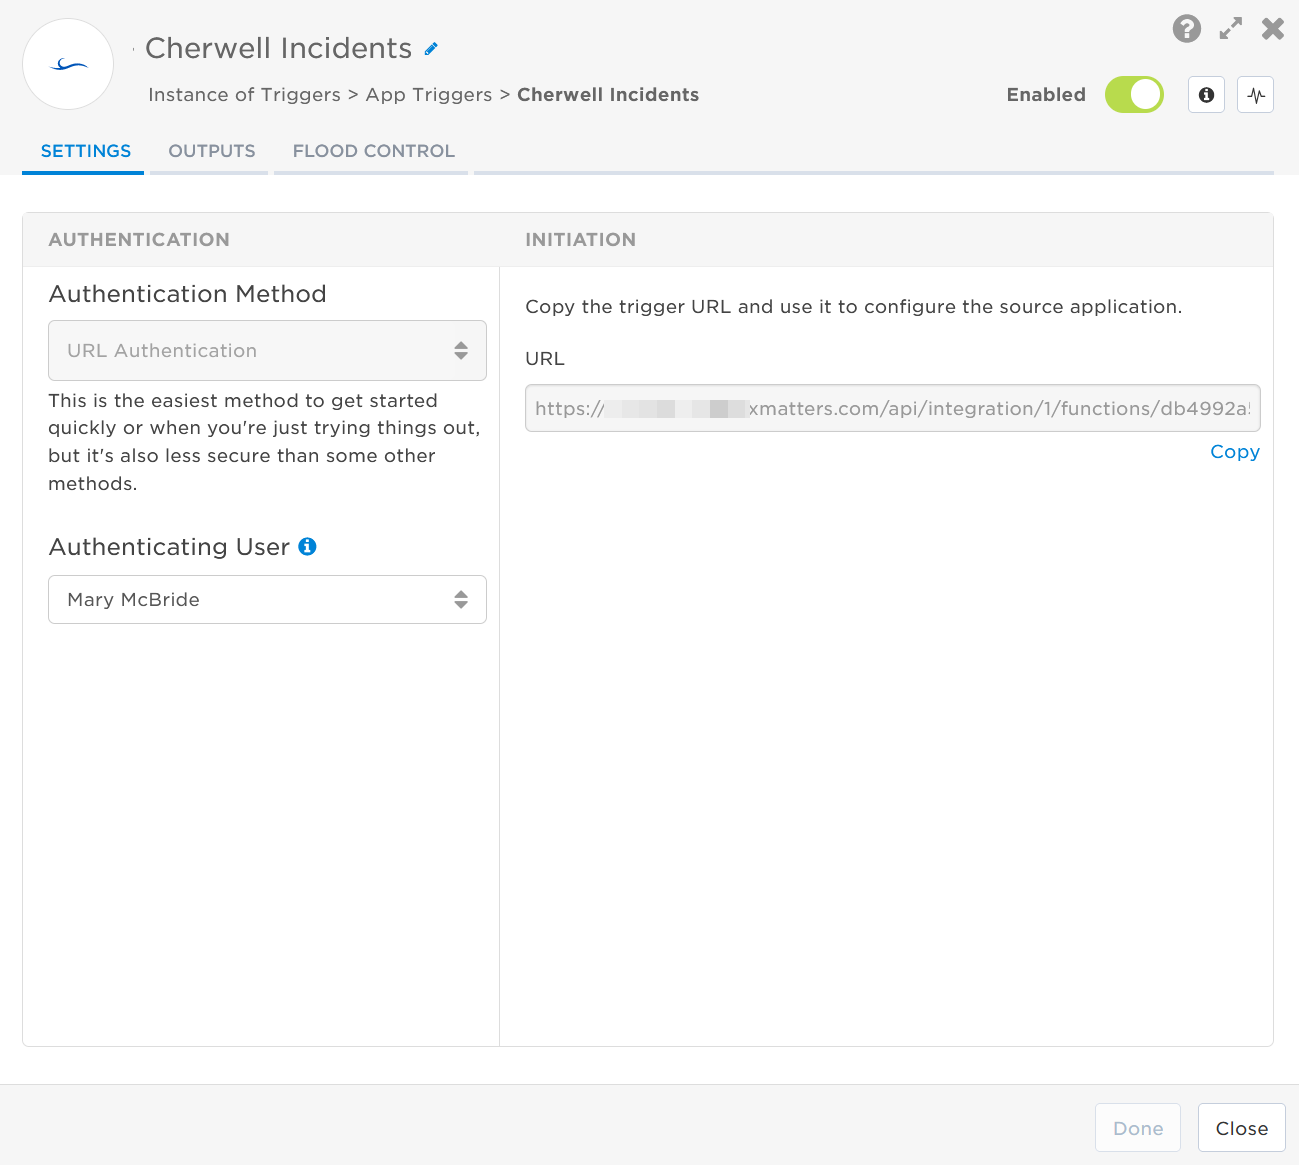
- Click the Flood Control tab to edit the trigger's default flood control settings. For more information about these settings, see Trigger Flood Control.
- Click Done.
- On the canvas, connect the steps you want to run when xMatters receives a request to that URL.
You're now ready to configure Cherwell to target the trigger.
To have Cherwell send alerts to the flow trigger, you need to import the xMatters blueprint, and then configure the webhook in a One-Step Action to use the trigger URL.
- Download the xMatters Cherwell Blueprint and save it to an easy-to-find location.
- Open Cherwell Administrator and, in the Categories menu, click Automation Processes.
- From the Pick a task options, select Open an existing Automation Process Blueprint.

- Navigate to the location of the xMatters Blueprint you previously downloaded, and click Open.
- In the Edit Automation Processes window, scroll to the bottom of the list, right-click xMatters - Incident Created and then select Edit process.

- On the Simple Action/Event Automation Process window, select Action.
- Select the One Step radio button and then select New Incident from the drop-down list.
- Click the Browse button to the right of the One Step field to open the One-Step Action Manager menu.

- In the One-Step Action Manager window, click New Incident, and then select Edit.
- In the One-Step editor, click the HTTP Request step to edit its details.
- In the Step Details for HTTP Request section, paste the trigger URL you copied from Flow Designer into the URL field. You can set the default recipient to be the Assigned Team or add the target names of any recipients you want xMatters to notify when the alert fires.
- For URL authentication, use an ampersand to attach recipients. For example, if you want to notify Emma Pearson and the on-call members in the group responsible for the Antares service, you'd add &recipients=epearson,antares to the URL.
- You must URL-encode any special characters or spaces in the target names.

- Click OK to close the One-Step Action Manager window, and then click Save to close the Simple Action/Event Automation Process window.
- On the Edit Automation Process window, select File > Publish Blueprint.

- In the Publish Options window, accept the default settings and click Publish.

Once the Blueprint is published, you're ready to use the webhook to trigger automated flows, including steps such as sending alerts and initiating incidents, though we always recommend testing before putting things into use.
The Cherwell Incidents trigger has the following outputs you can use as inputs to steps further along the flow. If you want to include additional items in the payload from Cherwell and make that information available in the outputs, you can convert the trigger to a custom HTTP trigger and edit the script.
|
Label |
Description |
|---|---|
|
Recipients |
List of targeted recipients. |
| Assigned Team | Name of the team assigned to the Cherwell incident. |
| Assigned To | First and last name of the person assigned to the Cherwell incident. |
| Call Source | Source that initiated the Cherwell incident. |
| Category | Category of the Cherwell incident. |
| Cherwell Incident ID | Unique ID of the incident in Cherwell. |
| Created Date Time | Date and time incident was created in Cherwell. |
| Customer Display Name | Name of the Cherwell customer impacted by the incident. |
| Description | Description of the incident as provided by Cherwell. |
| Incident Type | Type of incident in Cherwell. |
| Last Modified Time | Time the incident was last updated in Cherwell. |
| Priority | Priority level of the incident as specified by Cherwell. |
| Service | Service type of the Cherwell incident. |
| Status |
Status of the incident in Cherwell. Available options are:
|
| Subcategory | Subcategory of the Cherwell incident. |
| Raw Request | JSON representation of the request that can be parsed separately to get additional context on outputs. |
This trigger is used in our packaged Cherwell workflow. If you're using Cherwell in your incident management processes, you might want to check it out. The workflow instructions have additional information on automatically determining recipients of xMatters notifications based on agent or group assignment in Cherwell. The workflow already has steps in its flows to update and add comments to Cherwell tickets with information from the xMatters alert.