Provisioning with Okta
You can connect xMatters to Okta using the SCIM 2.0 application in the Okta application library.
Okta does not currently support the DELETE operation for SCIM v2.0. If you delete or unmap a user in Okta, the user in xMatters will be deactivated, not removed. Also, Okta does not support changes or updates to usernames.
Add and connect a new application
The first step in connecting xMatters with Okta is to add a new SCIM 2.0 application and configure the connection settings.
- Log into Okta and navigate to Applications > Applications in the left menu.
- Click Browse App Catalog, and then search for SCIM in the list of app integrations.
- Click the SCIM 2.0 Test App (Basic Auth) option, and then click Add Integration.
- On the General Settings tab, give your integration a name and set the visibility and browser plug-in option to whatever you prefer, and then click Next.
- On the Sign-On Options tab, accept the default settings and click Done.
- On the new application's details page, click the Provisioning tab, and then, in the Provisioning to App section, click Edit.
- Enable all four options, and then click Save.
- Click the Integration option in the left panel, and then click Configure API Integration.
- Select the Enable API integration option, and then enter the following information:
- SCIM 2.0 Base Url: The URL of the xMatters SCIM endpoint. For example: https://hostname.xmatters.com/api/xm/1/scim/v2
- Username: The username of your SCIM user or the xMatters user to use when authenticating SCIM requests.
- Password: The SCIM user's password.
- Click Test API Credentials to confirm that you've entered the correct username and passwored, and then click Save.
Set the attribute mappings
The next step is to define how the attributes of user and group objects match to attributes in xMatters. You will need to customize some of the mappings for the synchronization to work properly.
To set user attribute mappings:
- In the left menu, navigate to Directory > Profile Editor.
- In the Users list, click the SCIM 2.0 Test App you created for xMatters.
- In the Attributes section, click Mappings.
- On the User Profile Mappings page, click the Okta User to SCIM 2.0 Test App button.
- Edit the list of mappings to match the xMatters attributes specified in the table below.
- Set all mappings to Apply mapping on user create and update.
- Click Save Mappings to return to the Profile Editor.
You can use the default mapping for groups; you do not need to modify or customize the app assignments.
Sync users and groups
To sync a user or group from Okta into xMatters, you need to assign the SCIM app .
To sync a user:
- In the left menu, navigate to Directory > People.
- Locate and click on the user you want to sync.
- On the Applications tab of their profile, click Assign Applications, and then lick Assign beside the SCIM app you created for xMatters.
- In the Assign Applications window, click Save and Go Back, and then click Done.
To sync a group:
- In the left menu, navigate to Directory > Groups.
- Locate and click on the group you want to sync.
- On the Applications tab of the group's details, click Assign Applications, and then lick Assign beside the SCIM app you created for xMatters.
- In the Assign Applications window, click Save and Go Back, and then click Done.
- Navigate to Applications > Applications, and click on the SCIM app.
- Click the Push Groups tab, and then click Push Groups.
xMatters attributes
The following user attributes can be included in the attribute mapping configuration. Any attributes not listed here are not supported by xMatters and including them will result in a "400 Bad Request" error.
| Okta Attribute | SCIM App Attribute | Notes |
|---|---|---|
| userName | ||
| user.firstName | givenName | |
| user.lastName | familyName | |
| user.email | ||
| (user.email != null && user.email != "") ? "Work Email" : "" | emailType |
|
| user.displayName | displayName | |
| user.primaryPhone | primaryPhone | |
| (user.primaryPhone != null && user.primaryPhone != "") ? "Work Phone" : "" | primaryPhoneType | Phone numbers should be submitted in E.164 format. |
| user.preferredLanguage | preferredLanguage |
Must match available languages configured in xMatters, but can be either the two-character code or full name. |
| user.timezone | timezone | Must match available time zones configured in xMatters. |
| user.userType | userType | Valid values are STAKEHOLDER_USER and FULL_USER |
We are currently developing an extension to the user resource for xMatters-specific attributes not supported in SCIM by default. This will provide the ability to support custom user properties.
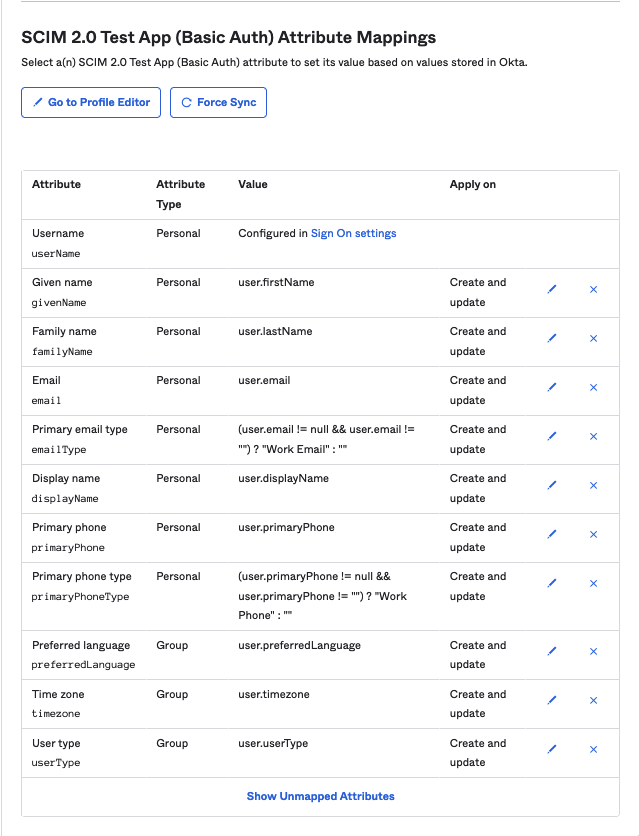
To check your mappings, navigate to Applications > Applications, and then open the SCIM app you created for xMatters. On the Provisioning tab, scroll down to the Attribute Mappings section. It should match the following image.
