Handling & sender overrides
The Handling and Sender Overrides form sections allow you to control how an alert behaves and how recipients interact with voice notifications (for example, you can specify the alert's priority and expiration, as well as several override, password, and voicemail options), and to override the Caller ID and display name associated with the alert to help recipients identify where the notification as been sent from.
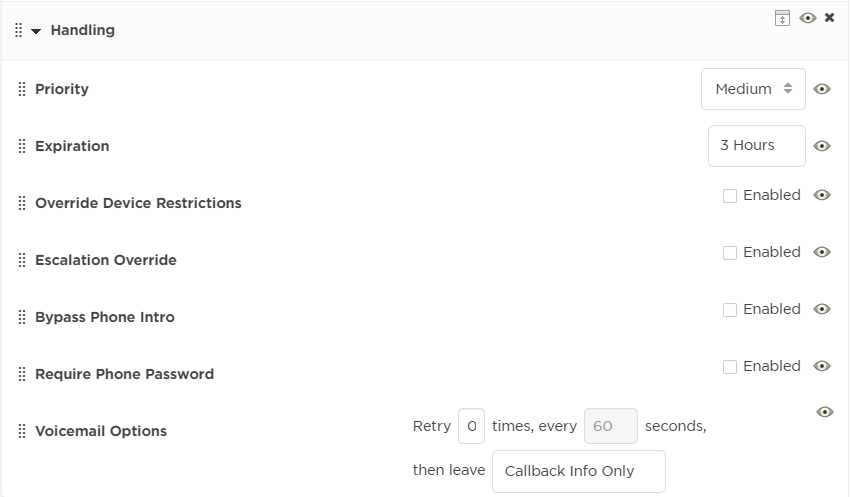
The Handling section allows the message sender to specify notification priority and expiration, as well as several override, password and voicemail options. These options provide granular control over how recipients interact with notifications.
The availability of handling options will depend on how the designer has configured the form. The section may include only a subset of the handling options, appear in a different order than described below, or may not be present on the form.

Notification handling options
|
Setting |
Description |
|
Priority |
Specifies the relative importance of messages. Higher priority messages have better access to notification resources relative to lower priority messages in the system. High-priority and low-priority email notifications generated by this form set the email message priority to the same value as the priority specified in this field. Most email readers display high-priority and low-priority messages with special markings such as exclamation marks and arrows, and allow users to filter messages based on priority. |
|
Expiration |
Specifies the maximum time to send messages. For example, if a situation typically requires a response within 30 minutes, you might set an Expiration of 35 minutes. |
|
Override Device Restrictions |
When selected, xMatters will ignore device timeframes and delays so that messages will be delivered as quickly as possible. Warning: this setting overrides User preferences and will potentially notify recipients at any time of day or night. |
| Escalation Override | When selected, specifies that xMatters should ignore shift escalation schedules (i.e., xMatters will send a 'broadcast' message to all users at the same time). Depending on your organization's policies, this setting may be appropriate for emergency situations. |
| Bypass Phone Intro | When selected, the greeting message (including any branding) will not be played during a phone notification. This allows urgent messages to be played as soon as possible. |
| Require Phone Password | When selected, a call recipient must enter a password before the message will be played. Note that selecting this setting indicates that the message content should be secure; as a result, the Voicemail Options Message Content and Callback Info and Message Content Only will be unavailable when a phone password is required. |
| Voicemail Options |
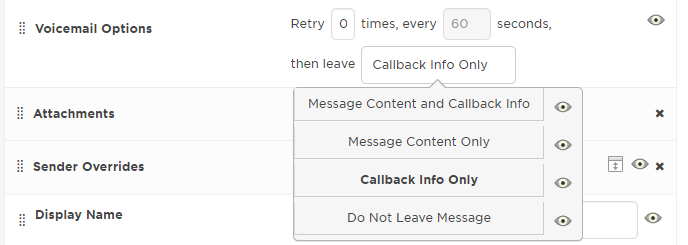
These settings can help you protect sensitive messages from being stored in a medium that is not secure, or to give a recipient more chances to answer a call that goes to voicemail on the first attempt. The Voicemail Options settings are used to configure the handling behavior for standard phone notifications and conference calls. You can use the fields to specify how many times xMatters should retry the call after reaching an answering machine or voicemail service on the initial attempt, and how long it should wait (in seconds) between attempts. For more information, see Retry behavior for voice notifications and conference call requests. You can also choose from the following options to specify what type of message xMatters will leave when a call is answered by an answering machine or voicemail system:
|
When added to the form layout, the Sender Overrides section allows you to specify the caller ID and display name for notifications. By setting the sender information to meaningful values, you can help recipients identify that the notification has been sent from xMatters, and also help prevent messages from being marked as spam or junk mail.

Default values for the Caller ID and Display Name fields can be set for each company. If defined, these values are displayed in gray text. If you do not specify values for these fields, then the default values are used for notifications.
Sender Override options
|
Setting |
Description |
|
Caller ID |
Allows you to override the caller ID displayed for voice notifications. Use of this functionality must follow the Truth in Caller ID Act of 2009. Caller ID overrides are only supported for use with the Voxeo service provider. It is not compatible with SIP or the conference bridge feature. |
|
Display Name |
Allows you to customize the name associated with a notification or alert. The display name is shown as the sender of notifications in the xMatters Inbox, the mobile apps, and for email notifications. The display name is also displayed in the Alerts report, Alerts widget and Properties report in the xMatters web user interface, and in the Alerts report in the xMatters mobile apps. |
Retry behavior for voice notifications and conference call requests
The default behavior used by xMatters for voice notifications and conference call requests is to call you once, and - if there's no answer - leave a voicemail message with callback information. If you're a member of a group, xMatters will escalate the call or request to the next contact in the escalation order.
The "Retry [#] times" field in the Voicemail Options under Handling sets the number of additional times xMatters will attempt to call after the first try. For example, if the Retry field is set to 3 times, then xMatters will make 3 more attempts after the first call - for a total of 4 attempts.
For example, assume you specified 3 retries at 60 second intervals, and selected the Callback Info Only option. If the initial call to a recipient's phone device went to voicemail, xMatters would wait 60 seconds before trying again. After the third attempt (the fourth call in total), xMatters would leave a message containing only the callback information, without disclosing the nature or details of the alert.
Additional retry attempts
If xMatters is unsuccessful at contacting you or leaving a message, it may retry the call even if the retry attempts are set to 0. This may happen in several circumstances:
- If the system determines the call was cut off before it could reach you, it assumes there may have been a system failure and will retry the attempt.
- If your phone continues to ring without being answered, our conference or voice provider may determine there is a problem and retry the call.
- If you decline the call and don't have voicemail, the system will assume the call was terminated and will retry the call.
Under these circumstances, an additional 3-5 call attempts are typically made. These retry attempts are not configurable by xMatters because they are being initiated based on how downstream voice providers are configured.
Note: Some customers, particularly those in countries where voicemail is not very common, may experience these additional retry attempts due to confusions between their systems and systems that expect voicemail (such as ours and our service providers' systems).
Configure Handling & Sender Overrides options
Form designers can configure many aspects of the handling and sender overrides options. These settings provide you with a highly flexible way to tailor the options for common or unexpected situations so that the message sender can configure these options as quickly and accurately as possible.
- Default values: optimize handling and override options by setting the default values for your business processes
- Visibility: control which options can be modified from their default values by defining their visibility to the message sender
- Order: place important options first by specifying the order in which options appear on the form
- Expanded/Collapsed view: prioritize visibility or space-saving by controlling whether the Handling or Sender Overrides sections appear by default in an expanded or collapsed view on the form
- Voicemail Option selection: take granular control over which voicemail options are presented to the message sender for standard phone notifications and conference calls.
- Navigate to the form's Layout tab, and drag Handling or Sender Overrides from the Sections area to the desired location in the main layout area.
- If you want to use the default settings for these sections, you are finished. To customize the settings, continue to the next step.
- Specify the default setting for each option.
- To specify the default Voicemail Options handling setting, click its text so that it appears in bold font:

- Control whether an item is visible or not to the message sender by toggling its Show/Hide Option icon.
- You can control visibility for all options by clicking the Show/Hide all Handling Options icon at the Handling section level.
- Reorder options by dragging them to the desired location within the Handling section.
- Control the default view of the Handling section on the form by toggling its Expand/Collapse Handling Section icon.
- If you want to remove the Handling section from the form, click its red X icon.
You can choose whether the Handling or Sender Overrides sections are displayed on the form. In effect, hiding or displaying a section controls whether the message sender can edit their values. Your organization may have very clear policies about who can define these values, and in such cases you may choose to hide one or both of these sections to prevent changes to the values you define as a form designer. In other situations, you may want to display one section element while hiding another.
To show or hide a section:
On the form's Layout tab, click the Section Visible icon (the eye icon).
When the icon is dark gray and the eye is open ( ), the section or element is displayed. When the icon is light gray and has a line across the eye (
 ), it is hidden.
To show or hide individual section elements:
On the form's Layout tab, click the Visible/Hidden icon (the eye icon) associated with the relevant section element.
You can control whether the section appears by default in an expanded or collapsed state, based on whether your priority is maximum visibility or saving space on the form. For example, if it's likely that the message sender will be modifying handling or sender override values, you may want to have these section appear by default in expanded mode. If other aspects of the form are likely to be the message sender's focus, specifying a collapsed view as the default might be more appropriate.
To set the default section view:
On the form's Layout tab, click the Section Expanded/Section Collapsed icon (this icon toggles between the two default views).