Schedule a message
You can schedule a form or scenario to send in the future, either just one time or on a recurring basis. You might want to use a one-time scheduled message to send a notification during off hours to a recipient in a different time zone, or send other messages on a repeating daily, weekly, weekday, weekend, monthly, or yearly basis.
You can choose from one of the following frequency options for repeating messages:
- Daily: the message is sent at a specific time every day.
- Weekly: the message is sent at a specific time on the same day each week.
- Weekdays: the message is sent at a specific time on each day of the week (Monday to Friday).
- Weekends: the message is sent at a specific time on each day of the weekend (Saturday and Sunday).
- Monthly: the message is sent at a specific time on the same day every month.
- Yearly: the message is sent at a specific time on the same date every year.
- Custom: includes advanced configuration of daily, weekly, and monthly frequency options (e.g., weekly on Monday, Wednesday, and Friday; on the 15th of every month, or the first Monday of January, April, and October).
Supported form or scenario features
Scheduled messages support all features of forms or scenarios (i.e., properties, attachments, device options, voice interactions, response counts, etc.), with important considerations for conference bridges:
- A new xMatters or external conference bridge will be created for every scheduled message alert; existing xMatters conference bridges will be ignored.
Depending on the selected message frequency, you can define the start date for your message schedule, and the days of the week or months of the year on which your message is sent. You can choose to allow a message to recur indefinitely, or end by a certain date or after a certain number of occurrences.
You must specify the time the message is sent for all frequency options. One-time messages that 'Never' repeat are scheduled to send at the specified time on a selected date in the future. For repeating messages, you must specify when the first occurrence Starts. The first message will be sent the next time the specified time and frequency option becomes available, on or after the start date. If you set your message to begin on today's date but the selected time has already passed, the message will be sent at the specified time on the next available date.
For messages scheduled with a custom weekly or custom monthly frequency, the On Days or On These Months fields allow you to choose which days of the week or months of the year the message will be sent. Use these fields to limit messages to send only on the selected days or months. If you would like your message to recur on every day of the week or month of the year, select every day or month. Monthly scheduled messages can be sent on a specific Date (i.e., 1 to 31, or last), or specific day of the Week (i.e., Second Tuesday, or Third Friday).
The Ends section, which appears when you click + Add End Date, allows you to specify when to end the recurrence of a scheduled message:
- Never: The message sends according to the specified frequency, indefinitely.
- On Date: The messages end on or by a specific date.
- After: The messages end after a fixed number of times. Every time a message is sent counts as an occurrence, regardless if the message repeats daily, weekly, monthly, or yearly. For example, if you configure a message to send on the first of every month of the year for 6 times, the message will occur on the first of the month for the next six consecutive months, and end after six months.
To schedule a message:
- Click Messaging from the main menu. You're taken to the Messaging page that contains a list of workflows, forms, and scenarios you have permission to use.
- Locate the form or scenario that you want to schedule, and configure your message.
- Click the drop-down menu next to the Send button, and then click Schedule Message.
- Type a descriptive Name for your message.
- This name is used to identify your scheduled message in xMatters; it is not the subject of your scheduled message.
- Select which Time Zone to use for scheduling and sending the message.
- Configure your desired message schedule using the available First Occurrence, Repeats, and Ends settings.
- Review the message schedule summary to confirm the message recurrence settings and date the next message will be sent.
- Click Schedule.
- Click Messaging from the main menu. You're taken to the Messaging page that contains a list of workflows, forms, and scenarios you have permission to use.
- Click Scheduled Messages from the top right-hand corner of the page.
- xMatters displays a list of scheduled messages:
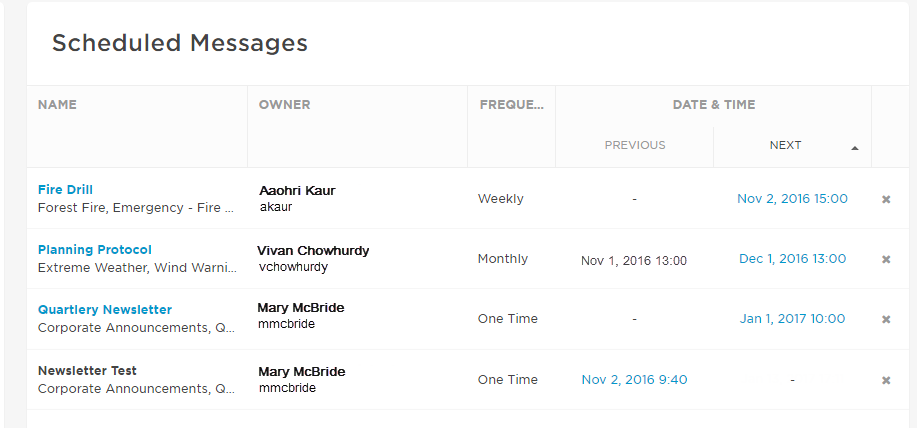
- Click a column heading to sort the list of scheduled messages by Name, Owner, Frequency, or the Date & Time of the previous or next scheduled message.
- Click the Date & Time link for a message to view its schedule details.
- For messages with future occurrences, the Date & Time link will be for the Next scheduled message.
- For expired scheduled messages, the Date & Time link will be for the Previous scheduled message.
- Click the Name link for a message to view the message content.
- The Name link is only available for messages with future occurrences.
Expired scheduled messages will remain in the list of scheduled messages until manually deleted by a user with appropriate permissions.
You can only edit the content of a scheduled message that has future occurrences. To edit the content of an expired message, first edit the message schedule so there is at least one future occurrence.
To edit a scheduled message:
- Do one of the following:
- To edit the schedule, click the Date & Time link for the message and edit the schedule details.
- To edit the content of the message, click the Name link for the message and edit the content of the message form.
- Save your changes or click Cancel to return to the list of scheduled messages.
If the layout of the message form has changed since the message was scheduled, editing the content of the scheduled message will update it to use current version of the form. Sections or properties removed from the form will no longer be displayed in the message, and new properties or sections will display default values until they are edited and saved.
- Click Messaging from the main menu. You're taken to the Messaging page that contains a list of workflows, forms and scenarios you have permission to use.
- Click Scheduled Messages from the top right-hand corner of the page.
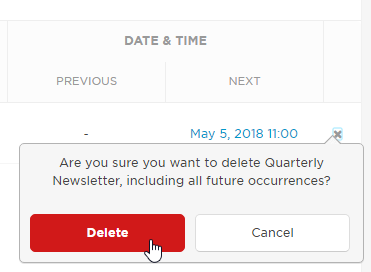
- To delete a scheduled message, click the X to the right of the scheduled message entry.
- Deleting a recurring message will delete all future occurrences of the message.
When you delete a user from the system, all of the scheduled messages created by that user are deleted.
Example scheduled messages
The following more detailed examples demonstrate how to schedule messages for different time frequencies.
A one time scheduled message is sent only once, on a specific date and time in the future.
To schedule a one-time message:
- In the Details section, type a descriptive Name for the message.
- Select which Time Zone to use.
- In the First Occurrence section, specify a future date and time when the message should be sent.
- In the Repeats section, use the drop-down to select a Frequency of Never.
- Click Schedule.
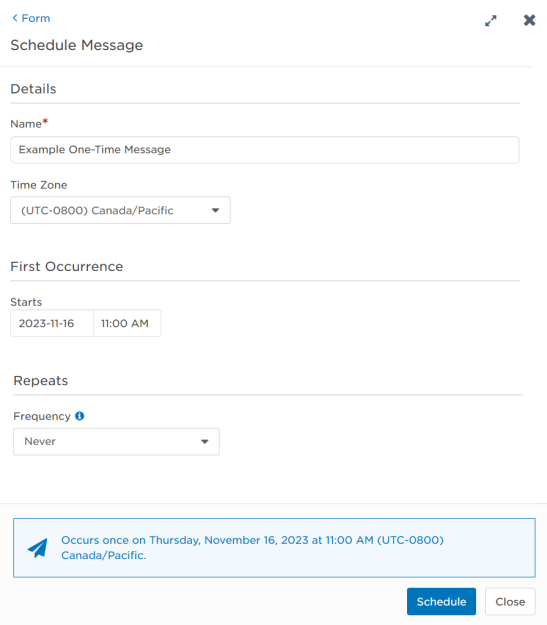
In this example, the message will be sent one time, on Thursday, November 16, 2023 at 11:00 AM (UTC-0800) Canada/Pacific:
A daily scheduled message is sent every day at a specific time, starting on or after a selected start date. For example, you could configure a message to send every day at 1:00 PM (UTC-0800) Canada/Pacific.
Daily messages can be scheduled to send indefinitely, to end on a specific date, or to end after a certain number of messages have been sent.
To schedule a daily message:
- In the Details section, type a descriptive Name for the message.
- Select which Time Zone to use.
- In the First Occurrence section, specify a future date and time the message should start on or after.
- In the Repeats section, use the drop-down to select a Frequency of Daily.
- To schedule an end date, click + Add End Date and choose one of the following:
- Never: The message will send daily, indefinitely.
- On Date: The message will send daily, ending on a specific date.
- After: The message will send daily, ending after a specific total number of messages have been sent. Every time a message is sent counts as an occurrence.
- Review the message schedule summary.
- Click Schedule.
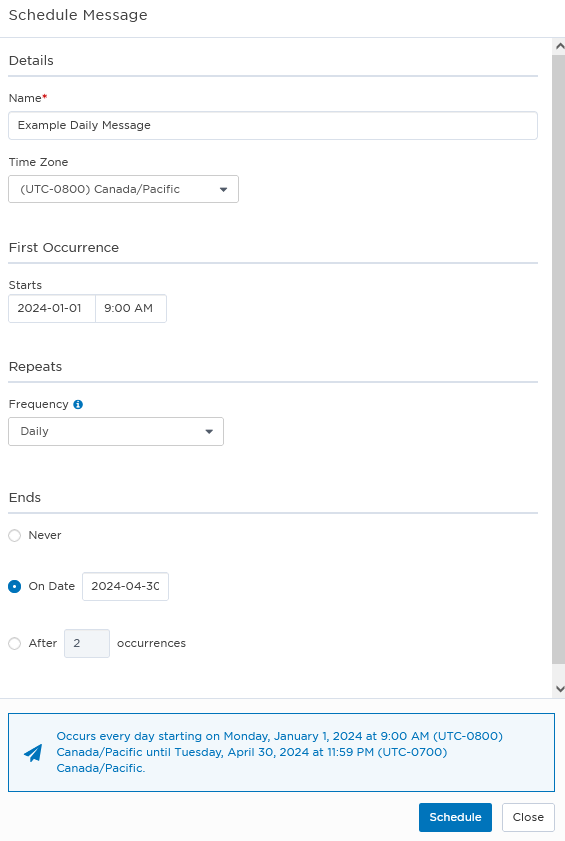
In the following example, starting on January 1, 2024 a message will be sent at 9:00 AM (UTC-0800) Canada/Pacific every day until April 30, 2024. The final message will be sent at 9:00 AM on April 30, 2024.
A weekly schedule message is sent at the same day and time every week, starting on or after a selected start date. For example, you could configure a message to send every Monday at 10:00 AM (UTC-0800) Canada/Pacific.
Weekly messages can be scheduled to send indefinitely, to end on a specific date, or to end after a certain number of messages have been sent.
To schedule a weekly message:
- In the Details section, type a descriptive Name for the message.
- Select which Time Zone to use.
- In the First Occurrence section, specify a future date and time the message should start on or after.
- In the Repeats section, use the drop-down to select a Frequency of Weekly.
- To schedule an end date, click + Add End Date and choose one of the following:
- Never: The message will send weekly, indefinitely.
- On Date: The message will send weekly, ending on a specific date.
- After: The message will send weekly, ending after a specific total number of messages have been sent. Every time a message is sent counts as an occurrence.
- Review the message schedule summary.
- Click Schedule.
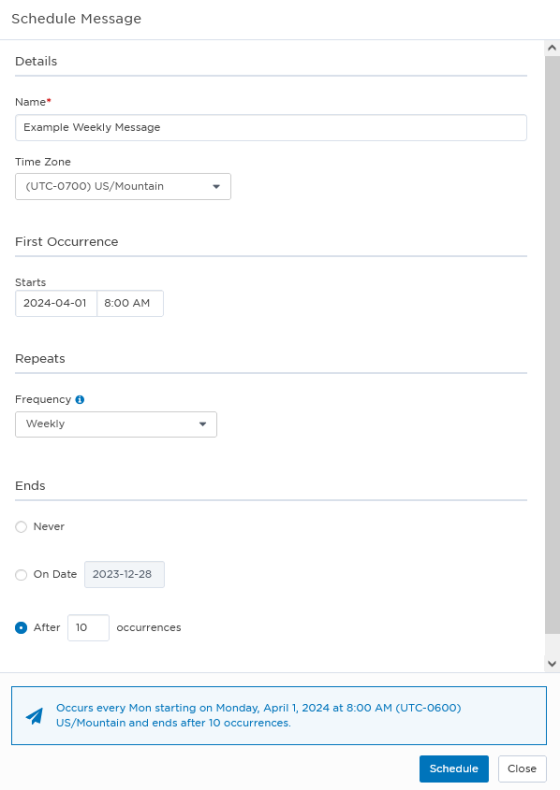
In the following example, starting on April 1, 2024 messages will be sent on Mondays at 8:00 AM (UTC-0600) US/Mountain, until a total of 10 messages have been sent. The final message will be sent at 8:00 AM (UTC-0600) US/Mountain on June 3, 2024.
A weekdays scheduled message is sent at the same time on Monday, Tuesday, Wednesday, Thursday, and Friday, starting on or after a selected start date. For example, you could configure a message to send at 10:00 AM (UTC-0800) Canada/Pacific from Monday to Friday.
Weekday messages can be scheduled to send indefinitely, to end on a specific end date, or to end after a certain number of messages have been sent.
To schedule a weekly message:
- In the Details section, type a descriptive Name for the message.
- Select which Time Zone to use.
- In the First Occurrence section, specify a future date and time the message should start on or after.
- In the Repeats section, use the drop-down to select a Frequency of Weekdays.
- To schedule an end date, click + Add End Date and choose one of the following:
- Never: The message will send on weekdays, indefinitely.
- On Date: The message will send on weekdays, ending on a specific date.
- After: The message will send on weekdays, ending after a specific total number of messages have been sent. Every time a message is sent counts as an occurrence.
- Review the message schedule summary.
- Click Schedule.
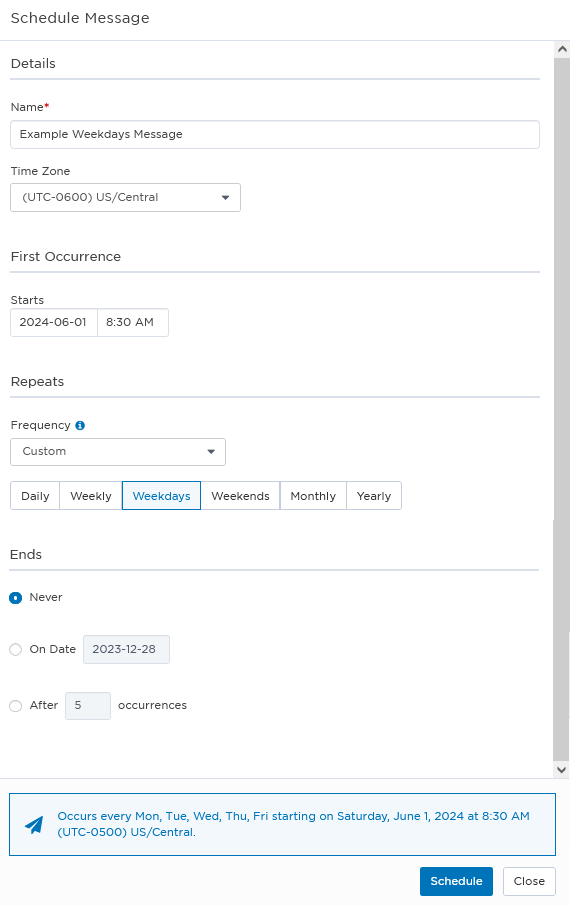
In the following example, starting on or after January 1, 2024 messages will be sent at 8:30 AM (UTC-0600) US/Central on weekdays (Monday to Friday) indefinitely.
A weekends scheduled message is sent at the same time on Saturday and Sunday, starting on or after a selected start date. For example, you could configure a message to send at 11:00 AM (UTC-0800) Canada/Pacific on Saturday and Sunday.
Weekend messages can be scheduled to send indefinitely, to end on a specific end date, or to end after a certain number of messages have been sent.
To schedule a weekend message:
- In the Details section, type a descriptive Name for the message.
- Select which Time Zone to use.
- In the First Occurrence section, specify a future date and time the message should start on or after.
- In the Repeats section, use the drop-down to select a Frequency of Weekend.
- To schedule an end date, click + Add End Date and choose one of the following:
- Never: The message will send on weekends, indefinitely.
- On Date: The message will send on weekends, ending on a specific date.
- After: The message will send on weekends, ending after a specific total number of messages have been sent. Every time a message is sent counts as an occurrence.
- Review the message schedule summary.
- Click Schedule.
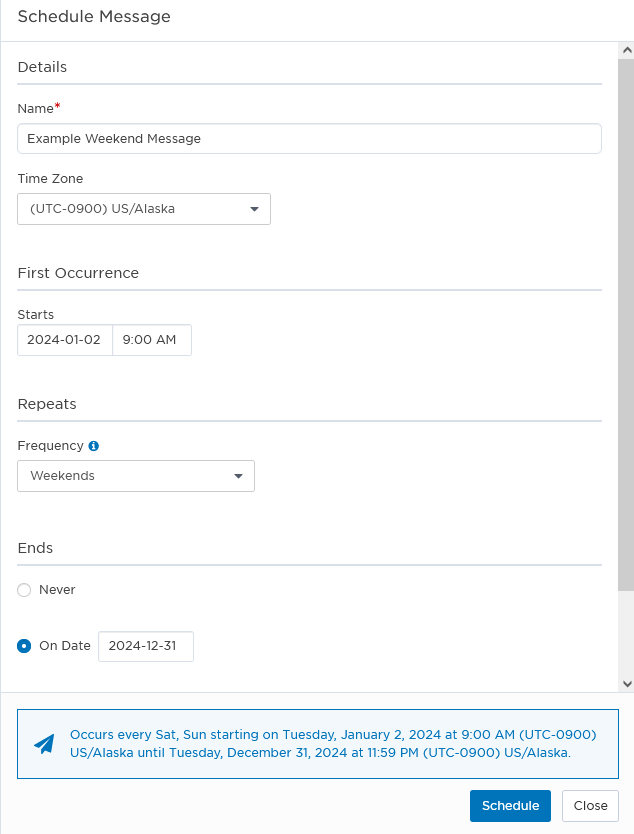
In the following example, starting after January 2, 2024 messages will be sent at 9:00 AM (UTC-0900) US/Alaska on weekends (Saturday and Sunday) until December 31, 2024.
Monthly messages can be scheduled to send at a specific time on the same date every month. For example, you could configure a message to send on the 15th day of every month at 8:30 AM (UTC-0800) Canada/Pacific. You can also define a custom monthly message to repeat on a specific date of a selection of months (for example, on the 15th day of January, April, July, and October at 8:30 AM (UTC-0800) Canada/Pacific.
Monthly messages can be scheduled to send indefinitely, to end on a specific date, or to end after a certain number of messages have been sent.
To schedule a monthly message:
- In the Details section, type a descriptive Name for the message.
- Select which Time Zone to use.
- In the First Occurrence section, specify a future date and time the message should start on or after.
- In the Repeats section, use the drop-down to select a Frequency of Monthly.
- To schedule an end date, click + Add End Date and choose one of the following:
- Never: The message will send monthly, indefinitely.
- On Date: The message will send monthly, ending on a specific date.
- After: The message will send monthly, ending after a specific total number of messages have been sent. Every time a message is sent counts as an occurrence.
- Review the message schedule summary.
- Click Schedule.
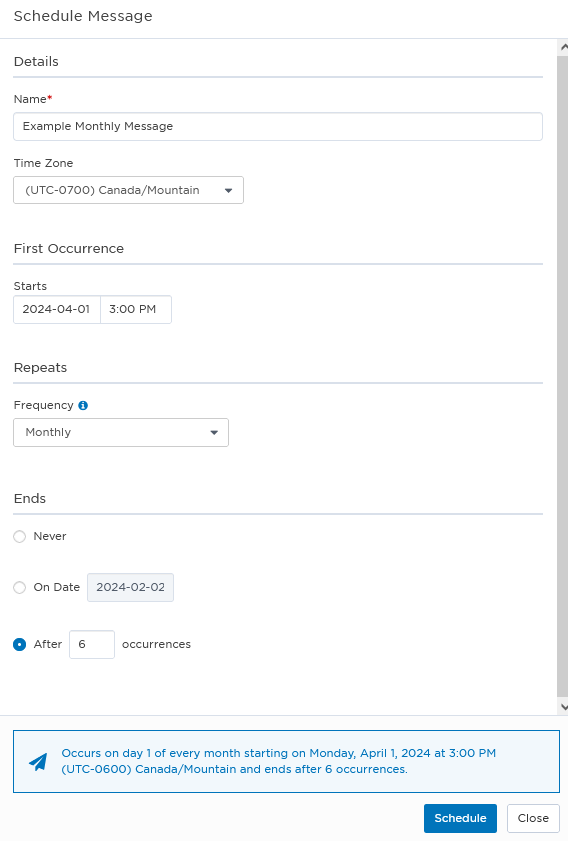
In the following example, starting on April 1, 2024 messages will be sent at 3:00 PM (UTC-0700) Canada/Mountain on the 1st of every month for 6 months. The last message will be sent on September 1, 2024 at 3:00 PM (UTC-0700) Canada/Mountain.
To schedule a custom monthly message:
- In the Details section, type a descriptive Name for the message.
- Select which Time Zone to use.
- In the First Occurrence section, specify a future date and time the message should start on or after.
- In the Repeats section, use the drop-down to select a Frequency of Custom.
- From the options that appear, select Monthly.
- Configure the message to send on a specific date or week:
- Day: Select Day and then select a date from 1 to 31, or the Last day of the month.
- Week: Select the first, second, third, fourth or last day of the week (Monday to Sunday).
- Select on which months the message should be sent using the On These Months selector.
- To schedule an end date, click + Add End Date and choose one of the following:
- Never: The message will send monthly, indefinitely.
- On Date: The message will send monthly, ending on a specific date.
- After: The message will send monthly, ending after a specific total number of messages have been sent. Every time a message is sent counts as an occurrence.
- Review the message schedule summary.
- Click Schedule.
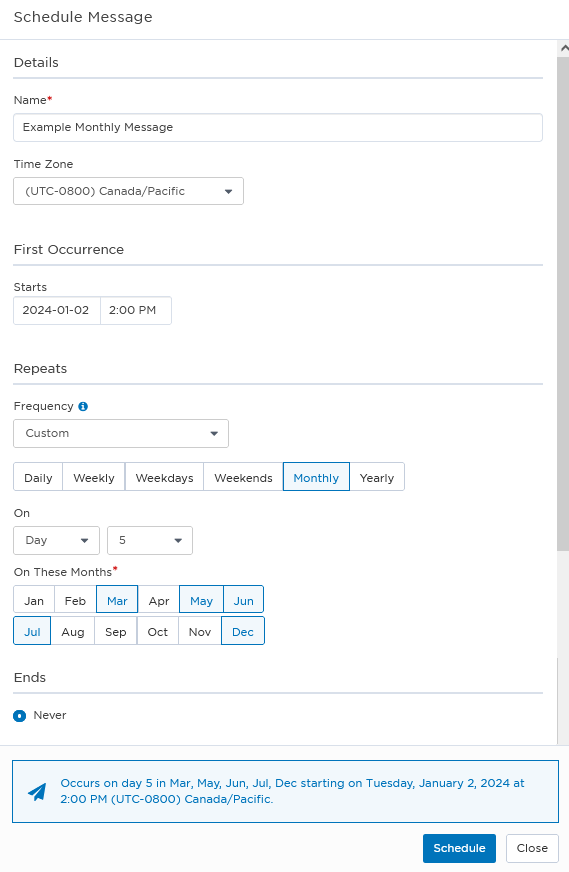
In the following example, starting after January 2, 2024 messages will be sent at 2:00 PM (UTC-0800) Canada/Pacific on the 5th day of March, May, June, July, and December indefinitely. The first message will be sent at 2:00 PM (UTC-0800) Canada/Pacific on March 5, 2024.
A yearly scheduled message is sent at a specific time on the same date every year, after a selected start date. Yearly messages can be scheduled to send on a specific date and time every year indefinitely, until a specific end date, or ending after a certain number of messages have been sent.
To schedule a yearly message:
- In the Details section, type a descriptive Name for the message.
- Select which Time Zone to use.
- In the First Occurrence section, specify a future date and time the message should start on or after.
- In the Repeats section, use the drop-down to select a Frequency of Yearly.
- To schedule an end date, click + Add End Date and choose one of the following:
- Never: The message will send yearly, indefinitely.
- On Date: The message will send yearly, ending on a specific date.
- After: The message will send yearly, ending after a specific total number of messages have been sent. Every time a message is sent counts as an occurrence.
- Review the message schedule summary.
- Click Schedule.
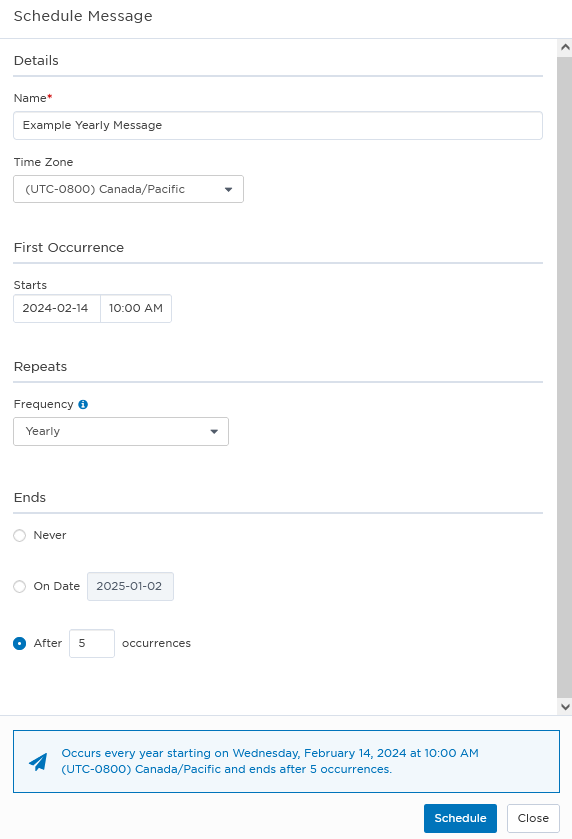
In this example, starting on February 14, 2024 messages will be sent every year at 10:00 AM (UTC-0800) Canada/Pacific on February 14 ending after 5 years. The last message will be sent at 10:00 AM (UTC-0800) Canada/Pacific on February 14, 2028.
