Convert an inbound integration to a flow
We've been hard at work turning Flow Designer into an easy drag-and-drop integration platform that anyone — coders and layfolk alike — can use to connect their everyday tools into a seamless, automated incident resolution chain.
We recognize that you might have Integration Builder integrations that are working for you, otherwise you wouldn't be using them. You don't need to convert your integration to a flow — it'll continue to function as it did before. But, if you want to unlock the power of Flow Designer and explore a new way of thinking about incident management workflows, you can convert your integrations to flows.
Why should I convert my integrations to flows?
Converting your integrations to flows and flow steps lets you share that power across your organization, including with people who might not be as comfortable with code. Even if you're a coder, there are benefits for you as well — did someone say observability?
Converting integrations to flows lets you:
- kick off a whole series of actions, all without manual intervention. Even without initiating an xMatters alert if that suits your processes the best.
- break big blocks of code into discrete steps, reusable by anyone in your organization whether they're coders or not...if you decide to let them.
- change a step in one place and have that update available wherever the step is used, making it easier to adapt to the ever-changing world.
- share steps across your organization to drive consistency and repeatability in your incident resolution processes.
- pull information from your tools and make it available to other steps in the flow, including using it to make decisions about what steps the flow should take next.
- see at a glance exactly which step is having problems if something goes wrong.
Okay, I'm sold...now what?
Of course, you might already have heard about the power of Flow Designer and want to jump in converting your Integration Builder integrations to flows. There are two components to converting your inbound integration to a flow:
- Creating a basic flow with a trigger to receive the request and a step to create an alert.
- Reviewing your integration script to see what steps might be buried in there.
Actually, what if I'm happy as is?
That's okay. We understand that you've got a system that works for you. We'll let you know if a change comes along that will impact your existing integrations. If you want to work with these integrations in Flow Designer, instead of the Integration Builder, there are some things you should know.
Create a basic trigger + alert flow
First, we'll create a simple two-step flow consisting of a trigger plus a Create Alert step. This gets the basic functionality of the integration into Flow Designer. If all you want to do is to send a request from your third-party application and launch an alert, you can stop after completing these first two steps — of course, then you'll miss out on a lot of the cool features Flow Designer offers.
Want a head start? Use our Send Alert workflow as a starting point, and edit the HTTP trigger to add any important information from the payload into the outputs.
The HTTP trigger receives and parses the request from the source application and passes the information into the trigger outputs.
To create the HTTP trigger, you map information from the request into the trigger's outputs. This makes the information available to steps further along the flow (for example, to update other tools, make requests to other systems for information to enrich notifications, or to include in an alert notification from xMatters).
When you use the HTTP trigger in the flow, double-click it to get the trigger URL.
Next connect a Create Alert step to initiate the alert in xMatters. Why don't we automatically create an alert and send notifications when a request is received? Because we want to give you the choice...is this the point in your workflow where you need to wake up your on-call team members or pull them away from another priority?
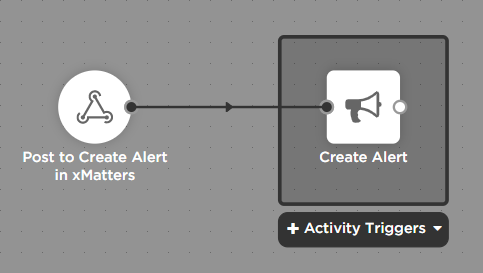
Because this is a two-step flow, there is only one place you can connect the Create Alert step, so connect the step the trigger and populate its inputs with constants, plain text, and outputs from the trigger.
Fully convert your integration into a flow
To convert your integration to a fully fleshed out flow, there's an additional step — reviewing the integration script to see what steps are hidden inside.
You can pack a lot of functionality into a block of code but when it's hidden in the Integration Builder script, it's hard to reuse, re-purpose, build on, or troubleshoot if something goes wrong, especially if you're not a coder.
And there's a good chance you can replace a lot of that code with built-in steps. To do that, we need to take a step back.
Let's look at a real-world inbound integration: a "Notify Assignee" integration designed to notify a user in xMatters that they've been assigned to a service desk ticket after finding and terminating any existing alerts related to the ticket.
There are actually 5 distinct steps hidden in the current script:
- Receive and parse the request from the source (a service desk application, in our example).
- Find any existing alerts in xMatters about the same issue.
- Terminate those related alerts.
- Look up the assigned user's target name.
- Create an xMatters alert to notify the user.
These can all be replaced by steps built right into Flow Designer. Take a look:

But my script isn't so simple...
If you have some coding acrobatics in your script, there are a couple of things you can do, depending on what you're trying to accomplish.
- If you have some switch statements, you can use the built-in switch step.
- Maybe you have extra calls to ServiceNow or Jira or your tool of choice that aren't covered by our built-in apps. Flow Designer lets you copy these steps as custom steps, giving you a starting point but also letting you tweak the functionality to your heart's content. Or you could create a custom step from scratch.
- Do you have code to terminate unnecessary alerts? You might not need it anymore since you can now create alerts only when you need them. If you still need to terminate an alert, we have a step for that.
Okay, I've examined my script...now what?
The first two steps are the same as the trigger + alert option: create an HTTP trigger and add a create alert step to your flow. However, we need to add a few steps in there.
To cover the steps you found lurking in your script, you need to add those steps to your flow and configure them.
This is what our Notify Assignee example looks like (without any fancy switch steps or additional tools):

We've added the steps from the script in between the trigger and the Create Alert step because we want to process those before we send the notification. This lets us send only the information the recipient needs, but also to enrich the notification with information from xMatters and other systems.
If the script has some unique requests it makes to your other tools, or you use a tool we don't have steps for yet, you might need to create a custom step (remember, you can use an existing step as a template using the copy as custom step function).
This step is optional, but it's always a good idea to test the flow to make sure you're seeing the results you expect. Simply send a request to the trigger URL of the HTTP trigger and head to the Activity panel to see how things, well, flow.
Take it a step further
Once you've turned your integration into a flow, it's easy to add additional steps to your flow, whether you go with the option to build a simple, two-step flow or completely convert your script into a flow. Heck, even if you don't convert your integration to a flow, you can still add steps to the inbound integration trigger.
For example, you could:
- Use one of our built-in apps to update a record in another system with xMatters alert information or change the status of a ticket based on the user's response.
- Create a custom step to post incident information from steps all along the flow to your proprietary dashboard.
- Use a switch step to only create an alert in certain circumstances.
- Tweak the notification sent to the assignee, for example, adding a new response choice that initiates a flow of its own.
What if I'm happy as is?
That's okay. We understand that you've got a system that works for you. As mentioned, we'll let you know if a change comes along that will impact your existing integrations. If you want to work with these integrations in Flow Designer, instead of the Integration Builder, there are some things you should know.
Can I see an example?
Absolutely. Below, we'll walk through each of the steps using the example of converting a "Notify Assignee" inbound integration to a flow. The integration was designed to notify a user in xMatters that they've been assigned to a service desk ticket after finding and terminating any existing alerts related to the ticket.
We actually covered the example above when we talked about step 0, where we found the following steps hidden in our "Notify Assignee" script:
- Receive and parse the request from the source (a service desk application, in our example).
- Find any existing alerts in xMatters about the same issue.
- Terminate those related alerts.
- Look up the assigned user's target name.
- Create an xMatters alert to notify the user.
In our example, the HTTP request from the source system needs to at least provide information to look up the assignee's xMatters target name (so we know who to notify) and the ticket ID (so we can look up related alerts).
- On the Flows tab, open the canvas where we want to add the flow (in our example, Notify Assignee).
- Go to the Triggers tab in the palette and click Create HTTP Trigger.
- On the Settings tab, give your trigger a name and description (you can add a description and label for this particular version as well; see the help for more information on step management). Leave the step as In Development until you're ready to release it.
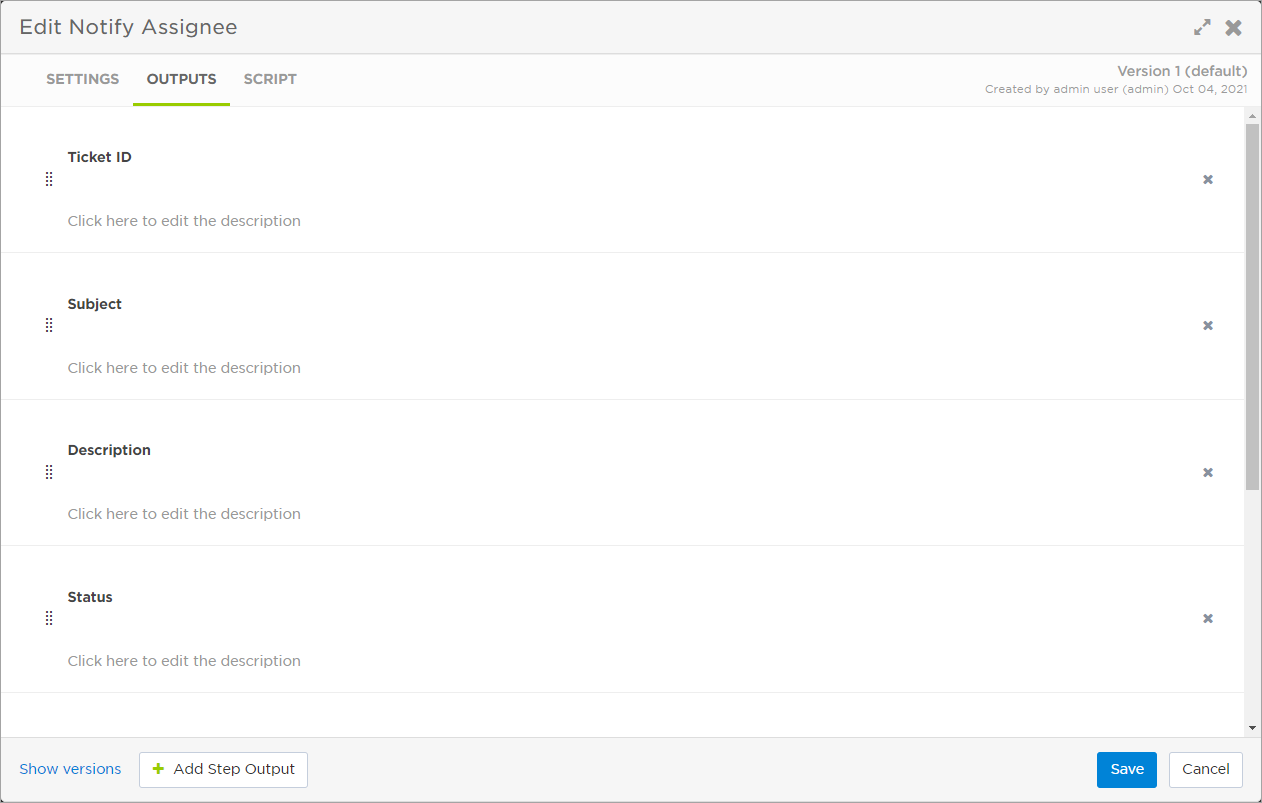
- On the outputs tab, we'll add:
- Assignee: The flow uses this information from the source application to look up the xMatters target name of the associated user.
- Ticket ID: The flow uses this to find existing alerts for the ticket so it can terminate them.
- In this example, we added a few more outputs so more information from the source application is available, giving the assignee all the details they need to start working on the issue right in the notification.
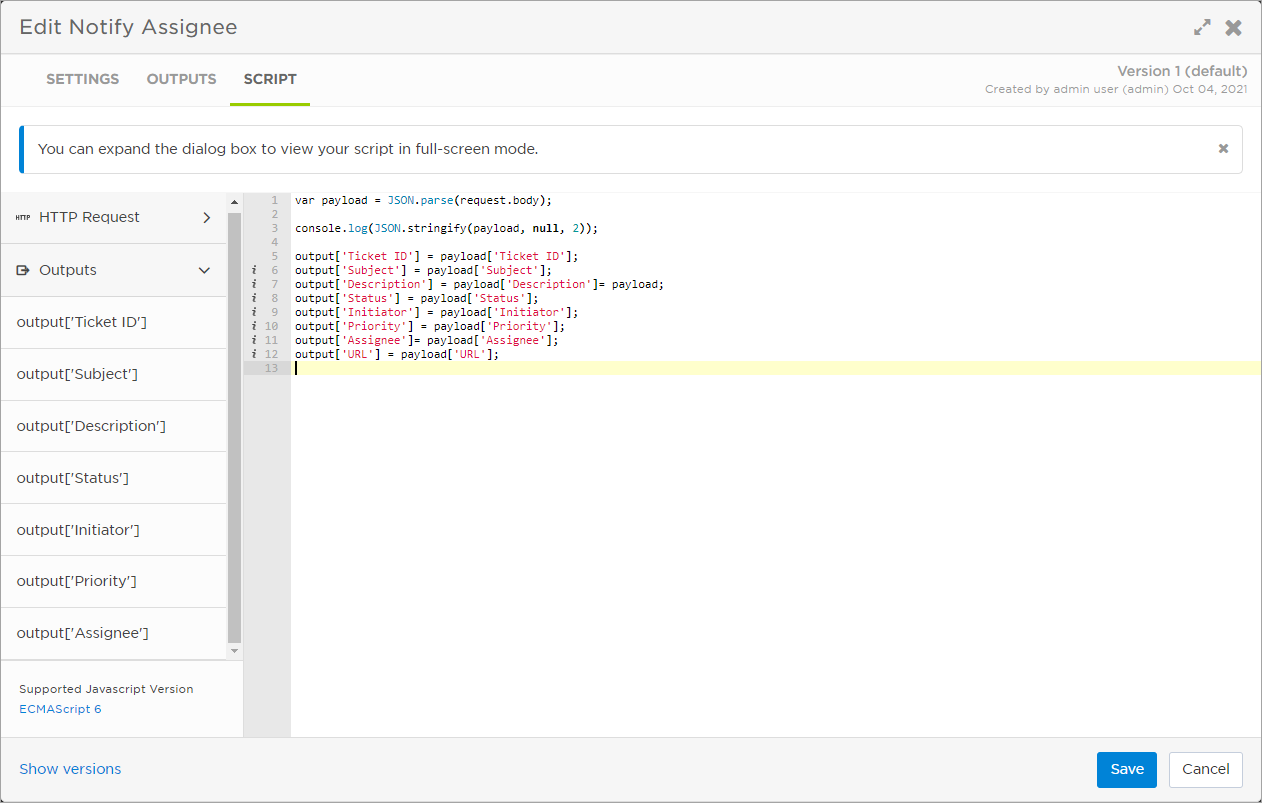
- In the script, we map the objects from the payload to the outputs, making the information available to steps in the flow.
- Click Save.
- Drag your newly created trigger onto the canvas.
Once you've identified the steps hidden in your integration script, the next step is to replace them with flow steps.
We'll replace the code for finding and terminating related alerts, finding the assignee's xMatters target name, and sending the notification with discrete, observable, ready to drag-and-drop steps.
Find and terminate any existing alerts
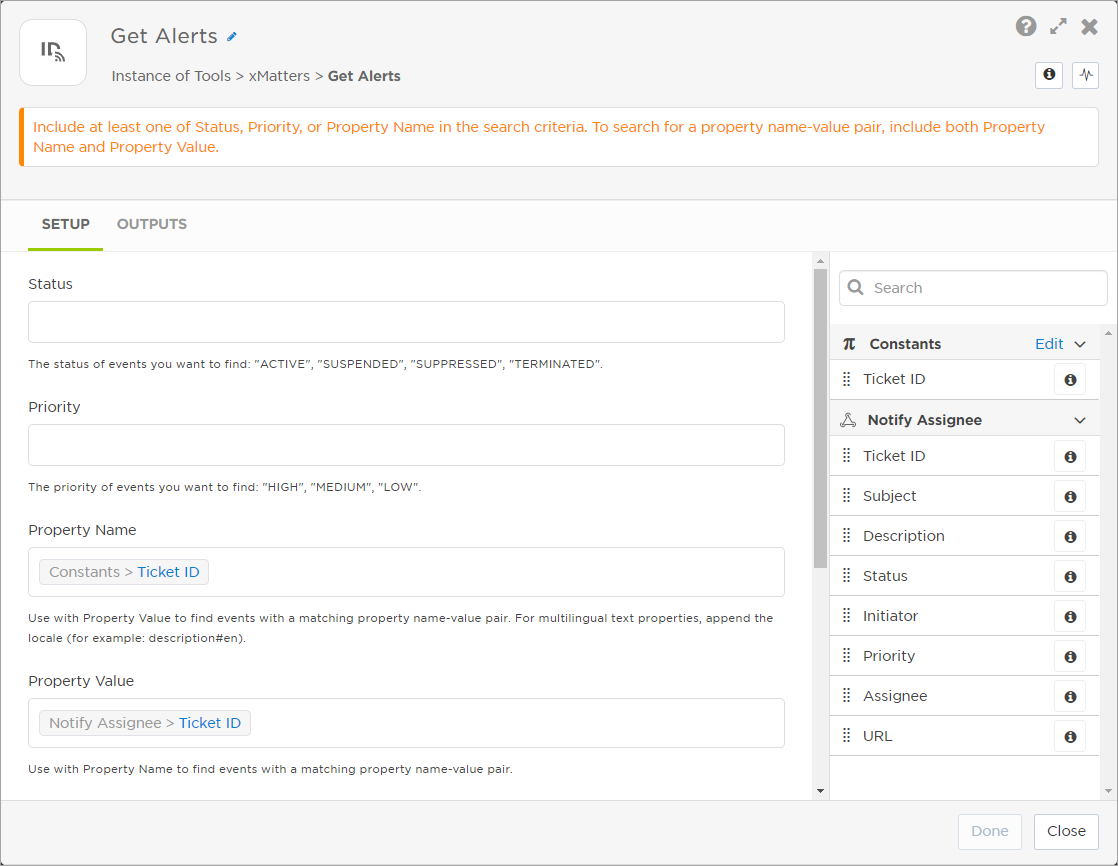
- From the Tools tab in the palette, drag a Get Alerts step onto the canvas and connect it to the trigger.
- Configure the inputs then click OK. In our example, we configured them as follows:
- Property Name: enter the name of the alert property holding the ticket ID, appending the language code (in our example, Ticket ID#en — this is the name of the alert property that holds the ticket ID from the source application).
- Property Value: Drag the HTTP trigger's Ticket ID output into the field.
- Plan Name: Set this to the workflow we're working in.
- Form Name: Set this to the form associated with our flow.
- Connect a Terminate Alerts step to the Get Alerts step.
- Drag the Event IDs output from the Get Alerts step into the field.
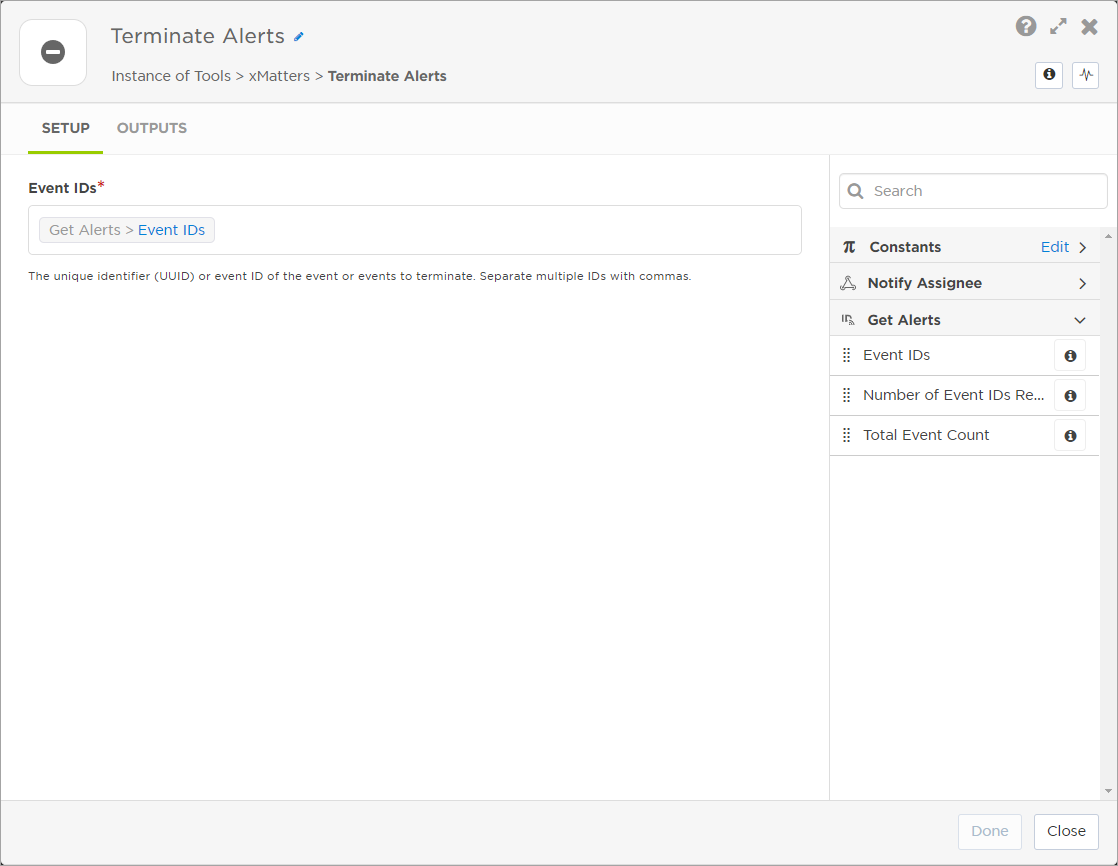
- Click OK.
Find the user ID of the assignee
Now we match the user assigned to the ticket in the service desk application with a user in xMatters, using the value of a custom user property. In the example below, we use Mary McBride, whose service desk ID ("marym3") is stored in a custom field labelled "SD User".
- Connect a Find User step to the previous step.
- Double-click the step to access its settings.
- We want to find the assignee based on their user ID in the source system, so select Custom.
- Set the Property Name input to the xMatters custom user property that holds the user's ID in the service desk (in our example, "SD User").
- Drag the HTTP trigger's Assignee output into the Property Value input.
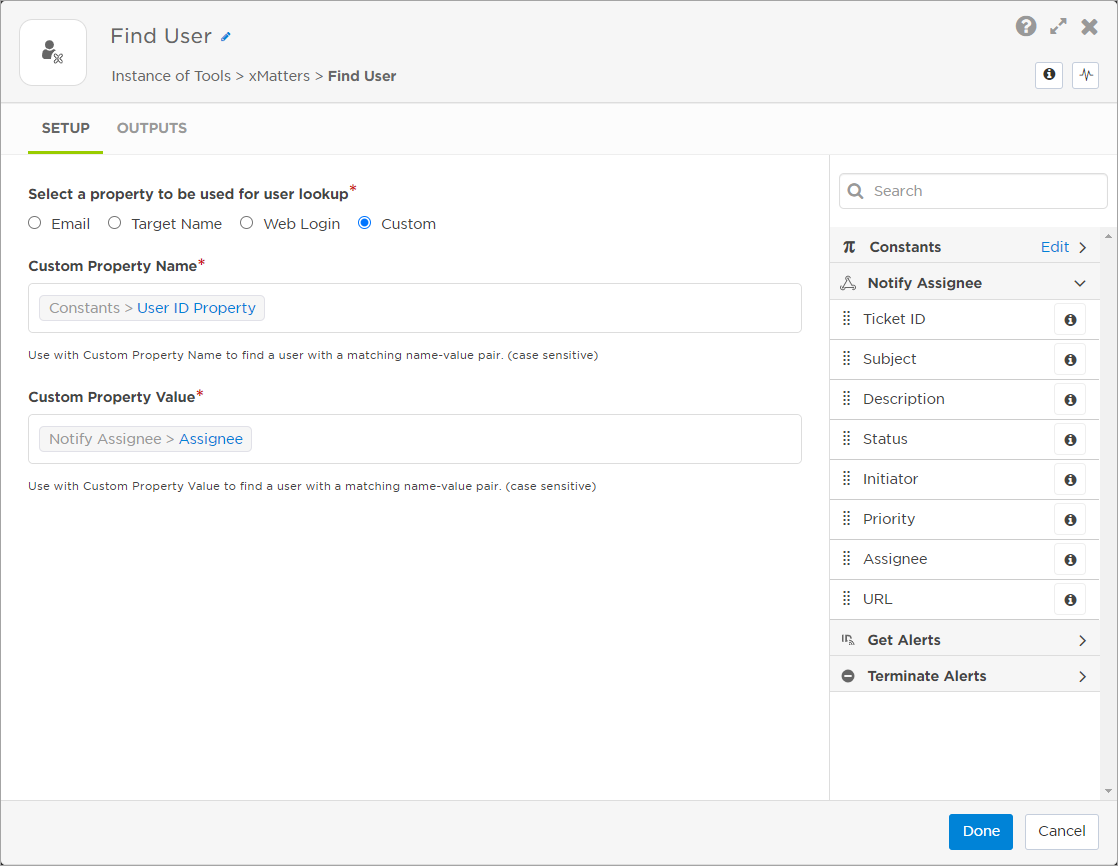
- Click OK.
Next, we'll create the alert to notify that assignee that they have work to do.
- Connect a Create Alert step to the flow.
- Double-click the step to configure it.
- Drag the User Target Name output of the Find User step into the Recipients field. This sends the notification to whichever user is found by that step.
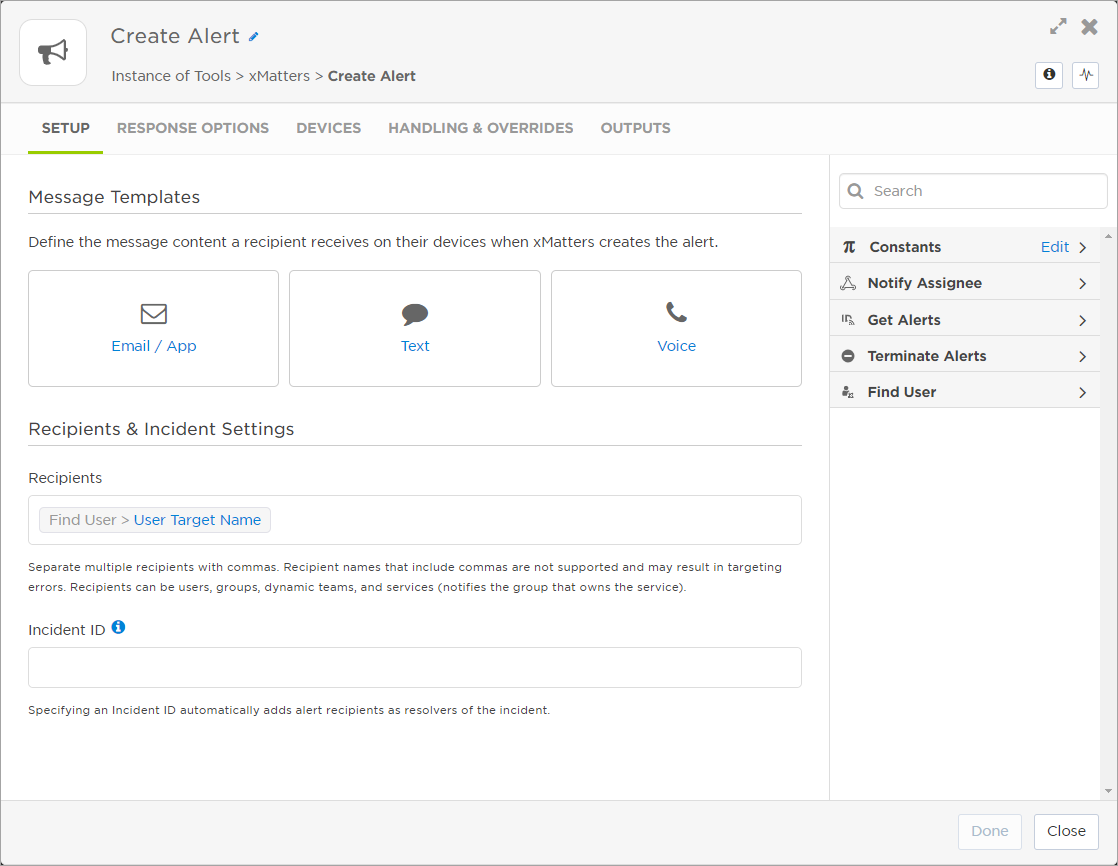
- Define your response options and create your messages using outputs from previous steps, constants, or plain text (or a combination).
- Click Done.
That's it. We've turned that blob of code into a flow of discrete, reusable, and observable steps.