Download and install the agent
You can download and install the xMatters Agent directly from the xMatters web user interface.
The xMatters Agent is supported on the following systems:
- Windows Server 2016, 2019, and 2022
- Red Hat Linux 7, 8, and 9
- Debian 10, 11, and 12
- Ubuntu 20.04, 22.04, and 24.04
Before installing an agent, ensure that your system meets the following requirements:
|
Software |
|
| User Account |
The account that you use to install the agent must have permission to install services on the system. This usually requires root access. |
| System Memory |
2 GB minimum 4 GB recommended |
| Disk Space |
The amount of required disk space primarily depends on how much information you want to store in the log files. Suggested minimum: 5 GB |
The Agent installation can be accessed from the web user interface.

The agent authenticates requests using the API Key credentials of the user that downloaded and installed it. As a best practice, we recommend using an integration user (or service account) to set up the agent instead of an individual user's account; this prevents the agent from failing to authenticate requests if the user who to set it up is disabled in the system or deleted.
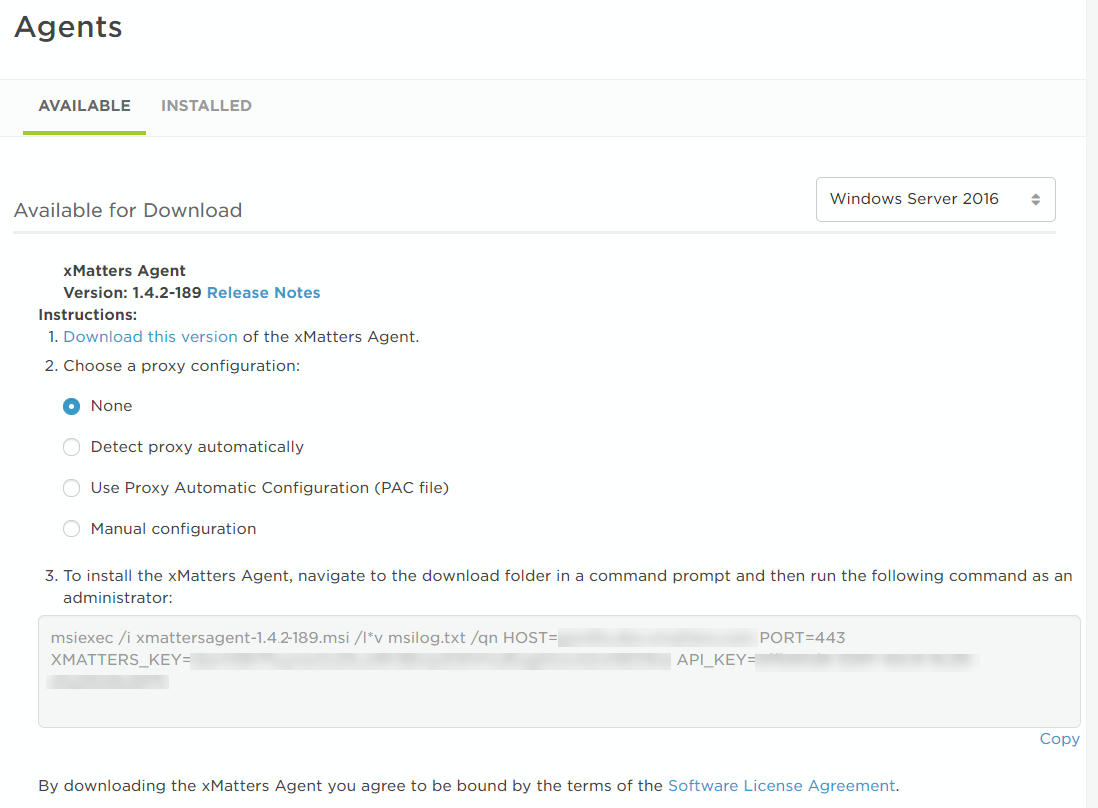
To install an agent on Windows Server 2016:
- In the Workflows menu, under Workflow Tools, click Agents.
- On the Agents window Windows Server 2016 is set as the default operating system.
- Click Download this version to download the installer file for the Windows version of the agent.
- Select a proxy configuration, or select None if you are not using a proxy server. (For more information about the different proxy configuration settings, see Connect to xMatters via a proxy server.)
- On your Windows system, open a command prompt as an administrator and install the agent by typing the command that is displayed on the screen.
- This command contains a key unique to your system that identifies the agent to xMatters.
- The default installation folder for the agent on Windows is in C:\Program Files\xa. To install the agent to a different drive or folder, insert INSTALLDIR="<drive>:\<path>" into the installation command just before the /l^v msilog.txt portion. (For example: msiexec /i xmattersagent-1.2.1-87.msi INSTALLDIR="D:\xmatters agents" /l*v msilog.txt. /qn ... )
Do not install the agent by clicking on or double-clicking the installer file, since this does not configure the agent with your system information.
By default, the agent runs using the LocalService account. To run the service using the credentials of another account, locate the agent in the list of services, right-click and select Properties. On the Log On tab, select the account you want the agent to run as.
To install the agent on Linux:
- In the Workflows menu, under Workflow Tools, click Agents.
- On the Agents window, use the drop down list to change the default operating system from Windows Server 2016 to your Linux operating system.
- Select a proxy configuration, or select None if you are not using a proxy server. (For more information about the different proxy configuration settings, see Connect to xMatters via a proxy server.)
- Open a terminal window on your Linux system and run the commands that appear on-screen as a super user.
- These commands contain a key unique to your system that identifies the agent to xMatters.
- These commands contain a key unique to your system that identifies the agent to xMatters.
During the installation process, you can configure the agent to communicate with xMatters via a proxy server. The following sections describe the available proxy configuration settings.
None
If your agent does not use a proxy server, you can leave this as the default value.
Detect proxy automatically
Select this option to have the agent automatically detect your proxy information during installation.
Use Proxy Automatic Configuration (PAC file)
Enter the location (URL) of your Proxy Automatic Configuration file. Protocol (http/https) is required.

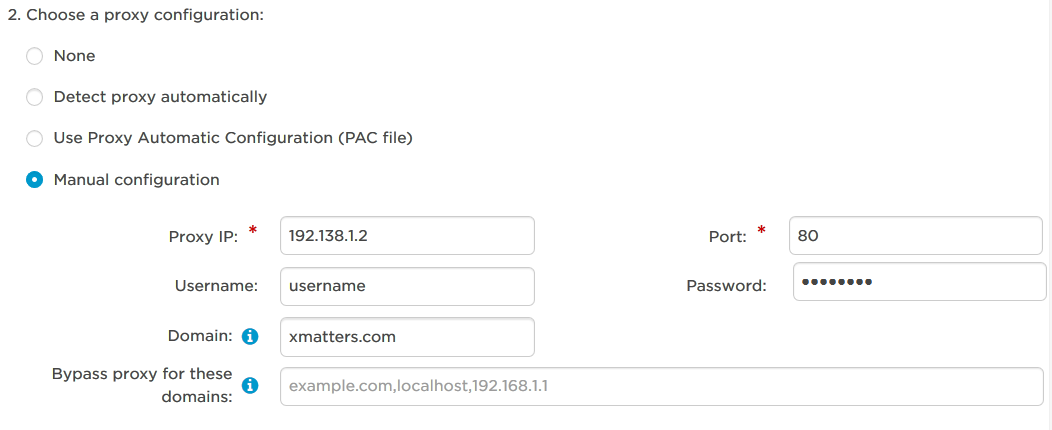
Manual Configuration
Manually configure your proxy settings using the following fields:
- Proxy IP: The IP address of the proxy server you want the agent to use (required).
- Port: The port to use on the proxy server (required).
- Username: The username used to authenticate with the proxy server.
- Password: The password used to authenticate with the proxy server.
- Domain: If the proxy server uses NTLM authentication, the domain name to use for the proxy server.
- Bypass proxy for these domains: The hostnames or IP addresses that have permission to bypass the proxy settings. Use commas to separate multiple domains.

By default, the agent runs on port 8081. If this works for your system, we recommend leaving it as is. However, in some cases, that port might be in use by another application (for example, if you are running multiple versions of the agent
Changing the port on Windows
- Open xagent-service.conf (located in the xa > config folder by default).
- Locate the section of properties that are prefaced with wrapper.java.additional.##, where ## are numbers counting up from 1.
- Go to the end of that list (usually 24) and add: wrapper.java.additional.25 = -Dserver.port=####, changing #### to the port number you want to use.
- If the existing list does not end at 24, make sure to change 25 to the next number in the sequence.
- Save the file and start the agent.
If you want to confirm that the agent is using the correct port, check the xagent-communication.log.
Changing the port on Linux
- Open xa.conf (located in /etc/xmatters/xa by default).
- Add the following line, replacing #### with the port number you want to use: export SERVER_PORT=####
- Save the file and start the agent.
If you want to confirm that the agent is using the correct port, check the xagent-communication.log.
Updating the agent to a newer version overwrites any changes you've made to the xa.conf file. Be sure to create a backup version so you can merge your changes after upgrading.
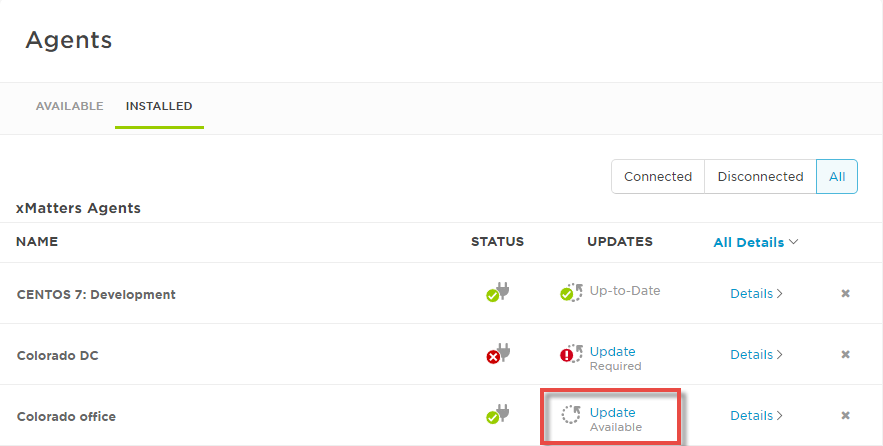
The Installed tab of the Agents page displays the agents that have recently connected to xMatters. The Updates column of the table displays whether there are any updates available, recommended, or required for the installed agents. (Click Details to view more information about the installed and available versions.)
Updating the agent to a new version overwrites any changes you've made to the xa.conf file, such as changing the port. If you have modified the file, create a backup version before upgrading and then merge your changes back once the upgrade is complete.
To update your agent, click the Update link, select the appropriate operating system, and follow the on-screen instructions to update your system.

You can uninstall the agent from your system. After you have uninstalled an agent, it appears in the list of disconnected agents and you can then delete it from your system.
To uninstall the agent on Windows Server 2016:
- In Control Panel > Programs, click Uninstall a program.
- Locate the xmatters-xa service and uninstall it.
On Linux systems, uninstall the agent with a package installer. You'll require administrator access to uninstall the agent.
To uninstall the agent from Debian 8 or Ubuntu 16.04, type the following command:
sudo apt-get purge xmatters-xa
To uninstall the agent from CentOS 7 or Red Hat 7, type the following command:
sudo yum remove xmatters-xa
For more information about running the agent on a Linux system, view the agent's manual page by typing man xmatters-xa from a command line.
You may want to stop and start an agent if you are troubleshooting the connection to xMatters or if you want to temporarily suspend processing. Using the following commands (as opposed to stopping the service using other system options such as the Windows Task Manager) allows the agent to handle the shutdown gracefully. The agent will stop accepting new requests, but allow up to 90 seconds for in-progress jobs to complete and existing requests to be forwarded. The process will also log any outstanding requests that could not be handled within the 90-second drain period.
On Linux systems
You can stop, start, or restart the agent service in Linux systems by typing the corresponding command:
sudo service xmatters-xa stop
sudo service xmatters-xa start
sudo service xmatters-xa restart
On Windows systems
You can stop, start, or restart the agent service on Windows from the services area of the Control Panel, or by typing the following DOS commands:
sc start "xMatters Agent"
sc stop "xMatters Agent"
When the agent is installed on your system, it configures a service to run automatically and installs files to specific locations on your system.
Linux systems:
- /opt/xmatters/xa/bin/: Contains executable files and scripts. These files are removed when the agent is uninstalled.
- /etc/xmatters/xa/: Contains configuration files. Some of the configuration files remain after the agent is uninstalled.
- /var/log/xmatters/xmatters-xa: Contains log files. Log files remain after the agent is uninstalled.
Windows systems:
- All files are located within the installation directory and are removed when the agent is uninstalled.