Running the agent in Docker
Docker is a software service that allows you to run applications in lightweight containers so they can work in different environments. Running an agent in a container not only allows you to run it under any operating system you choose, but also allows you to run multiple agents simultaneously.
To help aid in overall setup for anyone using Docker, we've created a Docker image you can use to run the agent in a container on your machine. To use it, make sure you have Docker running on the machine where you want to run the agent (referred to throughout these instructions as the "local" machine).
Retrieving environment variables
Before you get started, navigate to Workflows > Agents. On the Available tab, you will see the installation commands in a block at the bottom — the selected operating system doesn't matter, we're just after the environment variables here. Copy the values for XMATTERS_HOSTNAME (or HOST, depending on the selected OS), XMATTERS_KEY, and API_KEY and keep them handy.

The easiest method to load an agent image into a container is likely by using Docker Desktop as described in the following instructions, but we've also provided command line options for users seeking a more programmatic way of doing things.
Using Docker Desktop
Retrieve your environment variables as described above, and make sure you have Docker Desktop installed and running on the machine you want to host the agent.
Step One: Load the image into Docker
Open Docker Desktop and, in the search bar at the top, search for "flow-designer-agent" (including the dashes will greatly narrow the search results). In the list of returned images, select everbridge/flow-designer-agent, and then click Pull.
Step Two: Set the environment variables
When the image has finished loading, click the Run button. In the "Run a new container" dialog box, add each of the following environment variables (the agent accepts different variable names for some values) and set its value as described.
- XMATTERS_HOSTNAME is the hostname of your instance, also available from the install command block in the UI. Note: Do not include the https:// portion.
- XMATTERS_KEY is the value for the XMATTERS_KEY you retrieved from the install commands in the xMatters UI.
- API_KEY is the value for the API_KEY from the install commands.
- FRIENDLY_NAME is whatever label you want to use to identify the agent in the UI. This name must be unique for each agent you want to run in a single xMatters instance.

Step Three: Run the container
After adding the environment variables, you can provide a name for the new container (or accept the default), and then click Run to launch the container.
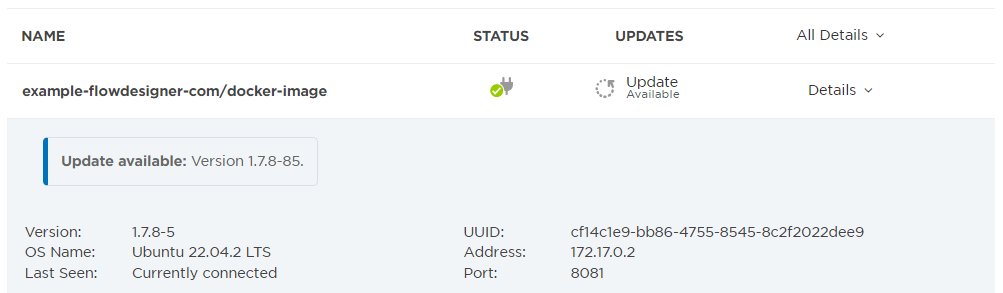
To check the status of the agent after starting the container, return to xMatters, navigate to Workflows > Agents, and click the Installed tab. You should see the agent running in Docker in the list; click Details to see more information about the agent.
Using the command line options
For a more programmatic way of using the Docker image, you can use the docker run command to launch the agent in a container and pass in the parameters as command line arguments. To greatly simplify the process and reduce the chance of mistakes inherent to lengthy command line arguments, you can create a file to hold the environment variables first, and then launch a container using either a docker run or a docker compose command.
Before you start, make sure you have the Docker engine running on the computer where you want to run the agent, and retrieve the environment variables from the user interface as described above.
Step One: Create a file to hold the environment variables
While you can pass in the environment variables using a command line, it's much easier to create a separate .env file to hold them and pass it in when launching the container. To create the file, copy the following code block into a plain text file and save it as variables.env in a local folder (alternately, you can download a copy of the variables.env file, save it to a local folder and then open it in a text editor):
XMATTERS_HOSTNAME=
XMATTERS_KEY=
API_KEY=
FRIENDLY_NAME=
# XA_PROXY_PAC=""
# XA_PROXY_IP=""
# XA_PROXY_PORT=""
# XA_PROXY_USER=""
# XA_PROXY_PASS=""
# XA_PROXY_DOMAIN=""
# XA_PROXY_BYPASS=""
Assign each of the environment variables as follows (the agent may accept different variable names for some values depending on your OS, but this list should work for all systems), and then save the file. Do not include spaces or quotes for these variables.
- XMATTERS_HOSTNAME is the hostname of your instance, also available from the install command block in the UI. Note: Do not include the https:// portion.
- XMATTERS_KEY is the value for the XMATTERS_KEY you retrieved from the install commands in the xMatters UI.
- API_KEY is the value for the API_KEY from the install commands.
- FRIENDLY_NAME is whatever label you want to use to identify the agent in the UI. This name must be unique for each agent you want to run in a single xMatters instance.
Note: If you want the agent to communicate with xMatters via a proxy server, you can assign appropriate values to the XA_PROXY variables. See the Manual Configuration section under Connect to xMatters via a proxy server for information about each setting.
Step Two: Create a Docker compose file (optional)
You can create a Docker batch file (docker-compose.yml) to store the command line arguments for starting the agent and simplify the actual command even further. To create the file, copy the following code block to a plain text file and save it as docker-compose.yml in the same local folder where you saved the variables file (alternately, you can download a copy of the docker-compose.yml file to your local folder and edit it as needed).
version: '3.8'
services:
xagent:
image: everbridge/flow-designer-agent:latest
container_name: agent-container
restart: unless-stopped
env_file:
- variables.env
This will launch the latest version of the agent in a container with the default name of "agent-container", using the environment variables specified in the variables.env file. To use a different container name, which is handy if you want to run multiple agents on the same server or in the same xMatters instance, replace "agent-container" with the name you want to use, and "variables.env" with the name of the file containing the appropriate environment variables.
Step Three: Run the container
Do one of the following to run the container:
-
If you want to create the container using the docker run command, run the following command in the same folder as the variables.env file. (You can replace "agent-container" with your preferred name for the container.)
docker run -d --restart=unless-stopped --env-file variables.env --name agent-container docker.io/everbridge/flow-designer-agent:latest
-
If you want to create the container using docker compose instead, run the following command in the same folder as the variables.env and docker-compose.yml files.
docker compose up -d
Note: Depending on your version of Docker and/or your OS, you may need to run docker-compose up -d instead (note the hyphen).
To check the status of the agent after starting the container, return to xMatters, navigate to Workflows > Agents and click the Installed tab. You should see the agent running in Docker in the list; click Details to see more information about the agent.
Accessing agent logs in Docker
To inspect the logs for the agent running in Docker, use one of the following options based on the method used to start the container:
-
If you started the container using Docker Desktop, navigate to the Containers page in Docker Desktop, and click the name of the container the agent is running in to open the Logs tab.
-
If you started the container using docker run, use the command docker logs agent-container (replace "agent-container" with the name of the container).
-
If you started the container using docker compose, run the command docker compose logs agent-container (or docker-compose logs agent-container), replacing "agent-container" with the name of the container.