ServiceNow Record Alerts
The built-in ServiceNow Record Alerts trigger initiates a flow when it receives a request from a ServiceNow webhook within the Everbridge Flow Designer app for ServiceNow.
- Go to the Triggers tab in the palette, expand the App Triggers section, and drag the trigger onto the canvas.
- Double-click the trigger (or click the pencil icon).
- When you first open the trigger, you must select an existing ServiceNow endpoint or configure a new endpoint that points to your ServiceNow instance before you can configure the rest of the trigger settings.
- After you configure the endpoint, choose one of the available record tables from the ServiceNow instance defined by the selected endpoint.
- Click Next to enable the rest of the trigger's settings.
- On the Output Mapping tab, you can map column data from the record table you selected to this step's outputs if you want to reference ServiceNow data in connected steps. Outputs pass the ServiceNow values to steps further down the flow.
- On the Settings tab, set the authentication method (we recommend Basic Authentication or OAuth) and then copy the Trigger URL — you'll use this URL to set up the webhook in ServiceNow by configuring it to the 'Incident Alerts' integration on the Everbridge Flow Designer app for ServiceNow. Make sure the authentication method for the trigger URL matches the one for the endpoint.
- By default, the workflow notifies the user or group assigned to the ServiceNow incident.
- Click the Flood Control tab to edit the trigger's default flood control settings. For more information about these settings, see Trigger Flood Control.
- Click Done.
- On the flow canvas, connect the steps you want to run when xMatters receives a request to that URL.
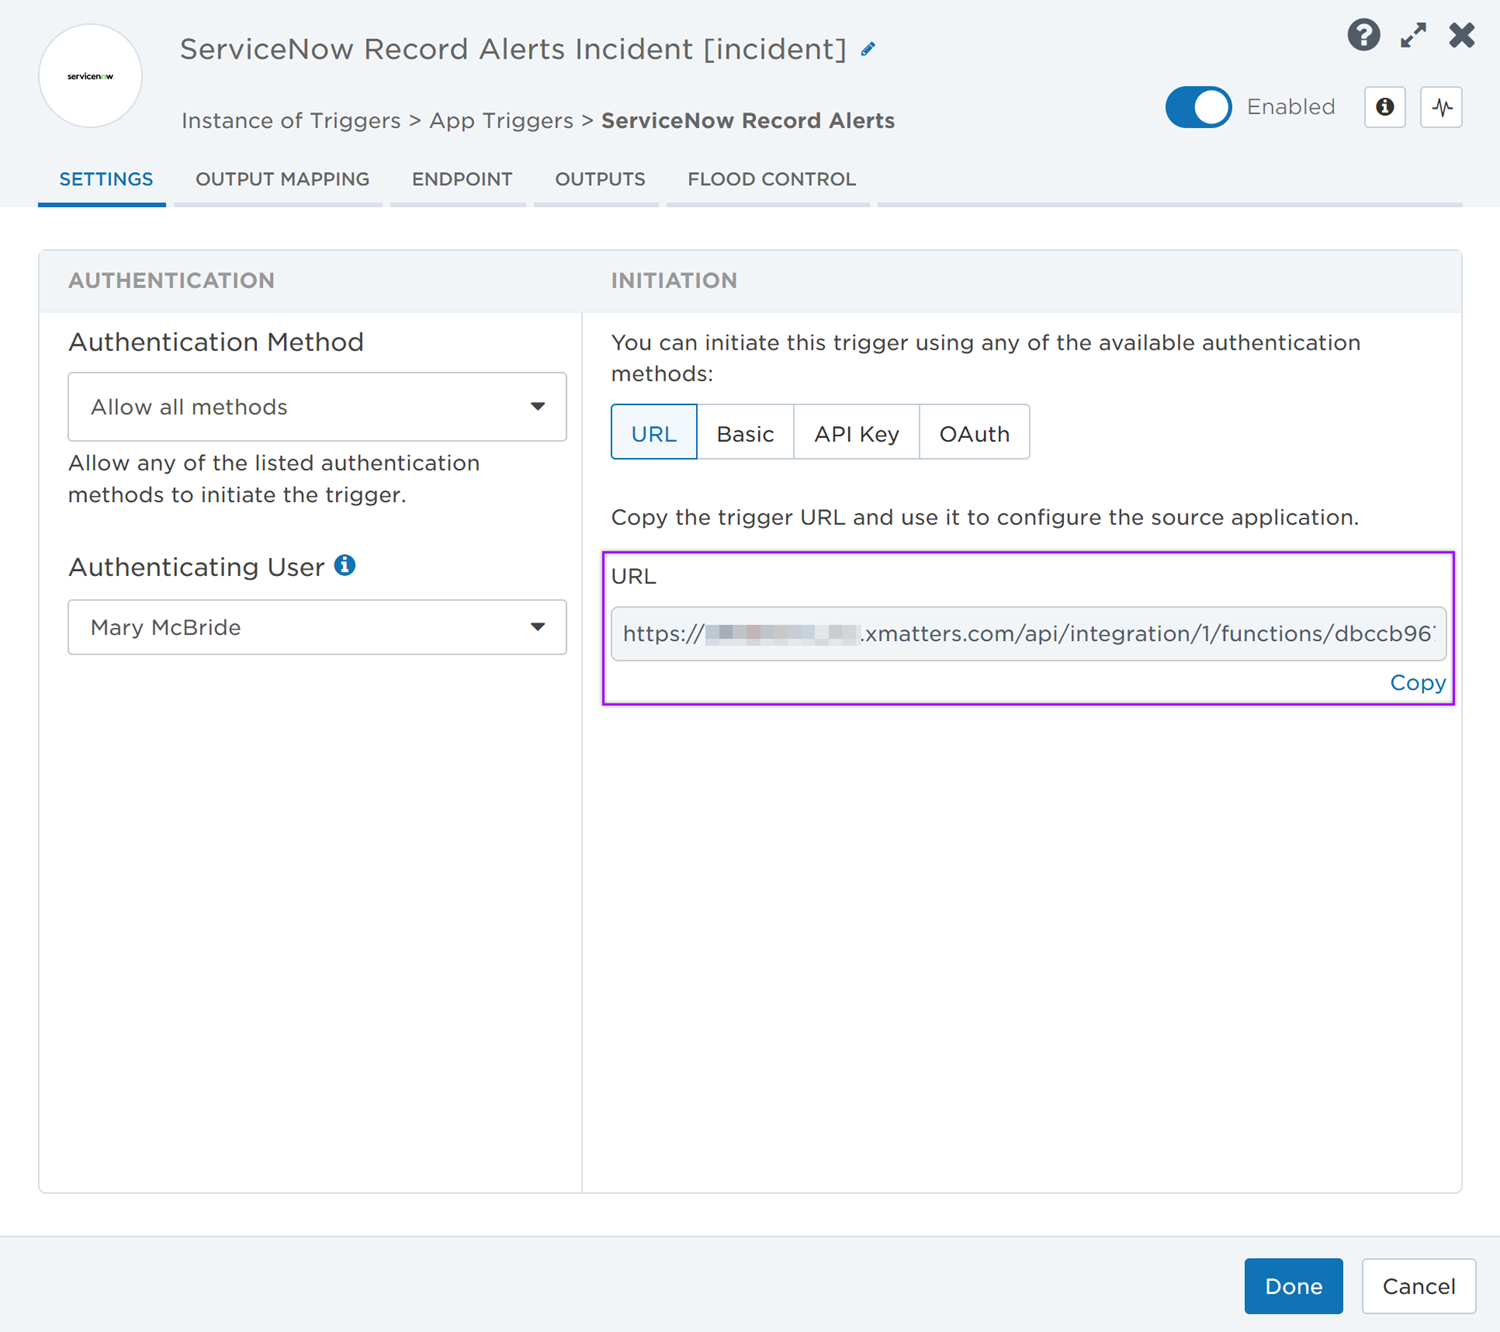
You're now ready to configure ServiceNow to target the trigger.
Configure ServiceNow to send requests to the trigger URL
Prepare ServiceNow
To have ServiceNow send alerts to the flow trigger, you need to configure a webhook and set it to use the trigger URL.
There are a couple of steps to get ServiceNow ready to integrate with xMatters — first and foremost, installing the Everbridge Flow Designer app. However, you also need to create a user in ServiceNow to make requests and assign the user specific roles installed with the application.
Go to the ServiceNow store at store.servicenow.com and install the free Everbridge Flow Designer app in your ServiceNow instance.
After you install the app, you should see the Everbridge Flow Designer menu in your ServiceNow instance.
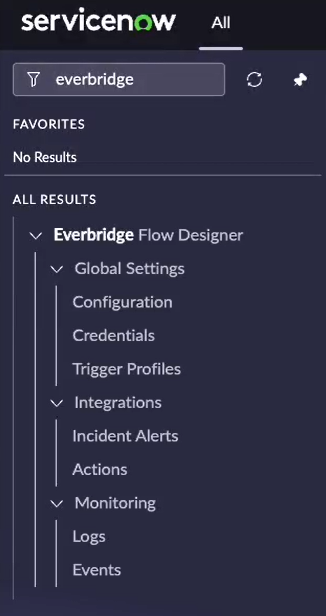
Flow Designer will need ServiceNow credentials to be able to perform actions like update the ServiceNow incident status, assignment, or add comments and work notes.
To configure the ServiceNow endpoint in Flow Designer, you need the username and password for a ServiceNow API user to handle REST requests from Flow Designer to ServiceNow. To access the REST endpoint and make the required integration requests, this user must have the itil or itil_admin roles (added with the Everbridge Flow Designer app). These roles have permissions to modify records and fields in the designated table.
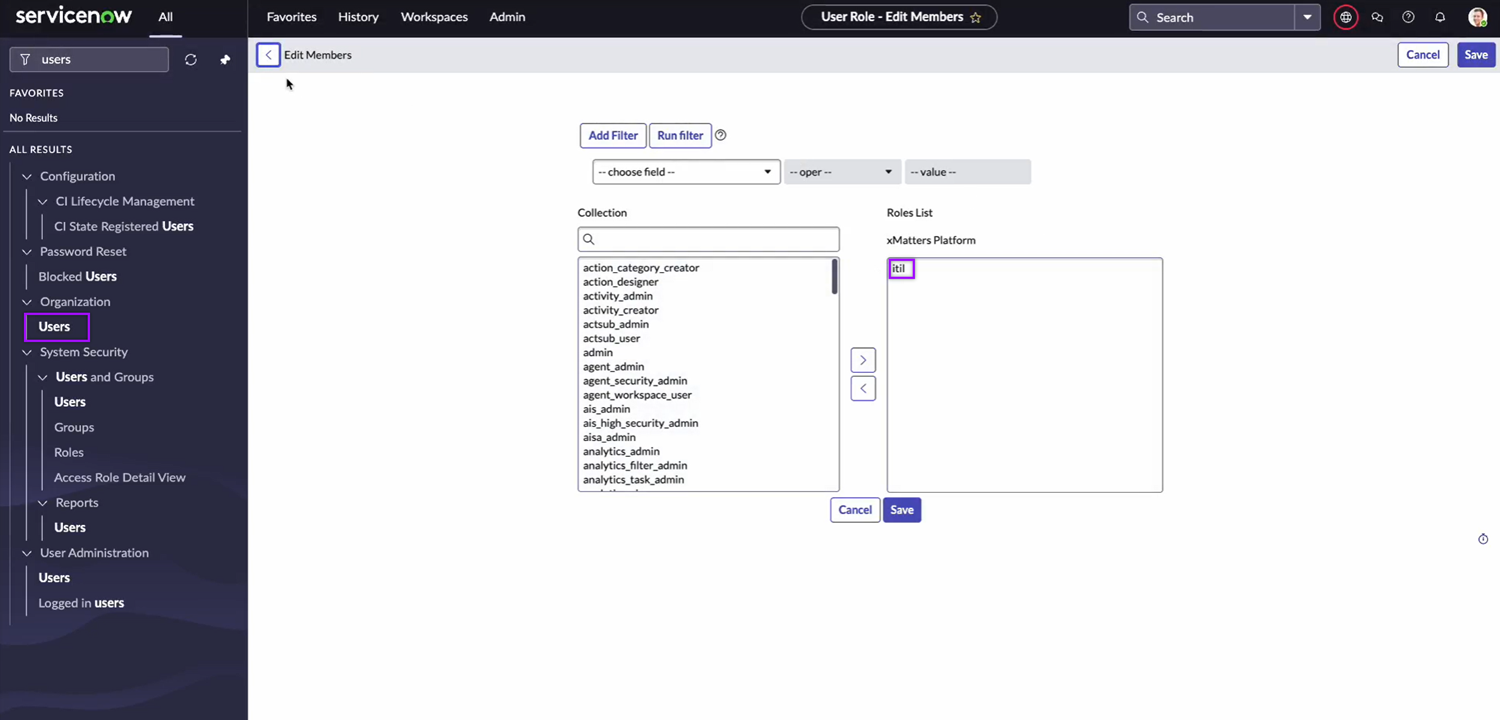
For information about adding users and assigning roles in ServiceNow, refer to the ServiceNow documentation.
Configure xMatters
Now that you've completed the first part of the configuration in ServiceNow, it's time to configure xMatters.
The trigger requires a user who can authenticate REST requests from ServiceNow to xMatters when working with alerts. The necessary permissions are provided by the 'REST Web Service User' role in xMatters. See Create an integration user for more information on creating an integration user.
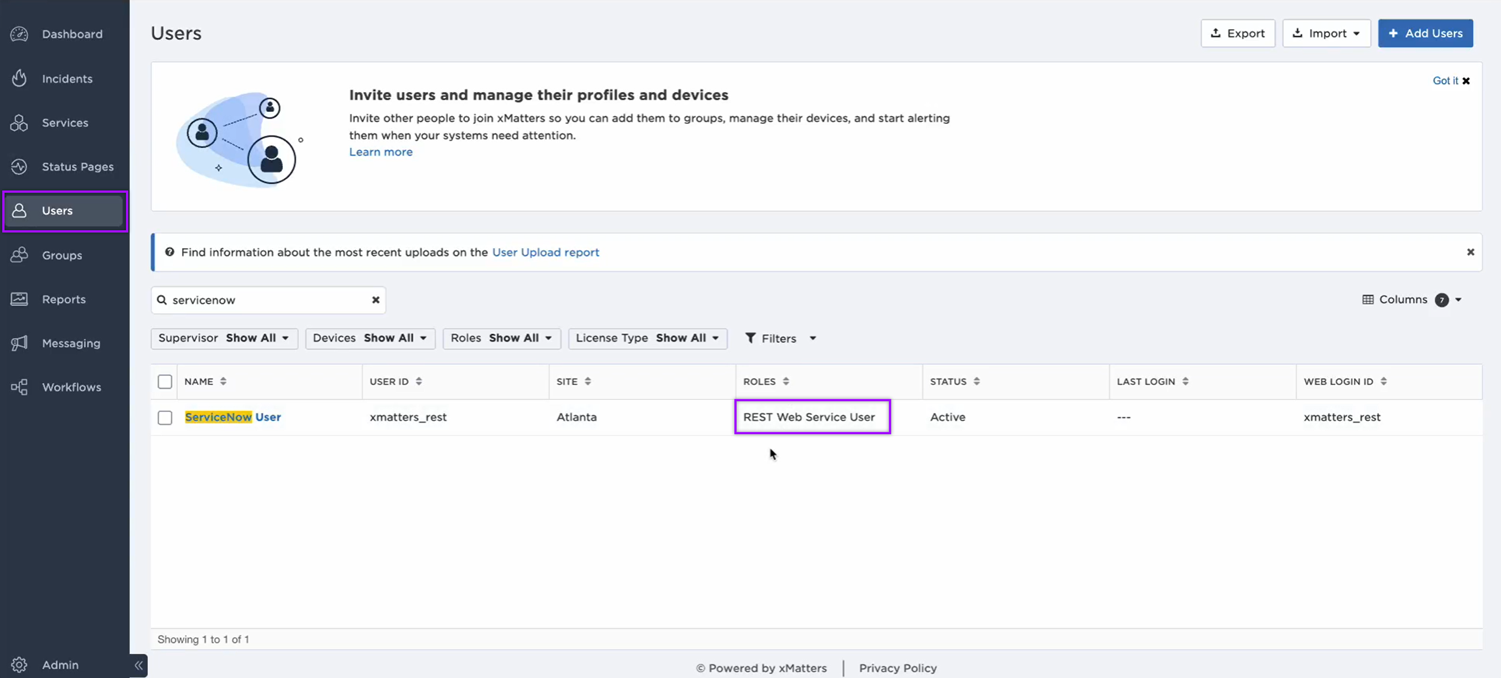
If you’re using Basic Auth, you need one of the following for authentication while setting up an integration:
- An API key or secret
- To obtain the API key, go to the user’s page, select the More Actions drop-down, then click Manage API Keys.
- The user ID and password of the xMatters integration user
If you’re using OAuth, you need the following information for authentication while setting up an integration:
- xMatters instance client ID
- To obtain the client ID, go to Workflows, then under Authentication, click OAuth.
- The user ID and password of the xMatters integration user
To set up an endpoint to connect to ServiceNow, follow these instructions on how to configure an endpoint with a ServiceNow authentication type in xMatters.
Configure the Everbridge Flow Designer app in ServiceNow
There are some global settings you need to configure on the Everbridge Flow Designer app in ServiceNow before you can set up your integrations.
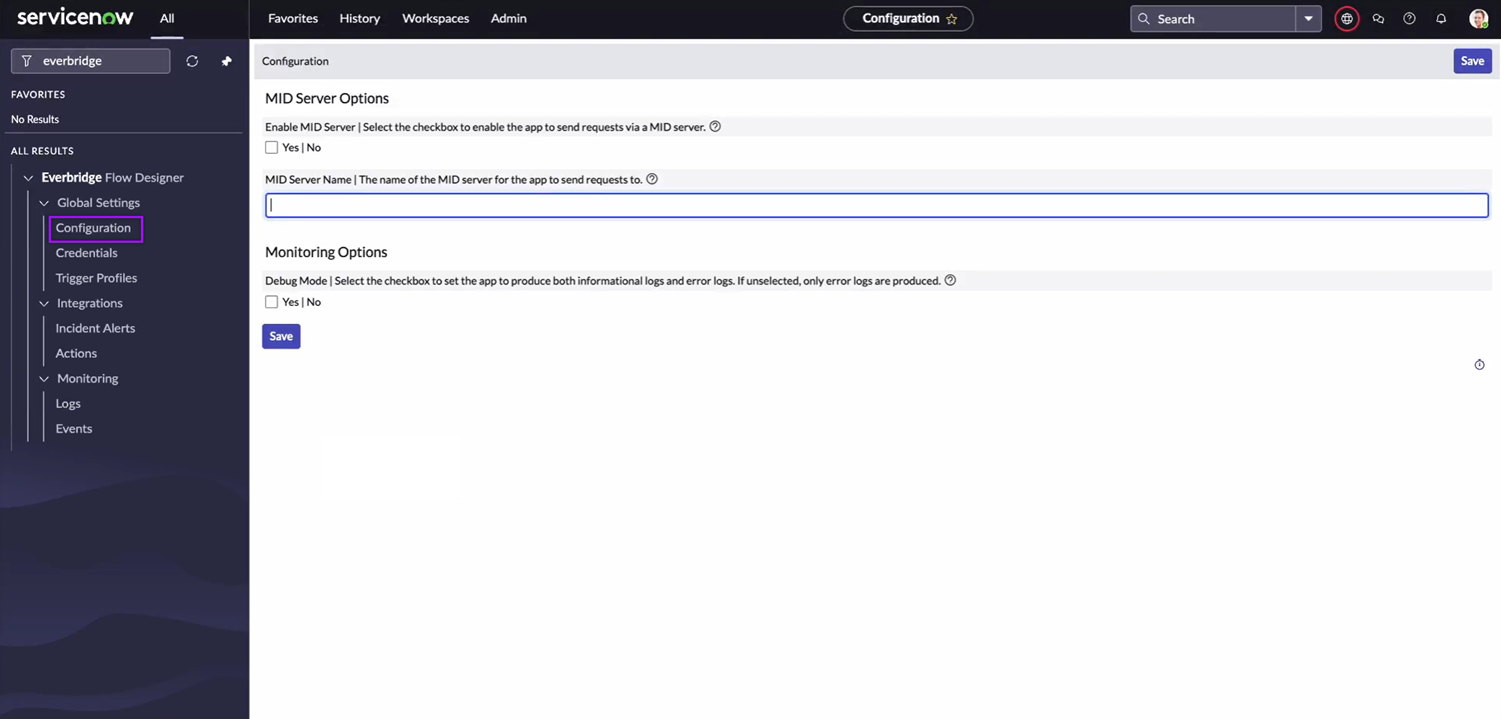
To open the Configuration page, go to Everbridge Flow Designer → Global Settings → Configuration, then configure the following options:
- Enable MID Server: If you’re using a MID server, select the checkbox and type the name of the MID server. If not, leave it unchecked.
- Debug Mode: You can enable debug mode by selecting the checkbox under Monitoring Options. If the checkbox is selected, more details will be logged in the Logs page under the app menu to help identify the cause of potential issues.
Click Save to save your changes.
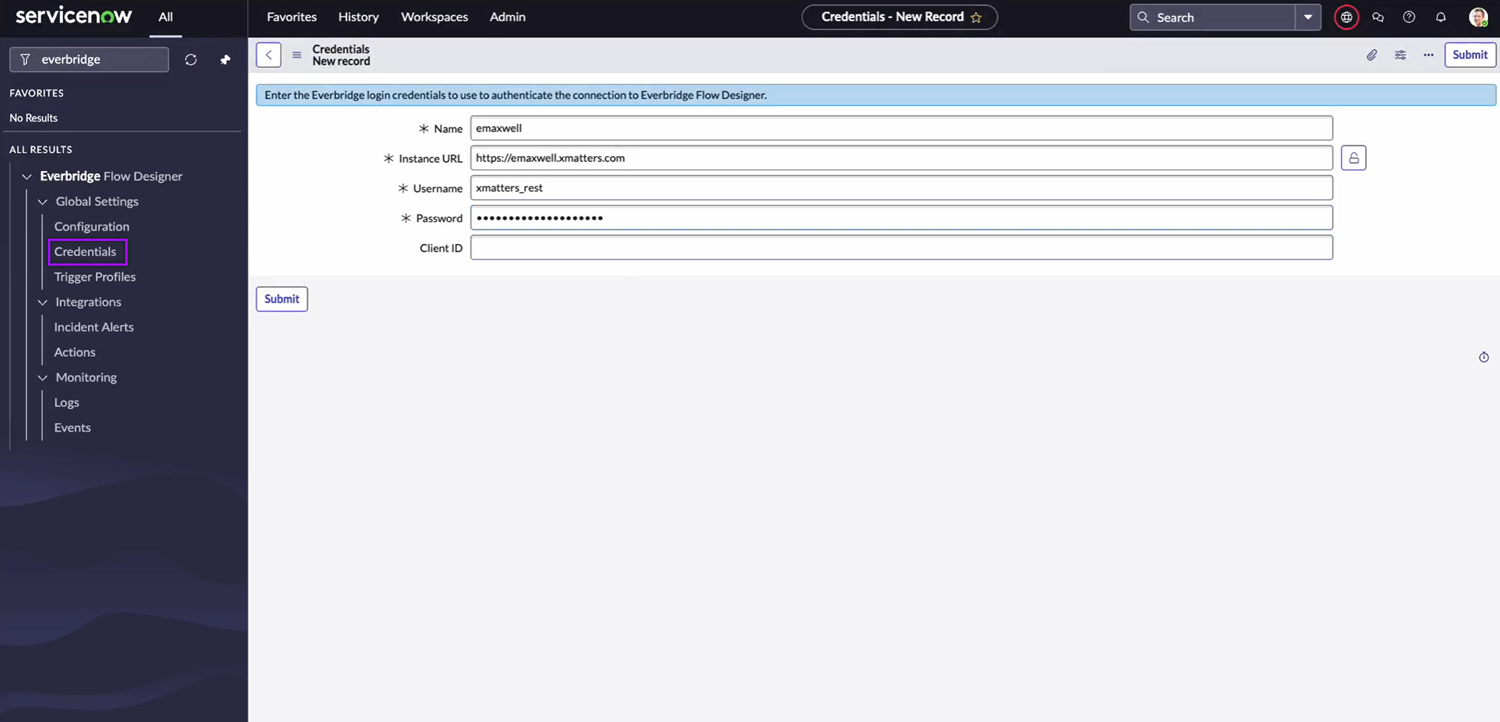
To open the Credentials page, go to Everbridge Flow Designer → Global Settings → Credentials, then fill in the following fields to create a credentials record:
- Name: Enter a name that describes this credentials record (e.g., the name of your xMatters instance)
- Instance URL: Type the Base URL for Flow Designer. Format: https://example.xmatters.com
- Username: Type the username of the user who will be used to connect to Flow Designer.
- Password: Type the password of the user who will be used to connect to Flow Designer.
- Client ID: If you used OAuth to connect to Flow Designer, enter the client ID. If you used Basic Auth, leave this field blank.
Click Submit to create the credentials record.
Configure the Incident Alerts integration
The ServiceNow Record Alerts trigger needs to be configured to the Incident Alerts integration in order for it to receive requests from the ServiceNow webhook.
The Incident Alerts integration on the Everbridge Flow Designer app allows ServiceNow users to configure filters that determine whether requests are sent to Flow Designer when ServiceNow incidents are created or updated.
Set up a trigger profile
In order to run the Incident Alerts integration, you need a trigger profile to connect the integration to the xMatters credentials and workflow configured for it.
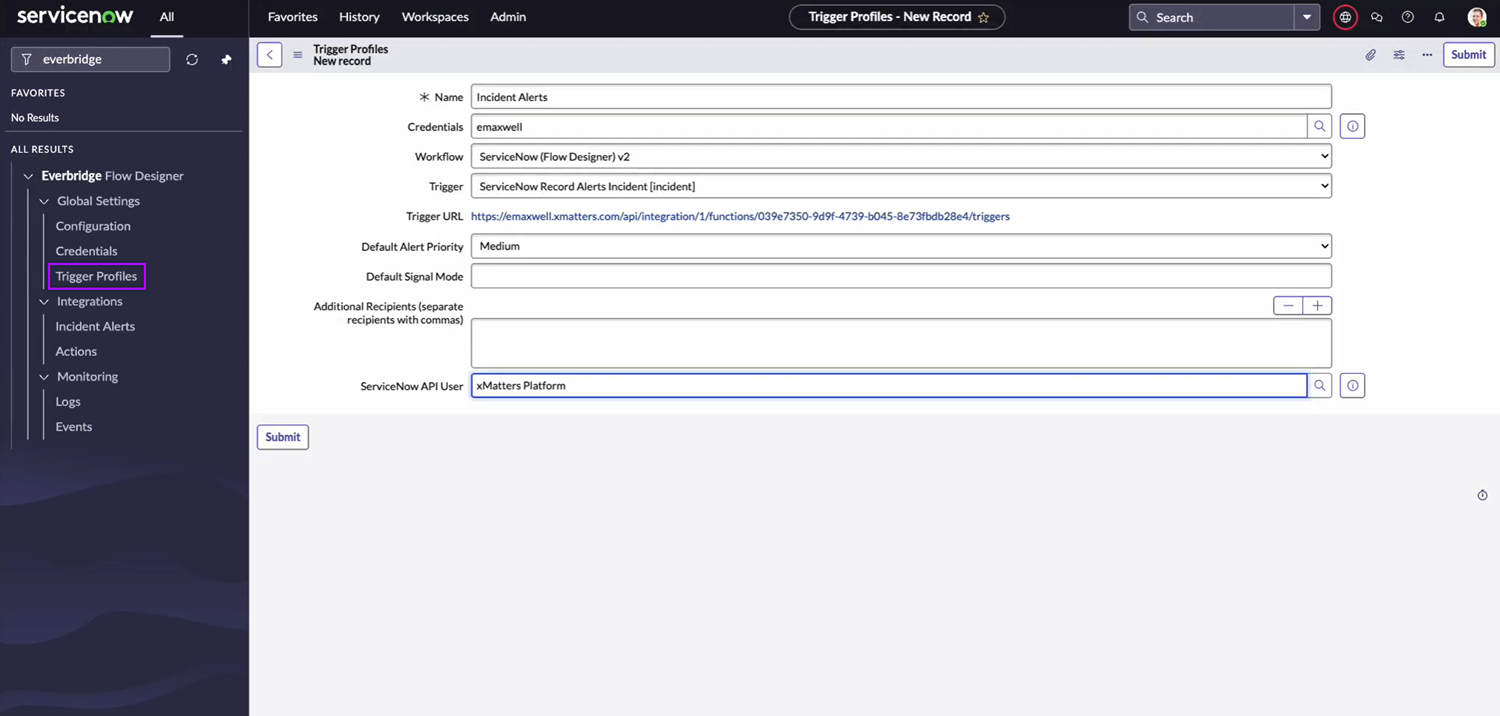
To create a trigger profile, go to Everbridge Flow Designer → Global Settings → Trigger Profiles. Click New on the upper-right corner of the page, then fill in the following fields and options:
- Name: Enter a name that describes this trigger profile (e.g., the name of the integration for which you’re going to use the profile).
- Credentials: Select the xMatters user credentials configured for this integration.
- If using URL auth, leave this field blank.
- Workflow: Once you select the credentials, the drop-down list will populate with workflows in Flow Designer available for the credentials. Select the workflow you’re using for this integration.
- If using URL auth, leave the ‘-- Enter trigger URL manually --’ option selected.
- Trigger: Once you select the workflow, the drop-down list will populate with the available triggers for the workflow. Select the trigger you're using to initiate the flow.
- Trigger URL: Once you select the trigger, this field will automatically be filled in.
- If using URL auth, enter the trigger URL manually.
- Default Alert Priority: Select a value that will be sent to Flow Designer or leave it on the default option. The integration may override the selection if the incident priority is set to a different value.
- Default Signal Mode: Type a value that will be sent to Flow Designer (optional). When the integration is triggered, it will override the selection depending on if an incident is created or updated.
- Additional Recipients: Type groups or users from xMatters or Everbridge as recipients that will receive the incident alerts in addition to the recipients in the Assignment group or Assigned to fields in the ServiceNow incident.
- ServiceNow API User: Select the ServiceNow user that Flow Designer is using to send the updates in ServiceNow.
Click Submit to create the trigger profile.
Configure the Incident Alerts page
In this setup, you'll configure the settings that will trigger a signal to Flow Designer when a ServiceNow incident is created or updated.
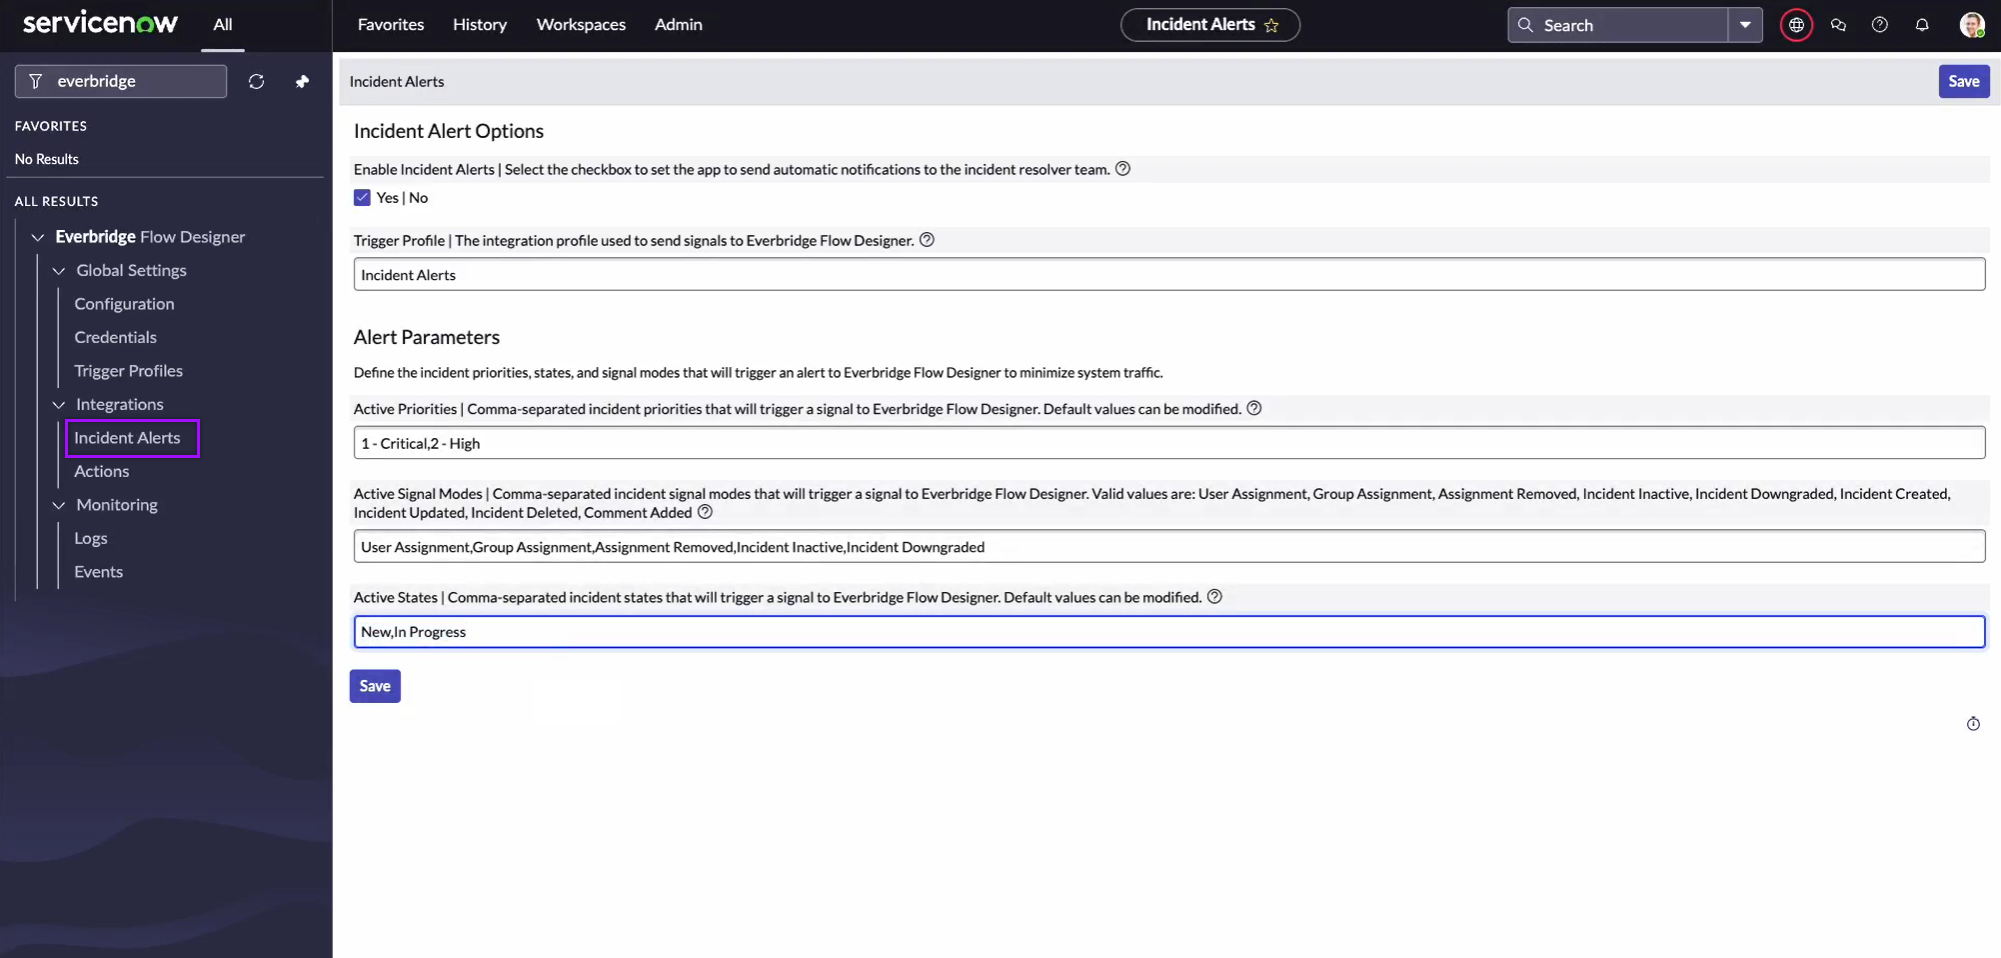
To open the main Incident Alerts page, go to Everbridge Flow Designer → Integrations → Incident Alerts, then fill in the following fields and options to configure the integration:
- Enable Incident Alerts: Select the checkbox to enable the integration.
- Trigger Profile: Enter the name of the trigger profile you created for the Incident Alerts integration.
- Active Priorities: Enter a comma-separated list of ServiceNow incident priorities that should trigger a signal to Flow Designer.
- Active States: Enter a comma-separated list of incident states that should trigger a signal to Flow Designer.
- Active Signal Modes: Enter a comma-separated list of signal modes you want to trigger a signal to Flow Designer. ‘Active Priorities’ and ‘Active States’ values apply to ‘Active Signal Modes’ values.
- The available signal modes are:
- User Assignment - a user was assigned to the incident
- Group Assignment - a group was assigned to the incident
- Assignment Removed - a user or group is no longer assigned to the incident
- Incident Active - the incident entered an active priority and state, but no one is assigned
- Incident Downgraded - the incident priority is no longer in the list of Active Priorities
- Incident Created - a new incident was created, but no one is assigned
- Incident Updated - an incident setting was updated other than assignment, priority, or state
- Incident Deleted - the incident was deleted
- Comment Added - a comment was added to the incident
- The available signal modes are:
Click Save once you’ve filled in all the required fields and options.
Test the Incident Alerts integration
After creating a trigger profile and configuring the Incident Alerts integration, you can test it by following these steps:
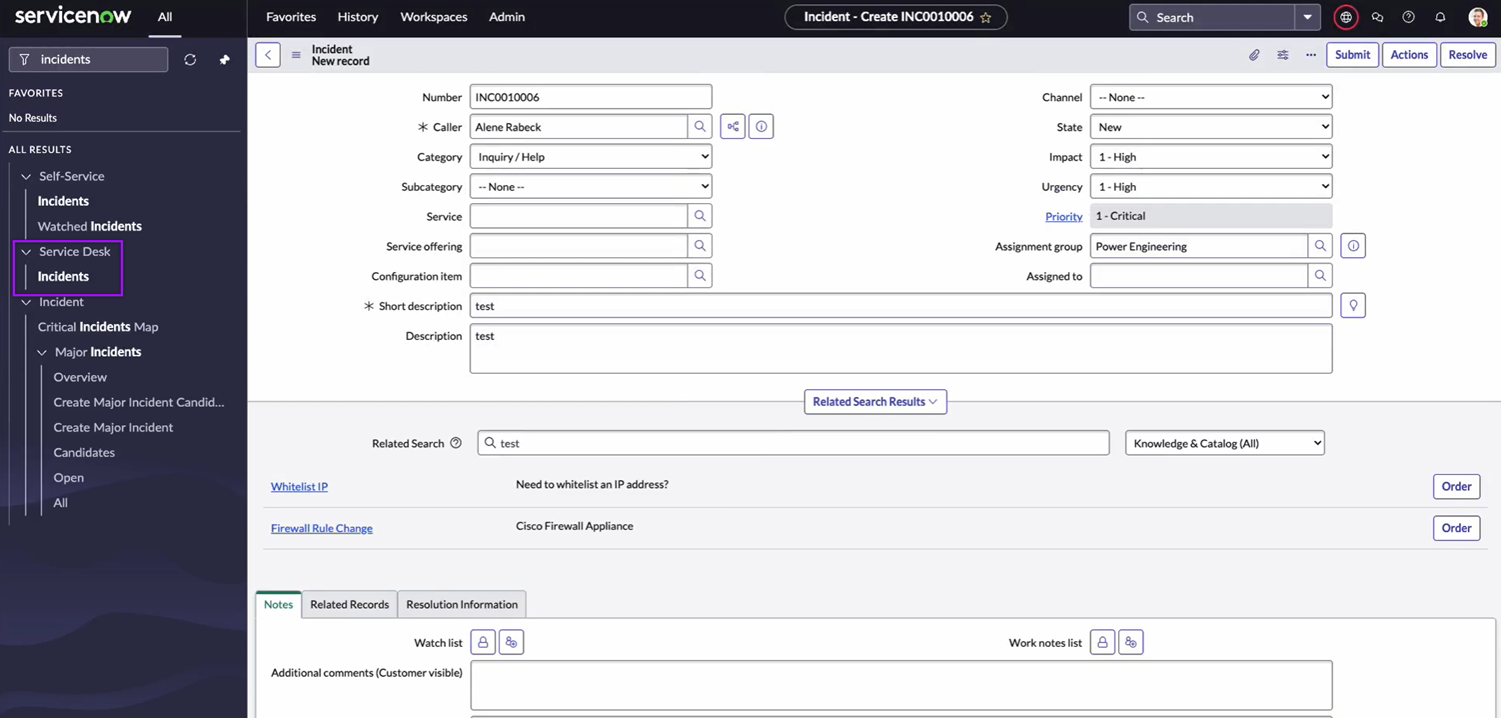
- Go to Service Desk → Incidents.
- On the upper-right corner of the page, click New.
- Fill in all the required fields.
- On the State field, select a state that you provided when you configured the ‘Active States’ field on the Incident Alerts configuration page.
- On the Impact and Urgency fields, select values that set the priority to a value you provided when you configured the ‘Active Priorities’ field on the Incident Alerts configuration page.
- On the Assignment group or Assigned to fields, select the groups and users you want to send the notification to.
- Click Submit.
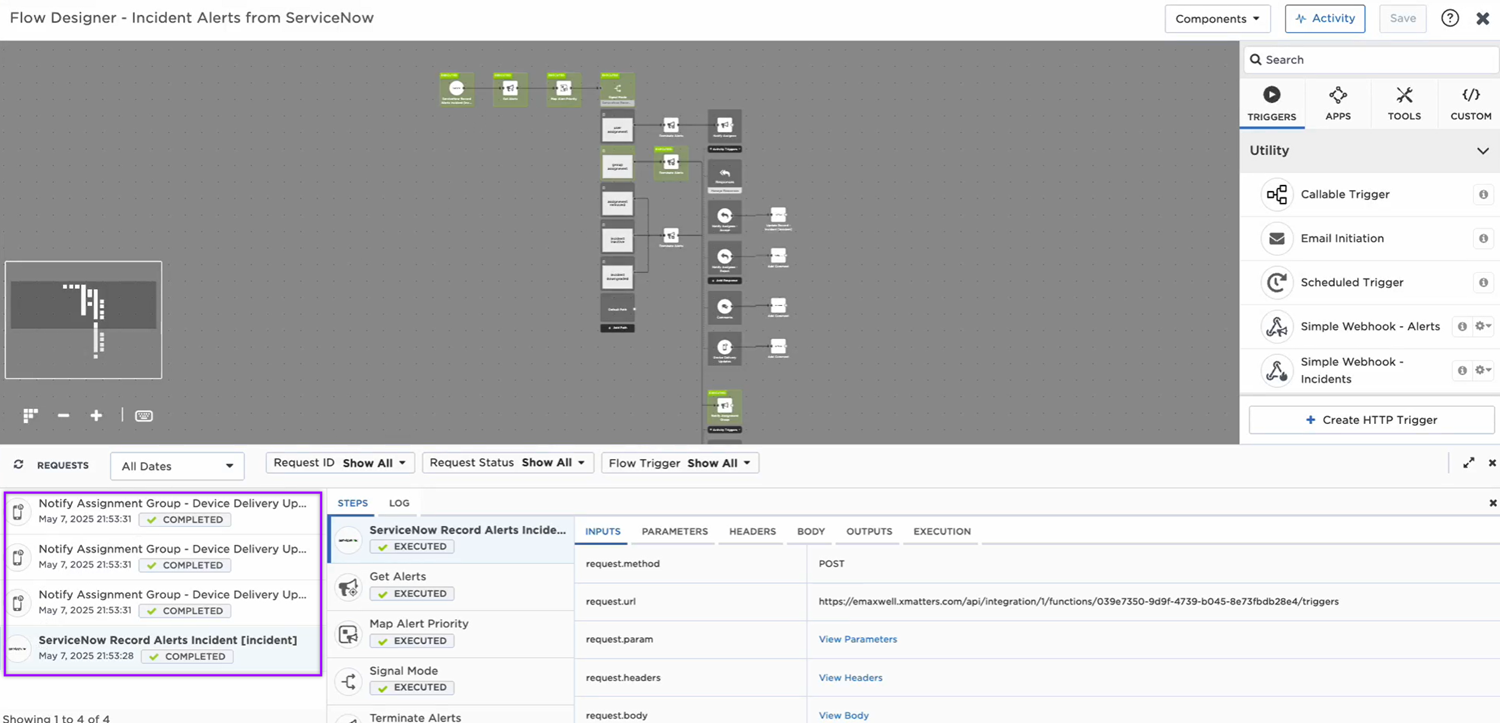
In xMatters, open the flow canvas with your ServiceNow Record Alerts trigger. Click the Activity button to open the Activity panel. You should see a log of the steps that were executed when the flow was triggered by creating the ServiceNow incident.
You're ready to use the webhook to trigger automated flows, including steps such as sending updates and initiating incidents, though we always recommend testing before putting things into use.
ServiceNow Record Alerts trigger outputs
The trigger has the following outputs you can use as inputs to steps further along the flow, including values for a ServiceNow major incident. If you mapped column data from the record table to the step's outputs on the Output Mapping tab, they'll also be listed as output properties.
|
Label |
Description |
|---|---|
| Signal Mode | Determines the flow path to follow. Set when configuring integration settings in ServiceNow. |
| Alert Priority | Priority level of the alert set in the ServiceNow record. Available values are: High, Medium, Low. |
| ServiceNow URL | Base URL of the ServiceNow instance. |
| Recipients | Comma-separated list of recipients. |
| Table Name | The name of the record table in ServiceNow where the record was created. |
| Table Label | The label of the record table in ServiceNow where the record was created. |
| Record URL | URL of the record generated by GlideSystem. Value is calculated using the endpoint URL, table name, and record ID. |
| Record ID | Unique record ID created by ServiceNow. |
| Raw Payload |
The incoming request body that can be parsed separately to get additional context on outputs. |