Trigger Flood Control
Flow Designer triggers capture data from incoming signals and use this information to run flows that prevent and resolve service availability issues. Trigger flood control inspects the signals targeting a trigger and prevents correlated signals that occur in quick succession from triggering the flow. This reduces system noise and duplication of activities for the same issue.
Once flood control kicks in, it continues to suppress signals from triggering a flow until the rate of correlated signals drops below the rate specified in the trigger conditions (by default, four or fewer signals per minute). When the flood is over, Flow Designer resumes allowing signals to trigger the flow.
You can view information about signals coming into xMatters, including suppressed signals, in the Signals report.
Manage trigger flood control settings
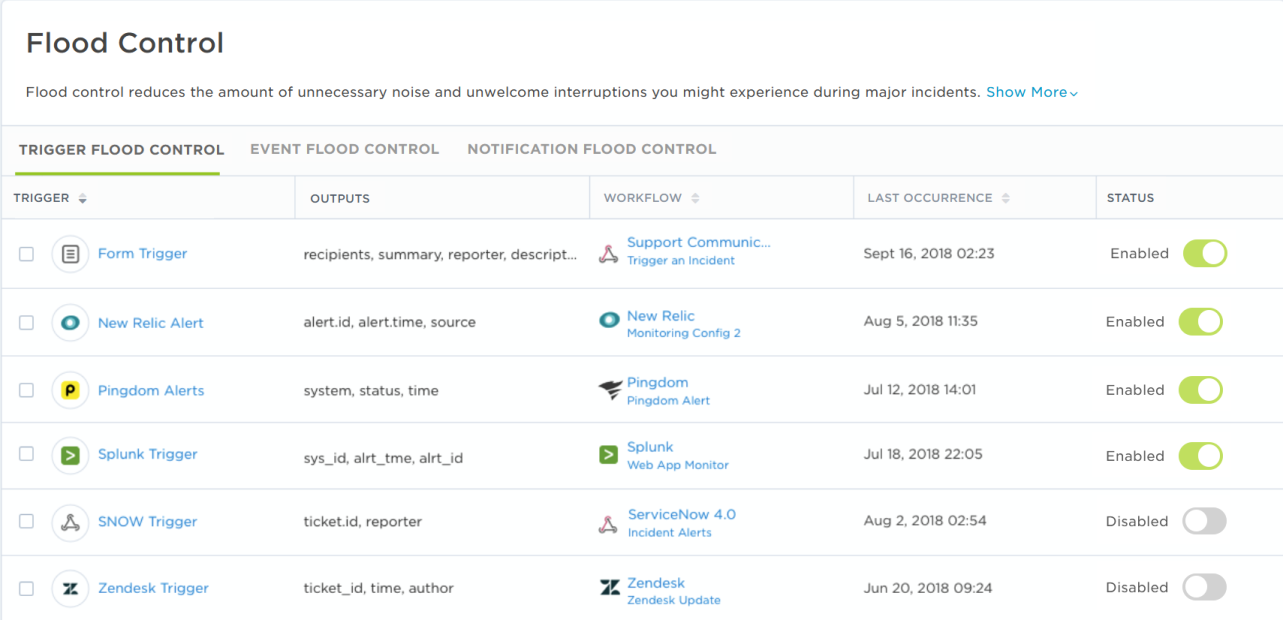
The Trigger Flood Control page in the web user interface allows you to view and manage flood control settings for each trigger.
Required permissions
To manage flood control settings for a trigger, you'll need the following:
- Edit permission for the relevant workflow.
- For HTTP triggers, usage permission on the trigger.

To view your trigger flood control settings:
- Open the Workflows menu.
- In the menu, click Flood Control.
- By default, the main Flood Control interface displays the Trigger Flood Control page.
- On the other tabs, you can access your Alert Flood Control and Notification Flood Control settings.
The following table describes the information displayed on the Trigger Flood Control page:
| Column | Description |
|---|---|
| Trigger |
The name of the trigger. If you have permissions to view the trigger, the name appears as a hyperlink. Click the name to access the trigger's flood control settings. |
| Outputs |
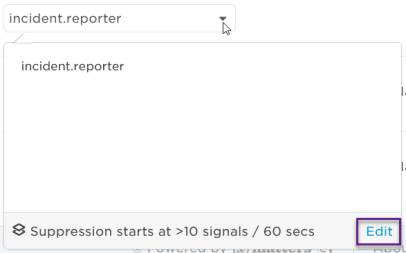
The outputs used to correlate incoming signals and the rate at which suppression begins. By default, suppression begins when a trigger receives more than four signals in one minute. Click the field's value to view the full list of outputs and when suppression starts:
If you have permission to edit the settings for a trigger, an Edit hyperlink is visible. Click this link to access the trigger's flood control settings. |
| Workflow |
The workflow and canvas the trigger belongs to. If you have permission to access the workflow and canvas, their names will appear as hyperlinks. Click a link to navigate to either the workflow or the canvas that contains the trigger. |
| Last Occurrence |
The date and time flood control last suppressed signals for the trigger. |
| Status | A toggle to enable or disable flood control for the trigger. |
To more easily view data in the table, do one or more of the following:
- To sort the content in alphabetical or chronological order based on a specific column, click the column header. (Click the header again to reverse the sort order.)
- To change the width of a column, move the pointer over the edge of the column and when the re-size icon appears, click and drag the column to the desired size.
- To rearrange the columns, click and drag a column header to a new location on the table.
- If the list contains more entries or columns than can be displayed on your screen, scroll horizontally or vertically. The system automatically loads more data as scroll down the page.
To enable or disable flood control for a trigger, do one of the following:
- From the Trigger Flood Control page, use the toggle in the Status column that corresponds to that trigger to enable to disable flood control for the trigger.
- In Flow Designer, on the Flood Control tab of the trigger's configuration screen, use the toggle to enable or disable flood control for the trigger.

You can access and edit a trigger's flood control settings from either the main Flood Control interface or by opening the trigger from the Flow Designer canvas.
To access a trigger's flood control settings from the Flood Control interface:
On the Trigger Flood Control tab, click the name of the trigger. If you do not have permission to edit its settings, its name will not be a hyperlink.

You can also access click Edit from the output list. If you do not have permission to edit the trigger's flood control settings, this text will not appear beneath the list of properties.

To access a trigger's flood control settings in Flow Designer:
Double-click the trigger (or move your pointer over the trigger and select the pencil icon), then click the Flood Control tab.

Configure flood control for a trigger
This section describes how to configure flood control for Flow Designer triggers.
- Access the trigger's flood control settings from the Flood Control interface or Flow Designer. For instructions, see Access a trigger's flood control settings.
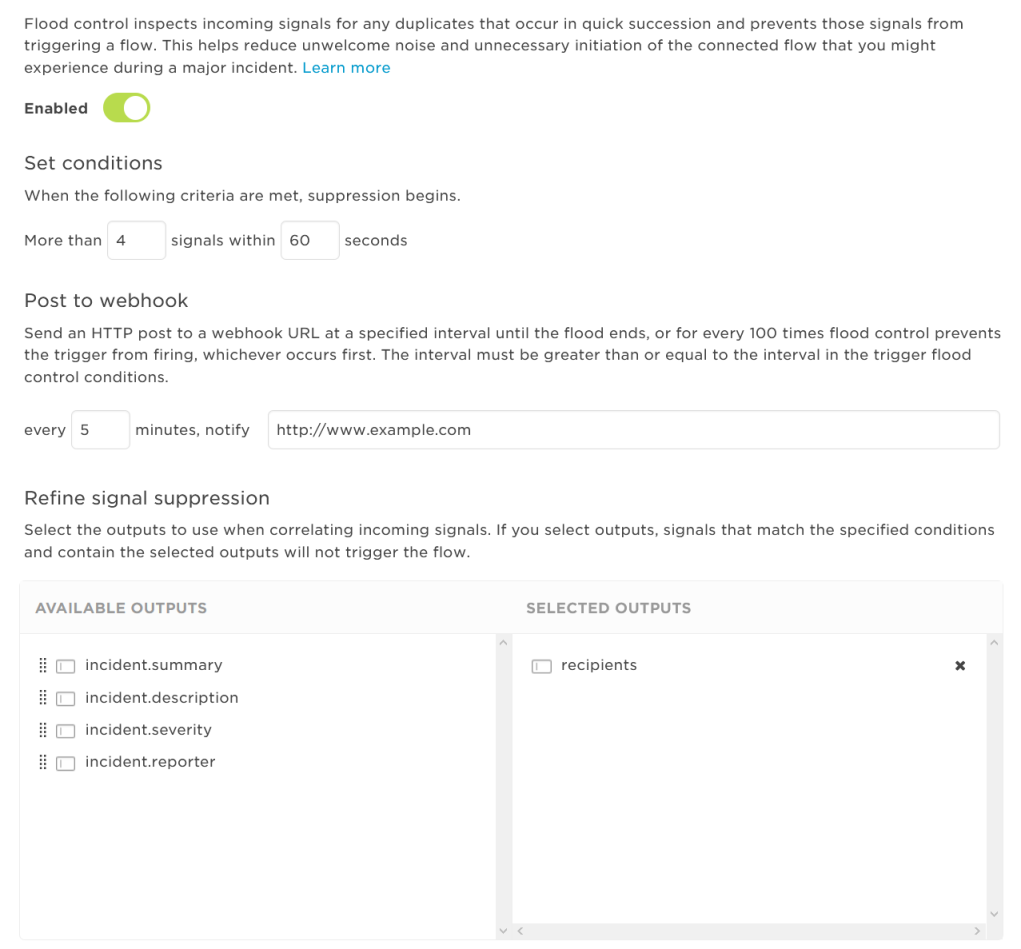
- Set the flood control conditions. When these conditions are met, suppression will begin.
- The default settings automatically suppress incoming signals from triggering a flow when they occur at a rate that exceeds four signals per 60 seconds.
- You may specify between 1 to 999 signals and 10 to 3600 seconds for the conditions.
- Optionally, you can send a webhook to a specific URL over the duration of a flood. This can be useful if, for example, you want to send a list of suppressed signals back to the source of the signals so that system can mark alerts associated with the signal as closed. Specify an interval in minutes, and provide the URL where you want to send the webhook.
- Optionally, you can refine signal suppression by select outputs to correlate incoming signals. If you select outputs, signals which meet the specified conditions that have matching values for the selected outputs will be suppressed.
- Drag outputs from the list of Available Outputs to the Selected Outputs column to include them.
- To remove an output from the selected outputs list, click the "x" next to its name. This will return the output to the list of available outputs.

View suppressed signals
If signals exceed a trigger's flood control conditions and correlation rules, xMatters suppresses them from triggering the flow. You can view suppressed signals in the Signals report. Signals are suppressed beneath the most recently processed signal to which they correlate (the "parent" signal). This is indicated on the Signals report by a stacked icon with a running badge count of the number of suppressed signals.
To view more information about suppressed signals, click the stacked icon beneath the parent signal.
![]()

