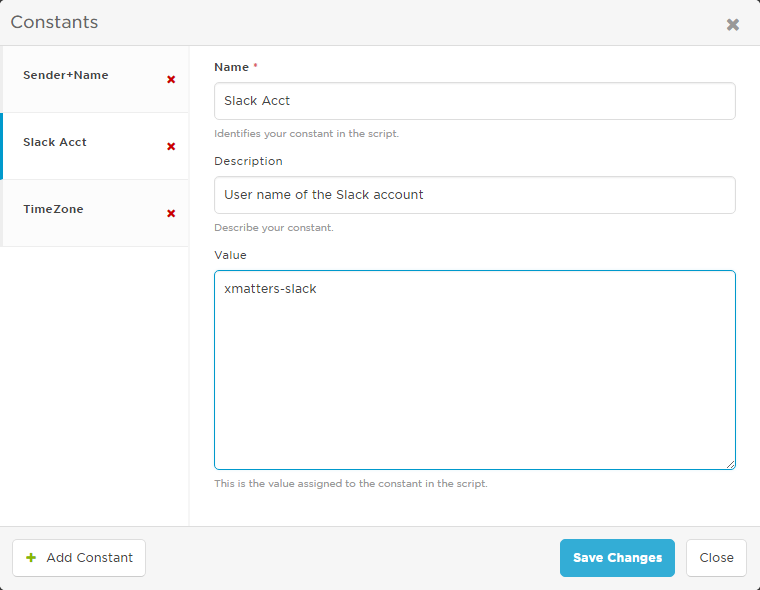
Constants
Integration developers can use constants to help non-technical users manipulate variables within integration scripts. Constants can be defined and implemented within the scripts when the integration is created, and users can update the values for the constants without needing to edit the scripts.
For example, you could use a constant to represent:
- the time zone when posting date stamps to a customer's help desk;
- the name of a third-party user account when making updates via an API; or,
- the "From" name when sending messages to a chat client.
Constants are available to all integrations within a workflow, and are included when exporting and importing.
If you want to create or use constants in Flow Designer, see Flow Components.
To access the Constants page:
- On the Integration Builder tab, click Edit Constants.
- In the transformation script editor, click the Edit link beside the Constants header on the right side of the screen.
- You can also move the pointer over the name of a constant in the list to see its assigned value.
- On the Constants page, click Add Constant, and then enter the following information:
- Name: Type a name for your constant; this will be the name of the variable within the JavaScript. Constant names are case-sensitive, and cannot exceed 80 characters in length. If the name is not JavaScript compatible (for example, names that include special characters or whitespace), it must be escaped or "stringed" in the script. (See below for instructions on how to reference a constant in the transformation script.)
- Description: Type an optional description for your constant (maximum 2000 characters). This description is not visible or accessible in the script, but can help other users or integration designers understand how to use the constant.
- Value: The value to use for the variable within the script (maximum 2000 characters). This field is not required when creating the constant, but any empty constants within the script when it is executed will be set to null.
- Click Save Changes to create the constant.
- Click Close to return to the Integration Builder.

- To edit an existing constant, click its name in the list on the Constants page, and then modify its details.
- If a constant is used by a step in Flow Designer, the Usage tab appears beside the Settings tab. Check the tab to see which flows you changes might impact. Because steps reference constants by name, you can't change the name of a constant if it is used by a step, since this would break the flow.
- Click Save Changes to apply the new settings to all instances of the constant within the workflow.
- Click Close to return to the Integration Builder.
To delete a constant, click the red X beside its name in the list, and then click Delete Constant.
To delete a constant that is used by a step in Flow Designer, you first have to remove references to it from any flows. If you try to delete the constant, a message appears, showing which flows the constant is used in. You can also check the Usage tab to see where it's used. Remove any references then return here to delete the constant.
For more information about referencing a constant in the transformation script, refer to the Integration Builder scripting reference.