Flow components
Flow components include constants that allow users to manipulate variables easily, endpoints to track where and how to communication with the apps in your toolchain, and script libraries that enable the sharing of code across all workflows.
You can access components from the following places:
- The Components menu on the Flow Designer tab in a workflow:

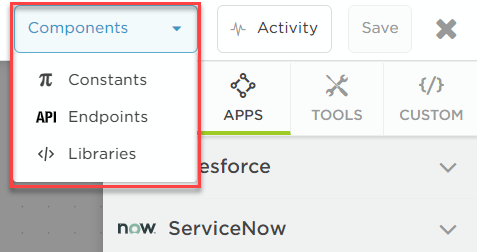
- The Components menu at the top of the canvas in Flow Designer:
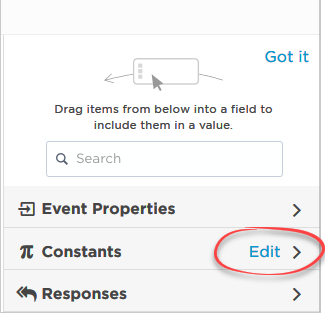
- For constants, the sidebar when you're configuring a step:
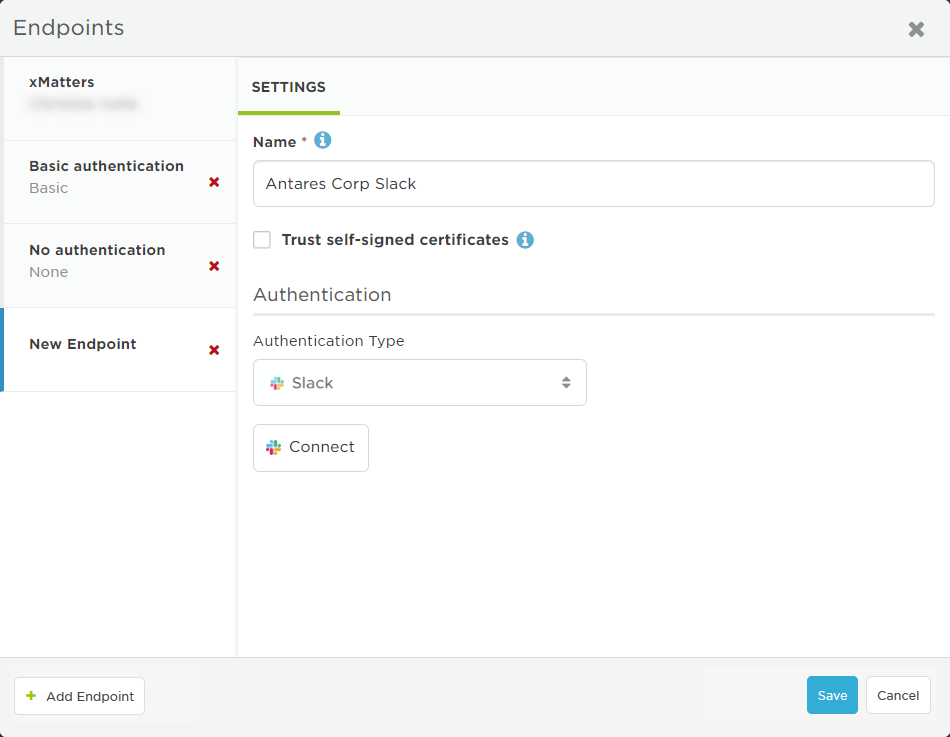
- For endpoints, from the Endpoints tab in a step:

- For libraries, from the sidebar of the Scripts tab in a step — click new library to create a new one or click the library you want to edit:
Constants
Workflow designers use constants to help non-technical users manipulate variables. For example, you could use a constant to represent:
- the time zone when posting date stamps to a customer's help desk;
- the name of a third-party user account when making updates via an API; or,
- the "From" name when sending messages to a chat client.
Constants are available to all flows, and are included when exporting and importing a flow.
By default, a maximum of 100 constants can be added to a workflow. You can see how many constants have been added and the total the number of constants allowed at the bottom of the Constants window.
- In the Constants window, click Add Constant, and then enter the following information:
- Name: Type a name for your constant; this is the name users see when adding the constant to a step. Constant names are case-sensitive, and cannot exceed 80 characters in length.
- Description: Type an optional description for your constant (maximum 2000 characters) to help other users understand how to use it.
- Value: The value to use for the constant when used by a flow (maximum 2000 characters).
- Click Save to create the constant.
- Click Close to return to where you were.
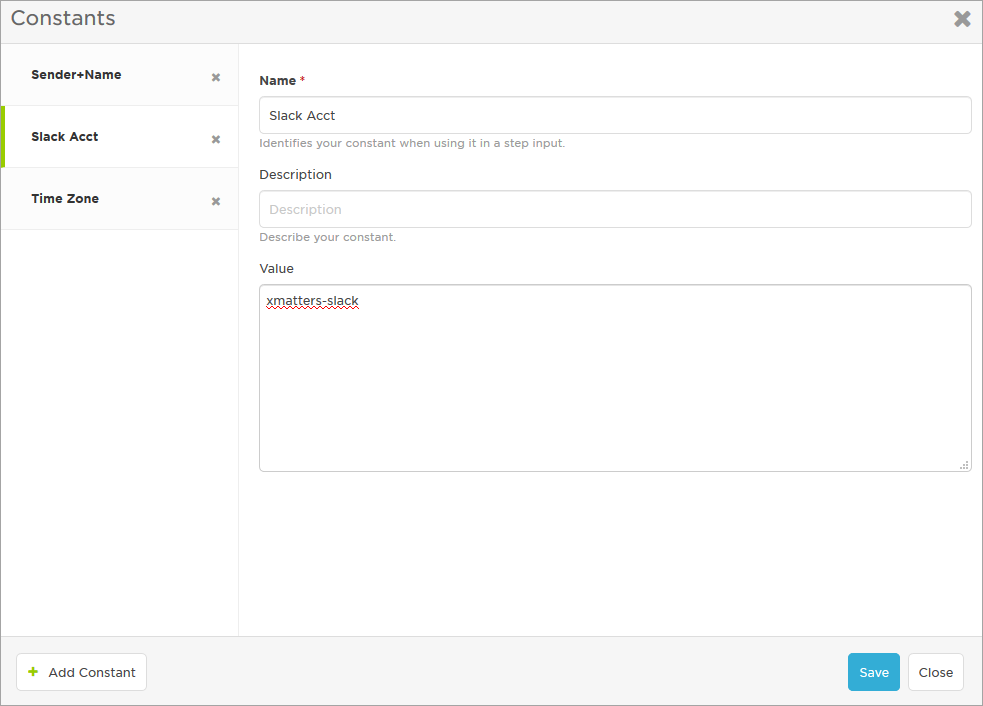
- To edit an existing constant, click its name in the Constants window, and then modify its details.
- If a constant is used by a step in Flow Designer, the Usage tab appears beside the Settings tab. Check the tab to see which flows your changes might impact. Because steps reference constants by name, you can't change the name of a constant if it is used by a step, since this would break the flow.
- Click Save to apply the new settings to all instances of the constant within the workflow.
- Click Close to return to where you were.
To delete a constant, click the X beside its name in the list, and then click Delete Constant.
To delete a constant that is currently in use by a step in Flow Designer, you first have to remove references to it from any flows. If you try to delete the constant, a message appears, showing which flows the constant is used in. You can also check the Usage tab to see where it's used. Remove any references, then delete the constant.
Some environment variables, such as your instance's base URL, are accessible from any step or script in Flow Designer. For more information about accessing these constants from your scripts, see the Using constants in the Flow Designer scripting reference. The following built-in constants are available:
| Constant name | Value |
|---|---|
| baseUrl | The base URL of your Flow Designer instance. |
| workflowName | The name of the workflow the step is running in. |
Endpoints
Each application you want to integrate with is represented by an HTTP endpoint. An endpoint provides a simple way to define the base URL and authentication credentials to use when making HTTP requests from Flow Designer.
By configuring endpoints separately, you can quickly modify all references to an endpoint across a workflow rather than editing each instance of the target URL in each step.
Steps use the xMatters endpoint to access your xMatters deployment, including the xMatters API. The Base URL shows the targeted hostname.
Steps that target xMatters use this endpoint to look up information in xMatters without you having to select it (for example, certain steps in the Tools tab). When you create a custom step, you can also set the endpoint type to xMatters to have that step target your xMatters deployment.
The authentication of the request is based on the credentials of the user triggering the flow. For a step using the xMatters endpoint to run successfully, that user needs to have appropriate permissions to make the requests associated with the step. Here are a couple of examples:
- If Ali Samara sends an email to an Email trigger with a Find User step connected to it, the find user request to xMatters uses Ali's credentials. This returns only the information for users Ali has permission to view.
- If you create a specific user to interact with xMatters on behalf of an application (for example, a Jira Integration user) and assign that user the REST Web Service User role, any steps in a flow initiated by this user (for example, an inbound HTTP request from that application) have all the permissions associated with the REST Web Service User Role.
You cannot delete or rename the xMatters endpoint. However, when creating a new custom step, you can assign a label to the endpoint, which you can use to reference the endpoint in the script for the step.
Legacy authentication methods
Some older integrations required a specific user account to authenticate web service requests from within transformation scripts. This authentication method has been deprecated.
These deprecated unauthenticated integrations used the credentials of the user assigned to the xMatters endpoint to authenticate web service requests. The Assign Endpoint section applies only to support the transition of existing legacy integrations to current authentication methods.
You can configure additional endpoints to target different URLs.
- On the Endpoints window, click Add Endpoint.
- Enter the following information:
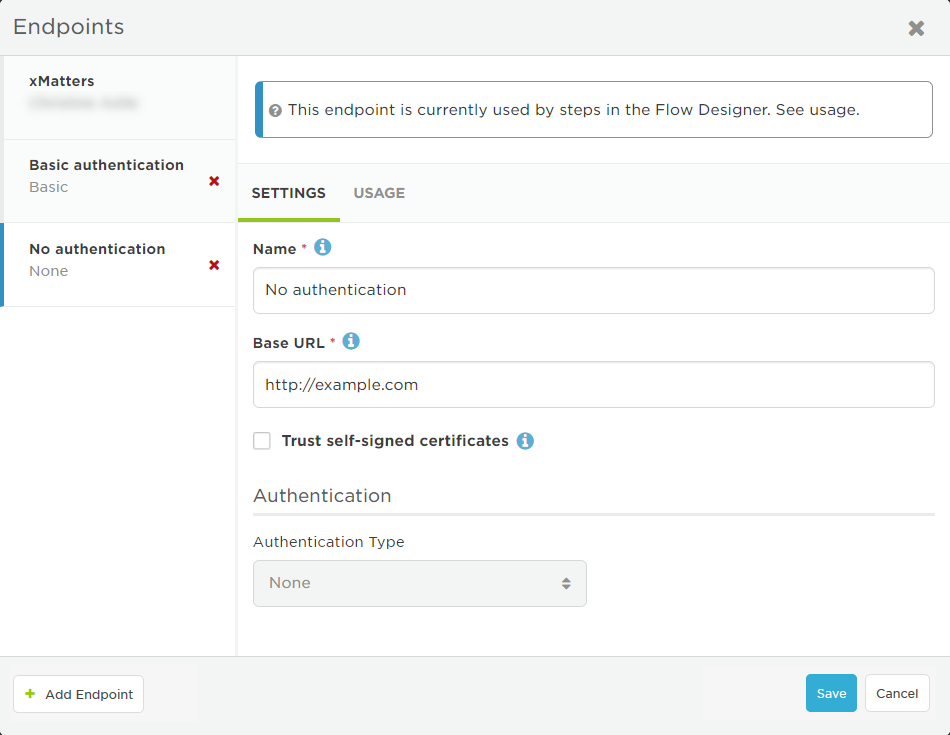
- Name: Type a name that will identify your endpoint.
- Base URL: Type the base URL, including the http:// or https:// protocol, of the target system. You can append additional paths in a Webhook step or the script of a custom step.
- Trust self-signed certificates: This optional setting allows you to target HTTPS endpoints secured using self-signed certificates when testing integrations. The base URL of your endpoint must match the common name specified in the certificate. If the certificate is not valid the integration will throw a security exception and fail. Details of the exception will be reported in the Activity panel.
- Authentication: Provide the required credentials. For more information, see Endpoint authentication.
- Click Save.
- After you save the endpoint and use it in a step, you can't change the authentication type.
The trust self-signed certificates setting is returned to a default state of disabled when you export a workflow.
- In the Endpoints window, click the name of the endpoint you want to edit, and then modify its details.
- You can't change the authentication type of an endpoint if it is in use in a step.
- Click Save to apply the new settings to all instances of the endpoint.
- Click Close to return to where you were
- On the Endpoints screen, select the endpoint to delete.
- If an endpoint is used in a flow, the Usage tab appears beside the Settings tab. Before you delete the endpoint, you need to remove references to it from those steps.
- Click the X beside the name of the endpoint you want to delete, and then click Delete Endpoint to confirm.
Endpoint authentication
Integration endpoints can be defined to support basic and OAuth 2.0 authentication. Customized OAuth 2.0 endpoints are available for BMC Remedy, Microsoft Graph API, Salesforce, ServiceNow, and Slack.
Configuring an endpoint with the required configuration and credentials for OAuth 2.0 authentication simplifies HTTP requests to an API secured with OAuth 2.0. When using an OAuth 2.0 endpoint, you do not need to include reference to the access token URL, or any of the OAuth 2.0 fields associated with the endpoint.
When workflows are exported, all authorization content is cleared, and endpoints are set to "No Authentication".
Select this option when authorization is not required to send requests to the URL.
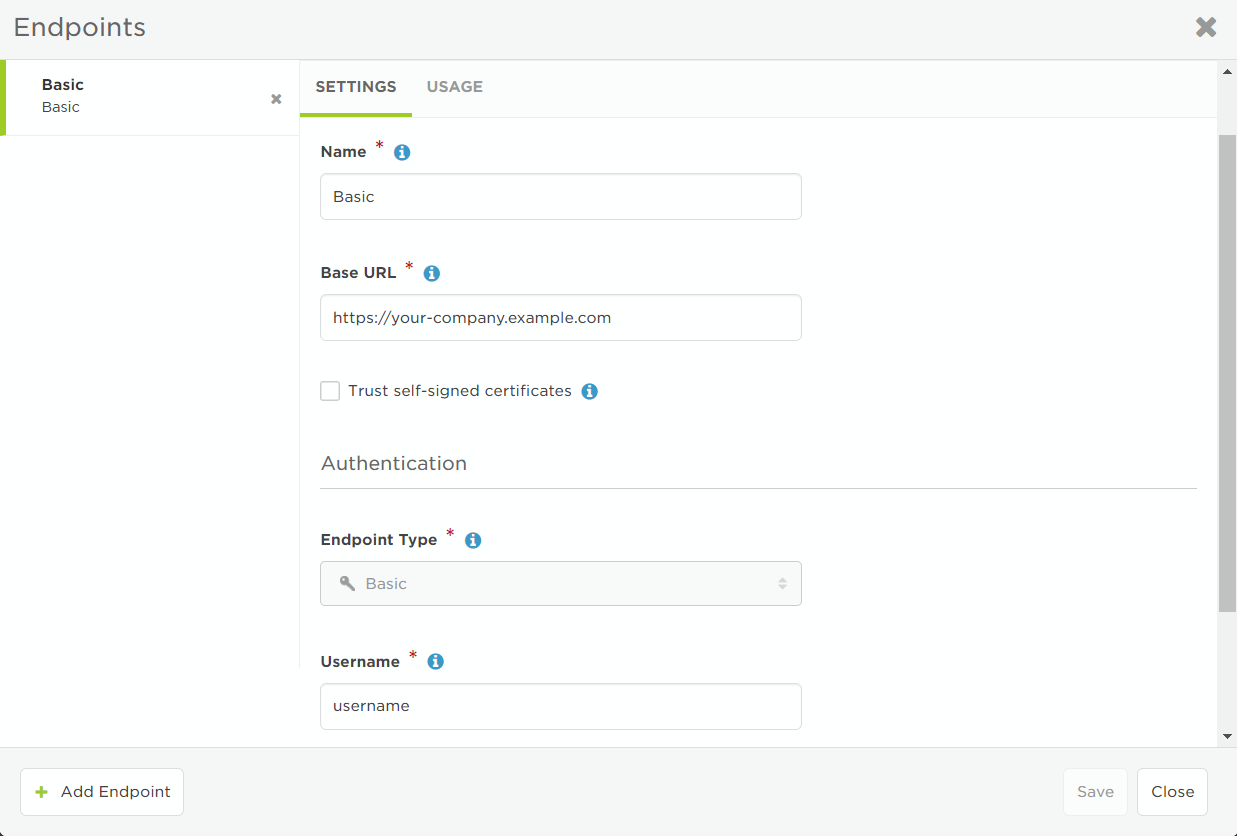
For basic authentication, the user's authentication credentials are used at the time the endpoint is configured. If the user changes their password in the target system, they should update their password for the endpoint as well.
- Select Basic from the Authentication Type list.
- This might already be selected because the authentication options are set when the step is defined.
- Supply a Username and Password credentials for a user with permission to execute API requests on the target system.
- Clear the Preemptive check box if you don't want to use preemptive HTTP authentication. (Almost all basic authentication procedures use preemptive authentication, so leave this option selected if you aren't sure.)
Token authentication is used for tools in Flow Designer that only support using tokens or API keys that should be passed in headers. Without the token authentication type, you have to pass tokens/API keys in a step input or store it in a constant, which isn't secure because the token or key is visible to everyone. This endpoint is also useful because you only have to configure the token/API key once for all the steps connected to your tool.
- Select Token from the Authentication Type drop-down list.
- If you accessed the Endpoints page from Flow Designer, this might already be selected because the authentication options are set when the step is defined.
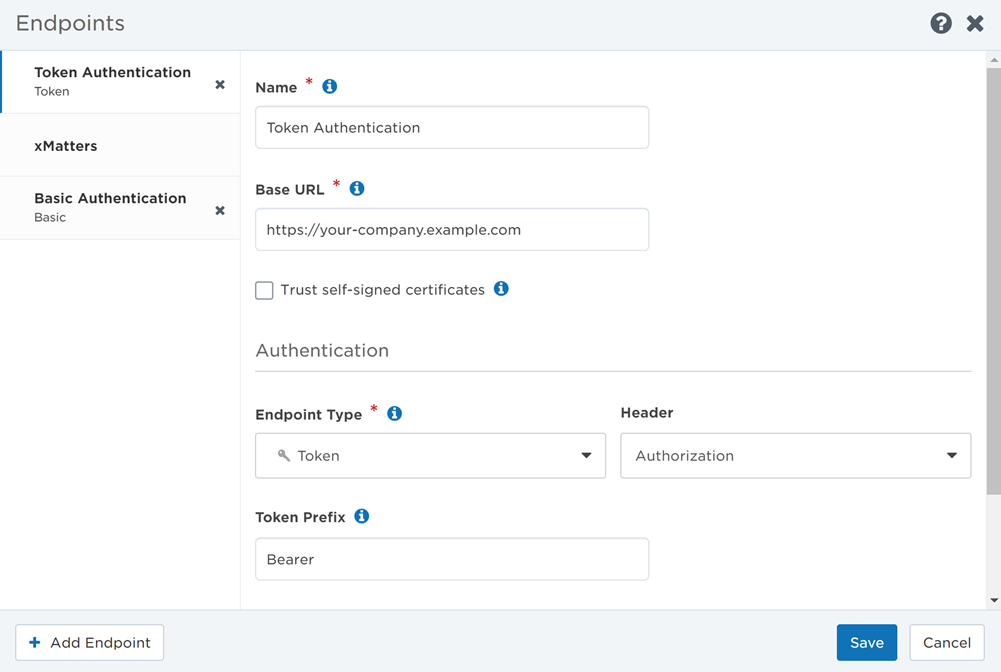
- Select a Header: Authorization or Custom.
If you select Authorization as your header:
- Specify the Token Prefix as needed for your application, with the default being 'Bearer'.
- Enter the Token value to pass in the header.
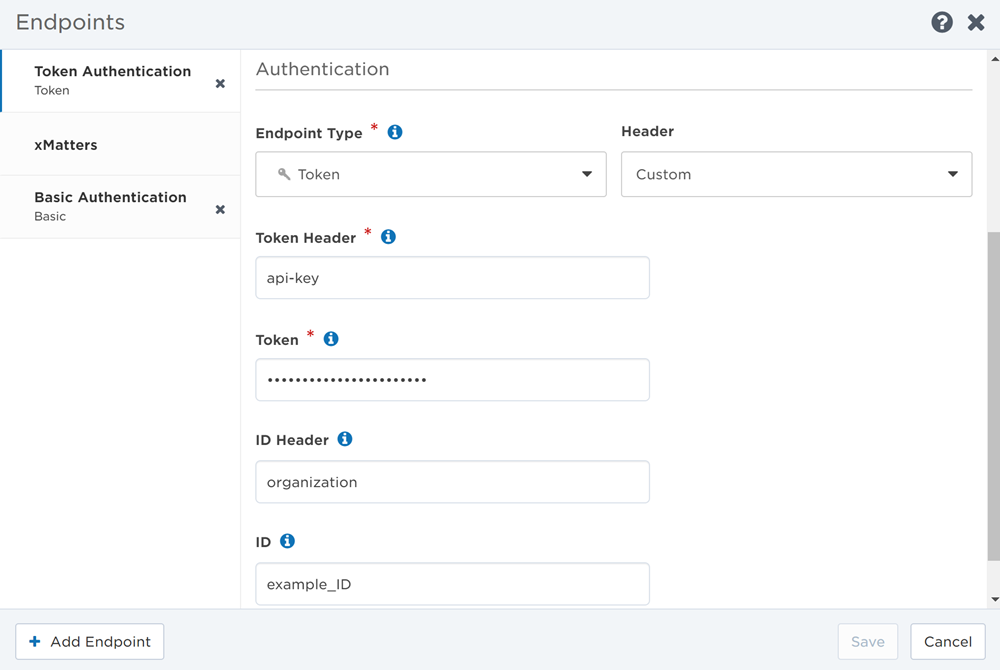
If you select Custom as your header:
- Provide the name of your Token Header for token transmission.
- Enter the Token value to pass in the token header.
- If required, provide the name of the ID Header for ID transmission.
- Enter the ID value to pass in the ID header.
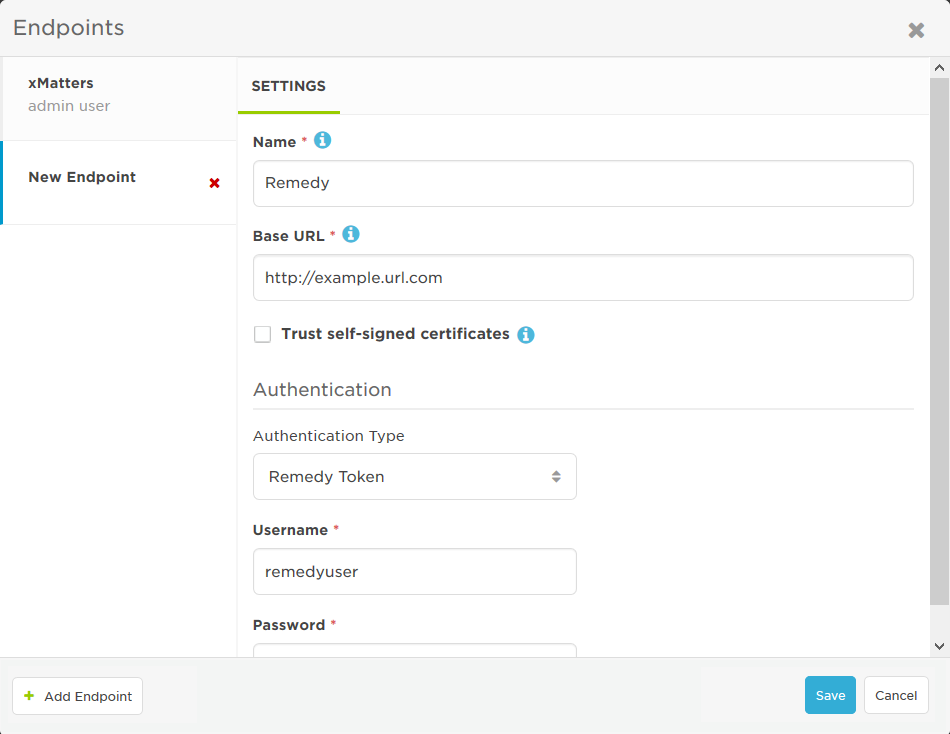
The BMC Remedy authentication type is used by BMC Remedy steps in Flow Designer and by the BMC Remedy workflow. When the endpoint is used, it makes a request to the Remedy API for the access token of the user provided in the Authentication settings.
- Select Remedy Token from the Authentication Type drop-down list.
- This might already be selected because the authentication options are set when the step is defined.
- Supply the Username and Password of a BMC Remedy user that is a Support Staff member with 'Incident Master', 'Incident User' or 'Incident Submitter' permissions.
- Because of Remedy's assignment rules, we recommend creating a user specifically for use with workflows.
- Once your setup has been successfully verified, click Save
The Microsoft Graph API authentication method lets you initiate the OAuth2 process to authorize access to Teams. You can use this method or any other OAuth methods to authenticate endpoints for the Microsoft Teams steps in Flow Designer.
Some of the permissions the Microsoft Graph API endpoint needs require admin approval, which you can request during setup if you're not an admin.
You may want to create a dedicated user account in Teams instead of using your own credentials or those of another individual user. Remember to assign this service account a Teams license and add it to the teams that you want it to create channels and post messages in.
Set up the Graph API authentication
- Select Microsoft Graph API from the Authentication Type drop-down list.
- If you opened the dialog from the step configuration, this is already selected.
- Click Connect.
- A new browser window connects to Teams and starts the connection process. If you're asked to sign in, enter your Microsoft credentials or choose the user account you want to use to connect.
- Accept the permissions (if you're an administrator) or request approval (if you're not).
- If you're an administrator (or a service account temporarily assigned 'Admin' rights by an administrator), review the permissions, select the check box to accept the permissions on behalf of your organization then click Accept.
- If you're not an administrator, enter the reason why you're requesting approval (for example, "Flow Designer is essential to streamlined workflows and communications") and click Request Approval. You should get an email when your Microsoft administrator has reviewed the request. If you're unable to request approval, you may need to reach out to your administrator and ask them to set up the endpoint.
If you're an administrator
The endpoint requests the following OAuth scopes with delegated permissions:
- ChannelMessage.Read.All
- Directory.ReadWrite.All
- Group.ReadWrite.All
- offline_access
- OnlineMeetings.ReadWrite
- Openid
- Profile
- User.Read
For more information on the requested Graph API scopes, see the Graph API documentation.
- Select OAuth 2.0 (Password) from the Endpoint Type drop-down list.
- If you accessed the Endpoints page from Flow Designer, this might already be selected because the authentication options are set when the step is defined.
- Enter the Access Token URL for the application.
- Provide the credentials required by the OAuth 2.0 server being targeted, which may include: Username, Password, Client ID, or Client Secret.
- Click Test Authentication to send a test request using your credentials to the target Access Token URL.
- If your credentials are correct, the Endpoints page displays a success message. If the request failed, the page displays the error details returned by the target system.
- Once your credentials have been successfully verified, click Save.
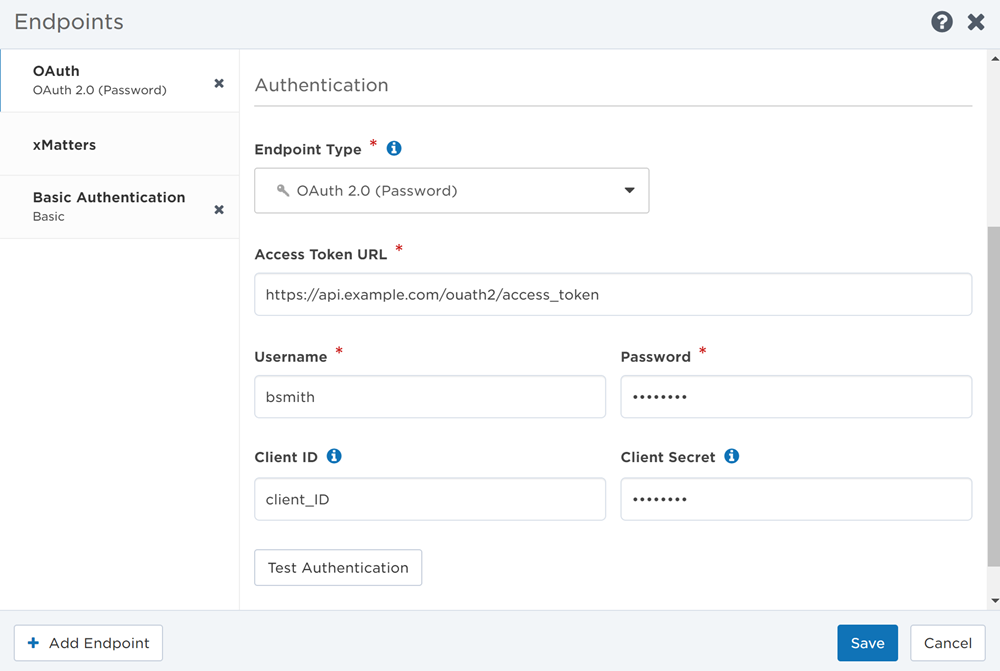
You can use the Test Authentication feature to verify your credentials, or run the integration or flow the endpoint is used in and check the output in the Activity panel to determine if the OAuth 2.0 endpoint is configured correctly. The following example demonstrates how an OAuth 2.0 endpoint would be used to query for a protected resource, and print out the response received:

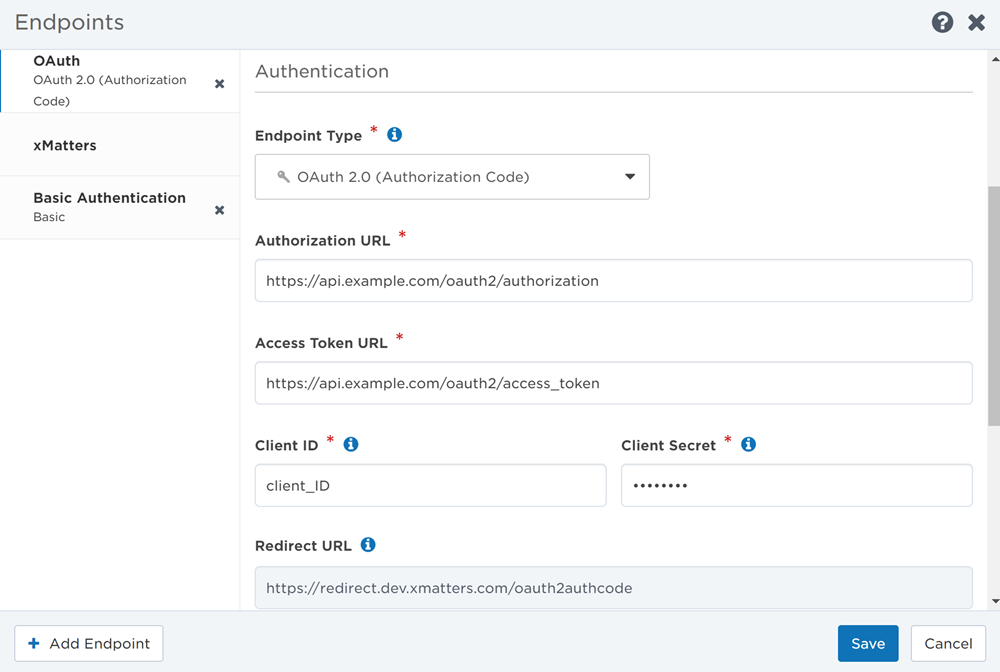
- Select OAuth 2.0 (Authorization Code) from the Endpoint Type drop-down list.
- If you accessed the Endpoints page from Flow Designer, this might already be selected because the authentication options are set when the step is defined.
- Enter the Authorization URL for the application.
- Enter the Access Token URL for the application.
- Provide the credentials required by the OAuth 2.0 server being targeted, which includes the Client ID, and Client Secret.
- If needed, copy the Redirect URL the application will send the user to after they authorize xMatters.
- If applicable, enter a Token Prefix to add before the token.
- If applicable, enter a list of scope values in the Endpoint Scope field to determine endpoint access. The scope values must be delimited according to your application's format requirements.
- The OAuth 2.0 (Authorization Code) endpoint type requires a refresh token, and some applications require a scope permission to be included in the request in order to receive a refresh token. For example, Microsoft Graph API requires the 'offline_access' scope permission, so you must enter it as a scope value if you're requesting access to this application.
- Click Connect to open a new browser window where your application prompts you to allow the connection. You may first need to sign in to your application if you aren't logged in already.
- If your credentials are correct, the Endpoints page will show that you have successfully connected (the Save button is not necessary and will be disabled–you only need to save your changes when you update the endpoint).
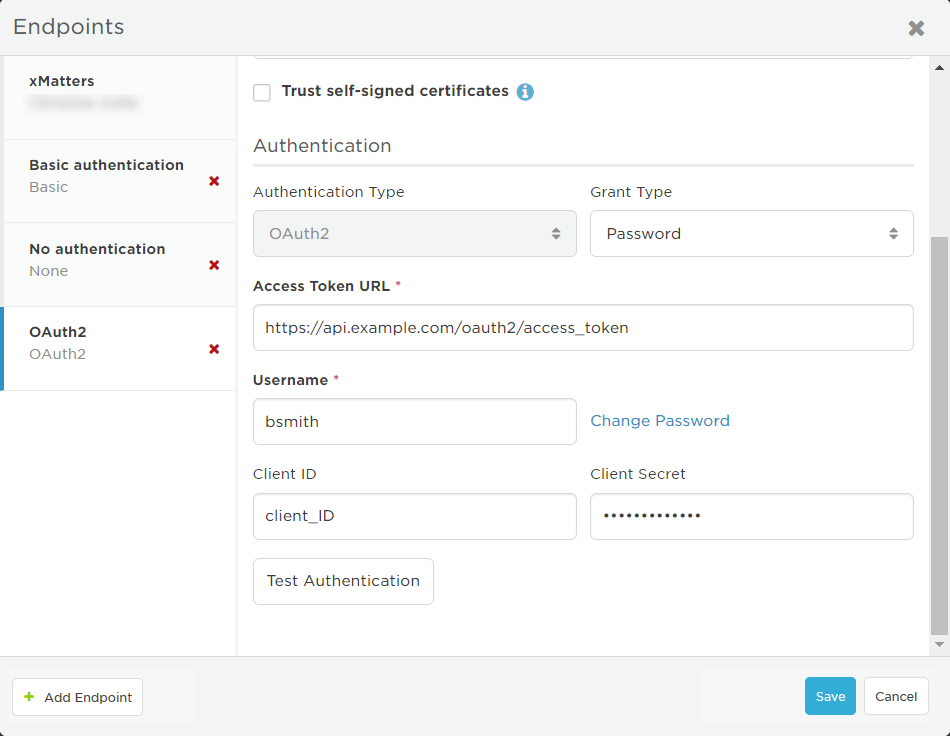
You can use the Test Authentication feature to verify your credentials, or run the flow the endpoint is used in and check the output in the Activity panel to determine if the OAuth2 endpoint is configured correctly.
- Select OAuth2 from the Authentication Type drop-down list.
- This might already be selected because the authentication options are set when the step is defined.
- Select a Grant Type.
- OAuth2 support is currently limited to Password (or resource owner password credentials) authorization flow.
- Enter the Access Token URL for the application.
- Provide the credentials required by the OAuth2 server being targeted, which may include: Username, Password, Client ID, or Client Secret.
- Click Test Authentication to send a test request using your credentials to the target Access Token URL.
- If your credentials are correct, the Endpoints page displays a success message. If the request failed, the page displays the error details returned by the target system.
- Once your credentials have been successfully verified, click Save.
The following example demonstrates how an OAuth2 endpoint would be used to query for a protected resource, and print out the response received:

For force.com integrations, the authentication response contains an instance_url parameter that is part of the hostname on which the access token is valid; for example, "https://na34.force.com". This portion of the URL is not known in advance, and is therefore unavailable when configuring your endpoint. To support these integrations, an OAuth2 (Salesforce) endpoint dynamically changes the URL assigned to the endpoint during execution of the step so it matches the instance_url property returned in the authentication response.
Set up a Connected App
Connected Apps are used to integrate xMatters with Salesforce. External Client Apps are currently not supported.
To use the OAuth2 (Salesforce) endpoint, you first need to set up xMatters as a Connected App on the target system.
- Create a new Connected App with the following settings:
- Connected App Name and API Name: Choose a name that indicates what this Connected App is used for (for example, xMatters).
- Contact Email: Enter a valid email address for a user in the target system.
- Enable OAuth Settings: Select this check box.
- Enable for Device Flow: Select this check box.
- Callback URL: Enter the URL of your xMatters instance.
- Selected OAuth Scopes:
- Access the identity URL service (id, profile, email, address, phone)
- Manage user date via APIs (api)
- Perform requests at any time (refresh_token, offline_access)
- Require Secret for Web Server Flow: Select this check box.
Other options can be left as their defaults.
- After you save the Connected App, you should be taken to a screen where you can obtain your secret and ID (or Key). Make note of these so you can use them when you configure the endpoint in xMatters.
- Finally, edit the Connected App and change the OAuth policies settings.
- Permitted Users: Select "All users may self-authorize".
- IP Relaxation: Select "Relax IP restrictions". If you don't select this option, you might need to append the user's security token to the password when configuring the endpoint.
- Refresh Token Policy: Select "Refresh token is valid until revoked".
- Password Grant Type: Enable "Allow OAuth Username-Password Flows".
Other options can be left as their defaults.
See the documentation of the target system for details on creating a new Connected App. When editing a Connected App, note that updates may take a while to be applied.
Configure the endpoint
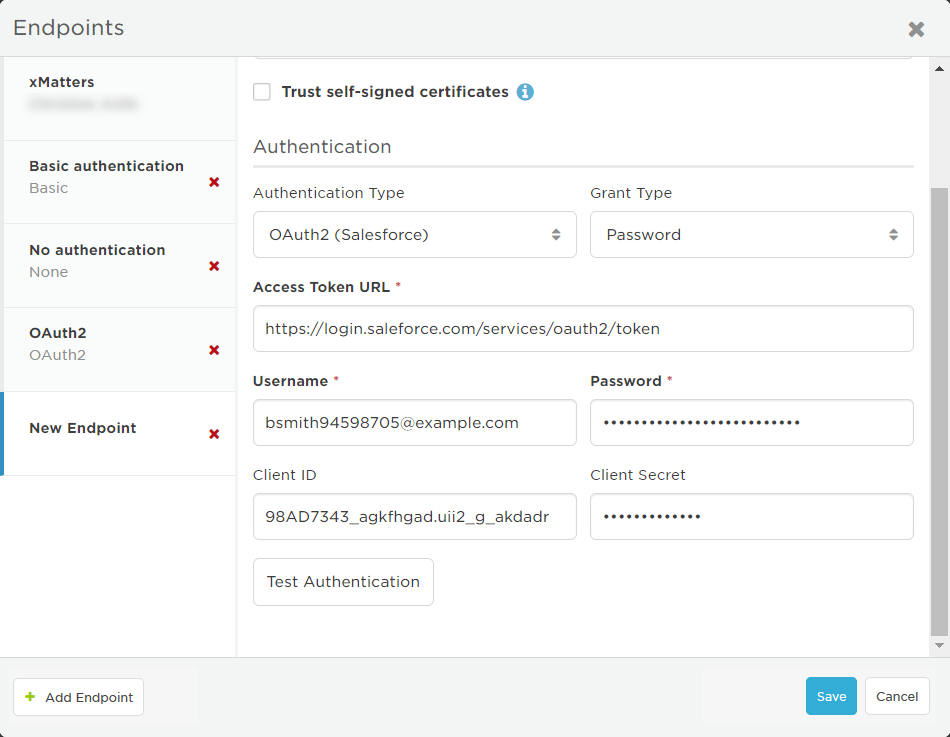
- In the Authentication section, select OAuth2 (Salesforce) from the Authentication Type drop-down list if it's not already selected.
- Grant Type is set to Password because OAuth2 support is currently limited to the Password (or resource owner password credentials) authorization flow.
- Enter the Access Token URL for the application.
- Production environments: https://login.salesforce.com/services/oauth2/token
- Non-production environments: https://test.salesforce.com/services/oauth2/token
- Provide the credentials required by the target OAuth2 server, which may include: Username, Password, Client ID, or Client Secret. Depending on your settings in the target application, you might need to append the user's security token to the password.
- Click Test Authentication to send a test request using your credentials to the target Access Token URL.
- If your credentials are correct, the Endpoints page displays a success message. If the request failed, the page displays the error details returned by the target system.
- Once your credentials have been successfully verified, click Save.
More details on accepted domains and endpoints are available in the Salesforce help documentation.
In June 2021, we released this new Slack endpoint and renamed our previous endpoint "Slack (Legacy)". The new endpoint uses the 'xMatters Connector' application in Slack to support Slack's granular permissions model. Although we continue to support custom scripts and steps using our previous Slack endpoint, we recommend upgrading to take advantage of new functionality.
For outbound integrations to Slack, users are not required to enter an access token URL, client ID, or client secret. Selecting the Slack authentication method lets you initiate the OAuth2 process to authorize access to your Slack team, using the credentials you enter. The Slack endpoint requests a bot token with the following OAuth scopes:
- channels:history
- channels:manage
- channels:read
- chat:write
- chat:write.customize
- chat:write.public
- groups:read
- groups:write
- pins:read
- pins:write
- team:read
- usergroups:read
- users:read
For the full list of available Slack scopes, see https://api.slack.com/scopes
- Select Slack from the Authentication Type drop-down list.
- This might already be selected because the authentication options are set when the step is defined.
- Click Connect.
- A new browser window opens to Slack to authorize access to your account.
- Select or sign into the Slack team that you want to authorize xMatters to access.
- Click Authorize.
Pop-ups must be enabled in your browser to open the Slack authorization page.
Adding the Slack token to API requests
When calling a Slack endpoint in an HTTP request, you must explicitly add a function call to add the Slack token to your API request, or the endpoint will not authenticate.
To add the authentication token, use the following syntax in the relevant portion of your script:
http.authenticate( '<SlackEndpointName' )
For example:
// Prepare the HTTP request
var slackRequest = http.request({'endpoint': 'Slack',
'method': 'POST',
'path': 'channels.create?token=' + http.authenticate( 'Slack' ) + '&name=' + channelName
});
var slackResponse = slackRequest.write();
var slackBody = JSON.parse( slackResponse.body );
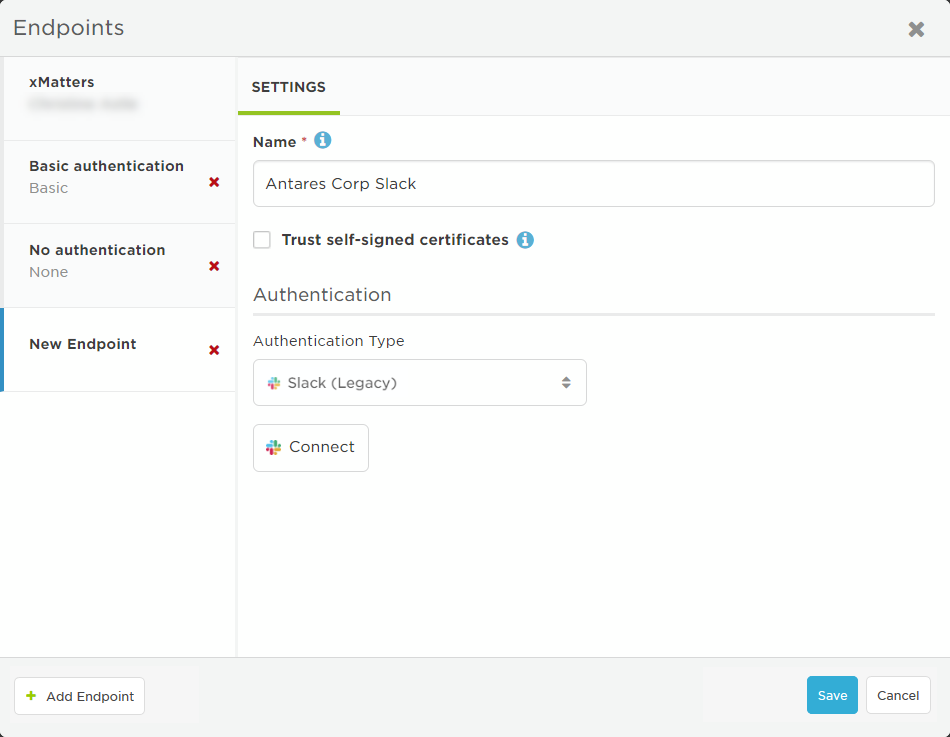
In June 2021, we released a new Slack endpoint and renamed our previous endpoint "Slack (Legacy)". Although we continue to support custom scripts and steps using the legacy endpoint, we recommend updating to the newer version of the Slack endpoint to take advantage of new functionality.
For outbound integrations to Slack, users are not required to enter an access token URL, client ID, or client secret. Selecting the Slack authentication method lets you initiate the OAuth2 process to authorize access to your Slack team, using the credentials you enter. The Slack endpoint requests the following OAuth scopes:
- users:read
- team:read
- channels:history
- channels:write
- channels:read
- chat:write:bot
- chat:write:user
For the full list of available Slack scopes, see https://api.slack.com/docs/oauth-scopes
- Select Slack {Legacy) from the Authentication Type drop-down list.
- This might already be selected because the authentication options are set when the step is defined.
- Click Connect.
- A new browser window opens to slack.com to authorize access to your Slack account.
- Select or sign into the Slack team that you want to authorize xMatters to access.
- Click Authorize.
Pop-ups must be enabled in your browser to open the Slack authorization page.
Adding the Slack token to API requests
When calling a Slack endpoint in an HTTP request, you must explicitly add a function call to add the Slack token to your API request, or the endpoint will not authenticate.
To add the authentication token, use the following syntax in the relevant portion of your script:
http.authenticate( '<SlackEndpointName' )
For example:
// Prepare the HTTP request
var slackRequest = http.request({'endpoint': 'Slack',
'method': 'POST',
'path': 'channels.create?token=' + http.authenticate( 'Slack' ) + '&name=' + channelName
});
var slackResponse = slackRequest.write();
var slackBody = JSON.parse( slackResponse.body );
The ServiceNow authentication type is used by ServiceNow steps in Flow Designer and by the ServiceNow workflows.
- Select ServiceNow from the Endpoint Type drop-down list.
- If you accessed the Endpoints page from Flow Designer, this might already be selected because the authentication options are set when the step is defined.
- Select an Authentication Method: Basic or OAuth 2.0 (Authorization Code).
If you select Basic to authenticate the ServiceNow endpoint:
- Supply the Username and Password of a ServiceNow user with the itil role.
- Click Test Authentication to send a request using the username and password to the ServiceNow instance you entered in the Base URL field.
- Once your setup has been successfully verified, click Save.
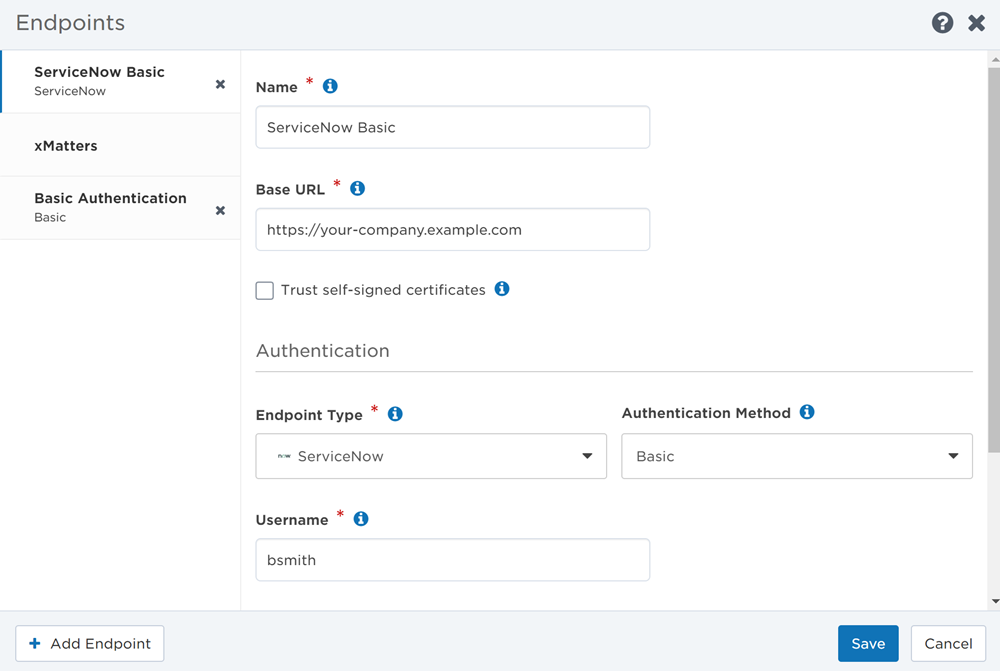
If you select OAuth 2.0 (Authorization Code) to authenticate the ServiceNow endpoint:
- Enter the Authorization URL for ServiceNow. https://{ServiceNow instance base URL}/oauth_auth.do
- Enter the Access Token URL for ServiceNow. https://{ServiceNow instance base URL}/oauth_token.do
- Provide the credentials required by the OAuth 2.0 server being targeted, which includes the Client ID, and Client Secret.
- If needed, copy the Redirect URL ServiceNow will send the user to after they authorize xMatters.
- If applicable, enter a Token Prefix to add before the token.
- If applicable, enter a list of scope values in the Endpoint Scope field to determine endpoint access. The scope values must be delimited according to ServiceNow's format requirements.
- Click Connect to open a new ServiceNow browser window prompting you to allow the connection, then click Allow. You may first need to sign in to your application if you aren't logged in already.
- If your credentials are correct, the Endpoints page will show that you have successfully connected (the Save button is not necessary and will be disabled–you only need to save your changes when you update the endpoint).
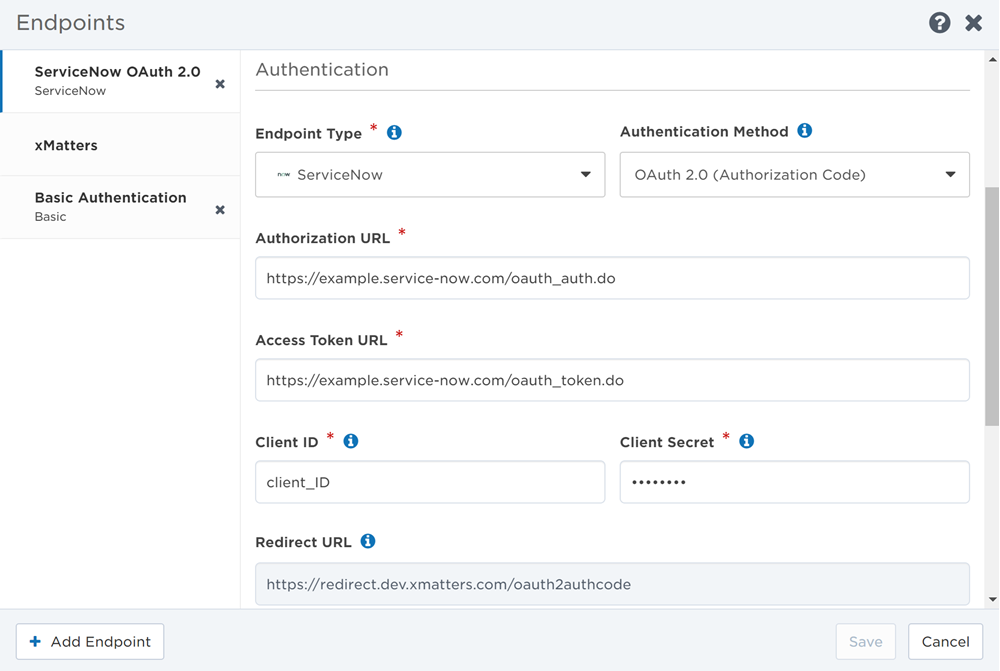
For more information on how to create an OAuth endpoint for ServiceNow, view their documentation.
The Zoom Server-to-Server OAuth authentication type is used by the Zoom Create Meeting step in Flow Designer. Each endpoint of this type is associated with a Zoom Server-to-Server OAuth app that enables you to securely integrate with Zoom APIs.
- Create a Zoom Server-to-Server OAuth app with the scope: View and manage all user meetings ("meeting:write:admin").
- Keep the Client ID and Client Secret from this app handy, as you'll need them to configure the endpoint in Flow Designer.
- In Flow Designer, select Zoom Server-to-Server from the Endpoint Type drop-down list.
- This might already be selected because the authentication options are set when the step is defined.
- Supply the Account ID from your organization's Zoom account.
- Supply the unique Client ID from the Server-to-Server OAuth app created specifically for this endpoint and its corresponding Client Secret.
- Click Save.
You must create a Zoom Server-to-Server OAuth app for each Zoom Server-to-Server endpoint.
Libraries
Libraries allow you to write common code functions once and use them in any workflow in your deployment.
For example, you can use a library to hold code that:
- parses, manipulates and displays date and time information
- trims leading and trailing white space
- trims strings to a maximum length
You can create a new library in the Libraries screen (accessed under Components) or under Libraries in the Script editor.
When creating the library script, keep in mind:
- You can't reference endpoints or constants, or outputs from triggers or other steps (since these might not be used in the workflow where the library is used). You also can't require one library in another. This makes sure you can use the library in any workflow.
- To make code in the library available to other steps, you must use the exports object to export any functions or methods you want to use.
- For additional information on working with scripts in Flow Designer, see Work with scripts in custom steps.
Refer to the examples to see how to use libraries.
Create a library on the Libraries screen
- In the Libraries screen, click Add Library.
- Give the library a unique name.
- Enter your library code.
- Click Save.
Create a library in the Script editor
- Click the Script tab of the custom step and scroll down to Libraries in the list of available items.
- Click New Library.
- A new script editor opens beside the existing one.
- Give the library a unique name.
- Enter your library code.
- Click Save Library.
- Click Close to close the library editor.
See Use a library in your script for information on how to import the library and access its functions in your script. Share the library if you want others to be able to use it.
Sharing a library and changing its owner work the same way as sharing and ownership of custom steps. See Share steps and libraries for more information.
You can edit a library by selecting it in the Libraries screen or in the Script tab of a custom step.
Edit the library in the Libraries screen
- In the Libraries screen, select the library you want to edit.
- Edit the name, if needed. This won't break the scripts that use the library because scripts use the reference name you assigned to the library when you use it in a script.
- Edit the script as needed and click Save.
- If the library is referenced by a script, the Usage tab appears to let you know which steps use the library. It's a good idea to check where it's used so you know which flows might be impacted by your changes.
Edit the library in the Script tab
- On the Script tab, click the library name in the panel of available objects. The library opens beside the script.
- Edit the library script as needed. To change the name, you need to use the Libraries screen in the Components menu.
- Click Save Library beside the library name to save your changes (or click Close to close the library without saving).
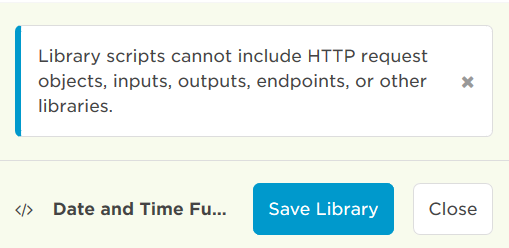
If you want to edit library code without impacting steps where the existing library is used, you can make a copy. This also lets you edit a library you only have permission to use. Copying can be done from either the Libraries screen or the Script tab of a custom step.
Copy a library on the Libraries screen
- In the Libraries screen, click the gear icon beside the library you want to copy and select Copy.
- A new library is added with the name "Copy of <libraryName>".
- Give the new library a name and edit the script as needed.
- Click Save.
Copy a library on the Script tab
- On the Script tab, click the gear icon beside the library you want to copy and select Copy.
- A new library is added with the name "Copy of <libraryName>" and it opens in a pane beside your step script.
- Give the new library a name and edit the library script as needed.
- Click Save Library beside the library name to save your changes (or click Close to close the new library without saving).
Deleting a library can be done from either the Libraries screen or the Script tab of a custom step.
- Click the gear icon beside the library you want to delete and select Delete.
- Click Delete on the confirmation screen.
- If the library is used in a script, a dialog box appears, letting you know there are steps that reference the library. You need to remove references to the library in those scripts before you can delete the library.
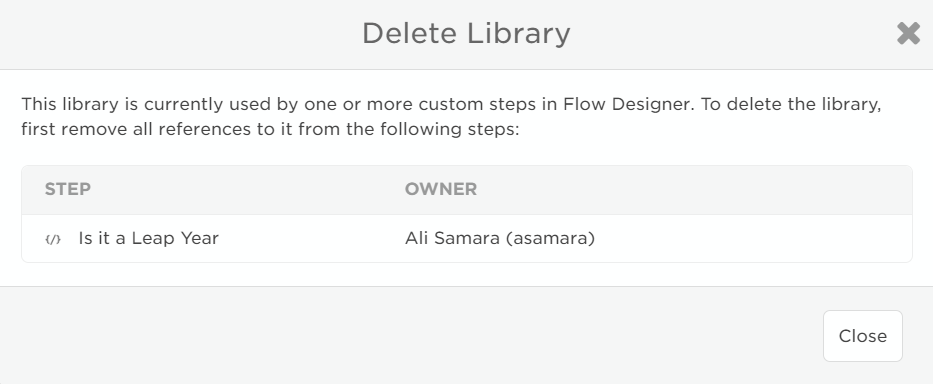
- Open the Script tab of the custom step where you want to use the library code.
- Find the library in the list of available items.
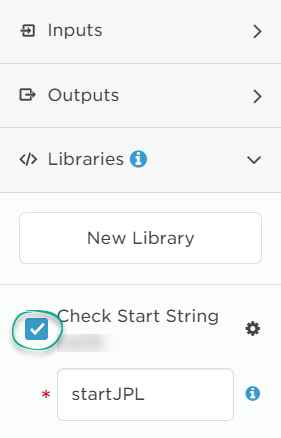
- Select the check box beside the library name. This makes the library available to use in your script.
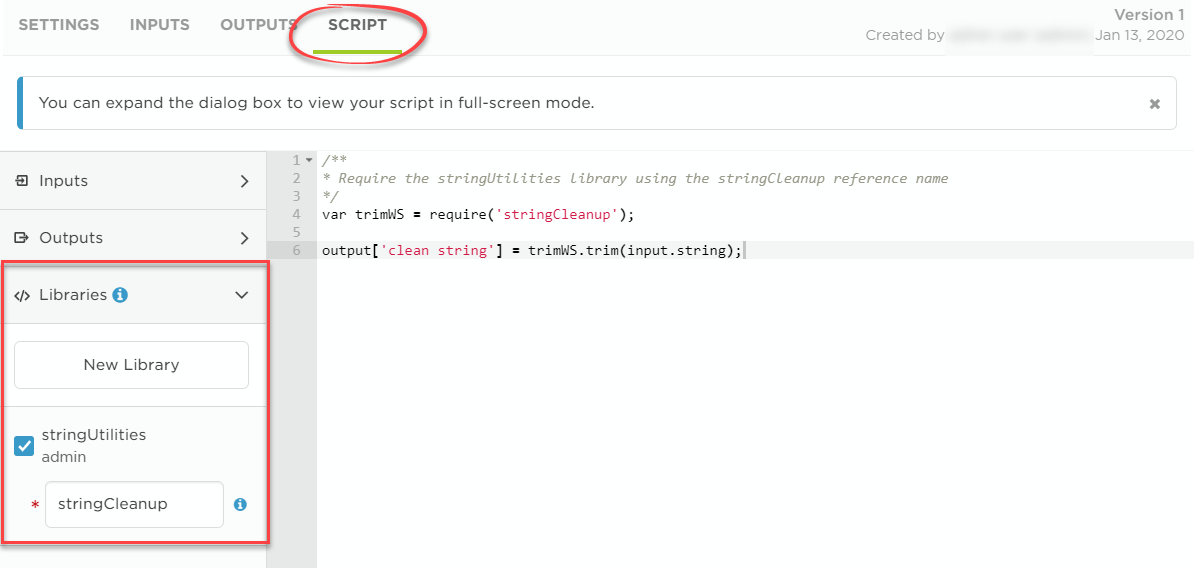
- In the field that appears below the library name and owner, enter a reference name.
- The reference name is the name you'll use in your script to refer to the library. Setting a reference name lets you change the name of the library without updating every script that uses the library.
- In the script editor, use the reference name in a require statement to call the library.
- For example: if Ali gives a 'Date and Time Functions' library the reference name alisTime, her require statement would be var now = require('alisTime');

Library reference names are case sensitive.
- Click Save to save the changes to your script.
It's always a good idea to test your flow when you make changes: trigger the flow and use the Activity panel to see if the flow hit any issues with the changes you made.
Before you make changes to the library code or delete a library, it's a good idea to check which steps might be impacted.
Use the Libraries screen to check the usage
Select the library you're interested in. The Usage tab appears if the library is used by a step, letting you know which steps refer to it and who the owner of the step is.

Remove a reference to a library
- Select the Custom tab in the palette and find the step where the library is used.
- Click the gear icon for the step and select Edit (you need to have edit permissions on the step).
- Select the Script tab and open the Libraries section in the side bar.
- Clear the check box beside the library and click Save.
For this example, we'll use a library full of functions for working with dates and times (ahem, moment.js) that has a function — isLeapYear — that checks if the date occurs in a leap year. We'll use that function in our custom step to populate the 'Result' output with 'yes' if it's true and 'no' if it's false.
To use the library functions, we've selected the check box beside our 'Date and Time Functions' library to make it available to the script, and then given it the reference name alisTime.
In the script, we've added a require statement that uses the reference name: var moment = require('alisTime');. Finally, we've called the isLeapYear function from the library (along with some others just for fun).
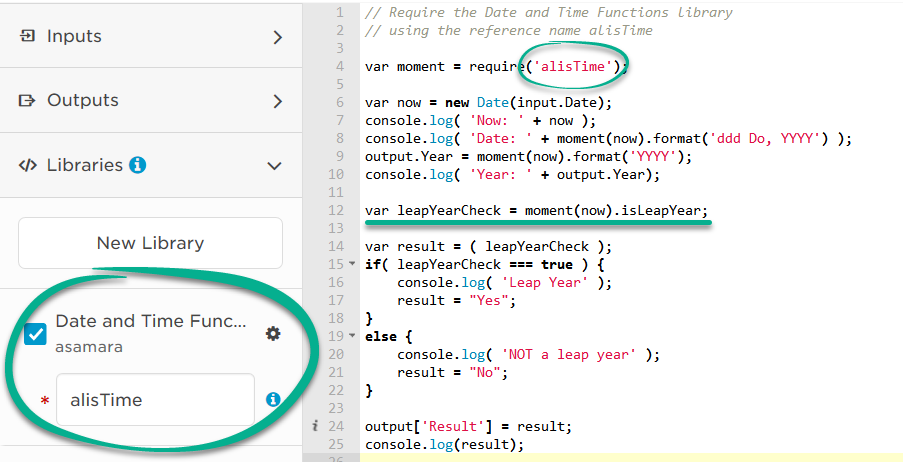
To wrap it all up, we put the result of the isLeapYear function into the 'Result' output.
Here's an example 'stringUtilities' library that has functions for removing whitespace around a string. For functions or variables to be available to a script, they need to be assigned to an exports object (in the example, ltrim wouldn't be available since it's not exported).
/**
* Remove trailing and leading whitespace from a string
*/
function trim(str) {
return str.replace(/^\s\s*/, '').replace(/\s\s*$/, '');
}
/**
* Remove trailing whitespace from a string
*/
var removeTrailingWhitespace = function(str) {
return str.replace(/\s\s*$/, '');
};
// This 'remove leading whitespace function won't be available to a script
// where the library is imported because it's not included in the exports below
function ltrim(str) {
return str.replace(/^\s\s*/, '');
}
// Export a function by name
exports.trim = trim;
// Export a function that was assigned to a variable
exports.rtrim = removeTrailingWhitespace;
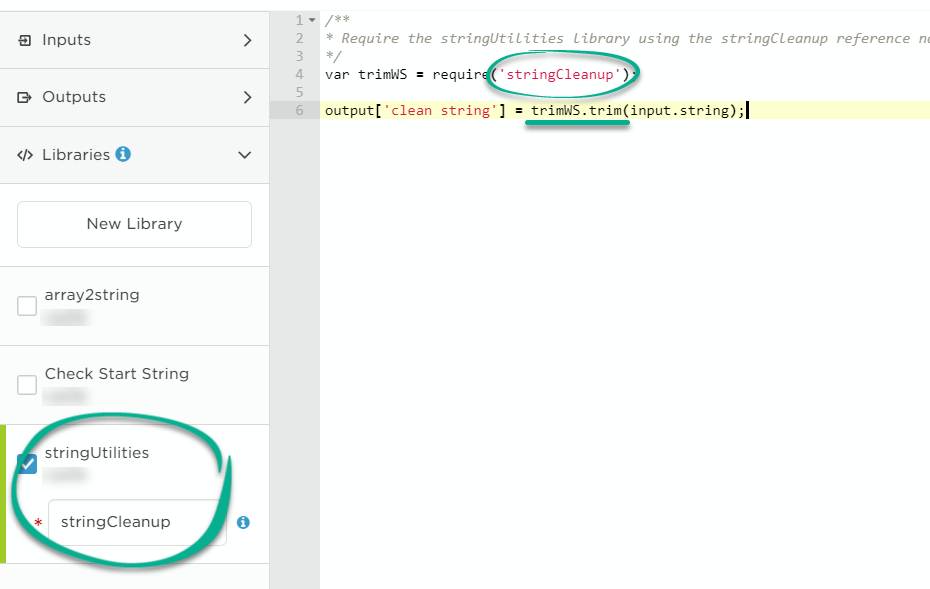
To use the library functions, we've selected to make the 'stringUtilities' library available to the script, and given it the reference name stringCleanup. In the script, we've added a require statement that uses the reference name. Finally, we've called the trim function from the library.
