Convert an outbound integration to a flow
From the very first release of Flow Designer, your outbound integrations appeared as alert activity triggers on your flow canvases (you might already have connected steps to them). However, if you wanted to edit them, you still had to go into the Integration Builder. But we've continued to pack features into Flow Designer, and you can now work with 'Run a script' integrations right in Flow Designer.
Run a script integrations
'Run a script' integrations are not automatically converted, since we can't easily tell exactly what steps are hidden in there, but you can now edit the settings and the script in Flow Designer.
If you want to convert an outbound run a script integration into a flow, there are a couple of basic steps: find the steps that are hidden in the script and surface them as steps on your canvas. Breaking the script into its constituent steps makes it easier to manage, reuse, and troubleshoot, even if you're not a developer.
If you don't convert the integration, don't worry — it will continue to function, and you can continued to edit them in the Integration Builder or in Flow Designer.
If you want to convert the integration to take full advantage of the power and flexibility of Flow Designer, keep reading. We'll go through the process of converting an integration to a flow using an example: a 'Notification Escalation' integration designed to add a comment to a Jira issue and post to a chat when an alert is escalated.
Step 1: Find the steps in your integration script
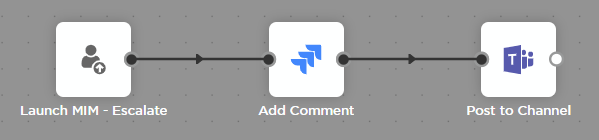
The first step is to look at the script and figure out what steps are hidden inside. In this example, there are actually three steps in this integration script...all of which we can replace with steps built right into Flow Designer:
- the trigger that initiates the action when the escalation occurs
- the request that adds a comment to the ticket, and
- the request that posts to the chat channel.
Here's what that looks like as a flow:
Step 2: Add the steps hidden in the code
Flow Designer comes with a slate of built-in steps that perform actions both in other systems and in xMatters. To add one to a flow, drag it onto the canvas, connect it to the flow and configure its settings.
Trigger the flow
The first step to replace is the alert activity that triggers the action.
This example uses the Escalations trigger, so we'll drag that trigger onto the canvas. The process is the same for any of the alert activity triggers; the only difference between triggers is the alert activity that initiates them and the information provided in the outputs specific to the activity.
Add a comment
In our example, we'll add a comment to the source application (in this example, Jira) and post to a chat channel (in Microsoft Teams).
The script finds the ticket ID then posts the following comment to the ticket, using the Jira endpoint set up in the workflow:
var msg = 'xMatters: ' + callback.recipient + ' escalated alert ' + callback.alertIdentifier + ' at ' + callback.time ' + '. Now notifying next on-call members in .' + callback.group + '.'
Here's how you'd set up an Add Comment step to replicate the script — all without any scripting, so anyone on your team can add and update the step:
- Configure the Add Comment step inputs. We've already connected the step to the trigger, so we have the alert and trigger properties available to drag into the inputs:
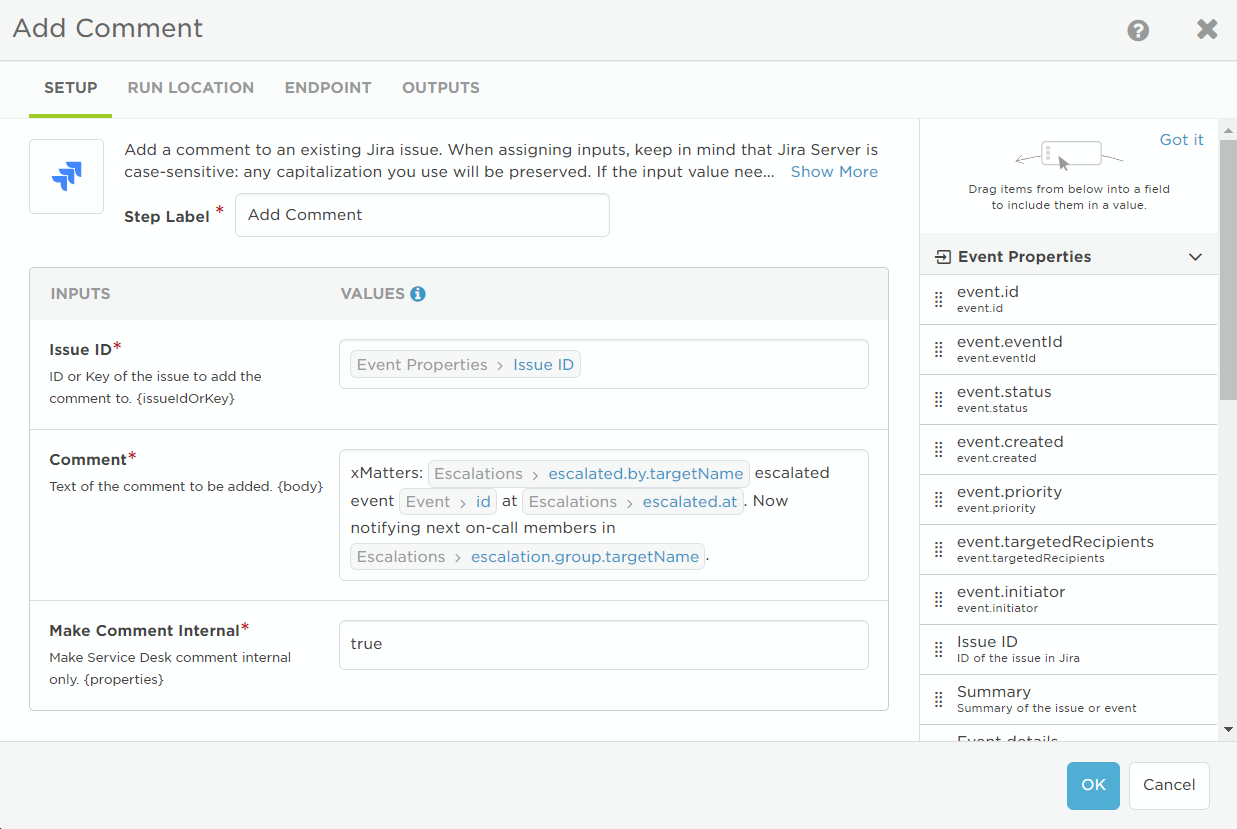
- Set the run location (if available). This sets whether the step should run on the cloud or on an xMatters agent; the Run Location tab only appears if the step is configured to allow running on an agent.
- On the Endpoints tab, select the existing endpoint for the application from the list (in this example, we had a Jira endpoint already configured).
Post to chat channel
The script posts a similar message in the service team's Teams channel so the team knows someone needs to take ownership.
var msg = 'xMatters: ' + callback.recipient + ' escalated alert ' + callback.alertIdentifier + ' at ' + callback.time ' + '. Now notifying next on-call members.'
To replicate this with the Post to Channel step:
- Configure the Post to Channel message:
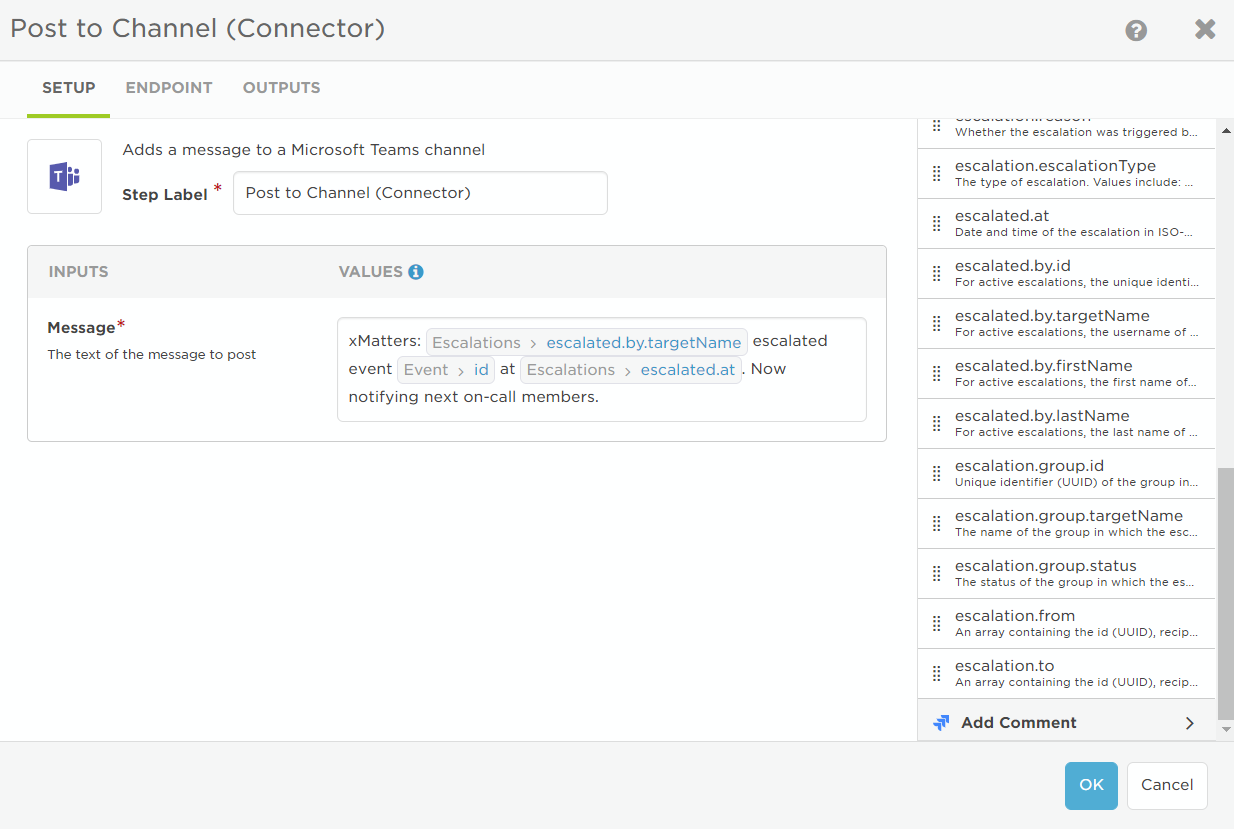
- On the Endpoints tab, select the existing endpoint for the application from the list (in this example, we had a Teams endpoint already set up).
That's it. We've turned that blob of code into a flow of discrete, reusable, and observable steps.
Step 3: Test your flow
This step is optional, but it's always a good idea to test the flow to make sure you're seeing the results you expect. You can open the Activity panel to see how the flow executed, and use it to help pinpoint any issues.
To test the escalation example, we'd initiate the alert for the form, targeting a group we're the on-call member of, and hit the "escalate" response when we receive the notification. We'd then check Jira and our chat channel to see if the message was posted.
But my script isn't so simple...
If you have some unique functionality in your script that looks up information in another application or posts to an application we don't have a built-in step for (yet), there are a few options:
- Maybe you have a switch statement in your script (for example, to add a different comment for manual escalations versus those that occur because an escalation delay elapses). Use a switch step that flips based on the escalation.escalationType trigger output.
- For posting to another application, you can use the built-in webhook step to send a payload to any system that accepts HTTP POST requests.
- If you want to get information from another application to enrich the flow, create a custom step.
- If a built-in step almost meets your needs, but not quite, you can convert it to a custom step and modify it.
What if I'm happy as is?
That's okay. We understand that you've got a system that works for you. As mentioned, we'll let you know if a change comes along that will impact your existing integrations. If you want to work with these integrations in Flow Designer, instead of the Integration Builder, there are some things you should know.