Design a flow
Creating flows with the visual, drag-and-drop Flow Designer is so simple it might disguise how powerful flows can be. With a palette of included steps and the ability to add custom ones, you can connect rich, complex processes into a single, automated toolchain.
You could easily learn by doing, but if you want to learn first then do, this page walks you through the steps of creating a flow, using triggers, how to add and connect other steps, how to use the available tools, and how to configure steps once they're connected.
As we go through the steps below, we'll build out a major incident management (MIM) flow triggered when xMatters gets a signal from a monitoring tool. Along the way, we'll figure out what steps we need, what information needs to flow through the steps, and if the flow needs to split at some point.
How to get to Flow Designer
Access to Flow Designer is controlled by the workflow — whoever has permission to edit the workflow can access its flows.
Access it from the Workflows page:
- Click the Workflows tab.
- If it's not already selected, click Workflows from the menu on the left.
- Click the name of the workflow that you want to build flows for and click the Flow Designer tab.
- Click the name of the canvas you want to create or edit flows for (or Create Flow Canvas if you don't have one yet).
Access it from within a workflow:
- If you're already in the workflow, click the Flow Designer tab.
- Click the name of the canvas you want to create or edit flows for (or Create Flow Canvas if you don't have one yet).
Step 1: Decide what triggers the flow
Triggers are steps that kick off each flow on the canvas. Triggers can be signals injected via an HTTP request or an email sent to xMatters, or different alert lifecycle activities (such as status changes, escalations, or responses).
In our example, we're using an HTTP trigger — when Monitoring Tool X detects an issue in our service, it sends a signal to xMatters, which starts the flow. For another flow, you might need a different trigger type; for example, you could allow someone to trigger the flow by responding to an alert notification.
If you already know which trigger you want to start your flow, drag it onto the canvas. Then you can skip ahead, though you might want to disable the flow until you have it laid out. If not, check out our detailed information on the triggers, including examples of when you might want use each one and what information is included in their outputs.
After you decide on the trigger type, drag it from the palette to the canvas. You can use HTTP and Email triggers multiple times on a canvas. Each alert activity trigger can only be used once, so when you add one of these triggers to the canvas, it disappears from the list of options; when you remove it from the canvas, it reappears and is available for you to use in future. If you've already built an outbound integration with the Integration Builder that uses the trigger, it appears on the canvas.
- Drag the trigger from the palette onto the canvas.
- For HTTP triggers, you can filter by triggers you own, triggers others have shared with you, or all triggers you have permission to use.
- Double-click the trigger icon to display information about the trigger and its properties.
- Click the Enabled toggle to enable or disable the trigger. When you disable a trigger, you disable the connected flow, which you might want to do until you've built it out.
For many triggers, that's all you need to do. If you're using the Responses trigger, you might need a bit more setup.
Flows are enabled by default, but you can disable them by disabling the trigger. For example, you might want to disable a flow if you're doing some system testing, diagnosing a runtime issue, or fleshing out a new workflow.
- Double-click the trigger to open its dialog box.
- Click the Enabled toggle to turn the flow on or off.
Triggers only fire if there are steps connected to them, so the next step is to figure out what steps you want connected to the trigger.
Step 2: Decide what information needs to go where
The next step in designing a flow is to figure out what applications you want to connect, as well as what information needs to flow between xMatters and those applications and when. This determines the steps you need to add, the order you need to connect them in, and the inputs you need to configure.
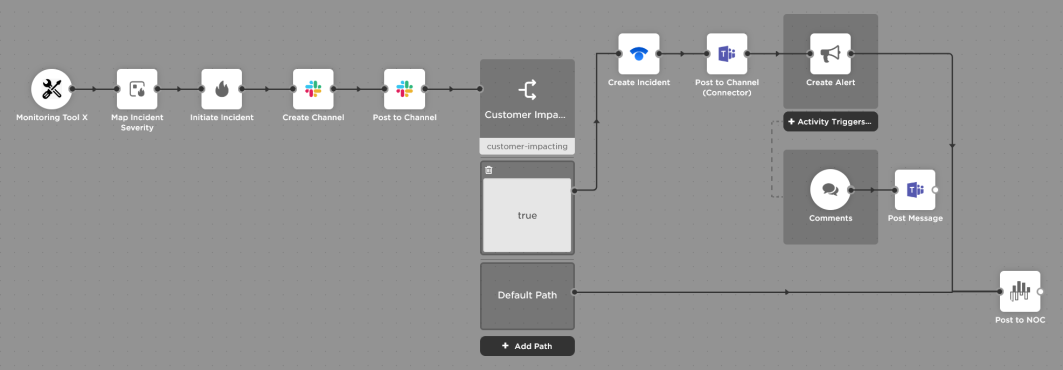
In our MIM scenario, the flow is triggered when xMatters receives a signal from Monitoring Tool X. The signal includes information about the issue summary, details, importance, issue_id, and customer_impacting, which will be available as outputs of the trigger.
We know we need use details from the signal to initiate an incident in xMatters and that we'll need to use the Map Incident Severity step to map the importance levels from Monitoring Tool X to match xMatters incident severity levels. We also want to create a chat collaboration channel for the incident and post details about the incident, including the incident number, to the channel. We'll get into the steps that come next when we talk about the switch step.

Whatever step you're adding, the basics are the same, though the setup required and any prerequisites depend on the particular step. In many cases, you simply need to drag a step onto the canvas, connect it to a previous step, and configure any required inputs to get started.
For some steps, you'll need to know the endpoint you want to send requests to (either to post to or get information from).
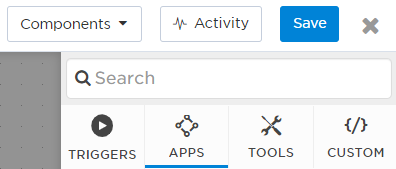
- Locate the step in the palette in either in the Apps or Custom tabs.
- For custom steps, you can filter by steps you own, steps others have shared with you, or all steps you have permission to use.
- Drag the step from the palette onto the canvas.
- To use a different version of a step, click the plus icon (+) beside the step on the palette to view the available versions, and drag the version you want to use onto the canvas.
- Drag a connector from the output port of the previous step in a flow to the input port of the step you're adding.
- Connect the step before configuring it to make sure you have access to all the alert properties and outputs from previous steps when setting up your inputs.
- If you're connecting multiple paths to the input port of a step, only constants and the outputs of individual steps common to all joined flow paths are available as inputs to this step.
If the built-in apps don't meet your needs, you can design custom steps to use in your flows.
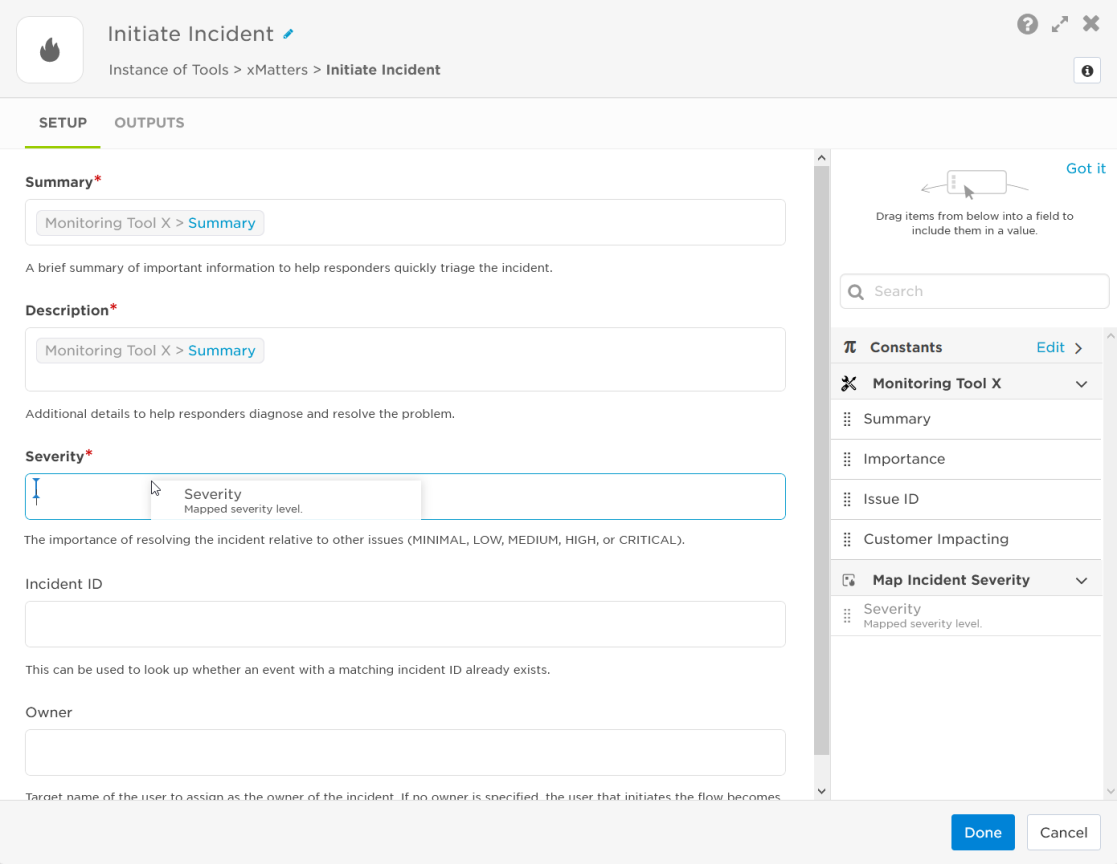
The setup required varies depending on the step you're adding, but how you configure the step is the same. When configuring inputs, you can include text, outputs from previous steps, or a combination of both. These outputs appear in the panel on the right side of the step setup screen — simply drag one from the panel to an input field. You can replace the current output in a field by dragging and dropping a different output into its place. For longer or more complicated flows with a large number of steps and variables, use the Search field at the top of the panel to quickly find the outputs you need.
We provide instructions on using the built-in steps in the Apps panel; for information on any custom steps, contact the person in your organization who created them.
- Double-click the step to open its configuration screen (or select it and click the pencil icon).
- Change the step label if it makes sense for your flow. For example, if you have a step to post to a specific channel and the channel name is hard-coded in a step input, you might want to the label to read "Post to antares-team-chat".
- Fill in the required inputs and any of the optional inputs you want to use in the flow of information. You do this by adding hard-coded text or by mapping output variables from the alert, trigger, or previous steps, which appear on the right. You can also copy a variable from one field and paste it in another, or drag-and-drop a variable onto another to replace it. The values of these variables are determined at runtime.
- Click OK to close the setup screen, then click Save at the top of Flow Designer.
Some things to keep in mind:
- If you add an output variable to an input field, Flow Designer doesn't know the value of the variable until runtime. This means it can only evaluate any configured minimums, maximums, or pattern validation at runtime. For example, you won't get a validation error if you map a Detailed Description variable into a Summary input field with a maximum length of 150 characters. However, when the flow is triggered, it throws an error if the value passed is 2000 characters long. If this happens, the errors shows up in the Activity panel.
- If you connected multiple paths to the input port of a step, only constants and the outputs of individual steps common to all joined flow paths are available as inputs to this step. Alert properties are available as inputs when the flow uses only Alert activity triggers.
- The value of the inputs you configure in this step might become outputs that you can use in steps further along the flow.
Some steps can either run in the cloud or use the xMatters Agent to run behind your corporate firewall. Running on an agent allows a step to update and retrieve information from systems that reside behind the firewall. If your flow is connected to an Incident Automation trigger and contains steps that are run on an agent, only registered users of all the agents in that flow can run the corresponding automation. If a step is configured to allow both locations, you need to select where you want this instance to run and, when it's set to run on an agent, you need to select one or more agents for it to use.
- Click the Run Location tab. If you don't see this tab, it means the step is only configured to run in the cloud.
- Select the location where you want this step to run: Cloud or xMatters Agent.
- If you set it to xMatters Agent, select one or more agents from the list of available agents.
- To select an agent from the list, you must be a registered user of the agent and it must be version 1.4.1 or later.
- If you don't have any agents configured, click Add an xMatters Agent to go to the Agents page, which has instructions for installing the agent.

- Click OK. If you're done configuring the step, close it and click Save on the canvas.
Some steps require that you set an endpoint (for example, to send alert information to a chat channel). You can use an endpoint that's already set up for the workflow or you can add one while configuring the step (which you can reuse in other steps).
- Click the Endpoint tab.
- If you don't see the Endpoint tab, it means the Include Endpoint option wasn't selected when the custom step was created.
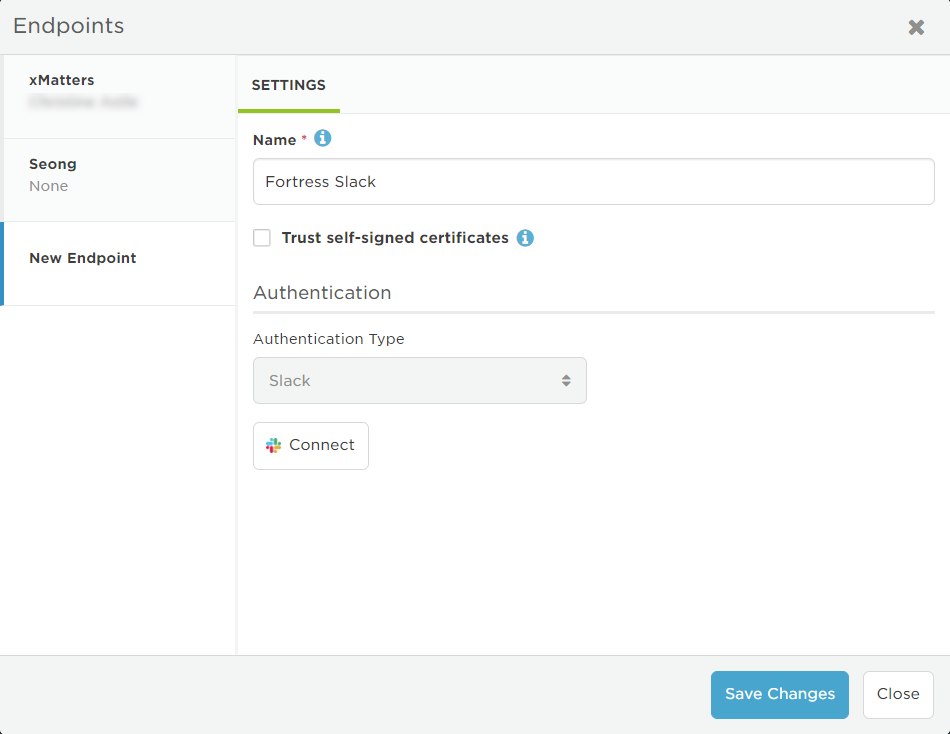
- Select an existing endpoint from the list, or click Create New Endpoint to set up a new endpoint. You'll only see endpoints that match the authentication type that was allowed when the step was created.
- If you create a new endpoint, a dialog box appears where you configure your new endpoint. You might not be able to change the authentication type; this is defined when the step is designed, and many specify a particular authentication type.
- If you create a new endpoint, click Save Changes then Close on the Endpoints dialog box when you're done, which returns you to the step setup.
- Click OK to close the step setup screen, then click Save on the canvas.
Step 3: Decide if your flow needs to take a detour
Tools are steps that evaluate the information coming through the flow and use it to decide what action to take next.
Adding a tool step is the same as adding any of the other steps — locate the step in the palette, drag it onto the canvas, and connect it to the preceding step. The configuration varies depending on the type of tool you're adding.
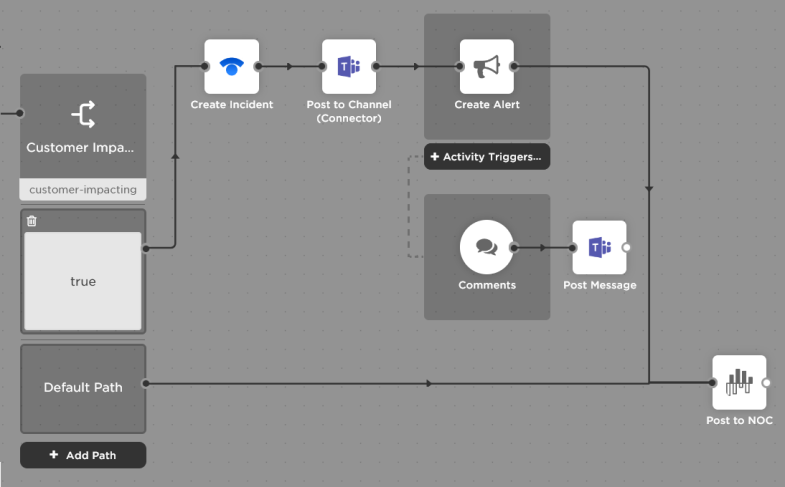
Think of a switch step like the switch on a set of railway tracks. It determines what route the train — or flow — takes based on alert properties, trigger outputs, constants, or outputs of previous steps in the flow. For example, a flow could be routed based on a severity property ("Critical" goes one way, "High" another, everything else follows a third, default path) or a customer impacting property ("Yes" follows one route, "No" another).
In our example, we split the flow based on the customer_impacting trigger output. A value of True creates a Statuspage incident, posts the page details to a channel, sends an alert to the customer-facing team with the incident details and channel links, and then posts to our NOC dashboard (if anyone comments on the alert, we also add those to the channel). Any other value for the customer_impacting output just posts to the dashboard.
To configure a switch step:
- Double-click the switch step to open the setup screen (or select it and click the pencil icon).
- Enter a label for the switch (for example, if the split in your flow is based on alert priority, you might label the switch Priority).
- Select the property that determines which path the flow takes. This list is populated with alert and trigger properties, outputs from any previous steps, and constants.
- Click Done.
- Click Add Path and then click the block to set the value that flips the switch (for example, if you want the flow to take one path based on "High" priority alerts and another based on "Medium" priority alerts, add paths for High and Medium).
- If the property comes through with a value other than those set in the paths, they follow the Default path (for example, if a "Low" priority alert comes through, it would follow the Default path).
- Set up the flows you want to follow for each path, or identify a merge point after which the paths follow the same series of steps.
As you're building out your flow, you might decide you need to create an xMatters alert. Maybe you're triggering the flow using email and you want to initiate an alert targeting the email recipient. Or maybe you want to kick off a new notification with different recipients depending on the value of that customer impacting switch step. Or you might have an "All Hands On Deck" response that creates a new notification targeting a wider audience.
The Create Alert step lets you create a new alert and send new notifications at any point in your flow, and you can pass information from any previous steps into the alert. You can also add activity triggers to the step if there are any steps you want to run when certain activities occur. In our example, we're posting comments on the alert to a chat channel.
To configure a Create Alert step:
- After dragging the step onto the canvas, double-click the xMatters Create Alert step to open the setup screen (or select it and click the pencil icon).
- Enter a label for the step (for example, if the alert is initiated based on a "Launch Major Incident" response, you might use that as the step label).
- Use the message templates to compose the email, xMatters mobile app, text, and voice notifications to send for the alert.
- Fill in the recipients and incident settings using text, outputs from previous steps, trigger properties, constants, or a combination of these. You can quickly find outputs with the Search bar. See the guidelines on setting recipients and incidents settings for details.
- Use the Response Options tab to create the response options to include with your notifications.
- Use the Devices tab to set which device types to target for notification (for example, 'Work Phone' and 'Work Email').
- Use the Handling & Overrides tab to modify the default notification handling settings, if needed, although the default settings (for notification priority and expiration, voicemail options, and other handling options) should work for most of your alerts. You can also modify the caller ID and display name associated with this alert.
- Click Done.
- Click Save on the canvas.
For more detailed instructions, see our topic on the Create Alert step.
Step 4: Test your flow
It's always a good idea test your flow before putting it into active use. This lets you check if there are any mismatched output-to-input mappings, issues in the underlying setup of any custom steps, or problems with endpoints.
- Make sure your flow is enabled.
- Perform whatever action triggers your flow. For example:
- Send an HTTP POST request targeting an HTTP trigger.
- Send an email targeting an email trigger.
- If using an activity trigger on a Create Alert step, trigger the flow that includes this step to initiate its activity triggers.
- If using an activity trigger for a Messaging form, initiate an alert that targets your form, either through the Messaging tab, an inbound integration or the xMatters REST API, and then perform the appropriate action for your trigger (for example, select the response for the Responses trigger or add a comment for the Alert Comments trigger).
- Use the Activity panel to track down any issues.
What's Next?
Now that you're familiar with creating a basic flow, check out the other available triggers and tools, the growing number of ready-made apps for tools you use everyday, or try creating a custom step and sharing it with others in your team.