Design custom steps
You can create your own steps with whatever inputs, outputs, and internal logic you need. This gives you the power to integrate even more systems into your toolchain, perform actions that aren't baked in (yet), or tailor a step to exactly your needs.
For example, you might create a custom step to:
- Integrate your proprietary, internal logging software into your incident resolution workflow.
- Transform the timestamp coming from a monitoring tool into the format your service desk system expects.
- Check for a substring in the payload and populate outputs based on the value of that string.
As we go through the steps below, we'll design a step to create a ticket in another system (Zendesk in our example, even though we have apps for it, but you could replace that with whatever tool you want to connect into your flow). Along the way, we'll look at what the basic framework needs to be, what inputs we need to bring information in, what outputs we want to create to pass information to steps downstream, and what transformation needs to happen to the information inside the step.
We recommend being discrete when creating a custom step — don't try to do everything in one step. Focusing the step on a specific task makes it easier to create, update, and troubleshoot. It'll also be more reusable in multiple flows.
Once you create and share the step, you can reuse it in any flow. You can also create new versions of the step as your needs change.
Creating a custom step is pretty straightforward — define inputs, map to outputs, transform the data — but it can be as simple or as complex as you need. Editing or deleting a custom step is a little different because the changes might impact flows where the step is already used.
You can also use an existing custom or built-in step as a template for creating your own step. For more information on how to do this, see Copy a step.
Step 1: Create the custom step
When you create a new custom step, the first thing to do is set up how it appears in the palette: the name, description, and icon.
- On the Custom tab in the palette, click Create a custom step. This opens the New Custom Step dialog box.
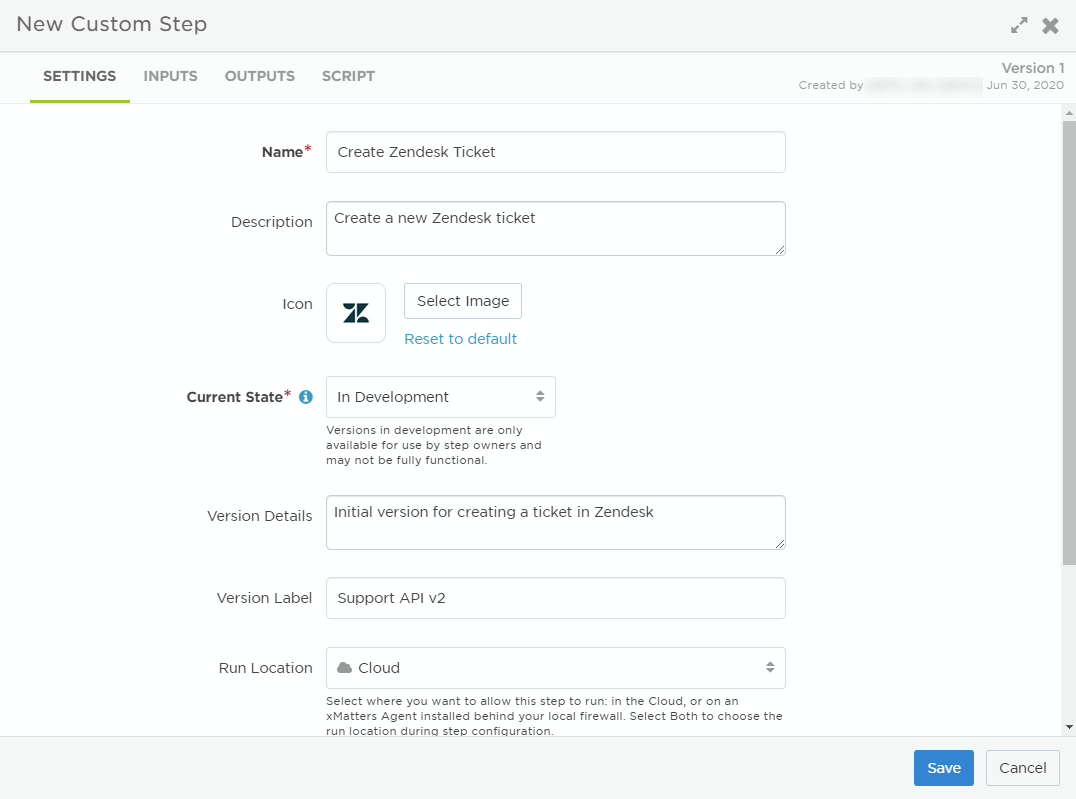
- On the Settings tab, give the step a name and description. These appear in the palette, and help people know what this step does and if it's something they should use. People can give the step a different label when they add it to a flow.
- To change the icon used for the step, click Select Image. This opens an image library with a selection of icons, including a few default ones and any icons you've already added.
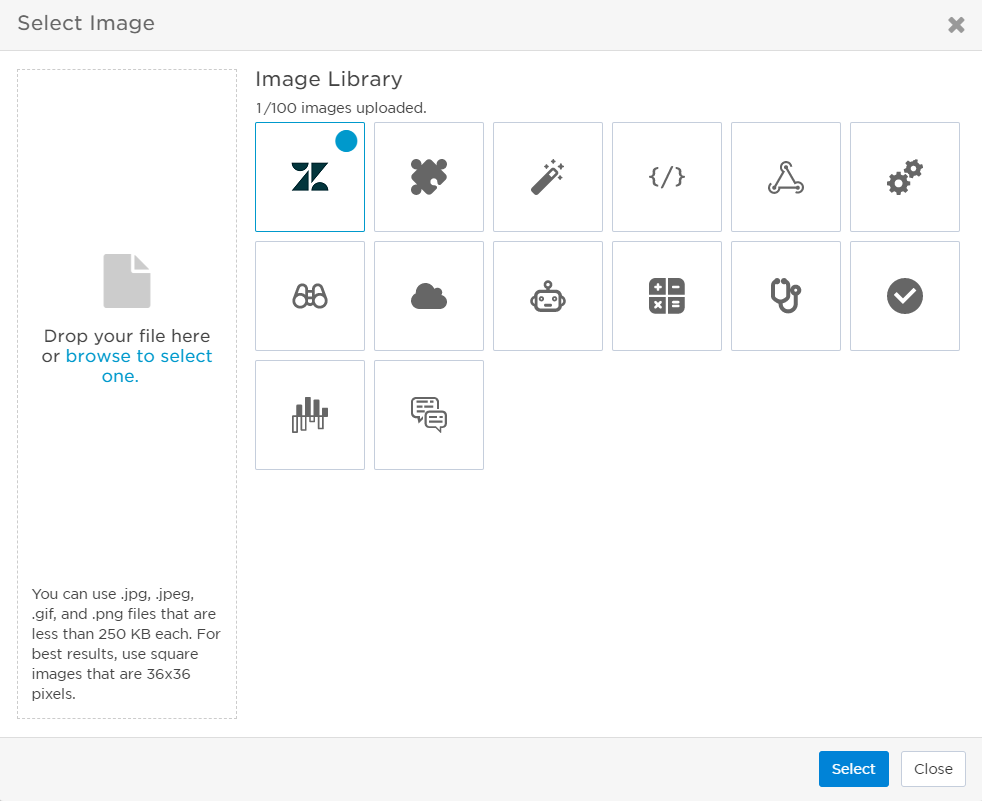
- Click an icon in the library to select it. To add a new icon to the image library, drop the file into the window or click browse to select on and browse for the file you want to use.
- For the best appearance on the canvas, we recommend using images that are 36 x 36 pixels. The maximum file size is 250 KB, and you can use a variety of common image formats: jpg, jpeg, gif, and png.
- Once you've selected your image in the Image Library, click Select to go back to the step settings.
- Leave Current State as In Development until you're ready to put your step into use.
- Enter version information in Version Label and Version Details to help users of the step know which version they should use in their flows.
If you want to follow along with the example, we created a step with the following settings:
- Name: Create Zendesk Ticket
- Description: Create a new Zendesk ticket
Next, set whether this step can run on xMatters Agent and if it uses an endpoint. If it can't run on an agent or doesn't require an endpoint (for example, if you're creating a step to convert all UTC timestamps into a special format), you can skip to defining inputs.
Step 2: Define the run location and endpoint options
The run location determines where the step can be configured to run: the cloud or on an Agent. Allowing a step to run on an agent lets it update and retrieve information from systems that reside behind your corporate firewall.
If your step needs an endpoint, you can define a label and authentication method. You might want a specific endpoint if the step needs to request information from or post information to another system. The endpoint label lets you reference the endpoint in the transformation script rather than hard-coding it. It doesn't need to match the endpoint name used when the step is added to the flow. For example, if you set the label to "TrackingSystem", someone adding the step to a flow could select an endpoint named "Jira Cloud", and the script would perform the TrackingSystem requests in the script on the Jira Cloud endpoint.
- Select the Run Location where the step is allowed to run.
- Cloud: The step can only run in the cloud.
- Agent: The step can only run on an xMatters Agent.
- Both: The person using the step in a flow can select where the instance of the step will run when they configure it.
- To include an endpoint, click the Include Endpoint check box. This brings up a few additional fields to fill in.
- Use the Endpoint Type drop-down list to select the authentication type you want to allow.
- When people add the step to a flow, they can target an existing endpoint of a matching type or create a new endpoint of the specified type, but they can't change the authentication type.
- In the Endpoint Label field, type the name you want to use when referring to the endpoint in the script.
If you want to follow along with the example, we left the default Cloud run location and defined the following endpoint:
- Include Endpoint: Yes
- Endpoint Type: Basic
- Endpoint Label: Zendesk End
Step 3: Determine the inputs
When you define the inputs, you're setting up the fields people populate when adding the step to their flow. You only need to create inputs that bring in the information this step needs to run its script and populate its outputs with new information (you don't need inputs that simply pass the information through the step from previous steps; once a step is in a flow, its outputs are available to all the steps further downstream).
Consider what your step needs for it to successfully execute the script and populate its outputs. Here's some questions you might think about:
- What information do you need from another system? Do you want to look up user information to populate an assignee output? Then you might need an input that lets people include a user ID or username to use in the lookup.
- What do you want to send to another system? Do you want to post alert information to an internal dashboard? You'd want inputs that can be populated with the information used to create the request body.
- What outputs from this step do you want available to steps further downstream? Do you need to make sure there's a timestamp output that uses decimal time? You'd want an input that captures incoming timestamps so you can convert them using the script.
Also consider which inputs are optional and which are required — is that timestamp necessary while the user information for the lookup is nice to have?
Use the Inputs tab to define the inputs that are available and the order the inputs appear in. As you add inputs, they appear on the left side of the tab.
- Click Add Step Input to create a new input.
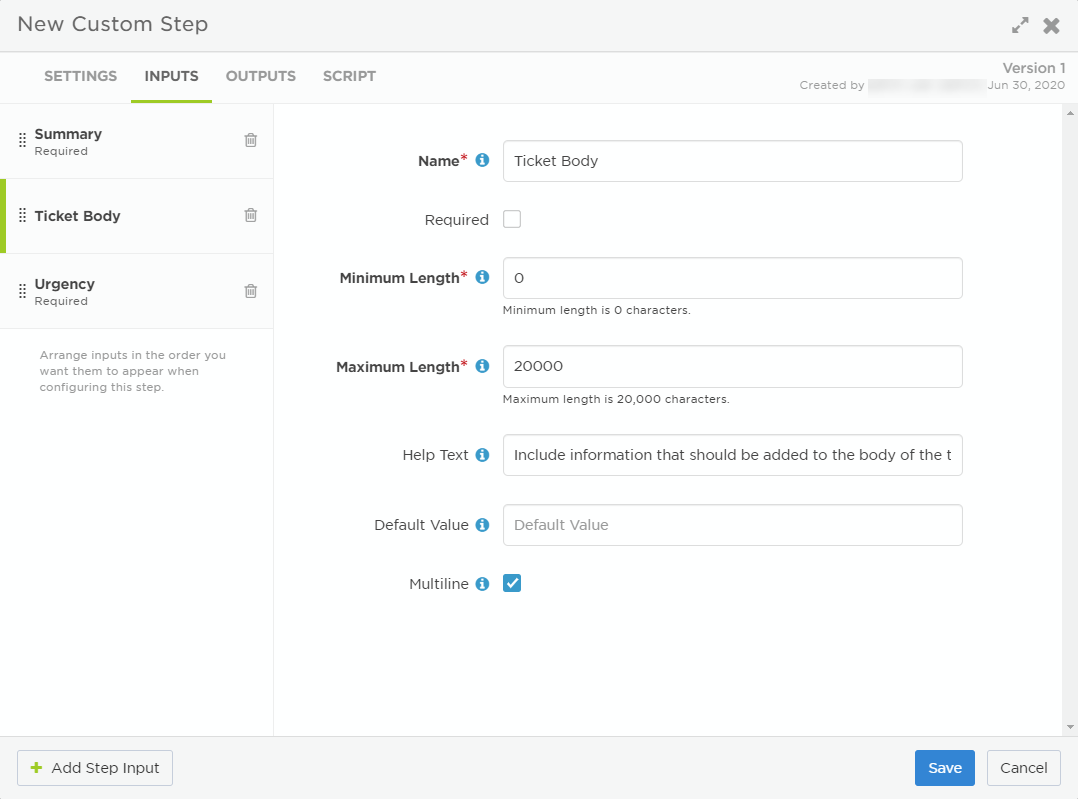
- Enter a name for the input. The name appears as the label for the input on the step setup screen, and can be used to reference it in the script editor.
- Select the Required check box if you want to make sure people configure this input when adding the step to a flow.
- Enter a minimum and maximum number of characters for the input.
- When setting these, keep in mind how the input will be used. For example, if this should be a Boolean value, you might set the maximum to 5 since 'false' has five letters. If this will be a long description of an issue, you likely want a much higher maximum value (the maximum you can set is 20,000 characters).
- Use the Help Text field to provide a description of the input to help people know if and how they should configure this input when setting up the step. This text appears below the input name in the step configuration dialog box.
- Enter a default value (optional) to be used if the person adding the step to their flow doesn't configure a different value.
- Select the Multiline check box if you want to allow people to use multiple lines when filling in a step input. This is useful for fields such as message bodies or detailed descriptions of issues.
- Drag the inputs on the left side of the tab to arrange them in the order you want them displayed in the step configuration dialog box. For example, you might want the required inputs at the top, then optional inputs in order of importance.
If you want to follow along with the example, we created the following inputs:
- Summary | Required | Maximum length: 300
- Urgency | Required | Default Value: High | Maximum length: 6 (the values we use in our example are High, Medium or Low, and Medium has 6 letters).
- We could have labeled this "Priority", which is what the Zendesk API is looking for, but our team uses Urgency.
- Ticket Body | Not required | Multiline: Yes | Maximum length: 20000
- For Ticket Body, we don't need inputs for all the information someone might want to include in a free-form body. When someone adds the step to a flow, they can map any of the outputs from previous steps into this one field.
When you're done, you can move on to defining any outputs.
Step 4: Determine the outputs
When you define the outputs, you're deciding what information this step should provide to steps further downstream. Some examples to consider:
- Is this step posting to a status website? Do you want to pass along the name of the page so it can be sent to a chat channel or added to the ticket details using another step? You might want a Page Name output that you can populate from the response.
- Is this step posting to a chat app? Do you want to provide the message in an output so it can be added as a comment in your service desk source-of-truth? Then you might want a Message output.
- Is this step converting time formats of the world into the one used by your dashboard? You probably need a Dashboard Timestamp output.
Use the Outputs tab to add the outputs you want to make available to steps further downstream. You'll use the script to tell the step what info to pass in at runtime.
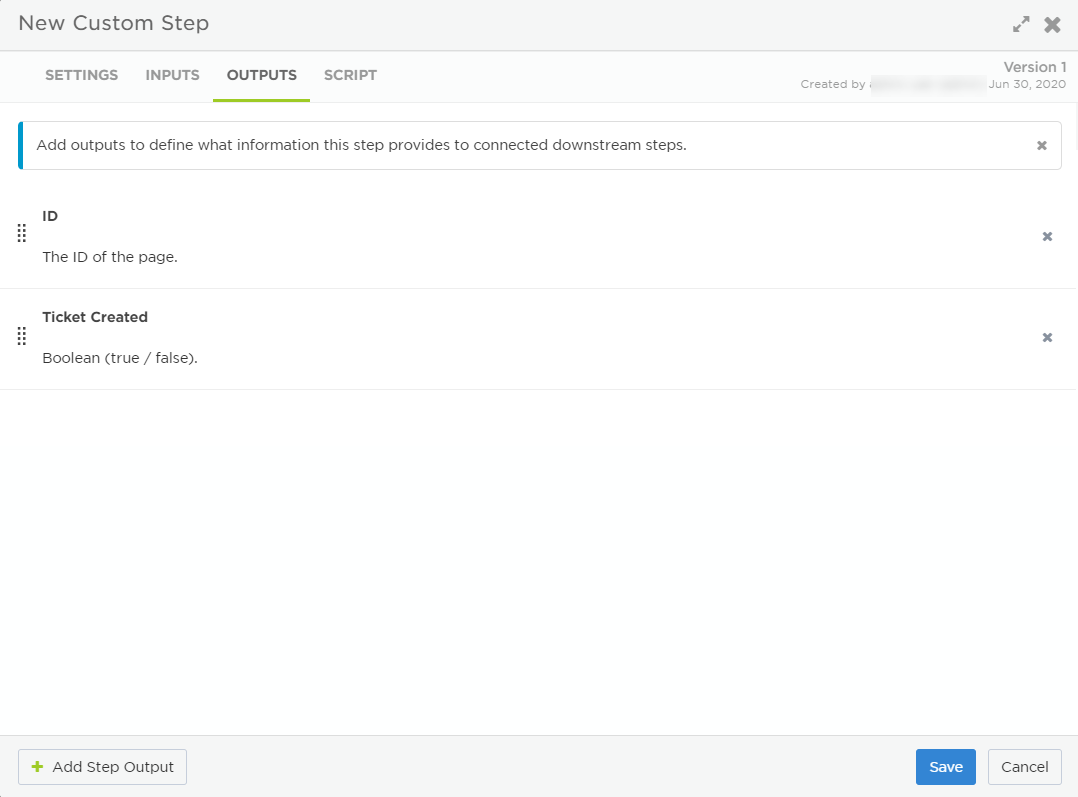
- Click Add Step Output to create new output.
- Enter a name for the output. This name can be used to reference it in the script editor, and appears in the step setup screen where people can drag it into the input of a connected step.
- Enter a description to make it easier for other users to know what it contains or how to use it.
- Drag the outputs to arrange them in the order you want them displayed in the step configuration dialog box. For example, you might want the most important or most useful outputs listed first.
If you want to follow along with the example, we created the following outputs that get populated by the script we create next:
- ID: You could use this output in a Channel Name input in a "Post to Chat" step further downstream or add it to a comment in an "Update" step pointed at your service desk.
- Ticket Created: This will be a Boolean (true / false) which someone designing a flow could use as the property to evaluate in a switch step.
The last step is to edit the script, where you can manipulate the inputs, get information from or send it to other applications, and map data to the outputs.
Step 5: Design the logic
The script is the heart of your custom step. It's where you design the internal logic that uses the inputs to request information from another application, structures the information into a payload to send to an application, transforms all that information, and maps it to the outputs.
For example, you might concatenate multiple inputs into a single output, transform information from an input into a format another system will accept (for example, all uppercase or a unique time format), or compile input values into a payload to post to another system and print a message to an output based on whether the post was successful.
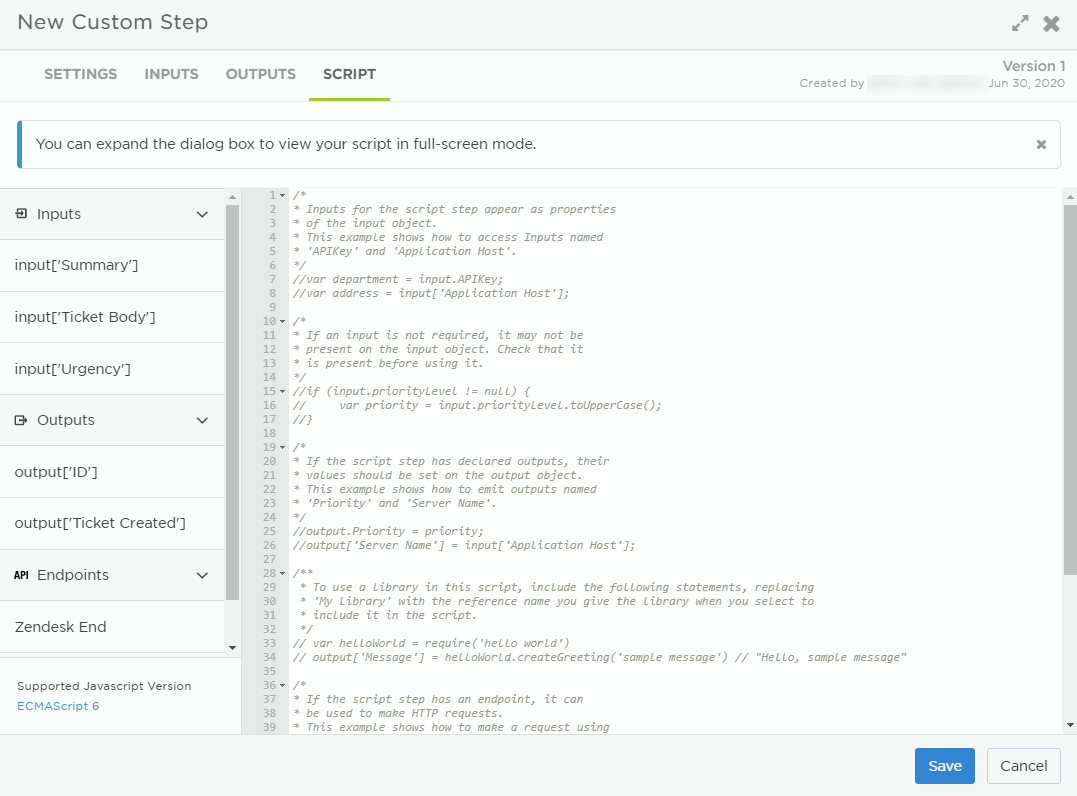
The Script tab includes an example script to get you started. It shows you inputs, outputs, and endpoints available to use in the script. The editor opens within the confines of the custom step dialog; click Full Screen to expand it (this changes to Reduce so you can shrink it when you're done). Once you're done creating your script, click Save to save your custom step.
The basics
When working in the script editor, there are some handy bits of JavaScript you use to reference resources outside your script and to post to the log as the script is processed. Before you get started, you should be aware that xMatters supports ECMAScript 6.
The basic function of the script is to map information to outputs. To map information to an output, use output["output name"] = <what you want to map>. You can refer to single word inputs and outputs using bracket or dot notation: input["inputlabel"] or output.outputlabel.
There are many sources of information you can feed into the outputs. For example:
- inputs to the step
- static text
- the response of an HTTP request to another system
- the result of some snippet of code that transforms any of the above
For more information on working with scripts in Flow Designer, see the scripting reference. This includes receiving making HTTP requests, using library functions , writing to the log in the Activity panel, and more.
Example: A step to create a ticket in Zendesk
This example script walks through creating a basic "Create a ticket" step, wrapping up the example we followed in the steps above. It constructs a payload from the step inputs, sends it to Zendesk, and populates the outputs based on the response from Zendesk.
| Command | Description |
|---|---|
| console.log("Begin Step: Zendesk Create Ticket"); | Writes a message to the log in the Activity panel that the step started processing. |
| var apiRequest = http.request({ 'endpoint': 'Zendesk End', 'path': '/api/v2/tickets.json', 'method': 'POST' }); | Prepares the POST request to another application (in this case, Zendesk). Remember to use the name you gave the endpoint in the Settings tab, which is also displayed on the right of the script editor. |
| var zdPayload = { "ticket": {} }; | Sets up the payload that will be sent to Zendesk (in this example, the information to create a ticket). |
| if (input.Summary !== "") { console.log("Subject = " + input["Summary"]); zdPayload.ticket.subject = input["Summary"]; } |
Checks if the "Summary" input contains text. If it does, it posts that text to the log and sets it as the "Subject" of the Zendesk ticket that will be created. In this example, because "Summary" is one word, it can be referenced using either input.Summary or input["Summary"]. If it were more than one word, you'd have to use bracket notation (input["Summary line"]). |
| if (typeof input["Urgency"] !== 'undefined') { zdPayload.ticket.priority = input["Urgency"]; } | Checks that the "Urgency" input is not undefined, then sets that as the "Priority" in the Zendesk ticket. |
| zdPayload.ticket.comment = { "body": input["Ticket Body"] }; | Sets the contents of the "Ticket Body" input as the body of the Zendesk ticket. When someone adds this step to their flow, they could populate the field with multiple outputs, for example a Jira Issue ID, a ServiceNow Incident Number, a Statuspage Incident Name, and a Details output from the originating alert. |
| console.log("Ticket = " + JSON.stringify( zdPayload, null, 3 ) ); | Prints the entire contents of the ticket payload to the log. It uses JSON.stringify to convert it to JSON; otherwise, it appears in the log as "[object Object]" |
| var apiResponse = apiRequest.write( zdPayload ); if (apiResponse.statusCode == 201) { var response = JSON.parse( apiResponse.body ); output["ID"] = response.ticket.id; output["Ticket Created"] = "true"; console.log("Ticket Created: " + response.ticket.id); } else { output["Ticket Created"] = "false"; console.log("Ticket Creation Failed"); } |
Sends the final payload to Zendesk. If a 201 response is returned, the "ID" output is populated with the Zendesk ticket ID, the "Ticket Created" output is populated with true, and "Ticket Created: <Zendesk ID>" is written to the log. If another response is returned, the "Ticket Created" output is populated with false and "Ticket Creation Failed" is written to the log. |
| console.log("End Step: Zendesk Create Ticket"); | Wraps up the step processing by writing a message to the log. |
Step 6: Deploy your custom step
After you've set up your custom step, we recommend you test it by adding it to a flow and kicking off whatever action triggers the flow. If you encounter runtime issues, check the Activity panel for clues about what the problem might be.
After you're happy with how the step functions, go back to the Settings tab and set Current State to Deployed. Anyone with permission to use the step can now add it to their flows.
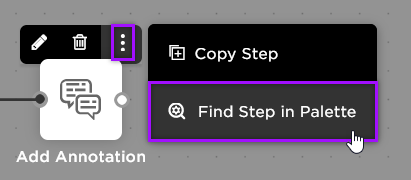
If you need to locate a step from your flow in the palette, hover over the step and click the options menu (the vertical ellipses icon). Select Find Step in Palette from the menu that appears. This highlights the step in the palette so you can easily find it to make changes or review version information.
If a step is deprecated or withdrawn, click Find step in palette and select one of the following options:
- Find New Version to find a newer version in the palette.
- View Deprecated Version/View Withdrawn Version to review version information in the step configuration.