ServiceNow Action
The built-in ServiceNow Action trigger initiates a flow when it receives a request from a ServiceNow webhook within the Everbridge Flow Designer app for ServiceNow.
- Go to the Triggers tab in the palette, expand the App Triggers section, and drag the trigger onto the canvas.
- Double-click the trigger (or click the pencil icon).
- When you first open the trigger, you must select an existing flow trigger form or create a new one to associate with the trigger. The flow trigger form layout will be used as the request submission form for a ServiceNow action. When you run the action, the flow will be triggered.
- Click Next to open the Endpoint tab.
- Select an existing ServiceNow endpoint or configure a new endpoint that points to your ServiceNow instance. You must associate the trigger with an endpoint before you can configure the rest of the trigger settings.
- After you configure the endpoint, choose one of the available record tables from the ServiceNow instance defined by the selected endpoint.
- Click Next to enable the rest of the trigger's settings.
- On the Output Mapping tab, you can map column data from the record table you selected to this step's outputs if you want to reference ServiceNow data in connected steps. Outputs pass the ServiceNow values to steps further down the flow.
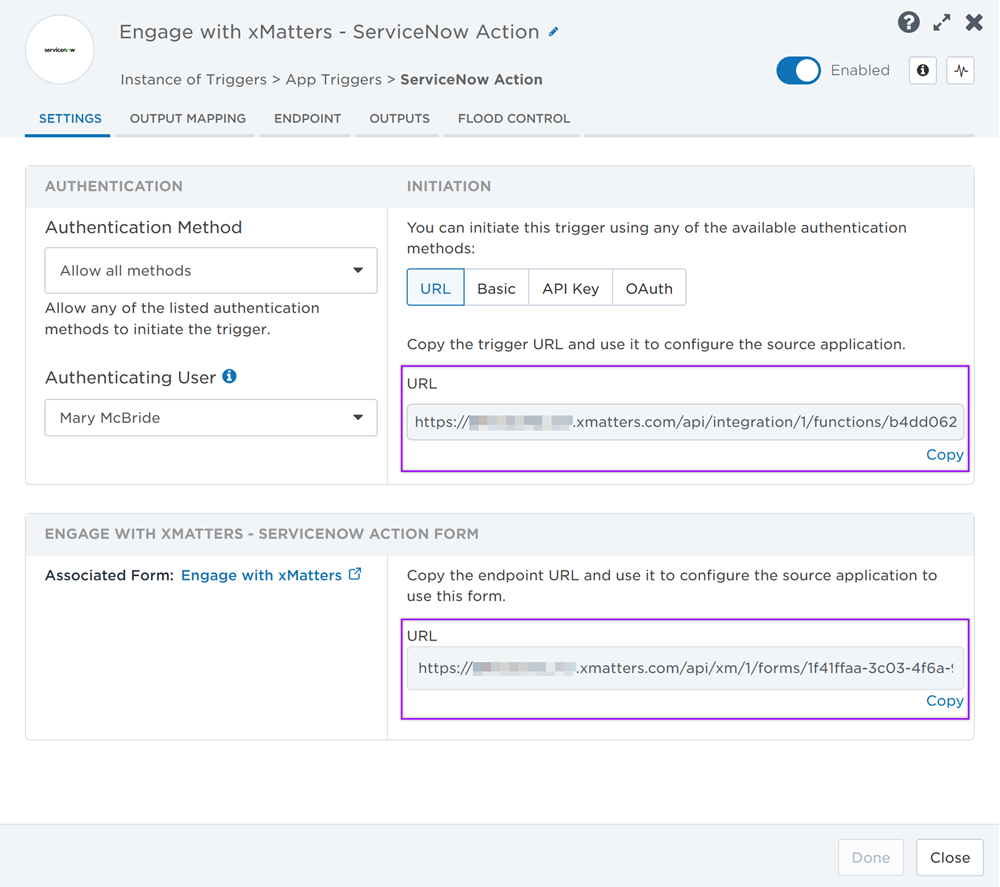
- On the Settings tab, set the authentication method (we recommend Basic Authentication or OAuth) and then copy the Trigger URL and Form URL — you'll use these URLs to set up the webhook in ServiceNow by configuring it to the 'Action' integration on the Everbridge Flow Designer app for ServiceNow. Make sure the authentication method for the trigger URL matches the one for the endpoint.
- By default, the workflow notifies the user or group assigned to the ServiceNow incident.
- Click the Flood Control tab to edit the trigger's default flood control settings. For more information about these settings, see Trigger Flood Control.
- Click Done.
- On the flow canvas, connect the steps you want to run when xMatters receives a request to that URL.
You're now ready to configure ServiceNow to target the trigger.
Configure ServiceNow to send requests to the trigger URL
Prepare ServiceNow
To have ServiceNow send alerts to the flow trigger, you need to configure a webhook and set it to use the trigger URL.
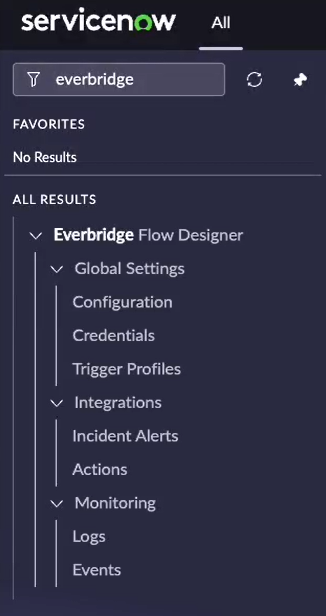
There are a couple of steps to get ServiceNow ready to integrate with xMatters — first and foremost, installing the Everbridge Flow Designer app. However, you also need to create a user in ServiceNow to make requests and assign the user specific roles installed with the application.
Go to the ServiceNow store at store.servicenow.com and install the free Everbridge Flow Designer app in your ServiceNow instance.
After you install the app, you should see the Everbridge Flow Designer menu in your ServiceNow instance.
Flow Designer will need ServiceNow credentials to be able to perform actions like update the ServiceNow incident status, assignment, or add comments and work notes.
To configure the ServiceNow endpoint in Flow Designer, you need the username and password for a ServiceNow API user to handle REST requests from Flow Designer to ServiceNow. To access the REST endpoint and make the required integration requests, this user must have the itil or itil_admin roles (added with the Everbridge Flow Designer app). These roles have permissions to modify records and fields in the designated table.
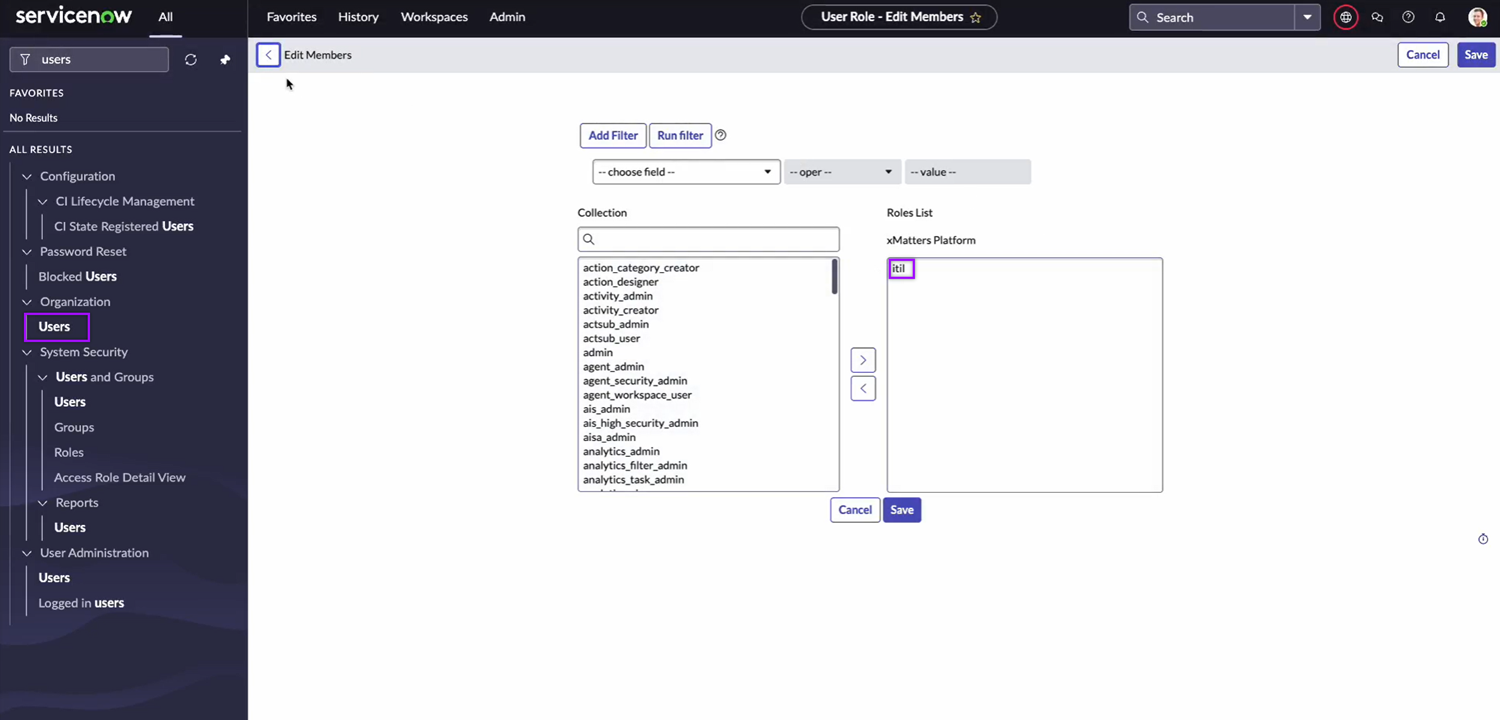
For information about adding users and assigning roles in ServiceNow, refer to the ServiceNow documentation.
Configure xMatters
Now that you've completed the first part of the configuration in ServiceNow, it's time to configure xMatters.
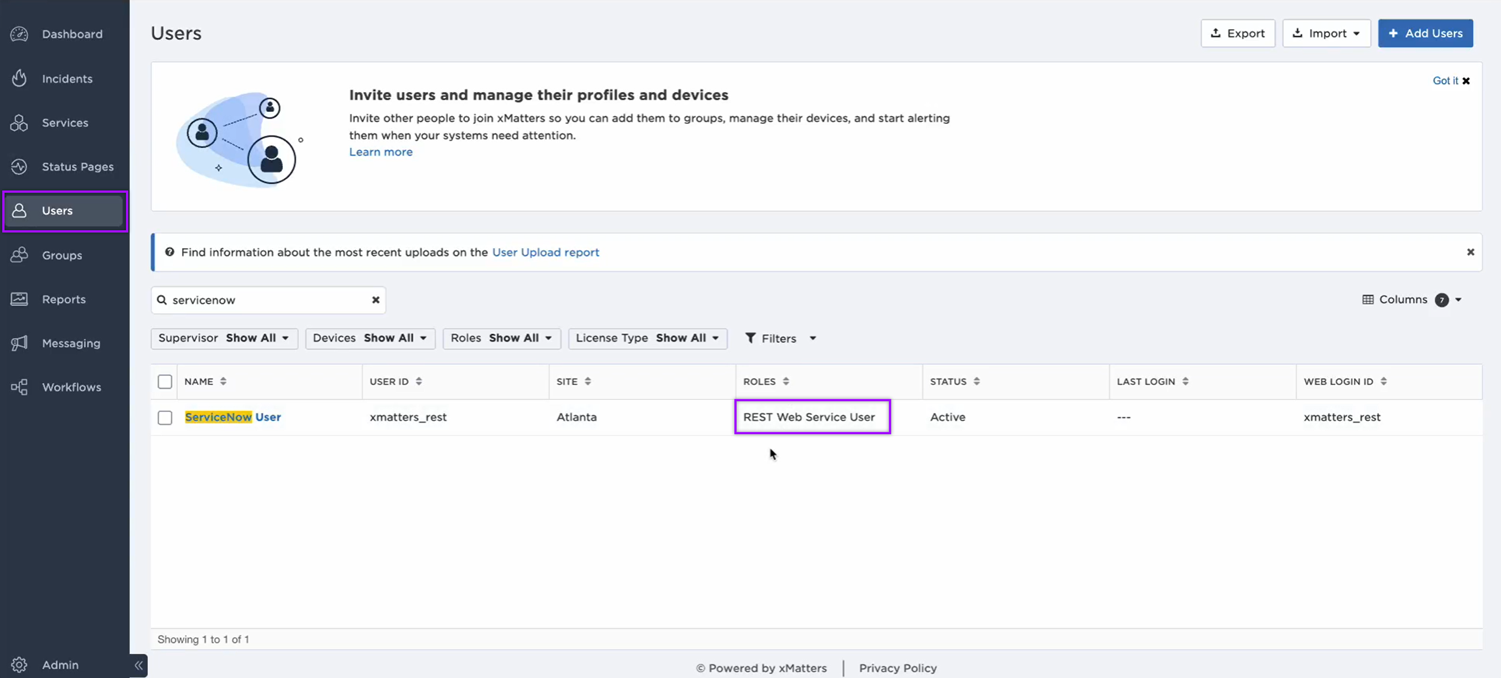
The trigger requires a user who can authenticate REST requests from ServiceNow to xMatters when working with alerts.
If you’re using Basic Auth, you need
- An API key or secret
- To obtain the API key, go to the user’s page, select the More Actions drop-down, then click Manage API Keys.
- The user ID and password of the xMatters integration user
If you’re using OAuth, you need the following information for authentication while setting up an integration:
- xMatters instance client ID
- To obtain the client ID, go to Workflows, then under Authentication, click OAuth.
- The user ID and password of the xMatters integration user
To set up an endpoint to connect to ServiceNow, follow these instructions on how to configure an endpoint with a ServiceNow authentication type.
Configure the Everbridge Flow Designer app in ServiceNow
There are some global settings you need to configure on the Everbridge Flow Designer app in ServiceNow before you can set up your integrations.
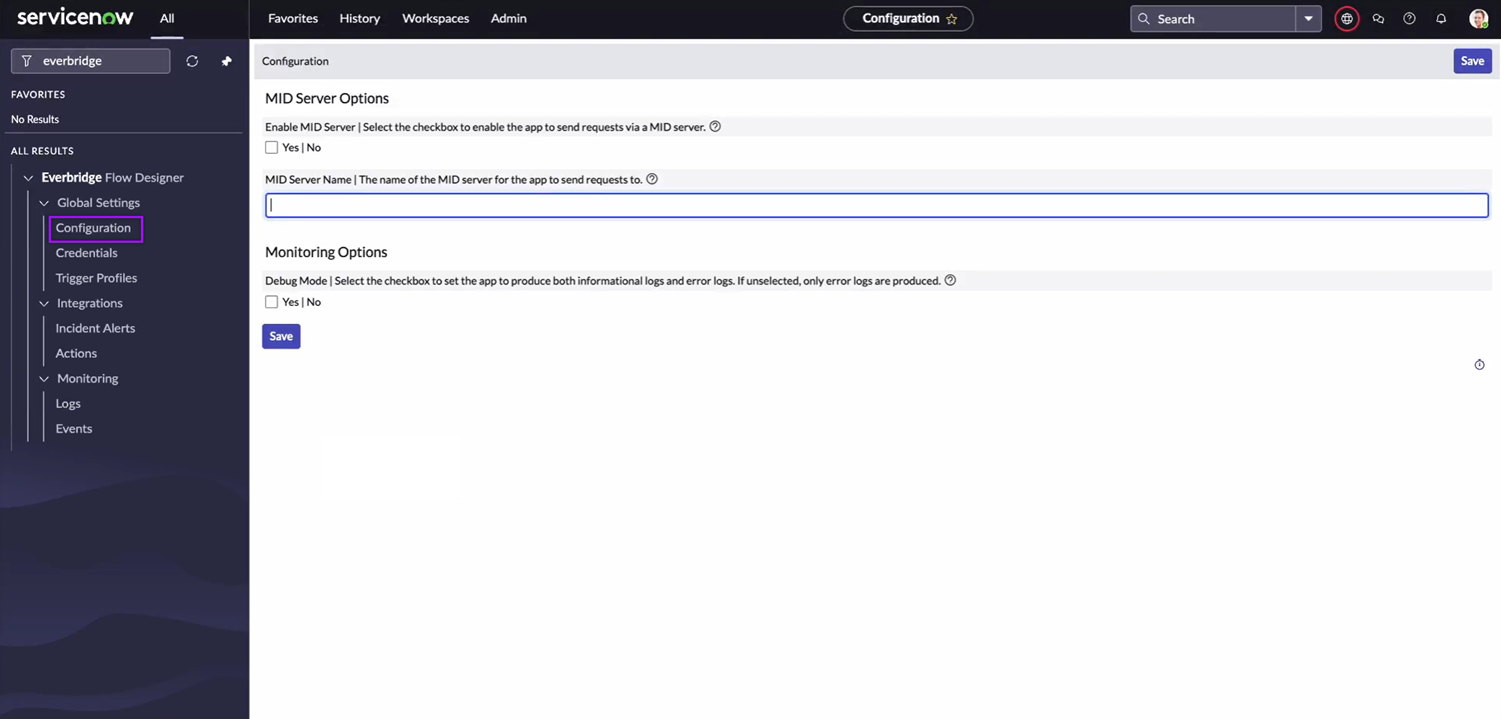
To open the Configuration page, go to Everbridge Flow Designer → Global Settings → Configuration, then configure the following options:
- Enable MID Server: If you’re using a MID server, select the check box and type the name of the MID server. If not, leave it unchecked.
- Debug Mode: You can enable debug mode by selecting the check box under Monitoring Options. If the check box is selected, more details will be logged in the Logs page under the app menu to help identify the cause of potential issues.
Click Save to save your changes.
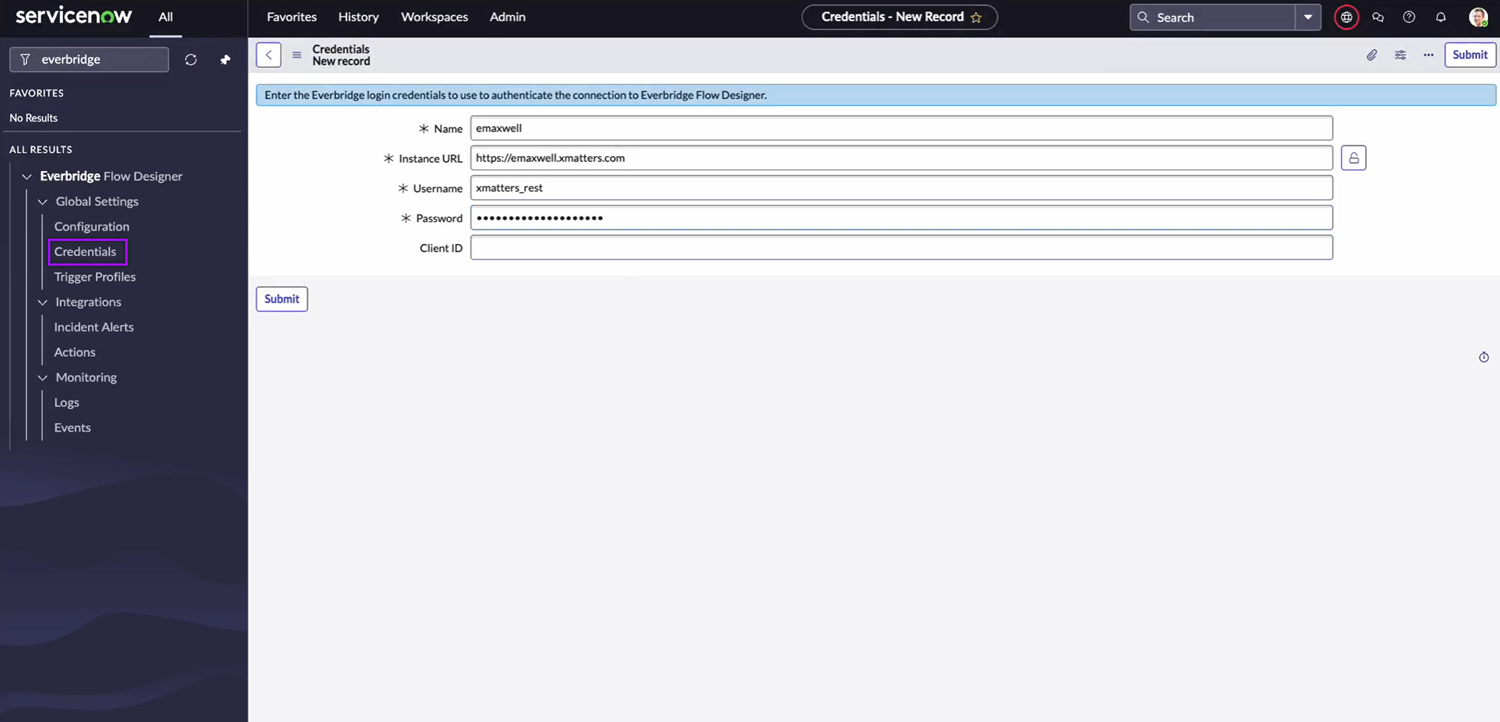
To open the Credentials page, go to Everbridge Flow Designer → Global Settings → Credentials, then fill in the following fields to create a credentials record:
- Name: Enter a name that describes this credentials record (e.g., the name of your xMatters instance)
- Instance URL: Type the Base URL for Flow Designer. Format: https://example.xmatters.com
- Username: Type the username of the user who will be used to connect to Flow Designer.
- Password: Type the password of the user who will be used to connect to Flow Designer.
- Client ID: If you used OAuth to connect to Flow Designer, enter the client ID. If you used Basic Auth, leave this field blank.
Click Submit to create the credentials record.
ServiceNow has implemented stricter cross-scope permissions starting with the Australia release. The new security features are enabled by default for new Australia instances, but are disabled by default for instances upgraded to Australia.
Table attributes and Glide properties
If you enable the cross-scope permissions security enhancement for an instance that was created before the Australia release, your organization's admins may need to add the following properties to some integrations:
- The table attribute enforce_dot_walk_cross_scope_access, which enforces dot-walk access restrictions for individual tables. You only need to add this attribute to tables created before the Australia release, as all new tables in an instance upgraded to Australia will have this attribute automatically applied.
- The Glide property glide.script.dot_walk.enforce_cross_scope_access_all_tables, which applies enforcement of the dot-walk access restrictions to all tables in your instance when set to 'true'. This property is automatically added to instances upgraded to Australia but is set to 'false' by default.
Cross-scope privilege (CSP) records
The Everbridge Flow Designer app installs the cross-scope privilege (CSP) records required for
You may need to create additional CSP records for the following scenarios:
- You customized your incident implementation.
- You set up Action integrations for tables other than the incident table.
- You encountered a cross-scope warning while running an integration.
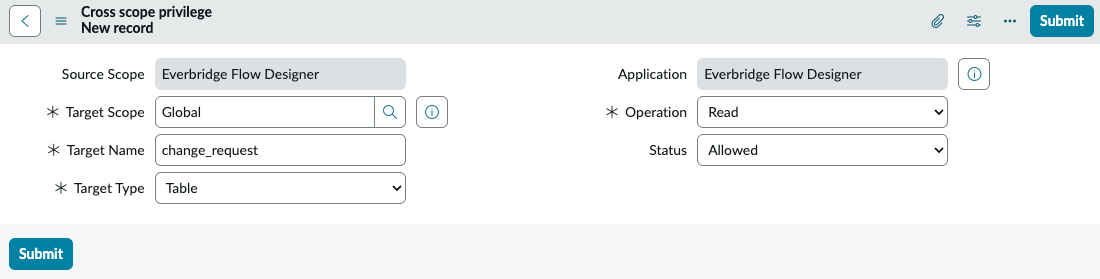
Before creating a CSP record for a table, first set your application scope to 'Everbridge Flow Designer', then go to System Applications→ Application Cross-Scope Access and fill in the following fields to create a CSP record:
- Source Scope: It should already be set to 'Everbridge Flow Designer'.
- Target Scope: Type 'Global'.
- Target Name: Enter the name of your table.
- Target Type: Select 'Table'.
- Operation: Select 'Read'.
- Status: Select 'Allowed'.
Click Submit to create the CSP record.
Configure an Action integration
The ServiceNow Action trigger needs to be configured to an Action integration in order for it to receive requests from the ServiceNow webhook.
Action integrations on the Everbridge Flow Designer app enable ServiceNow users to create actions that trigger flows in Flow Designer. Actions are linked to ServiceNow record types such as incidents and send requests to Flow Designer using the xMatters form layout as the request submission form. When the form is submitted in ServiceNow, ServiceNow will send the form values along with contextual record information to Flow Designer. Users can run an action without having to fill in a form by associating an empty xMatters flow trigger form with the trigger.
Configure a ServiceNow action
In this setup, you'll configure an action that will trigger a signal to Flow Designer when it is run within a ServiceNow incident.
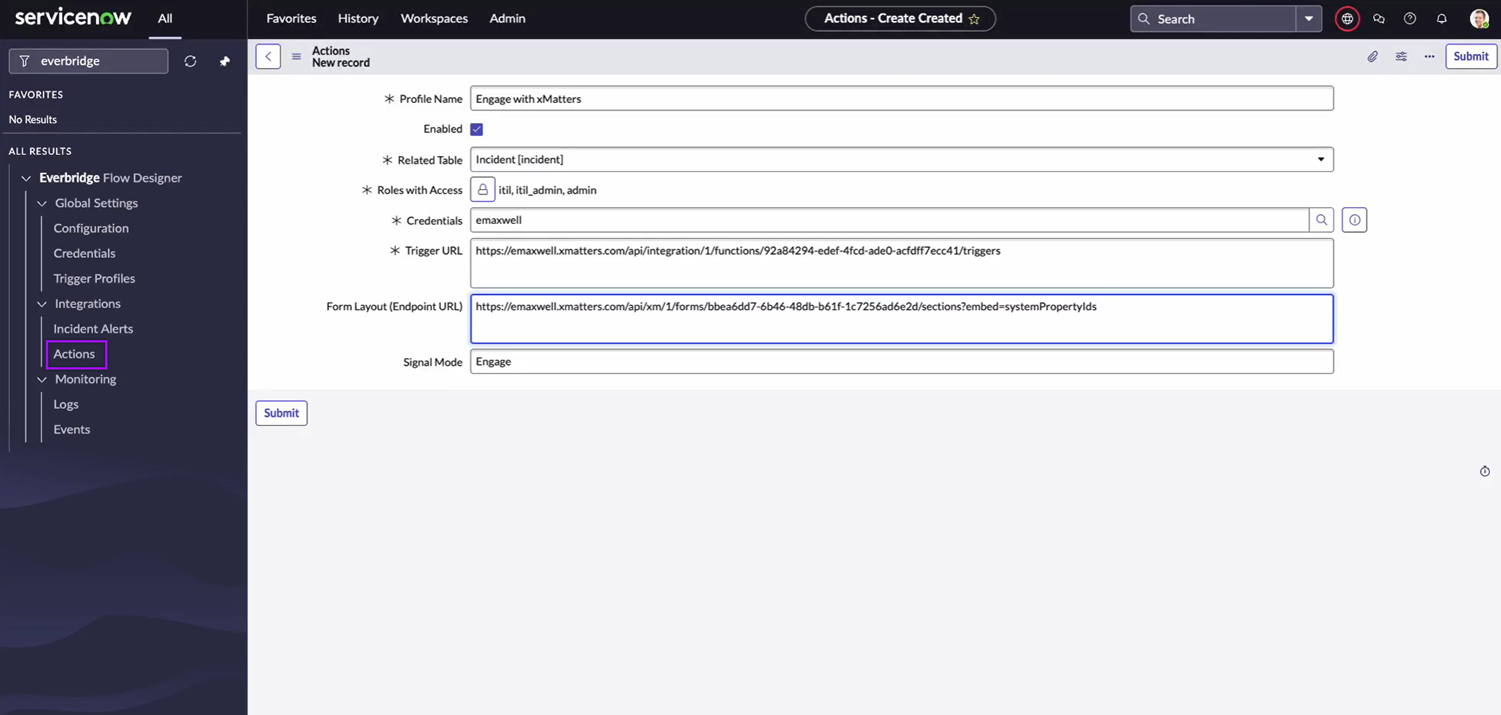
To create an action record, go to Everbridge Flow Designer → Integrations → Actions. Click New on the upper-right corner of the page, then fill in the following fields and options:
- Profile Name: Enter a name that describes this action. This is what you will see when selecting an action to run.
- Enabled: Select the checkbox so that the action will appear on the list of actions you can run.
- Related Table: Select the table for which you want the action to show up. In this case, set it to ‘Incident [incident]’.
- Roles with Access: Select the ServiceNow roles that must be assigned to users to access the action. In this case, roles like itil and itil_admin should suffice.
- Credentials: If using Basic Auth or OAuth to authenticate to Flow Designer, select the xMatters user credentials configured for this integration.
- Trigger URL: Enter the trigger URL you copied from the ServiceNow Action trigger on the flow canvas.
- Form Layout (Endpoint URL): Enter the form URL you copied from the ServiceNow Action trigger on the flow canvas.
- Signal Mode: Enter the value you want it to output as the Signal Mode in the xMatters workflow. You can set multiple actions to point to the same workflow and use the signal mode value to set which path a flow should take.
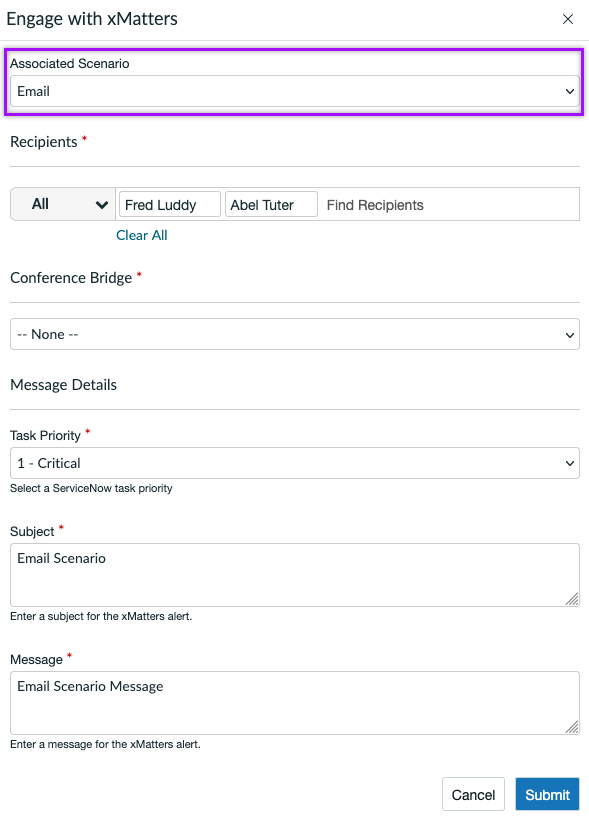
- Enable Scenario Selection in Form: Click this check box to enable selecting a scenario on the form when you run this action. Once you select from a list of scenarios associated with the form, its configured values will be loaded onto the form fields.
- Associated Scenario: Select a column from the related table. If a form scenario matches the column value, the scenario's configured values will be loaded onto the form by default when you run this action.
Click Submit once you’ve filled in all the required fields and options.
Test the Action integration
After configuring an Action integration, you can test it by following these steps:
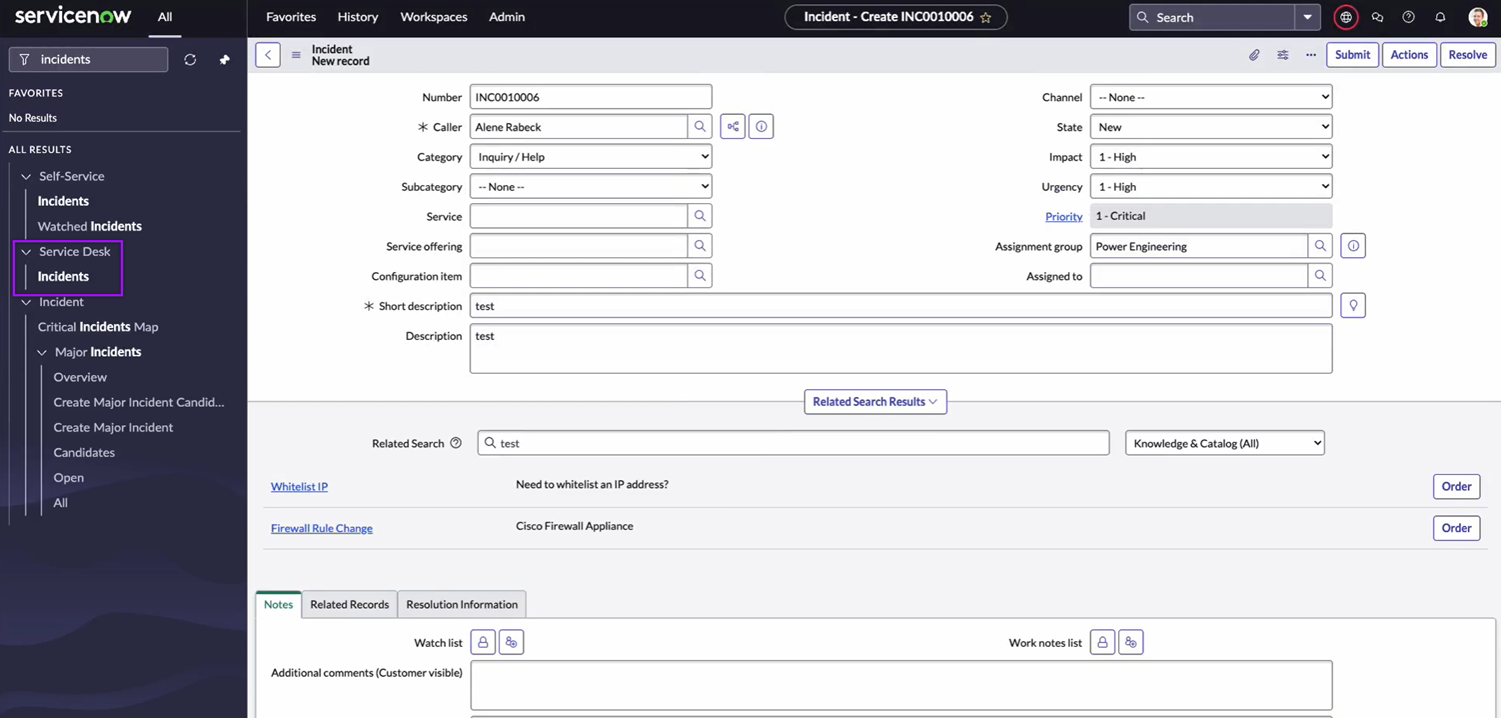
- Go to Service Desk → Incidents.
- On the upper-right corner of the page, click New.
- Fill in all the required fields.
- Click Submit.
- Go to Service Desk → Incidents.
- Open the ServiceNow incident you created.
- On the upper-right corner of the page, click Actions.
- Select the action you configured.
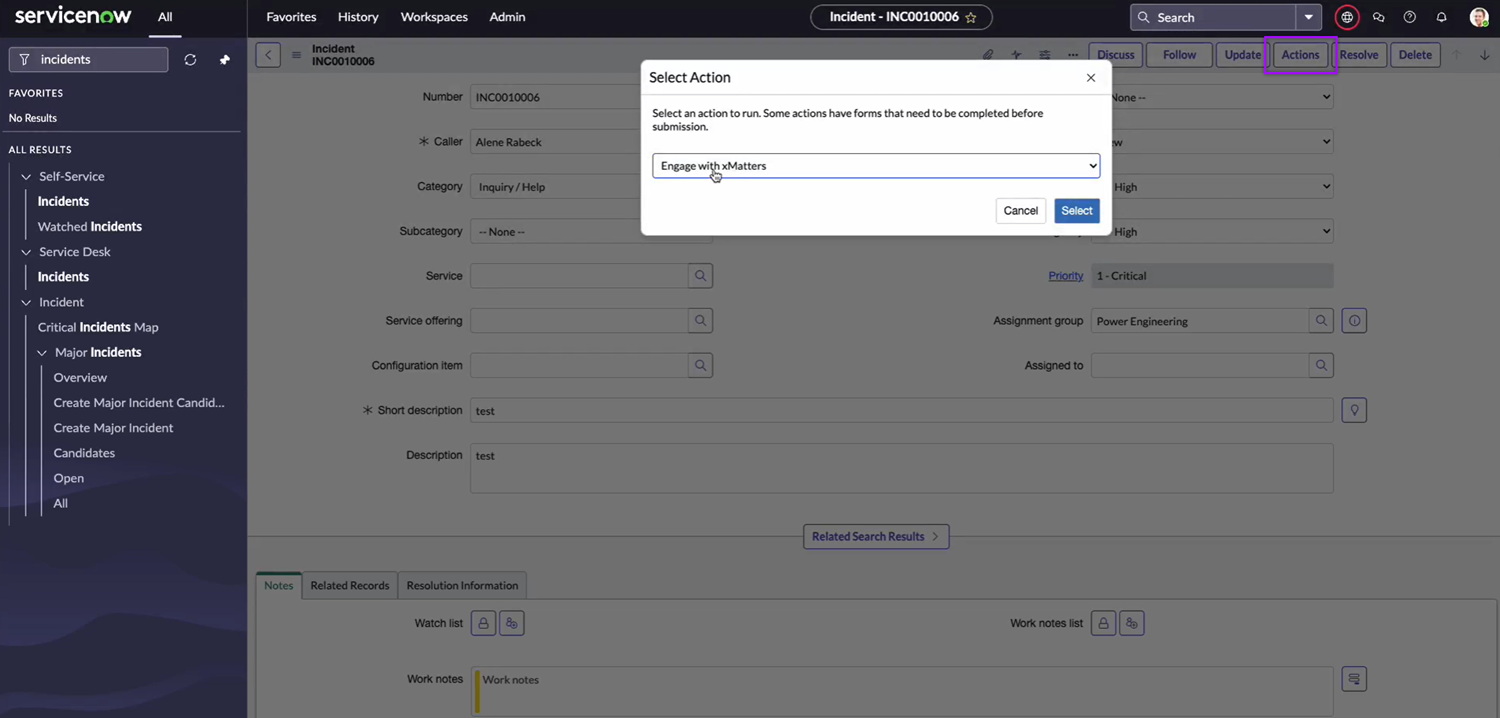
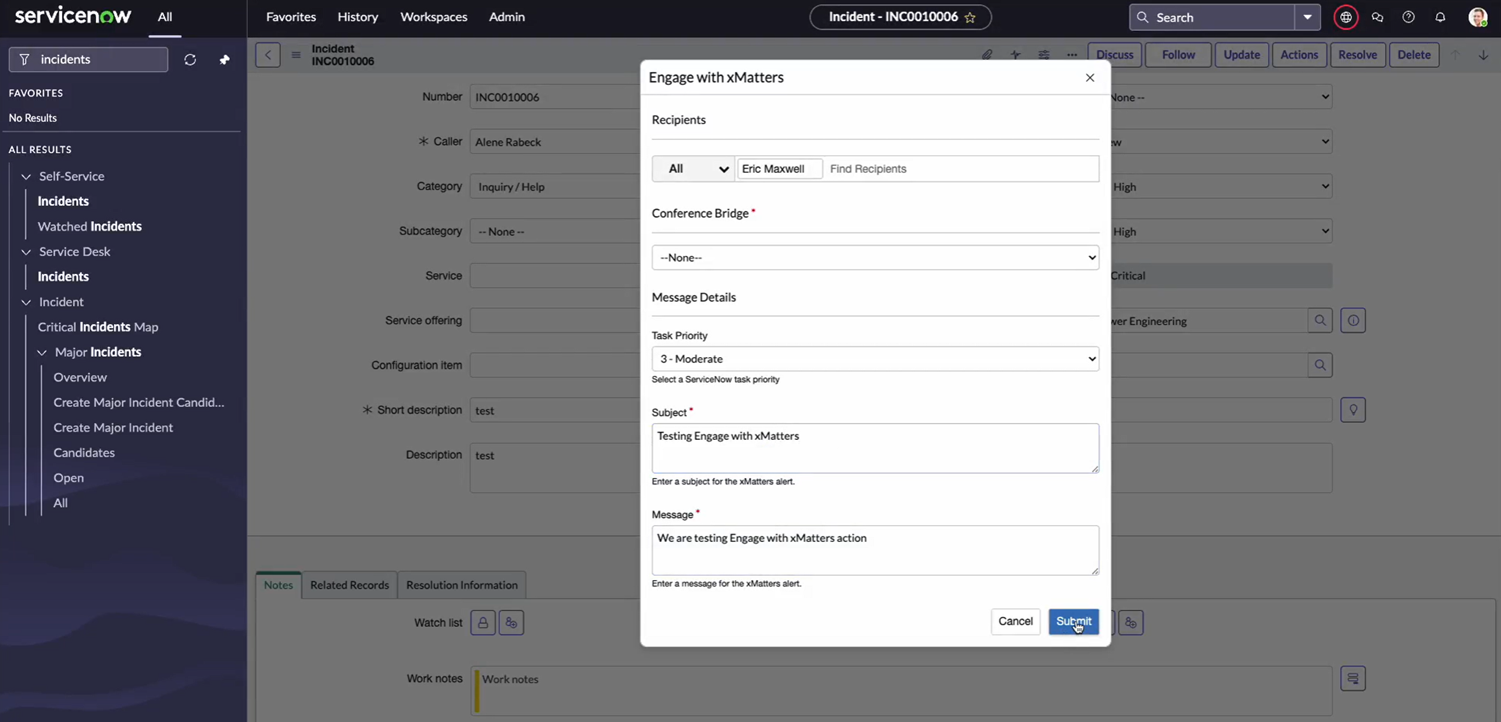
- A modal will pop up with the layout of the flow trigger form associated with the ServiceNow Action trigger. To run the action, fill in all the required fields and click Submit.
- If you want to run an action without having to fill in a form, you can associate an empty flow trigger form with the ServiceNow Action trigger. The action will run immediately once you select it.
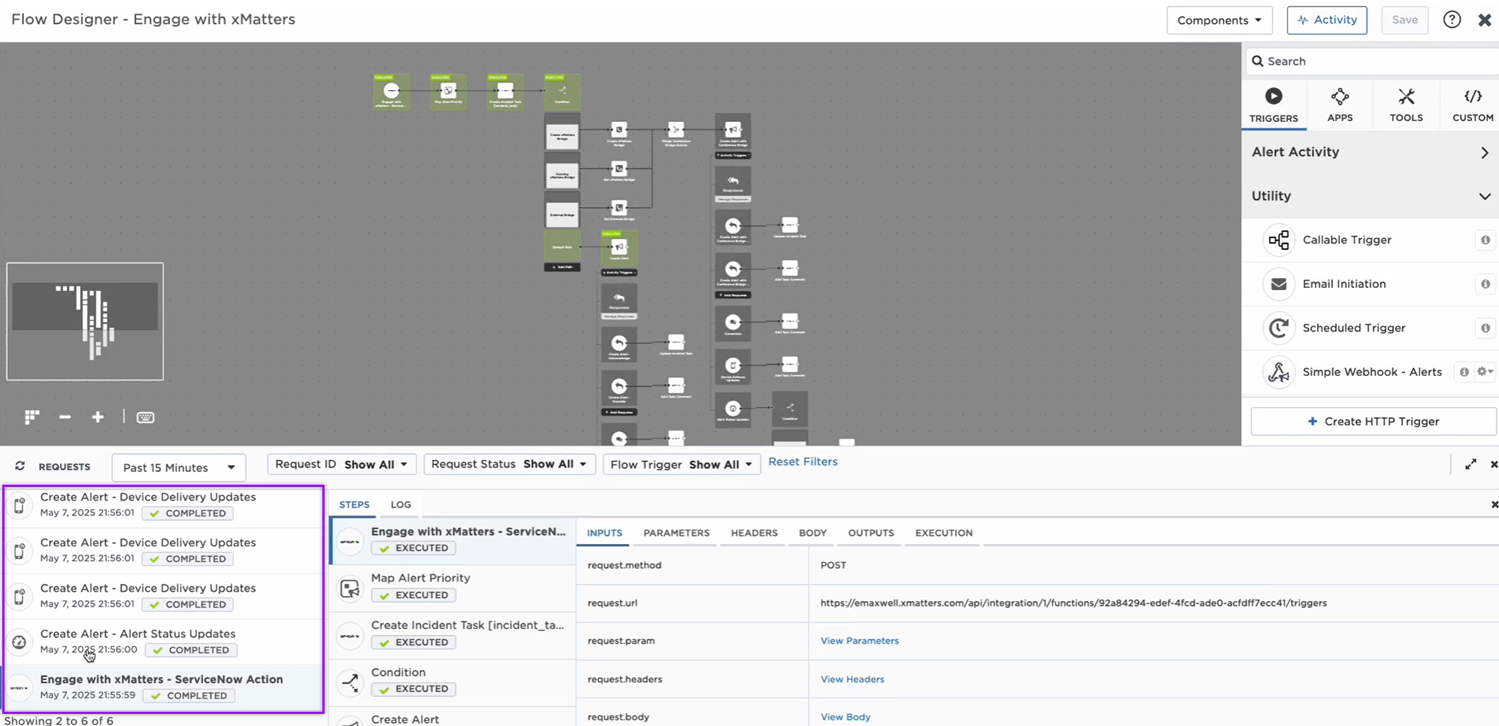
In xMatters, open the flow canvas with your ServiceNow Action trigger. Click the Activity button to open the Activity panel. You should see a log of the steps that were executed when the flow was triggered by running the action on the ServiceNow incident.
You're ready to use the webhook to trigger automated flows, including steps such as sending updates and initiating incidents, though we always recommend testing before putting things into use.
ServiceNow Action trigger outputs
The trigger has the following outputs you can use as inputs to steps further along the flow, including values for a ServiceNow major incident. If you mapped column data from the record table to the step's outputs on the Output Mapping tab and customized the layout of the flow trigger form associated with the trigger, they'll also be listed as output properties.
|
Label |
Description |
|---|---|
| Signal Mode | Determines the flow path to follow. Set when configuring integration settings in ServiceNow. |
| ServiceNow URL | Base URL of the ServiceNow instance. |
| Table Name | The name of the record table in ServiceNow where the record was created. |
| Table Label | The label of the record table in ServiceNow where the record was created. |
| Record URL | URL of the record generated by GlideSystem. Value is calculated using the endpoint URL, table name, and record ID. |
| Record ID | Unique record ID created by ServiceNow. |
| Action Initiator Username | Username of the ServiceNow user that initiated the action. |