Update incident details
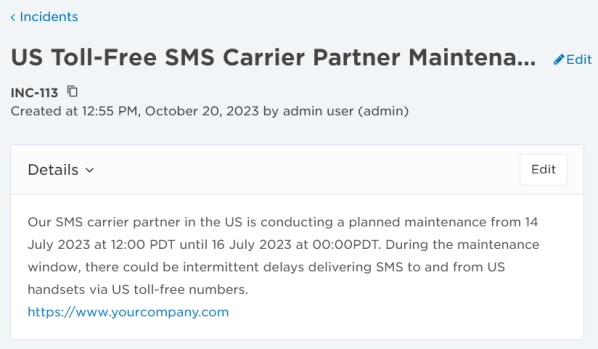
The top of the Incident Console includes information to help the incident commander and other resolvers understand the current state of the incident at a glance. This information includes the incident summary (its title), status, severity, and impact duration. A specific 'Details' section may include a longer description of the incident and specific incident properties and their values.
As an incident progresses, you can update this information to keep resolvers up-to-date, and to preserve an accurate record of the incident's progress in the timeline. When you update an incident's status, severity, or impact duration, xMatters prompts you to provide a rationale for the change. This justification is also recorded to the timeline to support post-incident analysis and reporting.

The incident's summary and description provide contextual information about the issue impacting the systems or services. The initial values of these fields are provided by the person or workflow that initiates the incident in xMatters. This information helps you triage the incident, understand which services or systems are affected, and identify who you need to engage to resolve the issue.
The incident summary appears as the title of the incident on the console and in the Incidents list. It's a good idea to keep the summary short and include only key information to help categorize the incident. The description field in the Details section is larger and better suited for providing more detailed background information about alerts leading up to the incident or the affected services. You can include URLs in the incident description (using HTTP or HTTPS protocol) and they'll appear as clickable links in the console.

As the incident progresses, you can update the summary and description to clarify details about the incident, or to provide further contextual information as it becomes available. Although the incident timeline is used to record resolver activities and notes, the description field is a useful place for making critical details immediately available without having to scroll through the timeline.
To update the incident summary:
Click Edit next to the incident summary to edit its value.
To update the incident description:
- Click Edit in the Details section, or hover over the description and click Edit.
- Modify the incident description.
- Click Save.
Depending on the type of incident, the Details section of the Incident Console may include specific incident properties and their values. These are typically used to present key information about the incident to resolvers.
To update the values of incident properties:
- Click Edit in the Details section, or hover over the property and click Edit.
- Modify the values of incident properties that you want to update.
- Click Save.
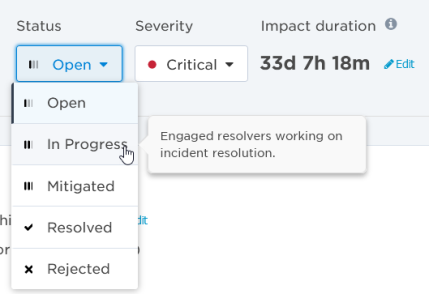
The status field indicates the state of the incident resolution process. Incidents default to an 'Open' status when they are initiated in xMatters. When the incident commander or other resolvers begin working on the incident, they set the incident status to 'In Progress' to indicate that they are engaged in resolving the issue. They can then move the incident through the remaining resolution states as the incident's life cycle progresses.
You can also move the incident back to a previous state if necessary. For example, if you had progressed the incident to the 'Mitigated' status and then realized the impact was not truly mitigated, you could set the incident back to 'In Progress'.
When you mark an incident as 'Mitigated' (or 'Resolved', if you bypass 'Mitigated'), xMatters automatically sets the end of the incident's impact duration to the current time. If you later move the incident back to 'Open' or 'In Progress', xMatters clears the impact duration end time and recalculates this metric.

The following table displays the available statuses xMatters:
| Status | Description |
|---|---|
| Open | Incident triage and analysis underway. The default status of an incident when it’s created. Initial responders are notified and can begin to triage and analyze the incident. |
| In Progress | Engaged resolvers are actively working on incident resolution. |
| Mitigated |
Users or services are no longer being impacted, but resolvers are still actively engaged in monitoring and incident resolution. |
| Resolved | Services have been restored, and the incident no longer requires active resolvers. No further notifications will be sent and responses will not be processed. |
| Rejected | Reject incidents to reduce noise, eliminate duplicates, or exclude incident floods from analytics. |
The 'Rejected' status is especially useful for duplicate incidents that can occur when an alert triggers a flood of duplicate incidents in xMatters; assigning duplicate incidents the 'Rejected' status excludes them from incident response metrics.
To update the incident status:
- Click the Status drop-down and select a new value.
- xMatters displays the Update Incident Status dialog box, with a summary of the new status.
- Provide a reason for the change in status to add a note with your rationale to the incident timeline.
- If you're updating the incident's status to Mitigated or Resolved, you can adjust the start and end of the impact duration.
- Click Update.
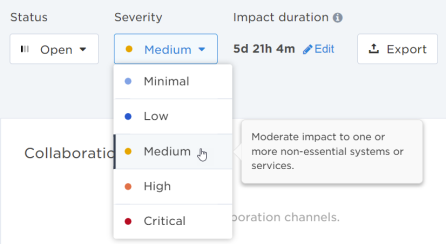
The severity of an incident indicates the impact on the service or system and the level of response that's required. Things to consider when setting this field can include the length of time of the outage, the effort required to mitigate and resolve the issue, and the potential business impact. Your organization may establish different criteria they use to classify how severe an incident is.
The incident's initial severity is assigned by the person or workflow that initiates the incident in xMatters. It's important that the people assigning severity understand the organization's established criteria and apply them consistently across incidents, as this value lets incident commanders prioritize which incidents require attention more quickly and which can wait.
Depending on your organization's protocols and reporting purposes, you may adjust an incident's status as it progresses. For example, some organizations may update the severity to 'Minimal' as an incident is mitigated, while others may retain the incident's highest severity ranking even after it's resolved so that they can compare incident severity over time in the Incidents list.

The following table displays the available severity levels in xMatters:
| Severity | Description |
|---|---|
| Minimal | Little or no impact to systems or services; no effect on customer or user access. Situation may require further monitoring. |
| Low |
Minor impact to a non-essential system or service; customers and users unlikely to experience any effects. Situation requires further monitoring. |
| Medium | Moderate impact to one or more non-essential systems or services; customers and users may experience some difficulty accessing or performing operations. Unlikely to affect service-level agreements or revenue. |
| High | Significant impact to important systems or services; customers and users cannot access or perform some essential operations. Service-level agreements may be in jeopardy, and revenue loss is possible. |
| Critical | Important systems or services wholly unavailable; customers and users cannot access or perform most essential operations. Service-level agreements are in jeopardy, and significant revenue loss is possible. |
The severity of an incident does not affect the priority of notifications or alerts in xMatters.
To update the incident severity:
- Click the Severity drop-down and select a new value.
- xMatters displays the Update Incident Severity dialog box, with a summary of the new severity.
- Provide a reason for the change in severity to add a note with your rationale to the incident timeline.
- Click Update.
Impact duration is the length of time the incident impacted the business. By default, the impact duration starts when the incident is initiated in xMatters and ends when the incident is moved to the 'Mitigated' status (or the 'Resolved' status, if you bypass 'Mitigated').

For more accurate incident metrics, you can update the start and end times of the impact duration to better reflect the true duration of the impact. For example, the impact of the incident may have started at or before the time it was detected by a person or monitoring system, and before the incident was initiated in xMatters.
To update the incident's impact duration:
When you update the status of an incident to Mitigated or Resolved, the Update Incident Status dialog box allows you to set the start and end of the impact. You can also edit impact duration directly from the top of the console:
- Click Edit next to the impact duration's value.
- Use the date and time pickers to change the Impact Start and Impact End times.
- You can only edit the end of the impact once the incident status is set to Mitigated or Resolved.
- Click Update.