View the Notifications report
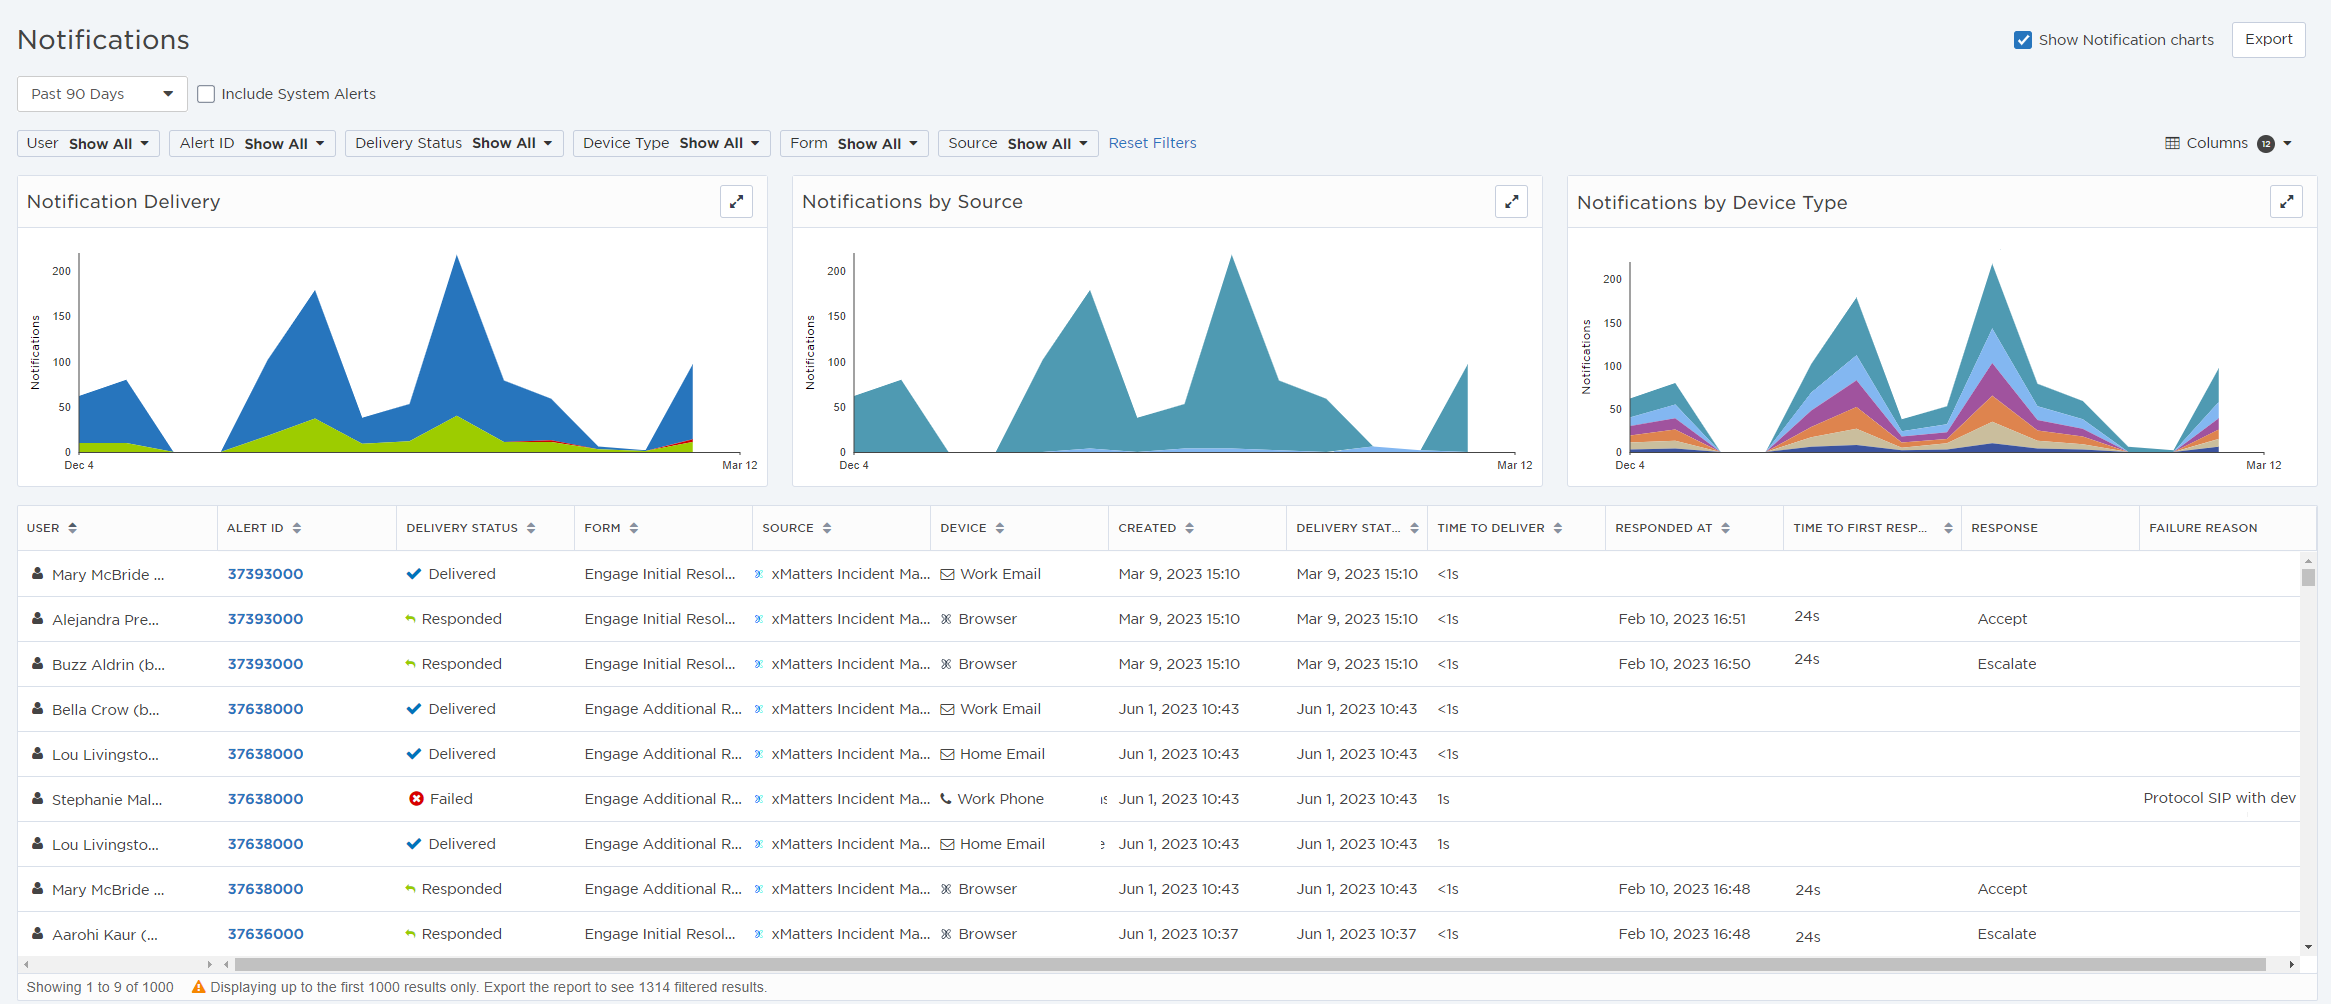
The Notifications report provides an overview of all notifications within the system, and can be used to monitor system activity during periods of load. The report contains data when the system is busy creating and delivering notifications.

- In the Reports menu, under Activity, click Notifications.
- Do any of the following:
- Specify the time period for which you want to view notifications (select a timeframe or specify a date range).
- Use the filters to adjust the information displayed in the report.
- View each notification's detailed alert information by clicking the associated Alert ID.
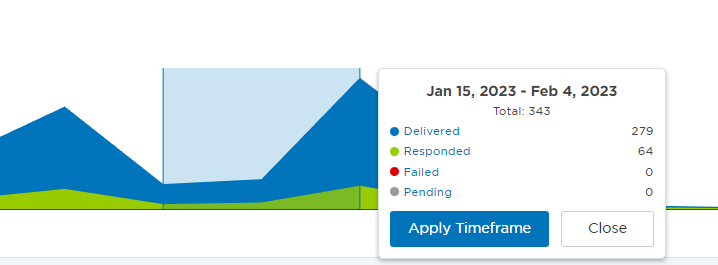
- Click and drag your pointer over the data graphs and click Apply Timeframe to highlight and summarize data for a specific time period. To adjust the selected area, move your pointer over the right or left border so that drag handles appear, then click and drag the border to a new position.

- Hover over the data graphs and click a status (such as 'Delivered') in the pop-up window to view data only for that specific status.
- Click the Expand icon to view the data graph in full screen mode.

- Select or deselect the Show Notification charts check box to display or hide the data graphs.
- Click Export to create a spreadsheet of the currently displayed report information.
The Notifications report includes the following columns:
| Column | Description |
|---|---|
| User | The first name, last name, and target name of the user targeted by the notification. |
| Alert ID | The ID of the alert that generated the notification. Click the link in this column to view the alert properties (for more information, see Detailed alert information). |
| Delivery Status |
Date and time a "Provider Delivered" response was received for this notification. This column does not appear on the Pending or Failed Notifications reports. |
| Form |
The form associated with the notification. |
| Source |
The workflow the alert was created by. |
| Device | The device targeted by the notification. Each device type is represented by a different icon, and you can mouse over the icon to view the device name. |
| Created | The date and time the notification was created in xMatters. |
| Delivery Status Time |
Date and time a "Provider Delivered" response was received for this notification. |
| Responded At |
The time and date a response was received for this notification. |
| Response |
The response returned by the user. The value in this column depends on the possible responses configured in the workflow. |
| Failure Reason |
The reason the notification failed to deliver. |
The Notifications report allows you to view data about Notification Delivery, Notifications by Device Type, and Notifications by Source so you can visualize the volume and velocity of notifications in your system.
The Notification Delivery graph displays data about the number of notifications in each of the following delivery states:
| Status | Description |
|---|---|
| Notifications |
Number of notifications created and submitted for delivery during the specified time period. |
| Pending | Number of notifications being processed, but have not yet been delivered. For more information about the conditions required for a notification to appear in this state, see Pending Notifications report. |
| Delivered |
Number of notifications successfully delivered to a provider, minus the number of notifications for which a response has been received.
Note: As used throughout this report, the term "delivered" does not necessarily mean that a notification has been received on a specific user's device, nor does it mean that a user has seen or heard the message. In this case, "delivered" means that xMatters has successfully sent the message to a provider responsible for delivering the message to that specific device type. |
| Responded |
Number of responses received for this alert. This number may be different than the number in the "Delivered" total, as the total number of "Responded" includes call-in responses, web browser responses, and responses via mobile apps. |
| Failed | Number of notifications that could not be delivered (all attempts, including retries, have failed). |
To more easily view data in the table, do one or more of the following:
- To sort the content of a column in alphabetical or chronological order, click the column header. (Click the header again to reverse the sort order.)
- To change the width of a column, move the pointer over the edge of the column and when the re-size icon appears, click and drag the column to the desired size.
- To rearrange the columns, click and drag a column header to a new location on the table.
- If the list contains more entries or columns than can be displayed on your screen, scroll horizontally or vertically. The system automatically loads more data as scroll down the page.
- To include or exclude information from the Notifications report, click the Columns drop-down menu. Every column (with the exception of the Alert ID) can be hidden from view to give you more screen real estate to see the things that matter to you. When you've hidden a column and want to see it again, it is added as the last column of the table.
The available filters allow you to narrow the Notifications report based on matching specific criteria. For example, you can use filters to view notifications within a specified date range, notifications which target specific device types, or by notification delivery status (for example, all 'Delivered' notifications).
You can apply one or more filters to narrow down the list of notifications. If you apply multiple filters, xMatters only returns notifications that match all of the specified filter criteria. For detailed instructions on how to use filters, see Filtering data tables.
The following table describes the available filters on the Notifications report and their values:
| Status | Values |
|---|---|
| Date Range |
|
|
Alert ID |
|
| Devices |
|
| Delivery Status |
|
| Form |
|
| Source |
|
If you need to share the Notifications report with others outside of xMatters or convert it to an editable document, you can by export the report as a multi-tabbed .xlsx file and save it to your computer.
To export the report:
- Filter the report using the search bar, available filters, and the Columns selector. (All filters applied to the Notifications report are used in the exported file.)
- At the top of the Notifications report, click Export.
Pending Notifications report
A notification will be included and displayed on the report when it meets the following conditions:
- The related alert must be active in the system.
- The notification must have been created; i.e., the delivery services must be properly configured and the notification must have been identified as a non-duplicate.
A notification is removed from the report under the following conditions:
- The notification is delivered to the provider, usually signified by the provider returning a "Provider Delivered " status update. In the rare event that no status update is received, the notification is removed from the Pending list if the user responds.
- The notification has passed the maximum number of allowable retries.
- The notification is archived. By default, xMatters archives runtime data after seven days, and purges archived data 21 days after archiving it, though this timing is dependent on your pricing plan.