User delivery
The User Delivery tab provides you detailed information about who was targeted and notified for a specific alert, if they were notified as part of a group, the delivery status, the date and time of the notification, and which devices were contacted, and how users responded.

The User Delivery tab contains the following fields:
|
Column |
Description |
|
User |
The first name, last name, and username of the user notified. |
|
Notified Groups |
The groups the user was notified as a member of, or if they received a 'Direct Notification'. Click the name of a group to see who was on call at the time of the notification. For more information, see Viewing shift on call information. |
|
First Delivery |
The date and time of the first notification attempt. |
|
Delivery Status |
The delivery status of the notification. |
| Responses |
The response option selected by the user, with the date and time the response was sent. If the user responds to a notification multiple times, for example by accepting the notification, then escalating it, the response status displays the last response provided by the user. In this case, the user's last response was "Escalate". |
|
Devices |
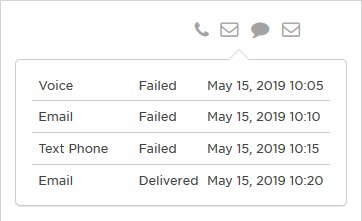
The device types notified, in order of their notification. Click the device icons to view detailed device notification information. If the device was given a specific name when it was added to a user's profile (for example "Stan - work email"), the name is displayed with notification information. If no name was provided, the device type is displayed.
|
To more easily view data in the table, do one or more of the following:
- To sort the content of a column in alphabetical or chronological order, click the column header. (Click the header again to reverse the sort order.)
- To change the width of a column, move the pointer over the edge of the column and when the re-size icon appears, click and drag the column to the desired size.
- To rearrange the columns, click and drag a column header to a new location on the table.
- If the list contains more entries or columns than can be displayed on your screen, scroll horizontally or vertically. The system automatically loads more data as scroll down the page.
You can quickly search for users that contain the search term in their first name, last name, or username. Start typing in the search bar (a minimum of two characters is required), and xMatters automatically updates the list to display users that contain the search term. The text that matches the specified criteria will also be highlighted.
To clear your search, click the 'x' in the right corner of the search bar.
The available filters allow you to narrow the users list based on matching specific criteria. For example, you can use filters to show only the users who responded to the alert (or those who did not respond), users who were notified by subscriptions, or whether users were targeted as part of a particular group or service.
You can apply one or more filters at once to narrow down the list of alerts. If you apply multiple filters, xMatters only displays alerts that match ALL of the specified filter criteria. For detailed instructions on how to use filters, see Filtering data tables.
The following table describes the available filters on the User Delivery tab and their values:
| Filter | Values |
|---|---|
| Delivery Status |
|
| Responses |
|
| Notification Streams |
|
| Notified Recipients |
|
| Targeted Recipients |
|
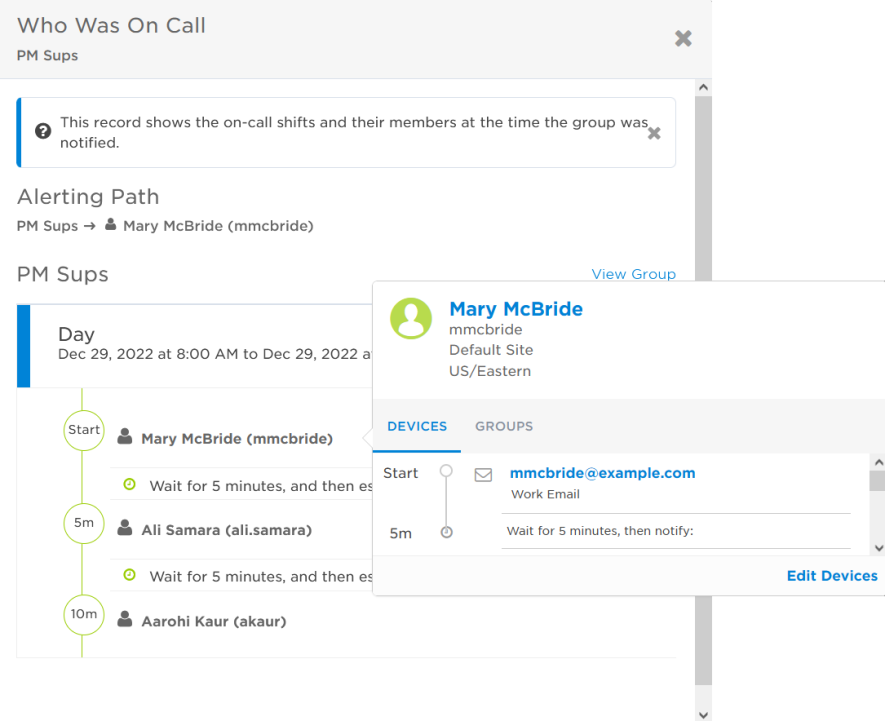
As a supervisor, you might want to see who was on call for a specific group to determine whether shifts are adequately staffed, or if the on call staff responded to alerts within an appropriate timeframe. You can click the name of a group in the Notified Groups column to view who was on-call when the notification was sent.

The Who Was On Call window opens and displays historical data for the group, shift, and users who were on call at the time of the notification, including temporary absences and their replacements, and the alerting context. If there are multiple shifts they are also displayed, and the first five escalation levels for each group are shown. For users with the appropriate permissions, you can click a user's name in either the User Delivery window or the Who Was On Call window to see their devices and the groups they belonged to at the time of the alert.

Using the Add to Group button, you can create a new group based on a filtered subset of the users on the User Delivery tab. For example, you can add all users who didn't respond to the notification into a group and notify them again, or kick off a follow up alert for those who did respond. When you click Add to Group, you can either add the users to an existing group, or create a new group.
To export the report content to a spreadsheet (Microsoft Excel .xls format), click the Export button at the top of the report.
