Configure Single Sign On with SAML
You can configure your xMatters deployment to work with SAML (Security Assertion Markup Language). SAML is often referred to as browser or Internet SSO (Single Sign On) and can greatly increase security while simplifying user account management for organizations.
When you configure SSO for your company, users are authenticated by a centralized identity provider (IdP), and are not able to log on to xMatters natively with a user name and password unless you explicitly grant permission to do so. Instead, users authenticate with the identity provider directly, and access xMatters without entering a user name and password.
The following sections provide general information about SAML and what you'll need to implement SSO in xMatters. For instructions on how to configure SAML in your instance, see Configure SAML in xMatters.
- Ask your identity provider for the information required to configure SSO in xMatters and for certificates for each of your production and non-productions instances. For more information about these requirements, see Identity provider SAML settings.
- Ask your identity provider to set up xMatters as a Service Provider. See xMatters SAML requirements for information about xMatters SSO requirements, including encryption requirements and the xMatters assertion claim URL.
- If you have the Company Supervisor role in xMatters, you can install the certificates provided by the identity provider and configure SSO. Contact your xMatters representative if you want to use encrypted assertions.
- If you are using encrypted assertions you can locate the encryption key from the xMatters user interface after the feature has been enabled. Give this encryption key to your identity provider. For more information about configuring encrypted assertions, see Encrypting Assertions.
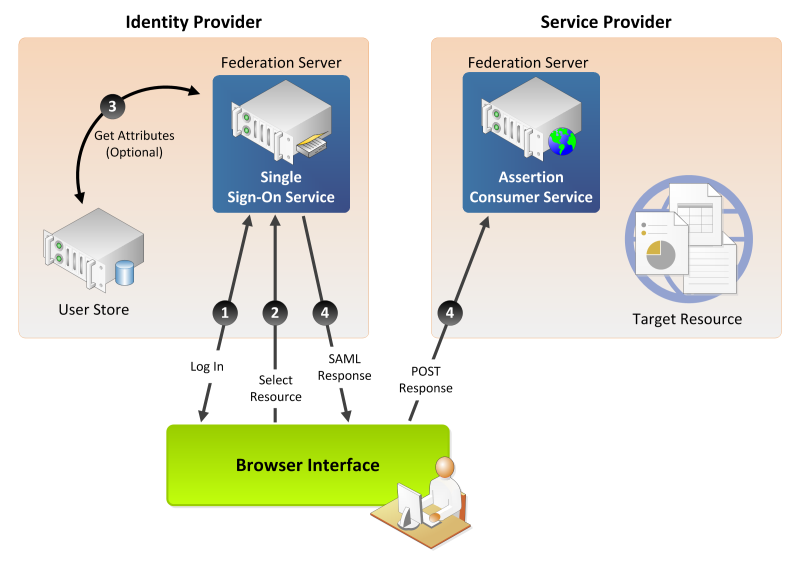
The following diagram identifies the major steps involved in SSO via SAML:

The identity provider represents the customer’s location, the service provider represents the xMatters instance, and the browser represents a user’s device. The following list corresponds to the numbered steps in the diagram:
- A user logs on to the IdP.
- The user requests access to a protected service provider resource. The user is not logged on to the service provider site.
- Optionally, the IdP retrieves attributes from the user data store.
- The IdP’s SSO service returns a Hypertext Markup Language (HTML) form to the browser with a SAML response containing the authentication assertion and any additional attributes. The browser automatically posts the HTML form back to the service provider.
If the signature and assertion are valid, the service provider establishes a session for the user and redirects the browser to the target resource.
If you are unfamiliar with how SAML works, we strongly recommend that you take advantage of the many resources on the web that explain SAML concepts. This section assumes that you have an understanding of SAML terminology and workflow, and that you have already selected an identity provider. Your identity provider may be an external cloud-based service provider, or you may manage your own identity provider.
If you have configured SAML for other service providers (e.g., Salesforce.com, Concur), you will have noticed that SAML terminology is not used consistently across implementations. To help you avoid the delays and frustration this may cause, the table below maps SAML terms you may encounter to their equivalents in the xMatters SAML implementation.
| xMatters Term | Typical SAML Terms |
|---|---|
| Identity Provider | IdP |
| Service Provider | SP |
| Identity Provider ID | Issuer, IdP Entity ID |
| Audience | Solution Provider Entity ID, Solution Provider ID |
| Certificate | Authentication certificate file, public key, Identify Provider certificate, digital signature |
| Single Sign On URL | Identity Provider login URL, SSO Login |
| Identifier Type | SAML user ID type |
| Identifier Location | SAML user ID location |
| Attribute Name | Attribute name, <Attribute>, <saml:Attribute>, <saml2:Attribute> |