Set a temporary absence
When you are unavailable to receive notifications for a period of time (for example, when you are on vacation, ill, or at an appointment), you may want to set an absence in your schedule, and possibly appoint one or more users to receive notifications on your behalf while you're away. You can configure temporary absences in advance so that if a user is replacing you, they'll start receiving your notifications on a specific date, and stop receiving them at a later date. You can create temporary absences and set up replacements for yourself, or your supervisor can do this for you.
When you or your supervisor adds a temporary absence to your schedule, xMatters sends a notification to your supervisor, the user who is replacing you (if you added a replacement), and the supervisors of any groups that will be affected to inform them when the absence will occur and for which groups the replacement applies. When your supervisor adds a temporary absence to your schedule, xMatters also sends you a notification about the absence. If temporary absences result in an empty shift, the shift supervisor is notified so adequate coverage can be maintained.
When the temporary absence period begins, xMatters automatically begins notifying your replacement. If you did not select a replacement, the notifications are discarded. xMatters then notifies the next person in a group escalation, skipping any delay that's set up after you but respecting a delay before you (even if that delay is the first thing in the escalation). When the temporary absence ends, xMatters automatically resumes sending notifications to you. If you want to start receiving your notifications before the temporary absence period ends, you can manually delete your temporary absences.
Replacements
Do I have to set a replacement?
That depends on your company; your company may have set up xMatters to require replacements. If this is the case, you're required to add a replacement when adding a temporary absence for yourself or someone you supervise.
Replacements for specific groups
When you configure a replacement to cover you for specific groups during your absence, any notifications targeting those groups will be sent to your replacement. This includes subscription notifications that target you based on your membership in a group. You will still receive any notifications that target you or your devices directly.
Replacement for all groups
When you configure a replacement to cover you for 'All Groups', any notifications that target you as part of a group will be sent to your replacement. This includes subscription notifications that target you based on your membership in a group. You will still receive any notifications that target your devices directly.
Include direct notifications
When your absence affects 'All Groups', you'll have the option to 'Include Direct Notifications'. When this option is selected, any notifications that target you as a user will be sent to your replacement, or discarded if a replacement is not set. This includes subscription notifications that target you as a user. You will still receive any notifications that target your devices directly.
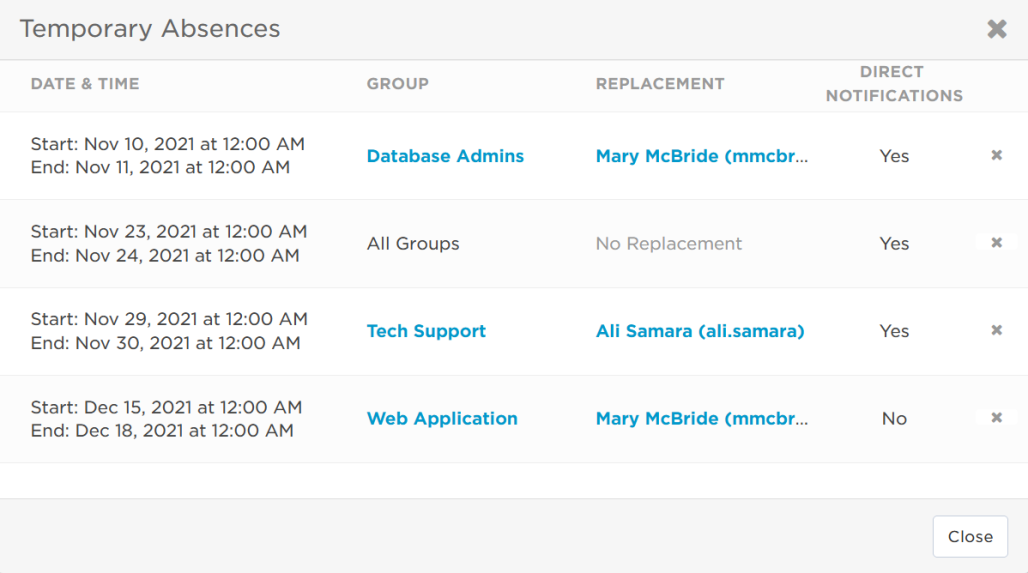
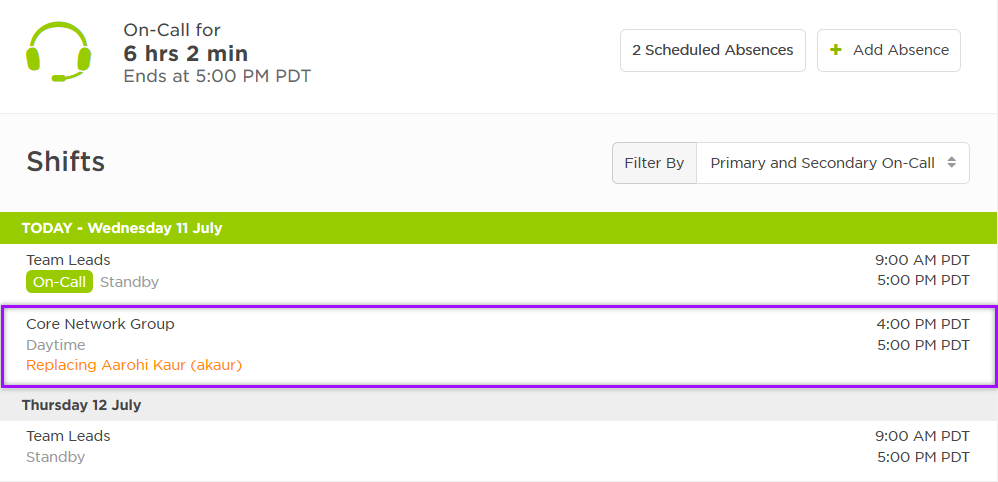
You can view your temporary absences from the Schedule tab of your user profile. The Scheduled Absences button in the-top right corner of your schedule includes a count of your upcoming absences. Click this button to view more detailed information about your upcoming absences and to delete a temporary absence.

The Temporary Absences dialog box includes a list of all your scheduled absences, the group they apply to, who your replacement is (if applicable), and if direct notifications are included.

When you are scheduled to replace another user, the shift you are acting as a replacement for will automatically appear on your calendar and indicate the user that you are replacing.

You can assign another user to replace your position within a specific group or all of your groups during your temporary absence. If you're away for 'All Groups', you can also specify whether your replacement should receive any notifications that target you directly while you're away.
When selecting replacements, you can only select users that you have permission to act on in xMatters. If you cannot view another user in xMatters, you cannot select them as your replacement.
To add a replacement:
- Click your username at the top-right corner of the xMatters web user interface. A drop-down menu appears.
- From the drop-down menu, click Schedule.
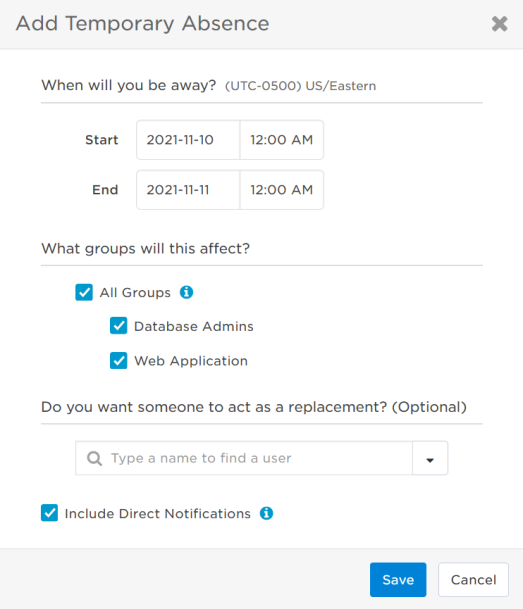
- On the Schedule tab of the user profile, click Add Absence. xMatters displays the Add Temporary Absence dialog.

- Specify when the absence will occur. Dates and times are displayed in your time zone.
- Set the Start time to when the absence begins.
- Set the End time to when the absence ends.
- Select the groups that the absence will affect, or select All Groups to apply this absence to all of your groups.
- Use the search box to locate the name of the user that you want to act as your replacement (this may be required by your company).
- If you do not select a replacement for your absence, any notifications sent to you as part of the selected groups are discarded and the next person in the escalation, if configured, is notified.
- If you configured your absence for 'All Groups', select if you'd like to Include Direct Notifications in your absence. When this option is selected, notifications that target you directly (not as part of a group) will also be sent to your specified replacement. If this option is selected and you do not specify a replacement, these notifications will be discarded.
- Click Save.
- If you can't save the temporary absence, you might be required to specify a replacement.
You can add a temporary absence for other users that you have permission to manage. This is helpful when one of the users you supervise does not regularly use the xMatters web user interface.
- On the Users list, use the search bar or available filters to locate the user you want to create an absence for.
- Click the user's name. The Schedule tab of the user's profile is displayed.
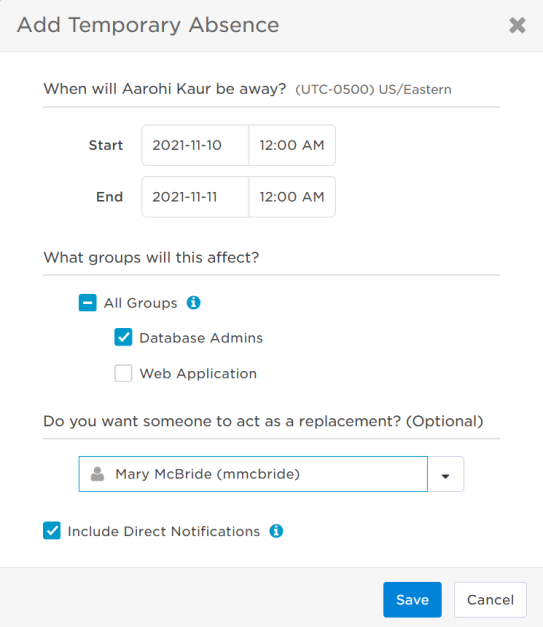
- In the top-right corner of the Schedule tab, click Add Absence. xMatters displays the Add Temporary Absence dialog.

- Specify when the absence will occur. Dates and times are displayed in the time zone of the absent user.
- Set the Start time to when the absence begins.
- Set the End time to when the absence ends.
- Select the groups that the absence will affect, or select All Groups to apply this absence to all of the user's groups.
- Use the search box to locate the name of a user that you want to act as a replacement (this may be required by your company).
- If you do not select a replacement for the user, any notifications sent to them as part of their membership in the selected groups are discarded and the next person in the escalation, if configured, is notified.
- If you configured the absence for 'All Groups', select if you'd like to Include Direct Notifications in the absence. When this option is selected, notifications that target the user directly (not as part of a group) will also be sent to their specified replacement. If this option is selected and you do not specify a replacement, these notifications will be discarded.
- Click Save.
- If you can't save the temporary absence, you might be required to specify a replacement.
You may want to remove a temporary absence if you become available or if you want to assign another user to be a replacement.
To delete a temporary absence:
- Click your username at the top-right corner of the xMatters web user interface. A drop-down menu appears.
- From the drop-down menu, click Schedule.
- On the Schedule tab of your user profile, click Scheduled Absences to view a detailed list of your upcoming temporary absences.
- To remove a temporary absence, click the x icon next to Replacement column.

- In the Delete Temporary Absence dialog box that appears, click Delete.