Manage users
Every person in the xMatters system is a "user" defined by a set of details, including ID number, username, login password, and more. Each user has a set of permissions that define the features to which they have access.
The Users page
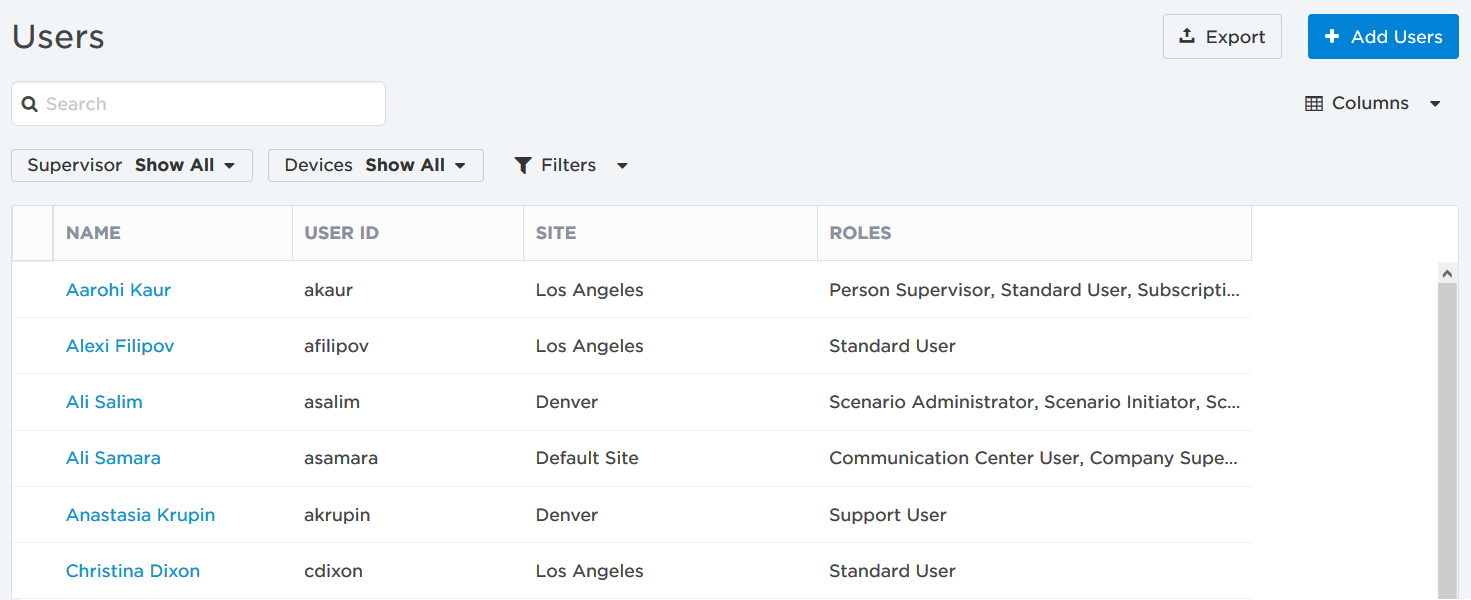
The Users page displays a list of all the users in the system that you have permission to view. You can use the search bar and filters to refine the list of displayed users. For example, you can find users that need to add, test, or update their devices, or users that don't belong to any groups. You can also export the list of currently displayed users and all of their data to a spreadsheet.

Users with similar roles and permissions to yours may see different results because the Users page does not display all of the users that exist in your deployment. Instead, it displays all the users you supervise, and any users assigned to roles that your role has permission to view (even if you would not normally be able to see those users based on their roles alone). For example, if two Person Supervisors both directly supervise the same number of users but also had permission to view people based on their roles, each supervisor would see a different number of users.
The following sections describe the actions you can perform on the Users page:
On the Users menu, under Users, click Users.
To more easily view data in the list, do one or more of the following:
- To sort the content of a column in alphabetical or chronological order, click the column header. (Click the header again to reverse the sort order.)
- To change the width of a column, move the pointer over the edge of the column and when the re-size icon appears, click and drag the column to the desired size.
- To rearrange the columns, click and drag a column header to a new location on the table.
- If the list contains more entries or columns than can be displayed on your screen, scroll horizontally or vertically. The system automatically loads more data as you scroll down the page.
- To include or exclude columns, click the Columns drop-down menu and select or clear the columns that are included. When you've hidden a column and want to see it again, it is added as the last column of the table.
The Users list includes the following columns:
| Column | Description |
|---|---|
| Name | First and last name of the user. |
|
User ID |
The user's target name. |
| Site | The user's primary location, which determines things like their time zone, default language, and site holidays. |
| Roles | The user's roles, which control the functions they're able to perform in xMatters. |
| User Status | Whether the user is toggled as active or inactive on their user profile. |
| Last Login |
The last time the user logged into the web user interface. |
| Web Login ID | The username or email address used to log into the web user interface. |
| Date Created | The date and time the user account was created. |
You can search for users that contain the search term in one of their user details fields:
- First name
- Last name
- Username
- Web login
- Email address
- SMS
- Phone number
Start typing in the search bar (a minimum of two characters is required). xMatters automatically updates the list to display items that contain (partially match) the search term, and highlights the portion of each item that matches the specified criteria. If you search multiple terms, xMatters returns users that match all of the terms.
To clear your search, click the 'x' in the right corner of the search bar.

When a user appears in the search list without any highlighted characters, xMatters found a match in one or more of the user's details that are not visible in the table, like their web login, email address, SMS, or phone number. In the example above, Melissa Campbell's email address malicampbell@example.com contains the search term.
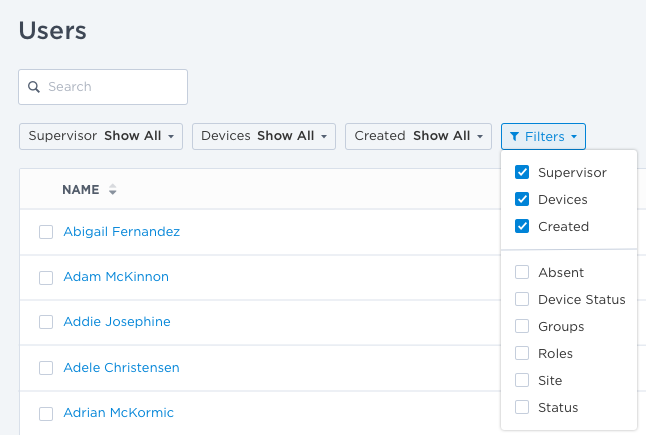
The available filters allow you to narrow the users list based on matching specific criteria. For example, you can use filters to locate all the users that you supervise, or those that have account configuration issues (such as being inactive, unsupervised, or having problems with their device configuration).

You can apply one or more filters to narrow down the list of users. If you apply multiple filters, xMatters only returns users that match all of the specified filter criteria. For detailed instructions on how to use filters, see Filtering data tables.
The following table describes the available filters on the Users page and their values:
| Filter | Values |
|---|---|
| Absent |
|
| Created |
|
| Devices |
Additional filter options for users without specific device types:
|
| Device Status |
|
| Groups |
|
| License Type |
|
| Roles |
|
| Site |
|
|
Status |
|
| Supervisor |
|
| Custom User Properties | Custom user properties used to store additional details about the users in your system are available as filters on the Users page. Depending on the type of property (text, check box, list, etc.), you can either select or search for a value. |
You can add users through the web user interface. Before adding users to xMatters, you should be aware of any naming conventions or rules regarding user IDs and numbering systems used by your organization. Users must have unique names within xMatters – you cannot create a user with the same name as any other user or group.
If you're using a Free version of xMatters, follow these instructions.
To add a new user:
- On the Users page, click Add Users in the top right corner of the users list.
- xMatters displays the Add Users dialog box.
- Specify the following details for the new user:
|
Field |
Description |
| First Name and Last Name |
The user's name. These values can be used to search for the user in the database, to check their schedule, or to look up the user or their device details. A user's name can later be changed without affecting notifications. |
| License Type |
The license type describes whether the user is a Full User, or a Stakeholder User. |
| Roles | Click in the field to see a list of available roles for your organization. For more information about roles, see Pre-defined roles. |
| Site |
The user's primary location. The site setting determines company and site holidays, phone class lists, default language, and time zone. If the user is assigned to a site that is not active (or not enabled within xMatters), they will not be able to receive notifications, so verify the site is active before selecting a new site. The Sites field does not appear if the default site is the only active site in your company. |
| User ID |
A unique identifier the user will use to log into xMatters. It also identifies them and their activities in the system. This is a mandatory alphanumeric field of up to 100 characters. This value can only be changed by a supervisor or an administrator. User IDs that contain spaces or other characters besides letters, numbers and .+-$ may not work with some advanced features such as email form initiation. |
| Web Login ID |
If you require users to log in using a different username, such as for SAML or single sign-on, deselect the Use as Web Login ID check box next to the User ID field. If specified, the Web Login ID overrides the User ID for logging into xMatters. |
| Password |
Maximum 30 characters. The password rules defined for your organization will be displayed when you begin typing in the Password field. Leave this field blank to let users set their own password the first time they log in.
For more information about password rules, see Password rules. For more information setting the password policy, see Set the password policy. |
|
Confirm Password |
Re-type the password in this field for confirmation. |
| Force Password Reset | Selecting this option requires the user to create a new password after they have logged into xMatters. For more information about forcing a user's password to expire, see Control a user's access. |
| Add an email address so you can send the user a welcome message after you've added them. | |
| Custom User Properties | Customized properties for your xMatters deployment that can be used to sort, organize, and locate users. The settings and information required in these fields are determined by your xMatters administrator, and are unique for each company. |
- To create another user immediately after you've finished adding the current user, select the Add Another User check box.
- Select the Copy Settings check box to use the same role, site, and custom field settings for the next user.
- Click Add User to create this user.
- Once you're finished adding users, click Close.
- xMatters displays the New Users screen with the users you've just added. You can optionally add these users to a group, send them a welcome message, or delete them (you can also do all these things later from the users list).
- Click Exit to return to the Users page.
If you have permission to supervise other users, you will automatically become the supervisor of any new users you create. If you do not have permissions to supervise users, the users you create will have no supervisor.
All users in the xMatters database count towards the license limit. This means that users not set as Active (i.e., on the sidebar of their user profile) are still counted for licensing purposes. For further details on xMatters licensing, contact xMatters Sales.
To add users to a Free xMatters account:
- On the Users page, click Add Users in the top right corner of the users list.
- xMatters displays Add Users dialog box.
- Specify the following details for the new user:
|
Field |
Description |
| First Name and Last Name |
The user's name. These values can be used to search for the user in the database, to check their schedule, or to look up the user or their device details. A user's name can later be changed without affecting notifications. |
| Email Address | This email address becomes the person's user ID and is also added as an email device. See Valid email address format for more information. |
| Role |
Select a Role for each user. xMatters displays the roles for your company that you have permission to assign to other users. Typically, you might want to use one of the following rules:
For more information about roles, see Pre-defined roles. |
- Click Add User to create this user.
- If you'd like to create another user immediately after you've finished adding the current user, select the Add Another User check box before you click Add User.
- The Add Users dialog box also displays your User Count: how many users you've added and how many total users you can have. Once you reach your user limit, the option to add another user is disabled.
- Once you're finished adding users, click Close.
- xMatters displays the New Users screen with the users you've just added. You can optionally add these users to a group, send them a welcome message, or delete them.
- Click Exit to return to the Users page.
xMatters includes a User Upload feature to perform bulk uploads or updates of user information using a template spreadsheet.
To upload users in bulk:
- On the Users page, click Import in the top right corner of the users list.
- From the drop-down menu, select one of the following:
- Select Create Upload to upload a spreadsheet of users.
- Select View Uploads to view the status of your upload jobs in the User Upload report.
For a copy of the template spreadsheet you can use to upload and update users, and for step-by-step instructions, see User Upload.
Groups allow you to schedule when users are on duty, the order they are notified, and how long to wait for them to respond. You can add users to a group directly from the Users page or the New Users screen that's displayed after you add new users. You have the option to add users to a new or existing group.
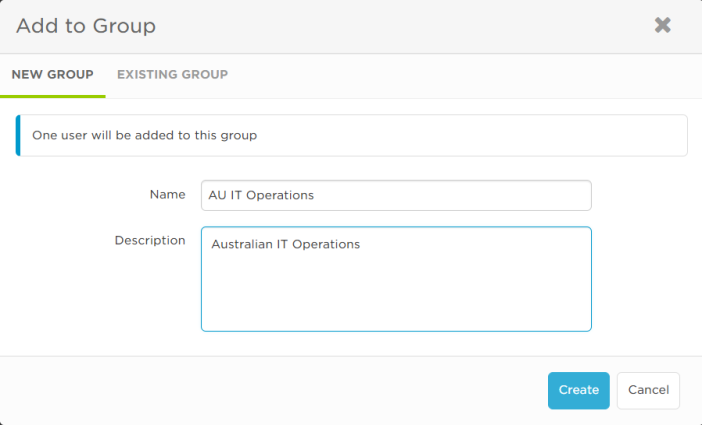
To add users to a new group:
- On the New Users screen or the Users page, select the users you want to add to a group.
- From the task bar that appears at the top of the list, click Add to Group.
- On the New Group tab, type a Name for the group and add an optional Description.
- Click Create.
- The users are added to a new default shift that is always active (24 hours a day, seven days a week). To get started creating new shifts or otherwise modifying the group, see Schedule shifts.

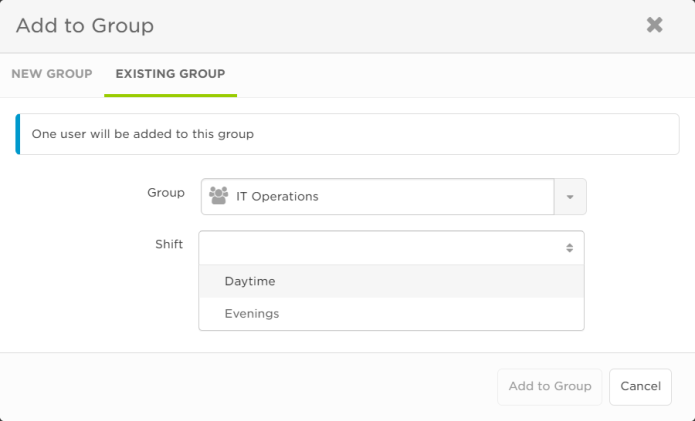
To add users to an existing group:
- On the New Users screen or the Users page, select the users you want to add to a group.
- From the task bar that appears at the top of the list, click Add to Group.
- Click the Existing Group tab.
- Use the Group drop-down to see the list of existing groups, or start typing the name of the group then select it from the list.
- If the group has existing shifts, you can use the Shift drop-down to select a shift to add the users to. If it doesn't have existing shifts, the group's name appears in the Shifts field as the default (which you can edit).
- Click Add to Group.

For more information on managing groups, viewing a group's calendar, and configuring a group's roster, see Manage on-call schedules.
Once you've added users, you can send them an email to let them know about their new xMatters account. You can send a default message that's pre-populated with their account details and basic information about xMatters, or you can customize the message to make it sound like it's coming directly from your company, rather than xMatters.

To send a welcome message:
- On the New Users screen or the Users page, select the users you want to send a welcome message to.
- From the task bar that appears at the top of the list, click the Welcome Message drop-down and select one of the following:
- Send Default Message: Send a generic email containing the users' account details and basic information about xMatters. For more information, see Send the default message.
- Customize Message: Customize the subject, body, and signature of the default message so it sounds like the message is coming from your company, rather than xMatters. For more information, see Send a custom message.
- On the Users page, click the name of a user to modify their details.
- You can only click the names of users for which you have the "View Person" permission.
- Set or edit the user's details as required.
- When you are finished making changes, click Save Changes.
Delete Users
You can permanently remove users and their information from the system by deleting them. When you delete a user, they will be removed from any groups which they are a member, and their devices, details, temporary replacement assignments, and login information will be removed. Any scheduled messages and Communication Center dashboards they own will also be deleted from xMatters.
To delete a user:
- On the Users page, use the search bar or filters to find the user you want to delete.
- Select the check box beside the user’s name, and then click Delete.
You cannot delete a user if they have active notifications, if they are the only supervisor of a group, or if they own subscriptions. In these cases, to delete them you must first terminate or wait for their active notifications to end, assign another supervisor to any groups where they are the only supervisor, and delete or change the owner of their subscriptions.
You may also need to delete the user from an external database, if you synchronize user data from an external system with xMatters. This will prevent the user from being added back into xMatters during a data synchronization process.
Deactivate Users
You can also deactivate users in xMatters to prevent them from being able to log in or receive notifications. This enables you to quickly disable an account without deleting it. Inactive users count against licensing limitations. For more information about product licensing, contact xMatters sales.
To deactivate a user:
- On the Users page, find the user that you want to deactivate, and click on their name.
- On the sidebar of the user's profile, click the toggle to make the user active or inactive.
Inactive users and their devices may appear grayed-out and struck through in different areas of the web user interface.
You can use the Export Users feature to generate a comma-delimited list of all users in the system (or a specific sub-set of users) to analyze the data in an external tool, or to import the data into another xMatters deployment. This feature generates a CSV file in the format supported by the User Upload feature. Some device information is only available to company supervisors. If you see "(privileged)" beside a device name and asterisks instead of a phone number, email address, or country name it means you don't have permission to view or edit that information. For more information, see Device Management
To export user details:
- In the Users menu, click Users.
- Use the available filters, options, and search tools to refine the list to show the users you want to export.
- The selection check boxes for individual users do not affect the Export feature; they are used only to select users for deletion.
- To export the currently displayed list of users, click Export.
- xMatters creates a file named User Export <date/time>.csv, where <date/time> is a timestamp of when the file was created.
The following table provides information about the fields included in the user export file. For more information on formatting this file to upload users, see Modify the upload template file.
| Field Name | Details |
|---|---|
| Operation |
Used in the upload process to indicate the following operations:
|
| User | User ID and web login ID |
| First Name | First name of the user |
| Last Name | Last name of the user |
| Site | Company site associated with the user |
| Externally Owned |
This field indicates if users are owned by an external management system and synchronized into xMatters Values include: TRUE or FALSE |
| External Key | The identifier of the user in the external system. |
| Password Status | Values include: Current, Unset, or Expired |
| Language |
The enabled language for the associated company used to contact the user |
| Time Zone | Time zone (e.g., US/Pacific) |
| User Supervisor | A list of user IDs of user supervisors for the user, delimited by the pipe ("|") character (e.g., bsmith | mmcbride) |
| Role | Roles assigned to the user, delimited by the pipe ("|") character (i.e., Company Supervisor | Developer | Full Access User) |
| License Type | The user's license type, either Full User, or Stakeholder User. If you don't have permission to view or set the license type, the column is excluded from the export. |
| Last Login | The last date and time the user logged into the xMatters user interface. For example: 2015-07-30 14:40:20 PDT. |
| UUID | The Universally Unique Identifier (UUID) of the user |
| Status | The status of the user in xMatters. Values include: Active or Inactive. |
| Web Login | The username or email address used to log into the web user interface. |
|
Device (e.g., Mobile Phone) |
Contact details for the listed device |
|
Device Status (e.g., Mobile Phone Status) |
Values include: Active or Inactive |
| Device Valid (e.g., Mobile Phone Valid) | Values include: Tested, Untested, or Pending |
| Custom User Properties |
Custom property types and values are assigned by administrators to help sort, organize, and locate users. Examples of custom fields might include: Department (Value = Name), Building (Value= Building number), First Aid (Value = True or False) |
| Date Created | The date and time the user account was created. |
To properly display names with special characters, such as accents and umlauts, in an external spreadsheet program, you may need to manually select UTF-8 encoding as the file origin when importing the CSV file.