Integrated properties
Integrated properties allow you to extract information from an integration and include it in your messages. For example, imagine that you want to send a notification to update people about the status of a network problem. You could use integrated properties to extract status information from the network management integration and then include these results in your forms and messages.
Once you add integrated properties to a workflow, you can use them in any forms within the plan. A workflow can contain many sets of integrated properties; however each form may use only one set of integrated properties.
Prepare your deployment for integrated properties
Before you can use integrated properties, your system must be properly configured. This configuration includes the following actions:
- The Integration Agent must be installed and running in indirect mode.
- You must have an integration service configured in the Integration Agent for the "applications" alert domain, and have a matching integration service configured on the applications alert domain in the web user interface.
- The .js file for the integration service must be updated with the actions you want to perform; i.e., code that will handle the integrated properties request.
More information about these requirements and the configuration process is available in the Integration Agent overview.
Sample integrated properties
xMatters has created a sample integration service that illustrates the basics of configuring and using integrated properties. This integration service must be installed and configured as part of the Integration Agent; contact xMattersCustomer Support for help installing it on your deployment.
The sample integration service includes a number of incidents with hard-coded data you can use to explore how integrated properties work, and use as a basis for designing your own integrated properties. If you have the sample integrated properties integration service enabled on your deployment, the following instructions explain how to configure and test its request and response properties.
Configure integrated properties
When you create integrated properties, you specify the settings required for them to access information from an external system, such as a help desk system. Before you get started, review how your integration is configured and determine the name, parameters, and return values of the available actions. (The actions must be defined and configured in the integration service's .js file, as described above, and are unique to your integration.)
Each set of integrated properties requires the following:
- Request properties identify what you are looking for in the external system and the parameters you want to pass in to the action. For example, you could add a request property that prompts a message sender to enter a specific alert number or status. Depending on the actions available in the integration service, xMatters would then return information about the indicated alert, or return the number of alerts with the requested status.
- Response properties identify the information you want to retrieve from the external system to include in your messages. For example, you might want to include the name of the person who is currently working on a change request, how long a help desk ticket has been open, or the intended address of a package delivery that's running late.
Integrated properties use the same settings workflow properties of the same type. You can specify a default value for each property to help message senders use integrated properties in a message. For more information about the settings for each property type, see Create and manage form properties.
Add integrated properties to a form
Add integrated properties to your form so they can be included in messages.
- Log in to xMatters, and click the Workflows tab.
- Click the name of the workflow for which you want to create integrated properties.
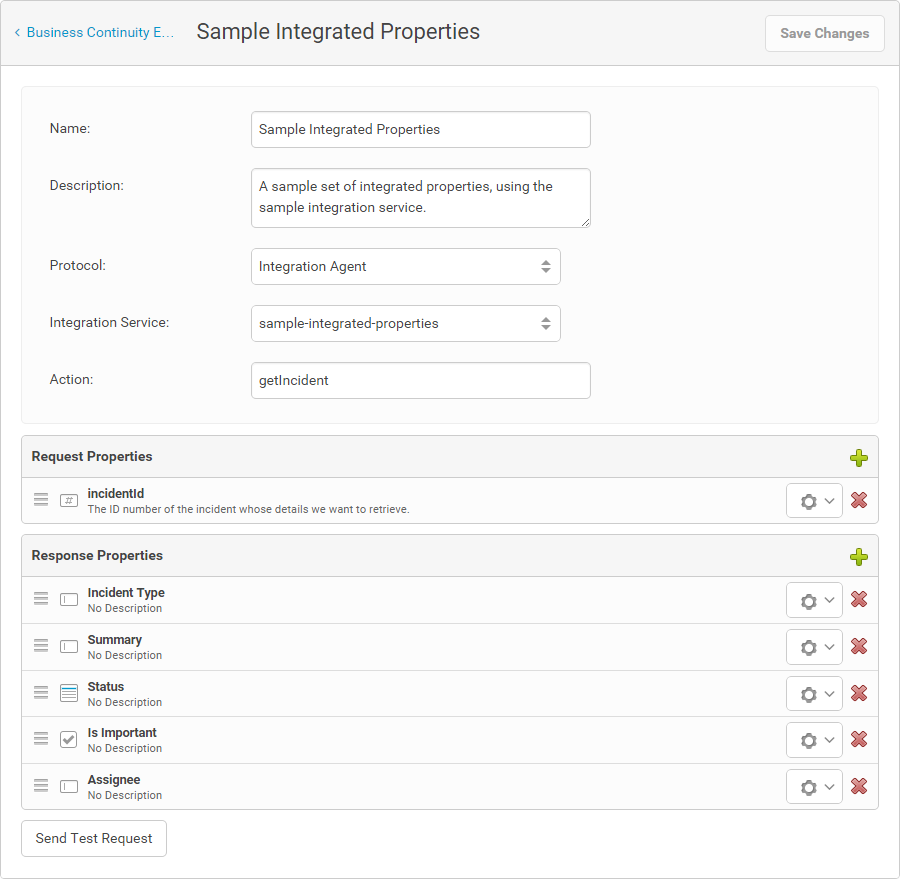
- On the Integrated Properties page, click Create Integrated Properties.
- Type a name and description, and then click Create Integrated Properties.
- On the Integrated Properties page, click Edit next to the set of integrated properties you just created.
- In the Protocol field, select Integration Agent.
- Select an integration service from the Integration Service drop-down list.
- For the sample integrated properties integration service, select sample-integrated-properties.
- In the Action field, type the name of the action that you will use to retrieve information from the integration. (This must match the action configured in the integration service's .js file.)
- For the sample service, type getIncident
- To add a request property, click the plus (+) icon in the Request Properties section, and then select the type of property to create. The names of these properties must match the names of the parameters that are passed to the action.
- For the sample integration service, click the plus (+) icon and select Number. In the Name field, type incidentId, and then click Create request property.
- To add a response property, click the plus (+) icon in the Response Properties section, and then select the type of property to create. The names of these properties must match the names of the properties returned by the integration service.
- For the sample integration service, add any or all of the following response properties.
| Type | Name | Notes |
|---|---|---|
| Text | Incident Type | Increase the Maximum Size setting to 50. |
| Text | Summary | Increase the Maximum Size setting to 100. |
| List | Status | Add "Active", "Suspended", and "Stopped" as list values. (Use commas to separate multiple items; xMatters will remove any leading or trailing whitespace for each item in the list.) |
| Boolean | Is Important | |
| Text | Assignee |
- Click Save Changes.

Test the integrated properties
Once you have finished adding request and response properties, you can use the built-in test feature to make sure you can your configuration is working.
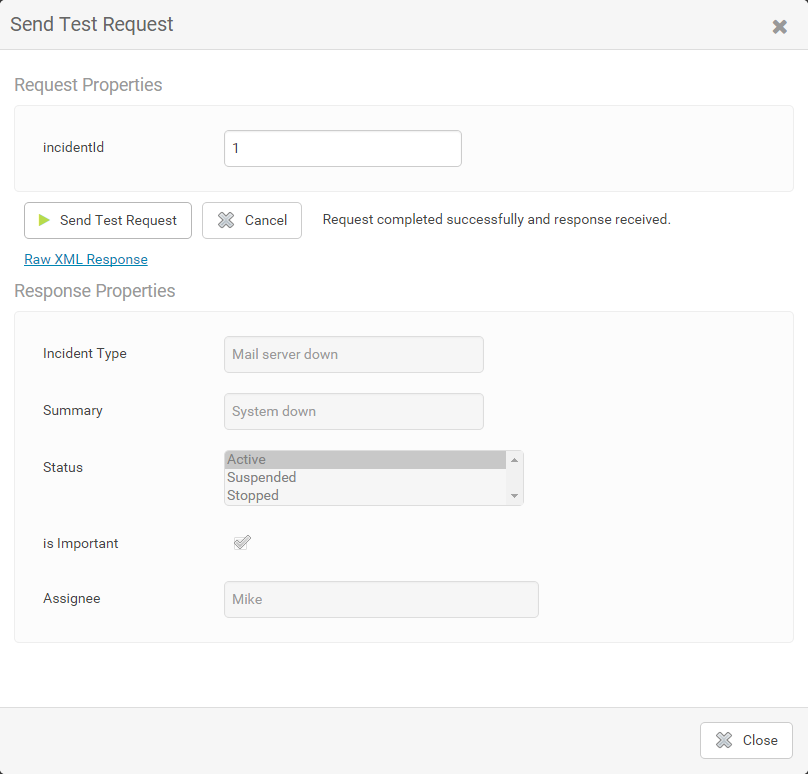
- Click the Send Test Request button.
- The Send Test Request dialog box displays a form with the request properties.
- Enter appropriate values for the request properties, and then click Send Test Request.
- For the sample integration service, type a number from one to eight in the incidentId field.
xMatters sends the test request to the external service and displays the results in the Test Response Properties area.

To view the returned XML (source code), click Raw XML Response. You can use this to verify that the data returned by the external service matches the expected results.
Due the potential differences in network latency and external system dependencies, there is no configured timeout on the test request. You can cancel the request at any time by clicking Cancel.
Modify integrated properties
You can modify existing integrated properties by performing any of the following actions from the integrated property editor:
- To edit a property's details, click the gear icon and select Edit Property.
- To delete a property, click the red X in the property's row.
- To reorder the request or response properties, click and drag the property to a new location. (This has no effect on the order in which the properties are requested or received.)
- To force message senders to enter a value for a specific property, click the gear icon, and then select the Required check box.