Flow tools
Tools are steps that use information coming through a flow to decide what action to take next or to gather additional information from xMatters to use in the flow. They help you create richer, more refined flows adapted to your use cases.
- Utility steps
- xMatters steps
- Alert steps
- User steps
- Conference Bridge steps
- Incident steps
- Initiate Incident
- Add Note to Incident
- Add Collaboration Channel to Incident
- Add Stakeholders to Incident
- Add Task to Incident
- Add Task List to Incident
- Map Incident Severity
- Add Change Record
- Get Incident
- Update Incident
- Get Incident Collaboration Channels
- Get Incident Attachments
- Add Status Page Incident
- Update Status Page Incident
Utility steps
The Utilities steps let you do things such as modify your flow based on information coming from previous steps or send information coming through the flow to other systems.
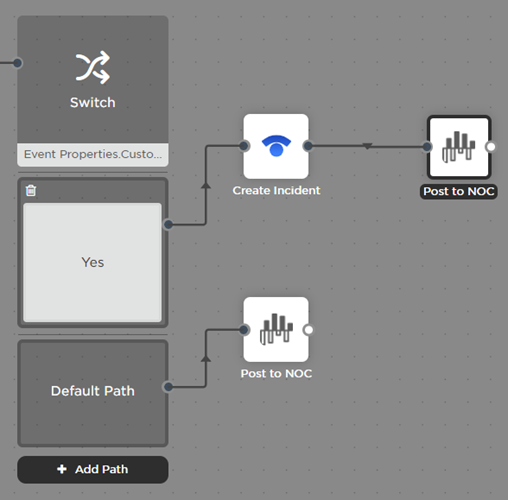
Switch step
A switch step functions like the switch on a set of railway tracks. It determines which route the train — or flow — needs to take next. You can base this decision point on the value of almost any property in the flow such as trigger outputs, constants, or outputs of previous steps.
Here are a few examples of how you can use a switch step:
- The value of a "Severity" property: "Critical" goes one way, "High" another, everything else follows a third, default path.
- A success response from a Create Ticket step: "201" continues the flow, while "400" sends a notification that something went wrong.
- The value of a "Team" property: "Alpha" follows one path that includes a "Post to Alpha Chat" step and "Beta" follows another path that posts to the Beta Chat channel.
- Drag a switch step onto the canvas.
- Double-click the step to open the setup screen (or move your cursor over the step and click the pencil icon).
- Enter a label for the switch (for example, if the split in your flow is based on alert priority, you might label the switch Priority).
Labels must match the spelling, capitalization, and spacing of the configured paths. The switch step reads "gamma" and "Gamma" as two separate values.
- Select the property you want to use to decide which path the flow takes. This list is populated with available properties, and you can quickly find properties or outputs with the Search bar. For example, in our priority scenario, you could use the priority output of a trigger as the switch property.
- Click Done.
- Click Add Path and then click the block to set the value that flips the switch (for example, if you want the flow to take one path based on "High" priority and another based on "Medium" priority, add paths for High and Medium).

- If any priority property comes through with a value other than those set in the paths, they follow the Default path (for example, if a "Low" priority comes through, it would follow the Default path).
- Set up the flows you want each path to follow.
- Click Save on the canvas.
Does your flow follow a path you don't expect? What if your flow gets to the switch and simply stops? This can happen if the switch can't match the value passed to it to one of its paths. If you have a step connected to the Default path, it'll flow that way; if you don't, it doesn't know where to send it, so it stops. The most likely culprit is a difference between the value coming in and the values you configured for the paths.
Double-check the value coming into the switch, whether it's coming from a constant, the output of an HTTP trigger, or some other step in the flow. As previously mentioned, make sure the spelling and capitalization match the configured paths (for example, the switch reads "omicron" and "Omicron" as different values). While you're at it, check for extra spaces in the property value coming into the switch, too.
Map step
A map step provides a centralized way to translate values between systems within a flow. You can define mappings that convert values from a source system into equivalent values required by a target system. The step supports configuring multiple value mappings within a single step, so you can translate several fields at once rather than creating separate steps for each mapping requirement. Once configured, a map step evaluates incoming values and returns the corresponding mapped output values which can then be used by subsequent flow actions.
The step has three predefined mapping types: Priority, Severity, and Status. Each mapping type has a customized layout to help you map values from an external system to static output values in Flow Designer. A Custom mapping type is also available if you want to customize both the incoming values from the source system and the output values to be used in steps further down the flow.
Here are a few examples of how you can use a map step:
- Using the Severity and Status mapping types, convert a source system's incident priorities and states to a target system's incident severities and statuses.
- Translate values between different system terminologies that correspond to the same concepts. For example, the source system refers to notifications as 'events', while the target system refers to them as 'alerts'. The map step can convert an 'event priority' value from the source system to the equivalent 'alert priority' value from the target system.
- Standardize different incident management systems. For example, when an incident in the source system is created, you can configure a mapping to convert that incident's status to the target system's corresponding ticket status.
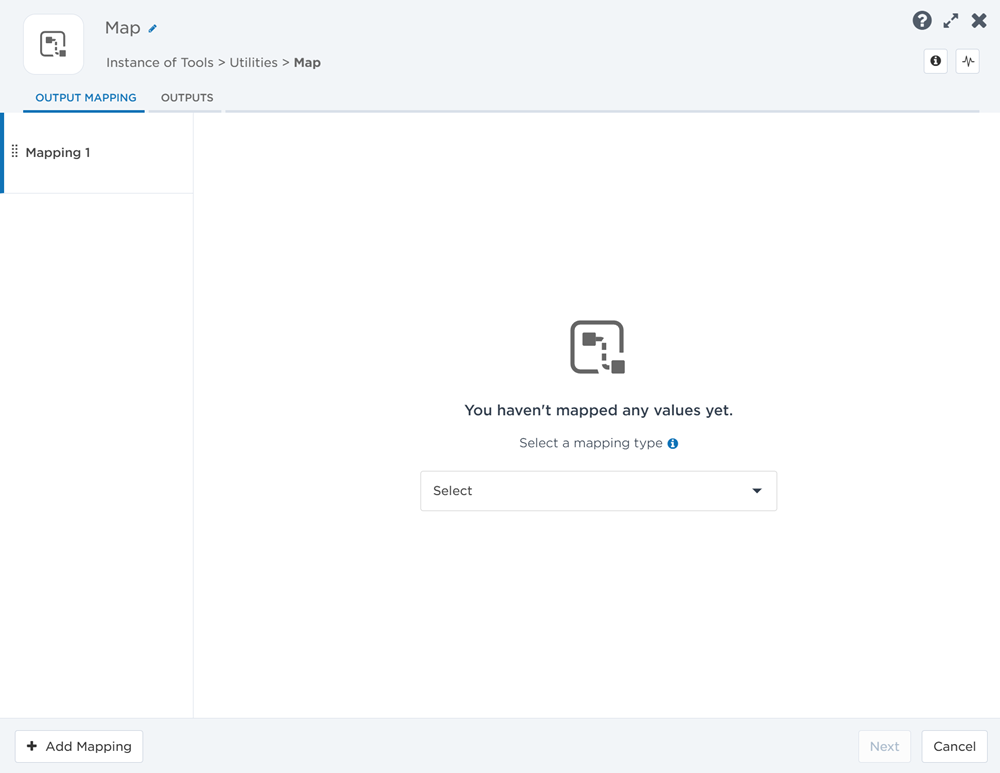
- Drag a map step onto the canvas.
- Double-click the step to open the setup screen (or move your cursor over the step and click the pencil icon).
- Enter a label for the map (for example, you can name the step after the source system).
- On the Output Mapping tab, select the mapping type you want to use.
- Priority, Severity, and Status have predefined output values while Custom lets you provide them.
- On the new mapping, define the input parameter from the external system that maps to the output name when the flow runs.
- Define the external values from the source system to map to the predefined output values. If you selected the Custom mapping type, you also have to provide the output values.
- You can use plain text, constants, or the outputs from any previous steps for the external and output values. Use the Search bar to quickly find properties or outputs in the menus.
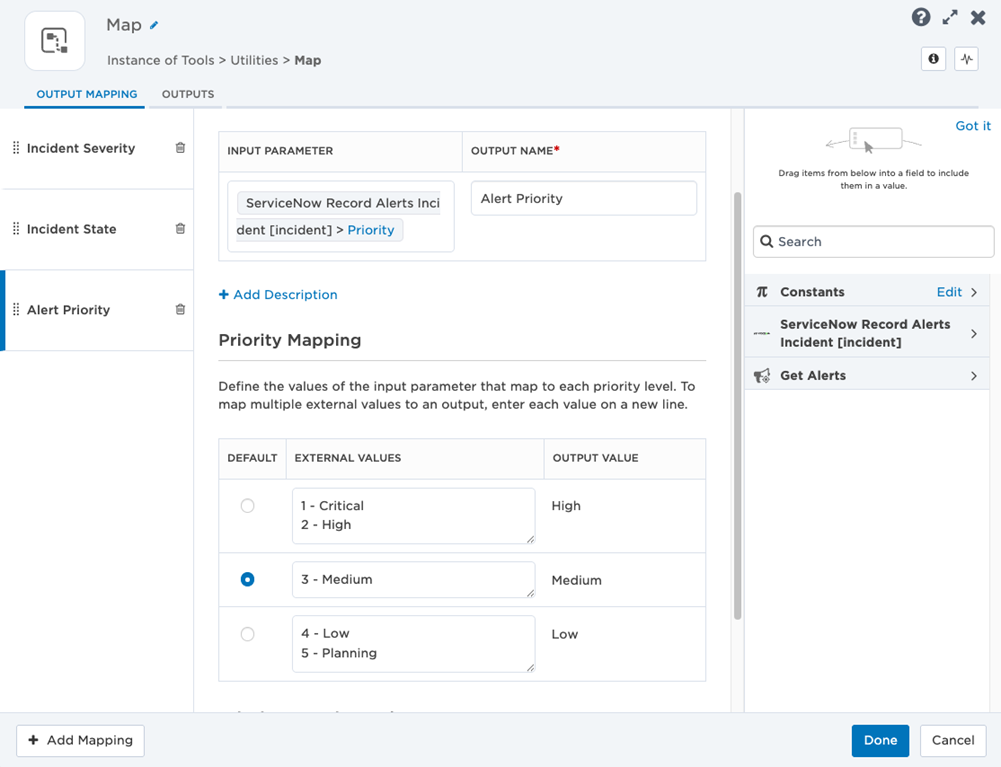
- Under Mapping Rules, you can:
- Select the Allow Partial Matches checkbox if mapping values can be contained in the runtime value of the input parameter (for example, "Critical" maps to "1 - Critical"). If unselected, values must be an exact match.
- Select the Case Sensitive checkbox if mapping values will consider letter case (for example, “Med” and “MED” are not the same). If unselected, values can be different letter cases.
- Click Add Mapping if you want to configure additional mappings for the same or another source system.
- Once you've configured all the mappings for your flow, click Done.
- Click Save on the canvas.
Are the incoming values from the source system not configured to the correct output values further in your flow? What if Flow Designer returns the default value from the source system and not the output value? This can happen if the provided external value doesn't match the output value in Flow Designer.
Double-check that the rules for each mapping are configured correctly. Make sure the spelling and capitalization match the configured settings (for example, if you enabled case sensitivity, "high" and "High" are considered different values). While you're at it, check for extra spaces in the external value coming into the map step, too.
Condition step
While a switch step lets you choose a path based on a specific property value, a condition step allows for more intricate logic to determine which pathways are selected in your flows by using 'AND/OR' logic and a range of conditional operators to compare both string and numerical values.
Here are a few examples of how you could use a condition step:
- An incident's severity is either High or Critical and alert priority is less than 3.
- Earthquake magnitude is greater than 5 or the epicenter distance is less than 100 miles.
- The name of a customer who reported an incident matches a specified value.
As another example, here's how a single condition step can replace two switch steps in our ServiceNow integration's 'Engage with xMatters' workflow.
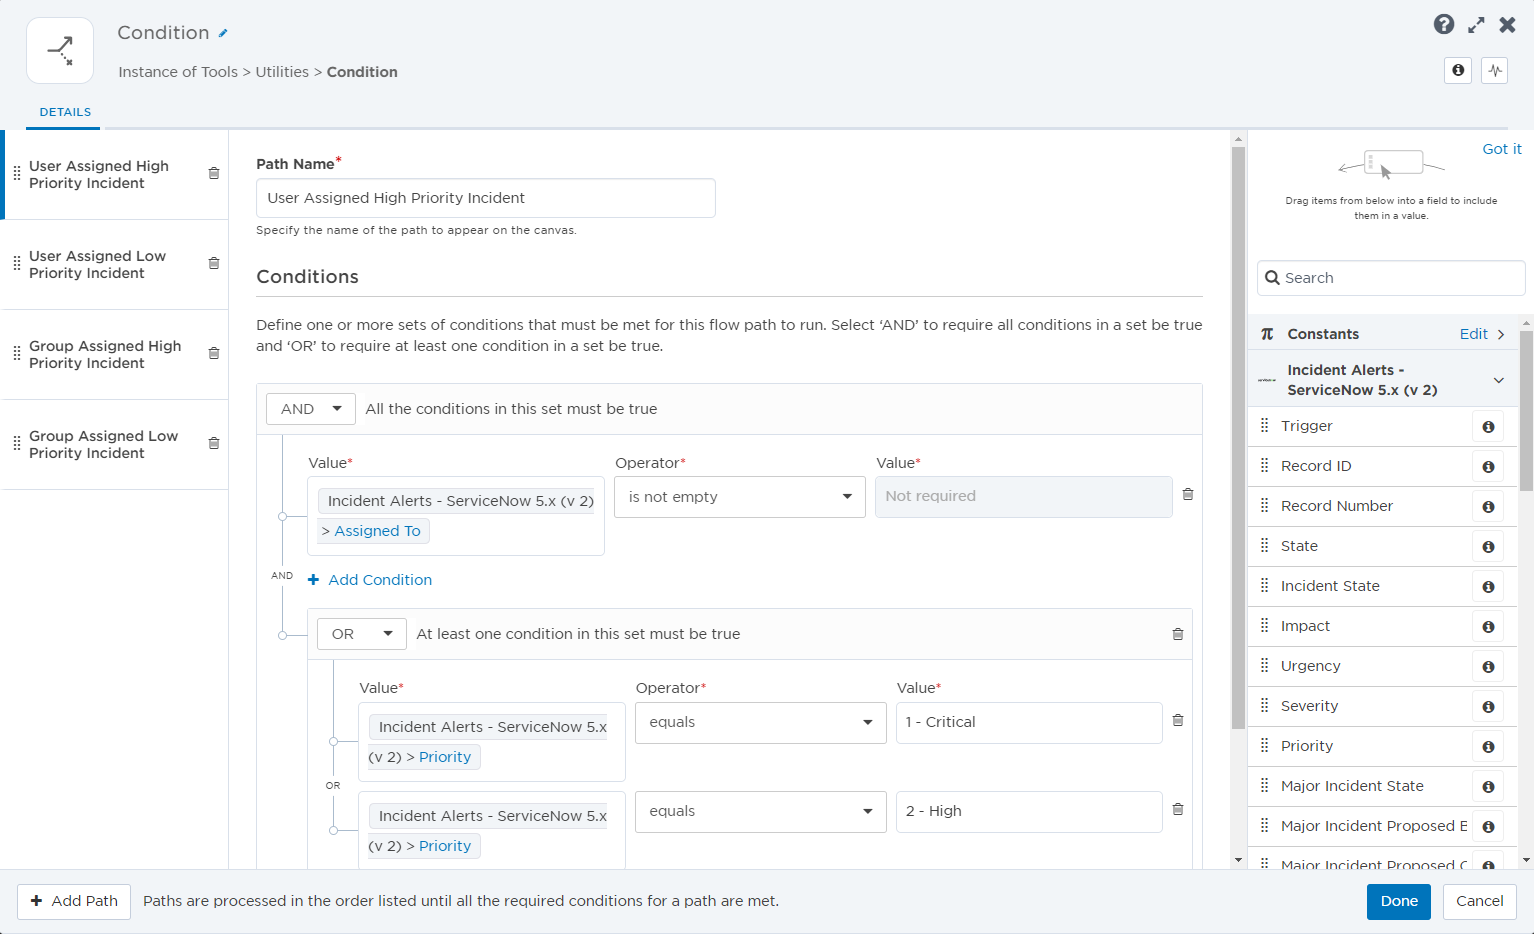
Instead of using one switch step to identify what type of conference bridge is required and then another switch step to determine whether a new bridge needs to be created, the condition step checks for bridge type and determines if there's an existing bridge in a single pass.
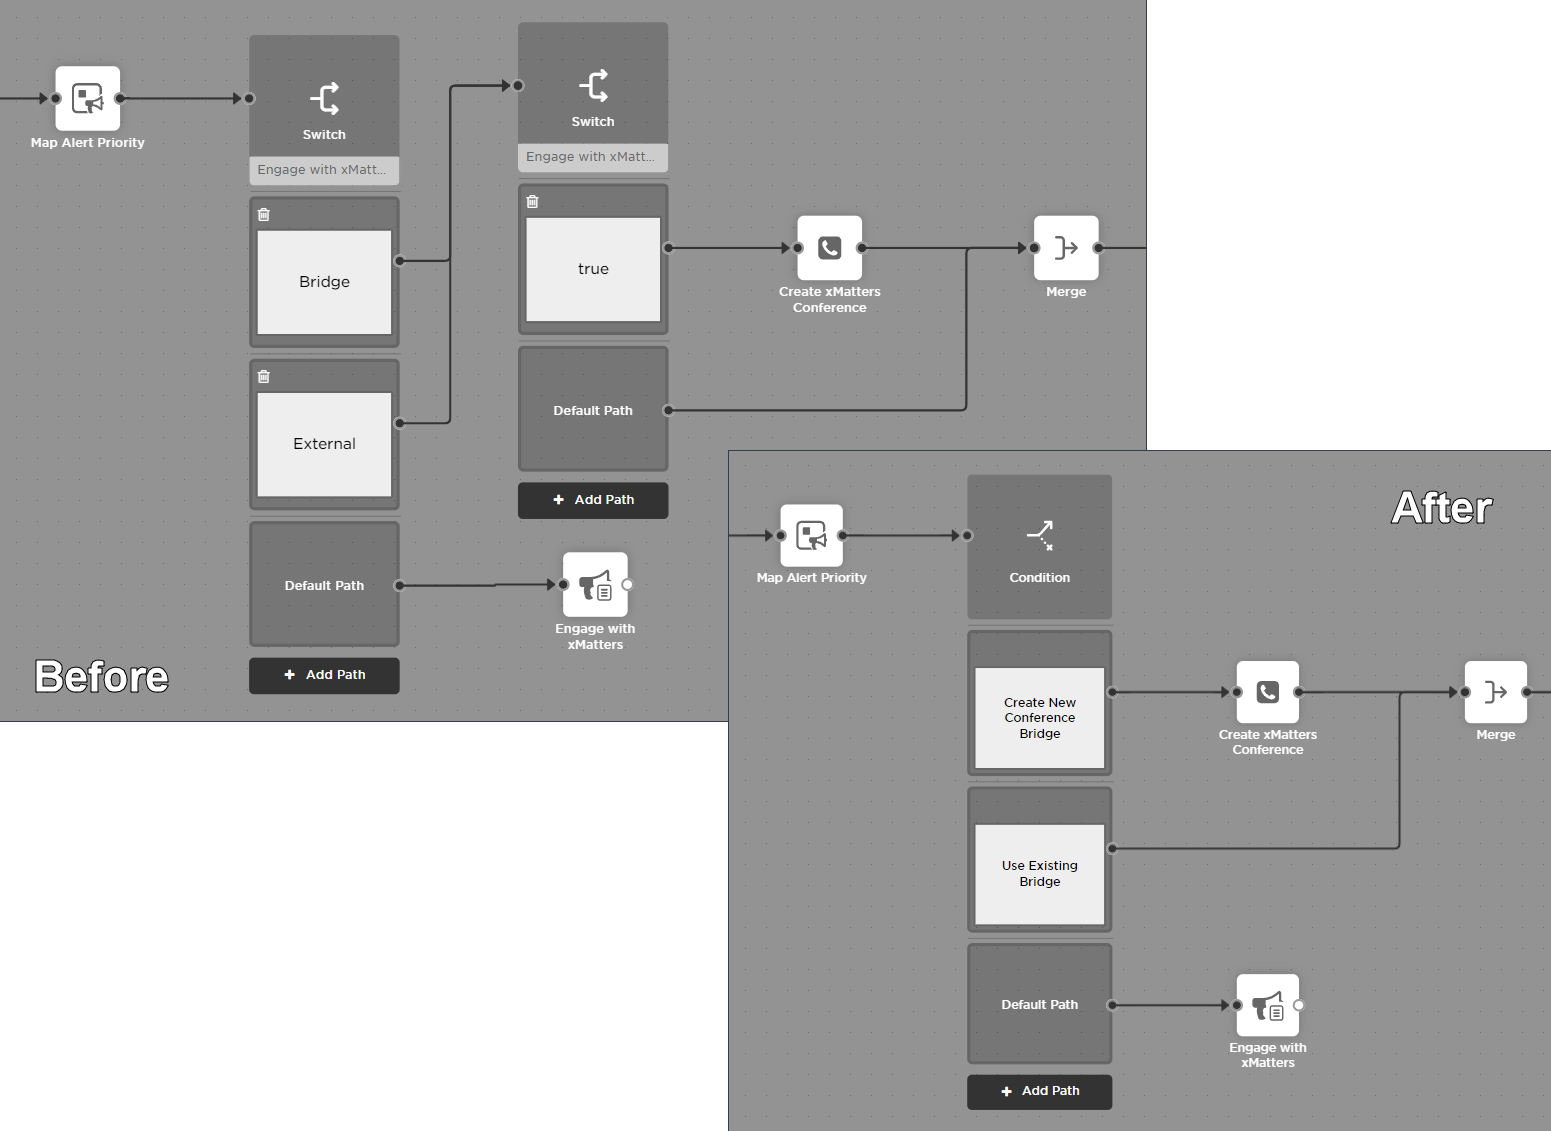
The combination of multiple forms of logic, pathways, and conditions in one step allows your designers to easily create and modify workflows to whatever complexity is required for your use cases.
- Drag a condition step onto the canvas.
- Double-click the step to open the setup screen (or move your cursor over the step and click the pencil icon).
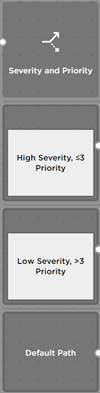
- Enter a label for the condition (for example, if the split in your flow is based on incident severity and alert priority, you might label the switch Severity and Priority).
Labels must match the spelling, capitalization, and spacing of the configured paths. The condition step reads "gamma" and "Gamma" as two separate values.
- Enter a label for the first path, then create conditions using the values from previous steps and the available conditional operators to decide which path the flow takes.
- Click Add Path on the setup screen or on the canvas to add more paths and set the conditions, operators, and values that determine if the flow follows a specific pathway (for example, if you want the flow to take one path based on 'High' severity and priority less than or equal to '3', and another based on 'Low' severity and priority greater than '3', add paths for both cases).
- This step processes paths sequentially from top to bottom, with the flow following the first path in which all required conditions are met. To modify the path order, grab the handle icon next to a path on the left column of the setup screen and drag it into a new position on the list.
- If a property comes through with a value other than those set in the paths, the flow follows the default path which is visible on the canvas but not the setup screen (for example, if a 'Medium' severity incident comes through which does not meet the configured paths, the flow would follow the default path).
- Click Done.
- Set up the flows you want each path to follow.
- Click Save on the canvas.
Along with 'AND/OR' logic, you can use the following operators to define the conditions of a path:
- contains
- does not contain
- equals
- does not equal
- is greater than
- is greater than or equal to
- is less than
- is less than or equal to
- starts with
- does not start with
- ends with
- does not end with
- is empty
- is not empty
- is null
- is not null
- is one of
- is not one of
Does your flow follow a path you don't expect? What if your flow gets to the condition step and simply stops? This can happen if the conditions in the step don't match the value passed to one of its paths. If you have a step connected to the default path, it'll flow that way; if you don't, it doesn't know where to send it, so it stops. The most likely culprit is a difference between the value coming in and the values you configured for the paths.
Double-check the value coming into the condition step, whether it's coming from a constant, the output of an HTTP trigger, or some other step in the flow. As previously mentioned, make sure the spelling and capitalization match the configured paths (for example, the condition step reads "omicron" and "Omicron" as different values). While you're at it, check for extra spaces in the property value coming into the condition step, too.
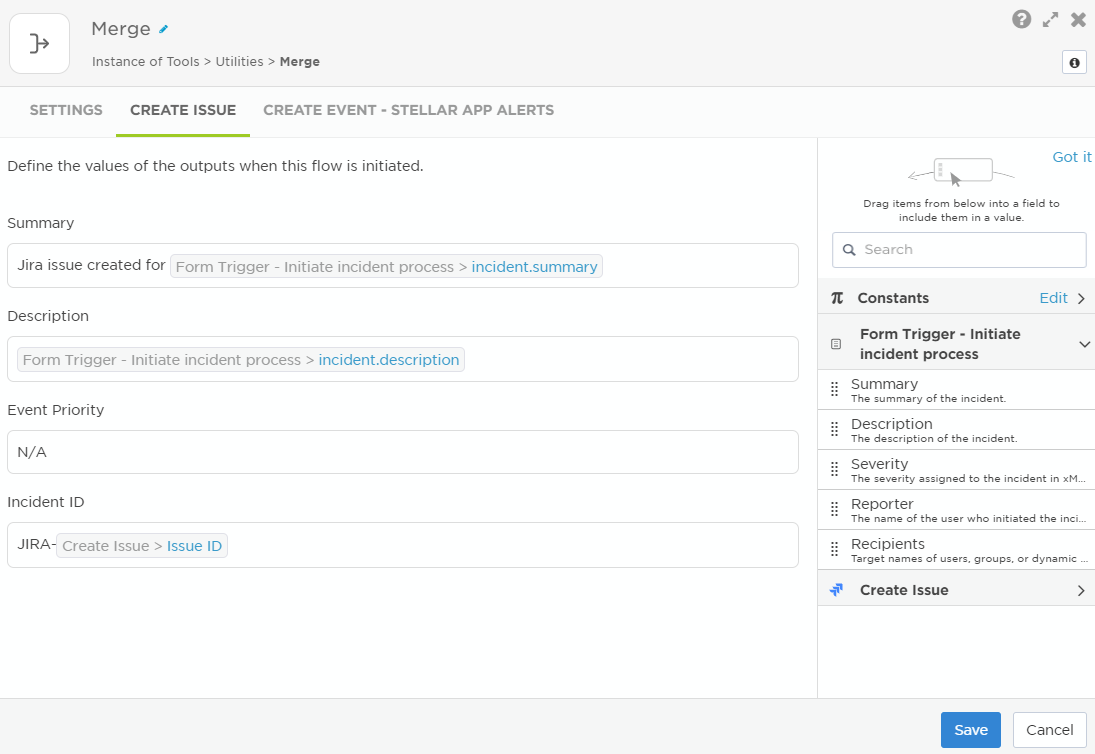
Merge step
The merge step lets you combine up to 10 flows into one path, giving you the ability to create new outputs and populate them with information for each of the flows. When a particular flow runs, the values specified for that flow are passed into the Merge step outputs.
- From the Utilities section of the Tools tab, drag a merge step onto the canvas and connect the flows you want to combine.
- Double-click the step to open the setup screen (or move your cursor over the step and click the pencil icon).
- Each connected flow has a tab named for the step immediately preceding the merge step — this makes it easier to know which flow you're working with. However, you can use outputs from any of the steps when configuring the merge step.
- On the Settings tab, enter a label for the step — this appears on the canvas to help identify the purpose of the step.
- For each output you want to make available to steps downstream, click Add Step Output and enter a name for the output.
- Click the tab for the first flow and define what the value of the outputs should be when that flow is run.
- You can use plain text, constants or the outputs from any previous steps in that flow. Use the Search bar to quickly find properties or outputs in the menus.
- Each output needs a value, otherwise steps further downstream that use the output could fail. If an output isn't applicable for a particular flow, add something like 'not applicable', 'N/A', etc.
- Repeat the output definition on the tabs for each of the remaining connected flows.
- After you define the outputs for each of the incoming flows, click Save.
- Click Save on the canvas.
When the flow is run, the values specified for whichever flow initiates the step are passed into the outputs.
- To delete an output, click the x beside the output on the Settings tab.
- Click Delete on the confirmation dialog that appears to let you know that this step might impact the flow.
- Click Save.
Any steps downstream of the merge step will show validation errors if they were using the output. Make sure you fix those steps to avoid errors at runtime.
In this example, we follow different paths depending on what the severity is in the incoming signal. If it's critical or high, we initiate an incident and notify resolvers, then create and post to a Slack channel. If the severity is anything lower, we simply create a Jira ticket and then create and post to a Slack channel. We use the merge step to decide what information should be available to the Slack steps for each flow — this lets us reduce duplication and maintain consistency, rather than having completely separate flows for different severity levels.
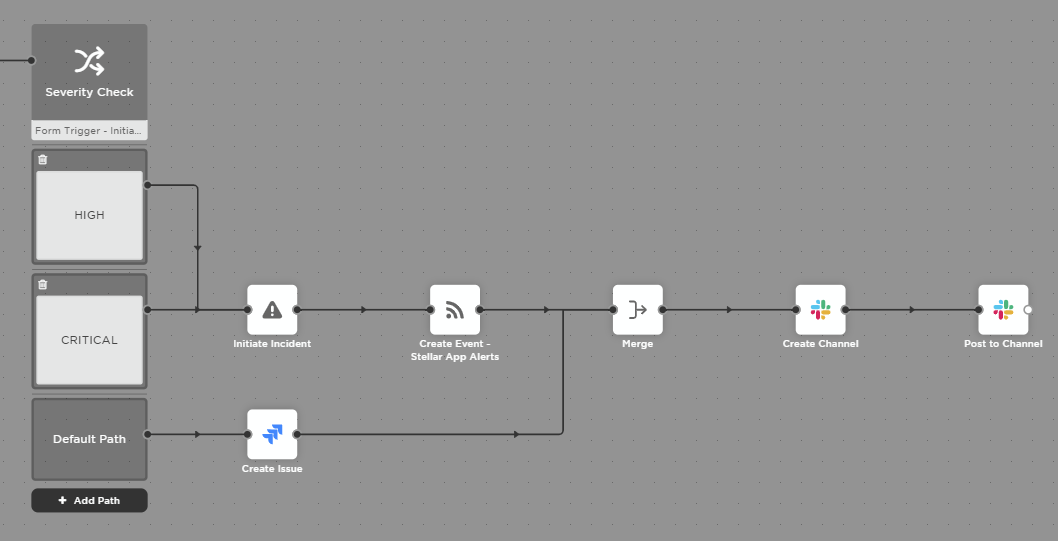
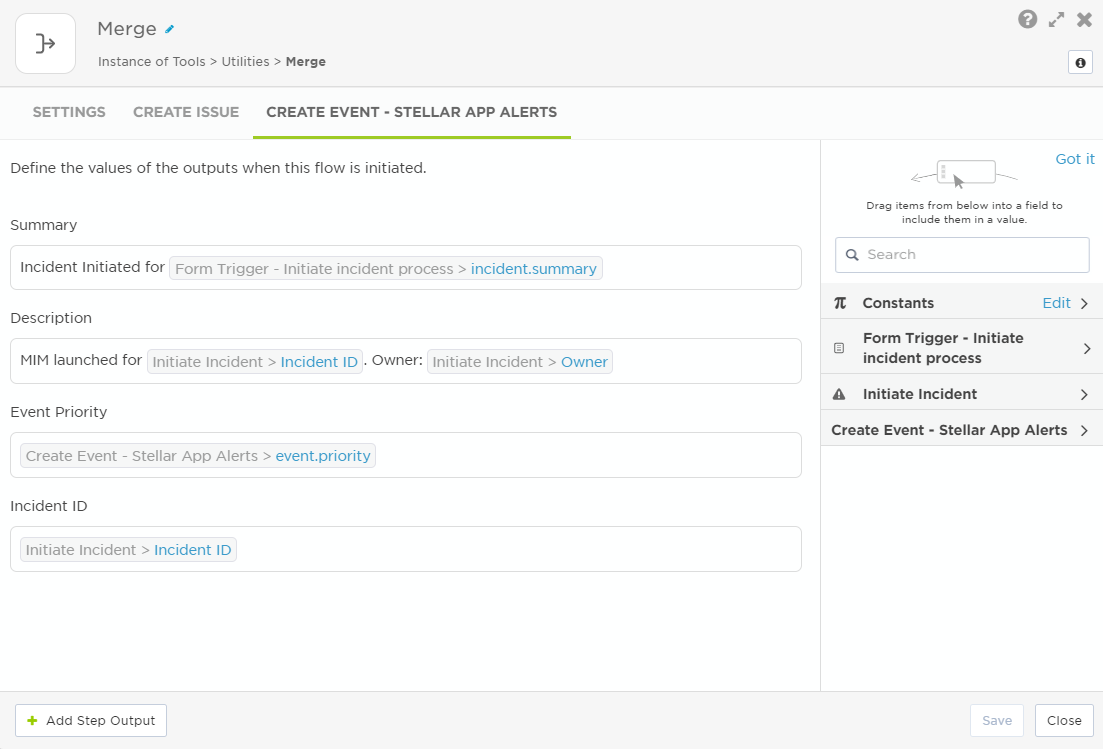
For the High / Critical path, we use a mix of values from the trigger, the Initiate Incident step, and the alert to set the merged values. We made sure to populate the Incident ID field with the Incident ID output from the Initiate incident step — this lets us use it to add Slack as a collaboration channel on the incident:
For the Medium and lower path, we set the Incident ID to the Jira ticket ID and set Alert Priority to N/A, since no alert is created in this flow.
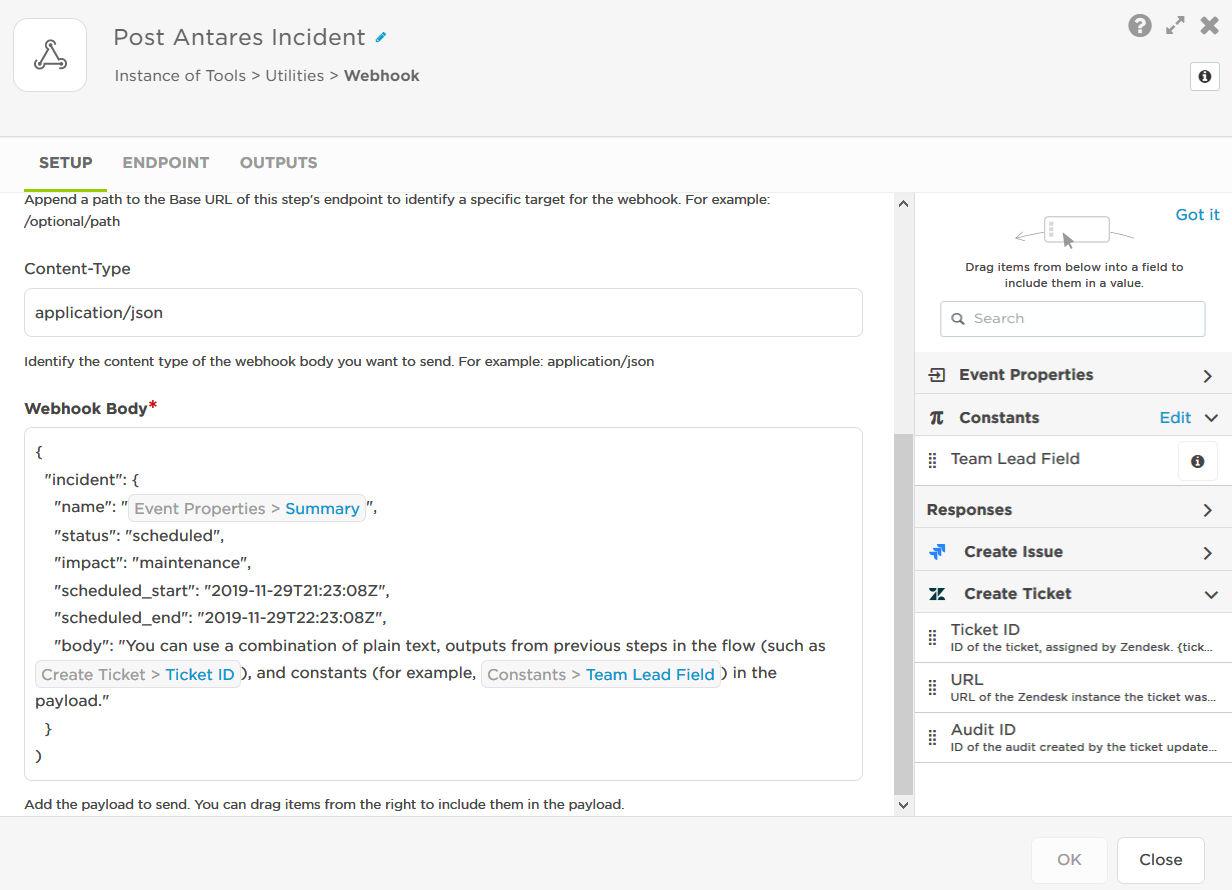
Webhook step
The webhook steps lets you send information from the flow to any system capable of receiving an HTTP POST request.
- From the Utilities section of the Tools tab, drag a webhook step onto the canvas and connect it to your flow.
- Double-click the step to open the setup screen (or move your cursor over the step and click the pencil icon).
- Enter a label for the step (for example, if the step sends an update to a webpage informing users of your application's status, you might change the label to "Post Service Status").
- Click the Endpoint tab and select the endpoint for the system you want to send the webhook to.
- If the endpoint you want doesn't appear in the list, click Edit Endpoints to add a new endpoint.
- On the Settings tab, enter a URL Suffix if needed.
- This appends an additional path to the Base URL of the selected endpoint. For example, if the Base URL is https://status-website.com and you want to send the request to https://status-website.com/pages/antares-status, enter /pages/antares-status in the field.
- This might be something you want to store in a constant so you can drag the constant into the field.
- Select the content type to tell the receiving system how to parse the payload (for example, application/json or application/x-www-form-urlencoded).
- Add the payload you want to send in Webhook Body. You can drag outputs from previous steps into the body to populate parameters with values coming through the flow.
- Clck OK.
- Click Save on the canvas.
| Property | Description | Example |
|---|---|---|
| Response Code | The HTTP response code received from the target system. | 200 |
xMatters steps
The xMatters steps let you do things in your xMatters instance, like create an alert, find a user, add an xMatters conference bridge, initiate an incident, map incident severity, and more. We've grouped the steps into sections so it's easy to find the information you're looking for for.
Alert steps
See Alert steps for more information about the available xMatters alert steps and how you can use them.
User steps
See User steps for more information about the available xMatters user steps and how you can use them.
Conference Bridge steps
See Conference Bridge steps for more information about the available xMatters conference bridge steps and how you can use them.
Incident steps
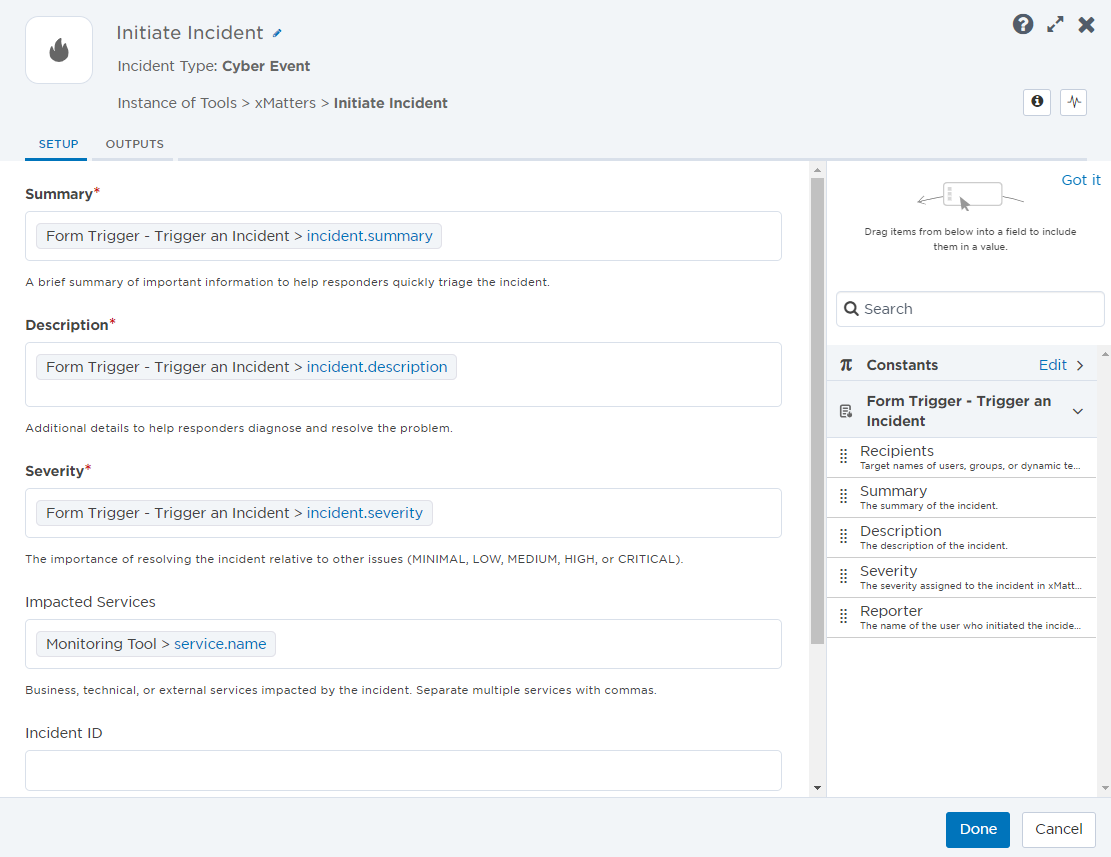
Initiate Incident
The Initiate Incident step allows you to create an incident. Use this step to define the basic details of the incident (type, summary, description, severity, and impacted services), the values for any incident properties, and to connect incident Status Change, Severity Change, and Notify to Engage flow triggers.
- In the Tools tab, under xMatters, drag the Initiate Incident step onto the canvas and connect it to your flow.
- Double-click the step to open the setup screen (or move your cursor over the step and click the pencil icon).
- Select the type of incident you want to initiate (this option appears only if your company has more than one incident type configured).
- Enter a step label to identify it in your flow.
- If the step includes an Incident Properties section, type text or drag variables (that will contain text as their values) into the incident property fields.
- These incident properties and their values appear in the Details section of the Incident Console.
- In the Summary field, provide the most important information for responders (this also becomes the summary in the Incidents list).
- Add a description, including any additional details about the incident.
- For the incident's initial severity, enter one of MINIMAL, LOW, MEDIUM, HIGH, or CRITICAL.
- Add any impacted services by typing text or dragging variables into the Impacted Services field.
- Add an Incident ID to use when referencing, or linking other steps to the incident.
- Add the Incident Commander. If this field is left black, the user that initiates the flow becomes the Incident Commander by default.
- Provide values for any other fields, if required.
- Once you're happy with the settings, click Done.
- Click Save on the canvas.
If you enter an Incident ID that already exists in xMatters, no new incident will be created. If you don't enter an Incident ID, one will be automatically assigned by xMatters, with the INC-# format (for example, INC-123). Using the same format for your incidents can cause conflicts with existing incidents, or when creating new incidents using other workflows.
| Property | Description |
|---|---|
| Incident ID | The ID of the incident. |
| Incident Commander | The person assigned as the Incident Commander. |
| Start time | The time the incident was initiated. |
| Status | Status of the incident. |
| Initiated By | The person who initiated the incident in xMatters. |
| Is New | True if the incident is new; false if an incident with a matching Incident ID already exists. |
| Impacted Services | Comma-separated list of all technical, application, and undefined services impacted by the incident. |
| Impacted Application Services | Comma-separated list of impacted services with the type ‘Application’. |
| Impacted Technical Services | Comma-separated list of impacted services with the type ‘Technical’. |
| Impacted Undefined Services | Comma-separated list of services reported as impacted by the incident but are not in the Service Catalog. |
| Highest Impacted Service Tier | Highest tier of the services in the ‘Impacted Services’ output. Valid values are: 1 – Platinum, 2 – Gold, 3 – Silver, 4 – Bronze, None (if no services have an assigned tier) |
| Highest Impacted Application Service Tier | Highest tier of the services in the ‘Impacted Application Services’ output. Valid values are: 1 – Platinum, 2 – Gold, 3 – Silver, 4 – Bronze, None (if no services have an assigned tier) |
| Highest Impacted Technical Service Tier | Highest tier of the services in the ‘Impacted Technical Services’ output. Valid values are: 1 – Platinum, 2 – Gold, 3 – Silver, 4 – Bronze, None (if no services have an assigned tier) |
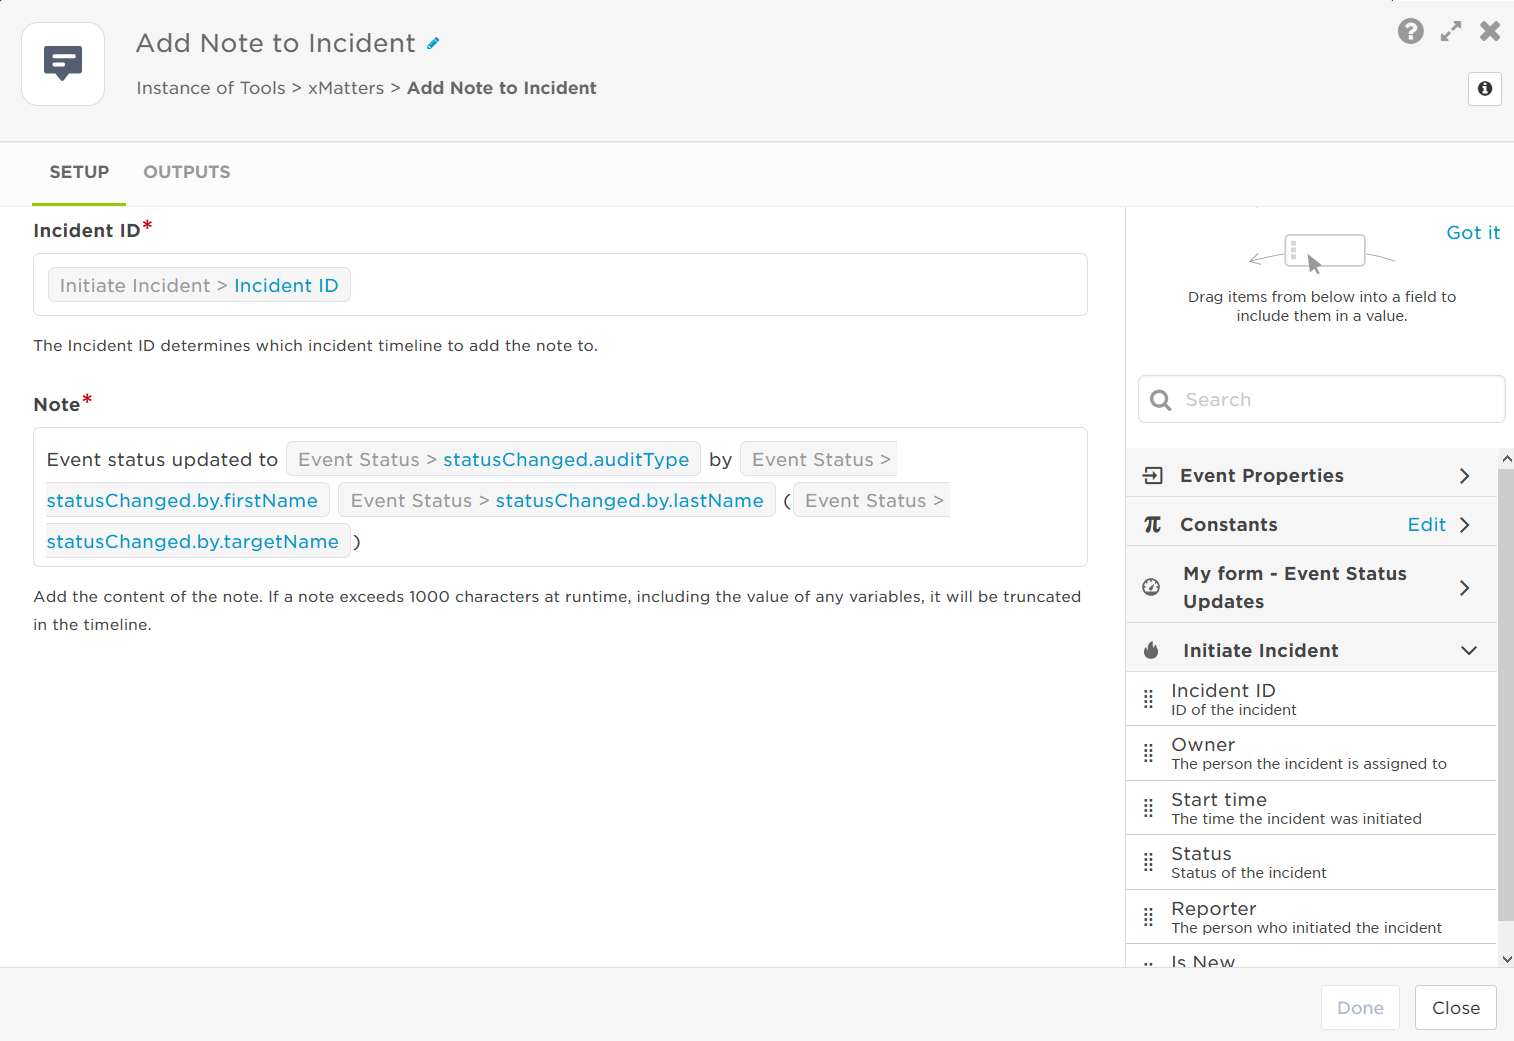
Add Note to Incident
You can use the Add Note to Incident step to add a note to the incident timeline at any point in your flow. This is useful for providing information to resolvers about flow activities and to make this information available for the Post-Incident Report. The user who authenticates the flow is recorded as the creator of the note in the timeline.
- In the Tools tab, under xMatters, drag the Add Note to Incident step onto the canvas and connect it to your flow.
- Double-click the step to open the setup screen (or move your cursor over the step and click the pencil icon).
- Enter a step label to identify it in your flow.
- The Incident ID field identifies the incident that you want to add the note to. If you have the Initiate Incident step in your flow, you can add the Incident ID variable. To do this, click the Initiate Incident tab in the sidebar and drag the Incident ID variable under the Incident ID section.
- Add the content of the note by typing text or dragging variables into the Note field. Notes exceeding 1000 characters at runtime, including the values of any variables, will be truncated in the timeline.
- Once you're happy with the settings, click Done.
- Click Save on the canvas.
| Property | Description |
|---|---|
| Note | The content of the note that was added to the incident's timeline. |
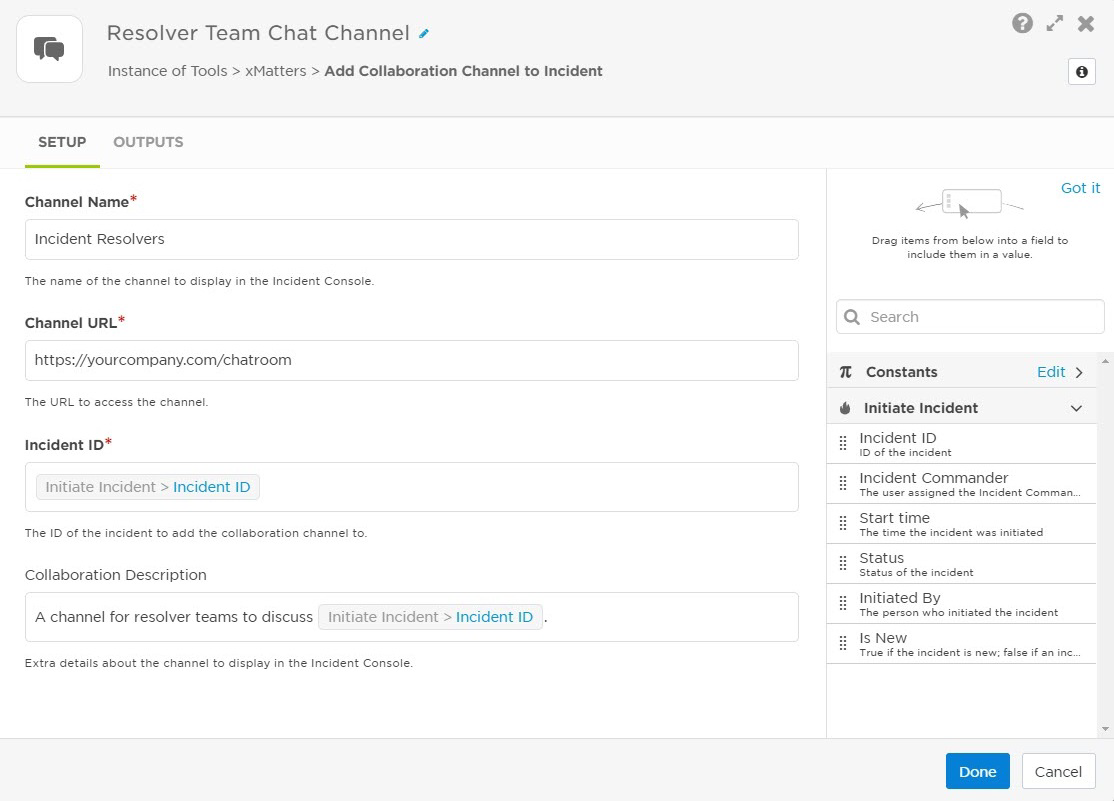
Add Collaboration Channel to Incident step
You can use the Add Collaboration Channel to Incident step to automatically link any type of collaboration channel to an incident in xMatters. By adding a collaboration channel to the Incident Console, you can include information (such as a name, description, and URL link) so teams can easily find the right place to communicate about issues. The user who authenticates the flow is recorded as the creator of the collaboration channel in the incident timeline.
- In the Tools tab, under xMatters, drag the Add Collaboration Channel to Incident step onto the canvas and connect it to your flow.
- Double-click the step to open the setup screen (or move your cursor over the step and click the pencil icon).
- Enter a step label to identify it in your flow.
- The Incident ID field identifies the incident that you want to add the collaboration channel to. If you have the Initiate Incident step in your flow, you can add the Incident ID variable. To do this, click the Initiate Incident tab in the sidebar and drag the Incident ID variable under the Incident ID section.
- Add the Channel Name, Channel URL, and Collaboration Description by typing text or dragging variables into the fields. (This is what is displayed in the xMatters Incident Console.)
- Once you're happy with the settings, click Done.
- Click Save on the canvas.
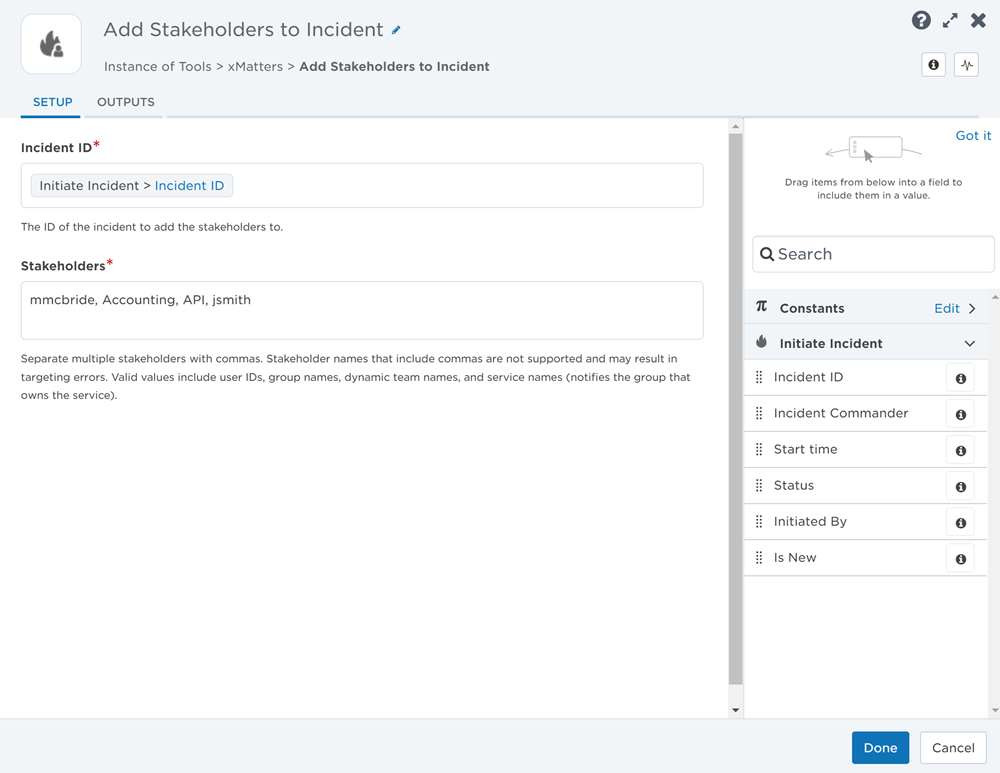
Add Stakeholders to Incident
You can use the Add Stakeholders to Incident step to add stakeholders to an incident in xMatters. Stakeholders receive status updates about the incident, but they are not resolvers and are not actively engaged in the incident.
- In the Tools tab, under xMatters, drag the Add Stakeholders to Incident step onto the canvas and connect it to your flow.
- Double-click the step to open the setup screen (or move your cursor over the step and click the pencil icon).
- Enter a step label to identify it in your flow.
- The Incident ID field identifies the incident that you want to add the stakeholders to. If you have the Initiate Incident step in your flow, you can add the Incident ID variable. To do this, click the Initiate Incident tab in the sidebar and drag the Incident ID variable under the Incident ID section.
- Add Stakeholders by typing user IDs, group names, or service names (the group that owns the service will be notified) or dragging variables into the field. Separate multiple values with commas. (The entered values will be displayed in the Stakeholders section of the xMatters Incident Console.)
- Once you're happy with the settings, click Done.
- Click Save on the canvas.
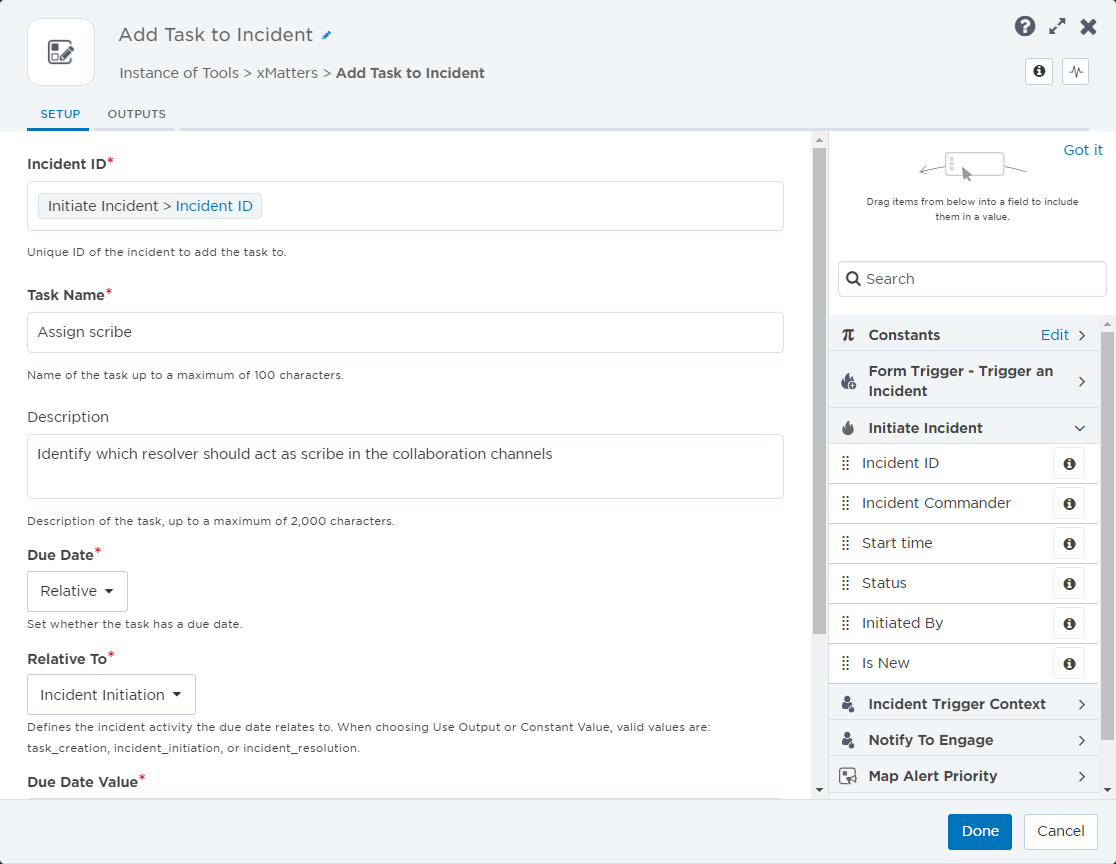
Add Task to Incident
The Add Task to Incident step lets you add a task to an incident at various points in your flow.
- In the Tools tab, under xMatters, drag the Add Task to Incident step onto the canvas and connect it to your flow.
- Double-click the step to open the setup screen (or move your cursor over the step and click the pencil icon).
- The Incident ID field identifies the incident that you want to add the task list to. If you have the Initiate Incident step in your flow, you can add the Incident ID variable. To do this, click the Initiate Incident tab in the sidebar and drag the Incident ID variable under the Incident ID section.
- Fill in the Task Name, Description, and Assignee fields by typing text or dragging variables into the fields.
- To notify the assignee when they are assigned a task, set the Notify Assignee field to true.
- Set the Due Date by selecting one of the following types and specifying the corresponding fields:
- Specific Due Date: In the Due Date Value field, enter a specific date and time in either Unix epoch format (e.g., 1700077364599 ) or ISO format (e.g., 2023-11-15T19:42:44.599Z).
- Relative Due Date: Select the type of incident activity the due date is relative to. If you choose Use Output or Constant Value, valid values are task_creation, incident initiation, or incident_resolution. In the Due Date Value field, enter the amount of time in minutes that should elapse before the task is due.
- Repeating Due Date: In the Repeat Interval field, set the amount of time, in minutes, that should elapse before a duplicate task is created.
- Once you're happy with the settings, click Done.
- Click Save on the canvas.
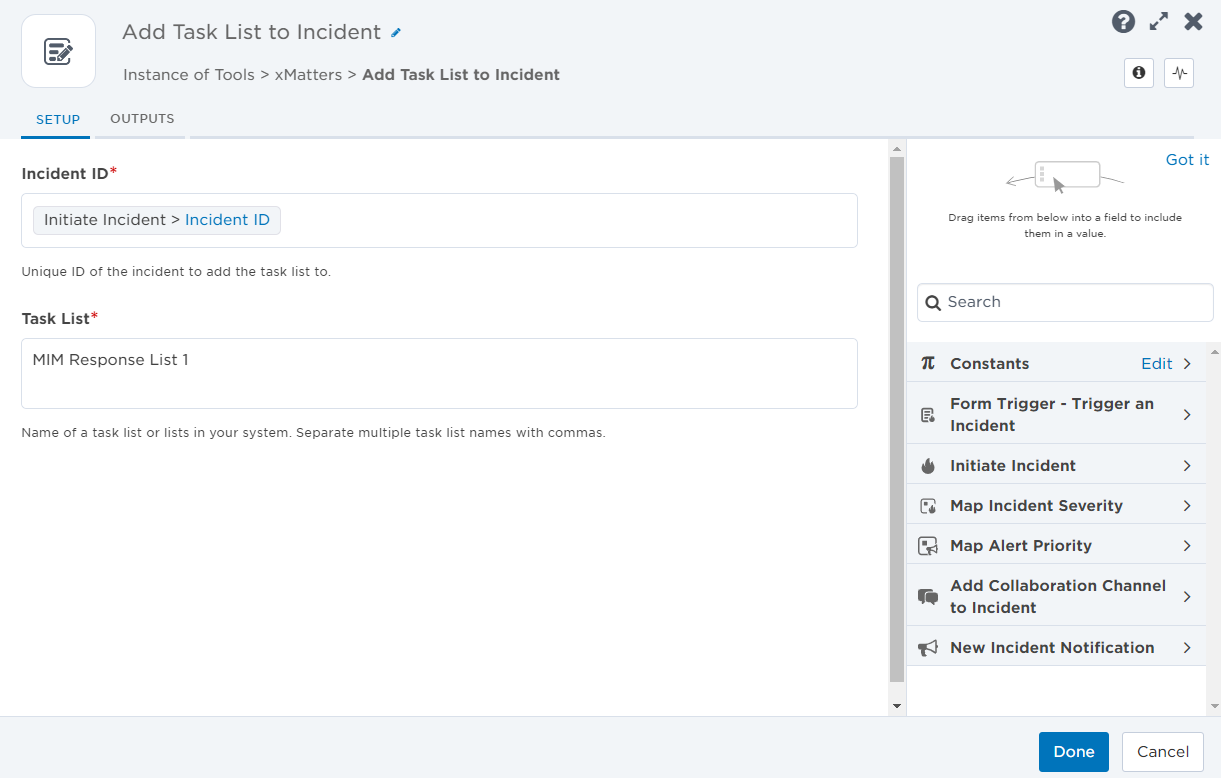
Add Task List to Incident
The Add Task List to Incident step lets you add one or more task lists in your system to an incident.
- In the Tools tab, under xMatters, drag the Add Task List to Incident step onto the canvas and connect it to your flow.
- Double-click the step to open the setup screen (or move your cursor over the step and click the pencil icon).
- The Incident ID field identifies the incident that you want to add the task list to. If you have the Initiate Incident step in your flow, you can add the Incident ID variable. To do this, click the Initiate Incident tab in the sidebar and drag the Incident ID variable under the Incident ID section.
- Add Task List by typing the name of one or more task lists in your system. Separate multiple values with commas.
- Once you're happy with the settings, click Done.
- Click Save on the canvas.
Map Incident Severity
The Map Incident Severity step lets you map the severity levels from an external system to xMatters severity levels. You can use the output of this step to set the severity when configuring a connected step, like the Initiate Incident step.
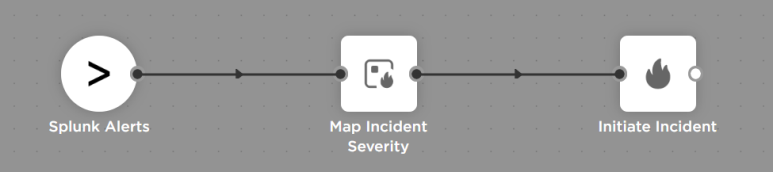
- In the Tools tab, under xMatters, drag the Map Incident Severity step onto the canvas and connect it to your flow.
- Double-click the step to open the setup screen (or move your cursor over the step and click the pencil icon).
- Enter a step label to identify it in your flow.
- Identify the Input Parameter from the external system whose values you'd like to map to xMatters severity levels.
- Select the Default Severity level to use if the runtime value of the input parameter does not match one of the values mapped for each xMatters severity level.
- Specify which values of the input parameter map to each xMatters severity level (Critical, High, Medium, Low, and Minimal).
- You can map multiple levels to a severity level by entering each value on a new line.
- Under Severity Mapping Rules, select if you'd like either, or both, rules to apply:
- Allow Partial Matches: If selected, the values mapped to each xMatters severity level can be contained in the runtime value of the input parameter. For example, in the screenshot below, if the runtime value of the input parameter is "1-Maximum", then a "Critical" severity level is assigned as the output of the step (because "Maximum" is defined as one of the values that maps to the Critical severity level, and it is contained in the input parameter value).
- Case Sensitive: If selected, severity mappings consider letter case. In the example below, a runtime value of "p1" for the input parameter would not map to the Critical severity level (because "p1" and "P1" are not considered a match) and the default severity level "Medium" would be assigned as the output of the step.
- Once you're happy with the settings, click Done.
- Click Save on the canvas.
| Property | Description |
| Severity | The mapped severity level. |
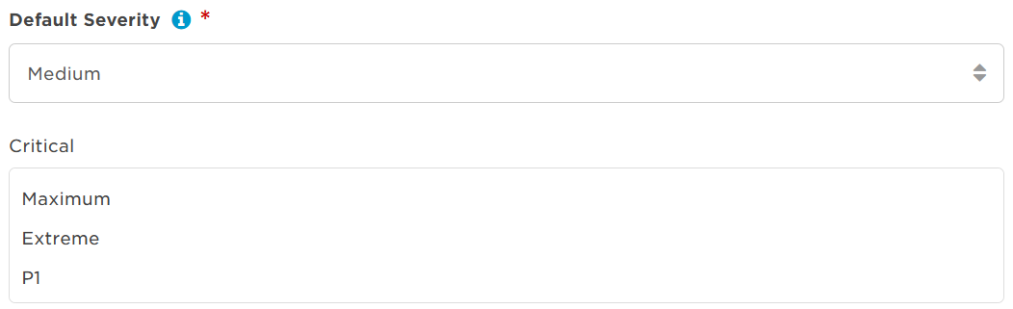
Add Change Record
The Add Change Record step lets you add a change record using the xMatters API. Recording a change can help incident resolvers understand if it contributed to the root cause of an incident. Inputs include information such as the type of change, its external source, and a summary that describes the change. If the change impacts an xMatters service, you can associate the service with the change. You can use the output of this step to reference the change record within xMatters during your team's incident resolution process.
- In the Tools tab, go to the xMatters section and drag the Add Change Record step onto the canvas and connect it to your flow.
- Double-click the step to open the setup screen (or move your cursor over the step and click the pencil icon).
- Enter a step label to identify it in your flow.
- On the Setup tab, fill in the following required fields:
- Change Type: The change type that best fits the change that occurred in the external system. The available options are:
- SOURCE_CODE_COMMIT
- DEPLOY
- ORCHESTRATION
- FEATURE_TOGGLE
- MANUAL
- OTHER
- Source: The name of the external source application where the change took place. This is usually an automation tool or version control system.
- Summary: A short summary describing the change.
- Change Type: The change type that best fits the change that occurred in the external system. The available options are:
- You can also fill in the following optional fields:
- Associated Service: An xMatters service that is impacted by the change. If you leave this field blank, the change record applies globally.
- External Change ID: A unique identifier or name for the change in the source (e.g., revision ID or feature toggle label).
- Timestamp: The date and time the change occurred in the source in UTC format. If you leave this field blank, the timestamp will be filled with the date and time xMatters received the change record.
- Changed By: The name of the user that made the change in the external source application.
- Details: Additional information about the change that can be written in any format (e.g., JSON, plain text).
- Click Done.
- Click Save on the canvas.
| Property | Description |
|---|---|
| Change UUID | Unique ID of the change in xMatters. |
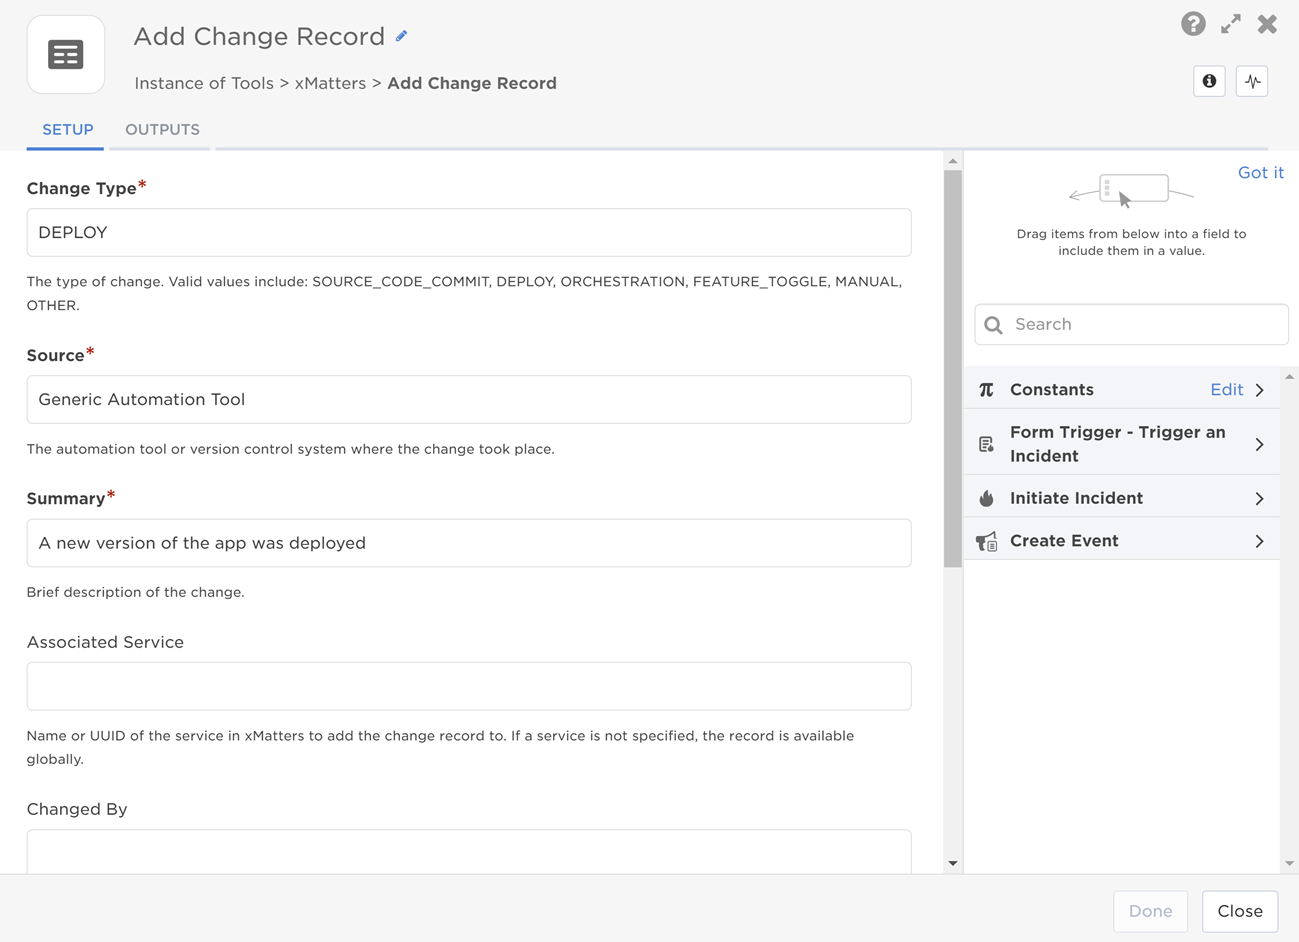
Get Incident
The Get Incident step lets you get current incident information, such as severity, status, impacted services, and the current incident commander and pass it on to other steps in your flow. You can also retrieve the value for specified incident properties and add them as outputs. This lets you use that information to perform specific incident management or resolution tasks for that incident. For example, you could send incident information to external systems like Statuspage to keep stakeholders and customers informed, or change incident details using the Update Incident step to reflect actions performed by resolvers.
- In the Tools tab, go to the xMatters section and drag the Get Incident step onto the canvas and connect it to your flow.
- Double-click the step to open the setup screen (or move your cursor over the step and click the pencil icon).
- On the Setup tab, fill in the following required field:
- Incident ID: ID of the incident to retrieve. Use either the unique identifier (UUID) or Incident Identifier (INC-245).
- In the Incident Properties section, do any of the following:
- To add a new incident property to the outputs of the step, click Add Incident Property, and then start typing in the Name field to find the property you want to add. Select the property when it appears in the drop-down list; the Description field is automatically populated with the incident property's description if it has one.
- To remove an incident property from the list and from the step outputs, click the delete icon to the right of the property you want to remove.
- Click Done.
- Click Save on the canvas.
| Property | Description |
|---|---|
| Incident UUID | Unique identifier of the xMatters incident. |
| Incident ID | xMatters-generated or user-provided incident identifier. |
| Summary | Summary of the incident. |
| Description | Detailed description of the incident. |
| Severity | Severity level of the incident. |
| Status | Status of the incident. |
| Initiator User ID | Target name of the user that initiated the incident. |
| Initiator First Name | First name of the user that initiated the incident. |
| Initiator Last Name | Last name of the user that initiated the incident. |
| Incident Commander User ID | Target name of the user assigned as the Incident Commander. |
| Incident Commander First Name | First name of the user assigned as the Incident Commander. |
| Incident Commander Last Name | Last name of the user assigned as the Incident Commander. |
| Start Time | Date and time the incident was initiated. |
| Impact Start Time | Date and time the incident first impacted the business. |
| Acknowledged Time | Date and time the status was set to In Progress or a resolver became engaged, whichever occurred first. |
| Resolved Time | Date and time the incident was resolved |
| Impacted Services | Comma-separated list of services impacted by the incident. |
| Is Retrieved | Whether the incident was retrieved ('true') or if an incident with a matching Incident ID was not found ('false'). |
| Incident Properties | List of the incident properties configured on the Setup tab. Incident properties that are not associated with the incident type retrieved will be empty strings. |
| Impacted Services | Comma-separated list of all technical, application, and undefined services impacted by the incident. |
| Impacted Application Services | Comma-separated list of impacted services with the type ‘Application’. |
| Impacted Technical Services | Comma-separated list of impacted services with the type ‘Technical’. |
| Impacted Undefined Services | Comma-separated list of services reported as impacted by the incident but are not in the Service Catalog. |
| Highest Impacted Service Tier | Highest tier of the services in the ‘Impacted Services’ output. Valid values are: 1 – Platinum, 2 – Gold, 3 – Silver, 4 – Bronze, None (if no services have an assigned tier) |
| Highest Impacted Application Service Tier | Highest tier of the services in the ‘Impacted Application Services’ output. Valid values are: 1 – Platinum, 2 – Gold, 3 – Silver, 4 – Bronze, None (if no services have an assigned tier) |
| Highest Impacted Technical Service Tier | Highest tier of the services in the ‘Impacted Technical Services’ output. Valid values are: 1 – Platinum, 2 – Gold, 3 – Silver, 4 – Bronze, None (if no services have an assigned tier) |
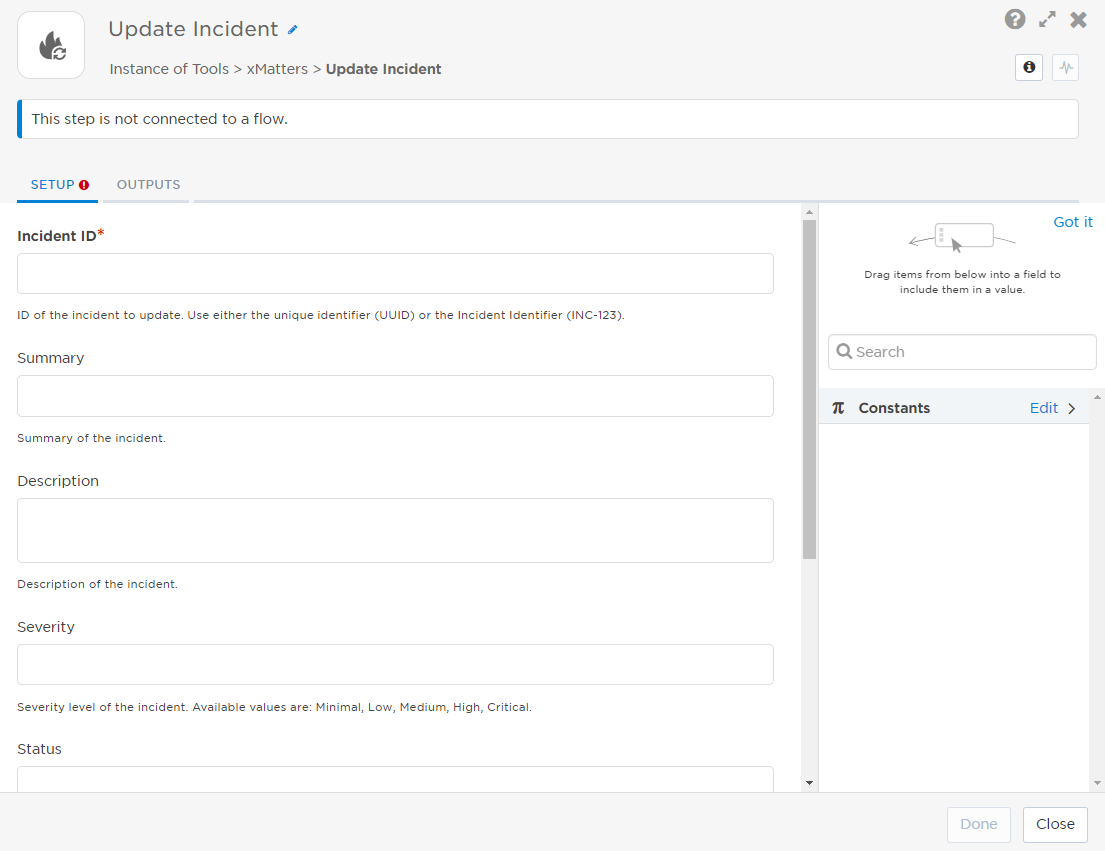
Update Incident
The Update Incident step lets you update details for an existing incident when information changes. This not only keeps the Incident Console as up-to-date as possible for users as they work to resolve an incident, but also helps ensure that changes from other systems or actions taken by resolvers that impact the incident are reflected immediately. and can be communicated to resolvers and stakeholders. All updates are logged in the incident's Timeline.
You can also specify any incident properties you want to update. If the incident or incident type does not have a corresponding property, the property is ignored.
- In the Tools tab, go to the xMatters section and drag the Update Incident step onto the canvas and connect it to your flow.
- Double-click the step to open the setup screen (or move your cursor over the step and click the pencil icon).
- On the Setup tab, fill in the following required fields:
- Incident ID: ID of the incident to update. Use either the unique identifier (UUID) or Incident Identifier (INC-245).
- Fill in the fields you want to update. The provided values will overwrite any existing values on the Incident Console and will be logged in the Timeline. Blank fields will not affect existing incident information.
- Summary: A summary of the incident. The summary is used as the title of the incident.
- Description: An description of the incident. This will overwrite the existing incident description, if one exists.
- Severity: The severity level of the incident. Available values are:
- Minimal
- Low
- Medium
- High
- Critical
- Status: The status of the incident. Available values are:
- Open
- In Progress
- Mitigated
- Resolved
- Rejected
- Impacted Services: A comma-separated list of the business, technical, or external services impacted by the incident. Values specified in this field will overwrite the existing impacted services listed in the incident.
- Note: A reason for the update to the incident. If a note exceeds 1000 characters at runtime, including the value of any variables, it will be truncated in the timeline.
- In the Incident Properties section, do any of the following:
- To update an incident property on the incident, click Add Incident Property, and then start typing in the Name field to find the property you want to add. Select the property when it appears in the drop-down list; the Description field is automatically populated with the incident property's description if it has one.
- To remove an incident property from the list, click the delete icon to the right of the property you want to remove.
- Click Done.
- Click Save on the canvas.
There are no outputs for this step.
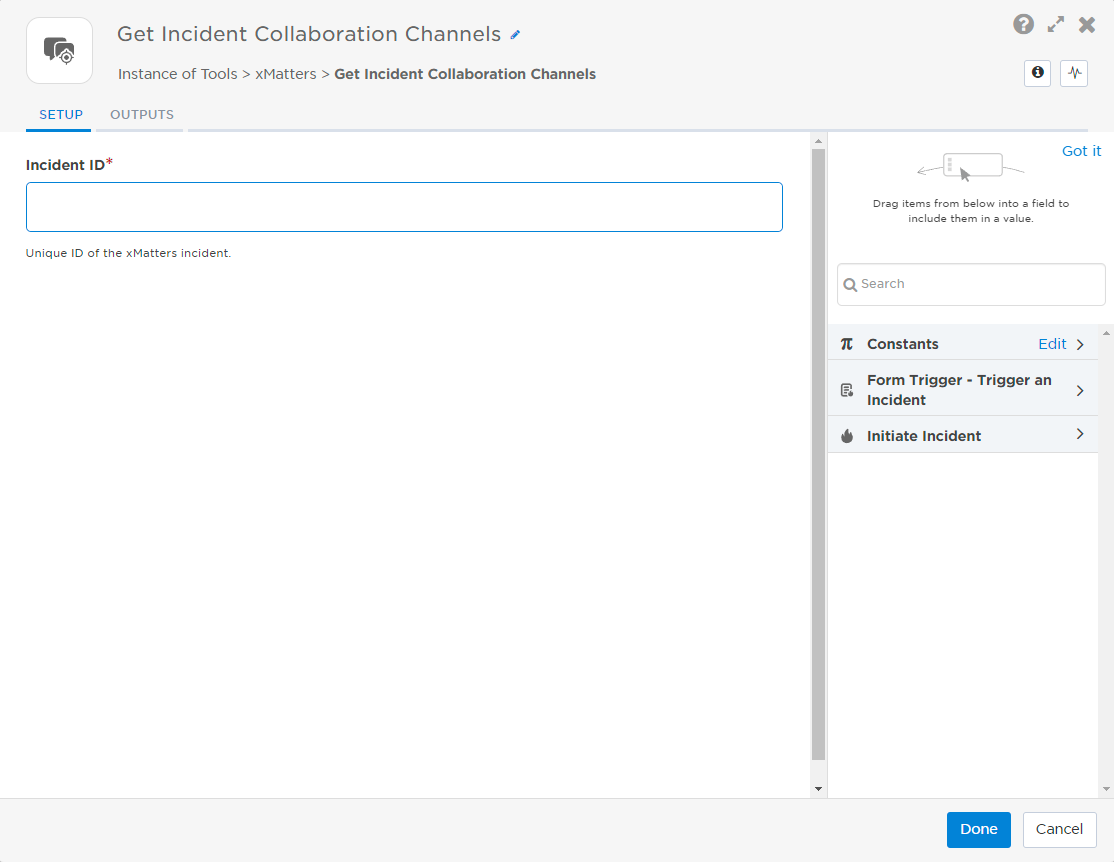
Get Incident Collaboration Channels
The Get Incident Collaboration Channels step lets you get information about collaboration channels for specific incidents, such as the names, URLs, details, and total number of collaboration channels associated with an incident. This allows you to see how incident resolvers are communicating and send channel information to external systems or additional teams to engage them in the conversation.
- In the Tools tab, go to the xMatters section and drag the Get Incident Collaboration Channels step onto the canvas and connect it to your flow.
- Double-click the step to open the setup screen (or move your cursor over the step and click the pencil icon).
- On the Setup tab, fill in the following required field:
- Incident ID: ID of the incident to retrieve. Use either the unique identifier (UUID) or Incident Identifier (INC-245).
- Click Done.
- Click Save on the canvas.
| Property | Description |
|---|---|
| Number of Collaborations | Number of collaboration channels associated with the incident. |
| Collaborations as Text | Name, URL, and collaboration channel details, in text format. |
| Collaborations as HTML | Unordered list of collaboration channel URLs, in HTML format. |
| Collaborations as JSON | JSON representation of collaboration channels, as returned by the xMatters REST API. |
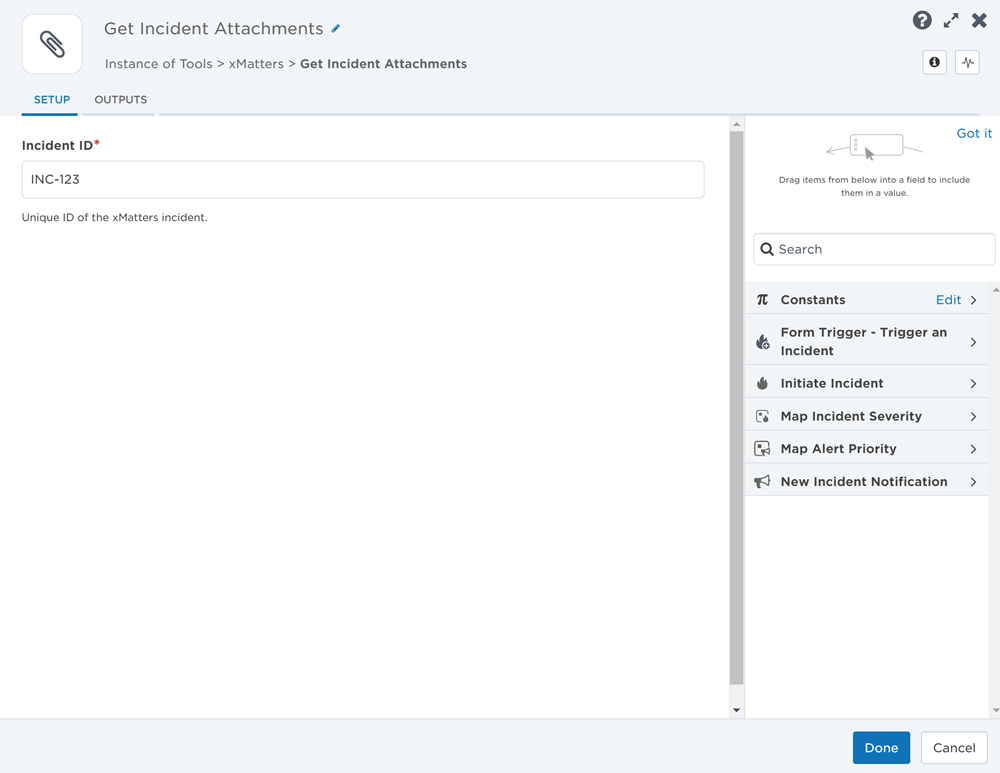
Get Incident Attachments
The Get Incident Attachments step lets you retrieve information about attachments in specific incidents, such as the names, URLs, and total number of files attached to an incident. This allows you to access files that resolvers have attached to an incident and provides you additional information about the issue.
- In the Tools tab, go to the xMatters section and drag the Get Incident Attachments step onto the canvas and connect it to your flow.
- Double-click the step to open the setup screen (or move your cursor over the step and click the pencil icon).
- On the Setup tab, fill in the following required field:
- Incident ID: ID of the incident to retrieve. Use either the unique identifier (UUID) or Incident Identifier (INC-245).
- Click Done.
- Click Save on the canvas.
| Property | Description |
|---|---|
| Number of Attachments | Number of attachments added to the incident. |
| Attachments as Text | List of attachment URLs, in text format. |
| Attachments as HTML | List of attachment URLs, in HTML format. |
| Attachments as Slack Markdown | List of attachment URLs, in Slack markdown format. |
| Attachments as JSON | JSON representation of attachments, as returned by the API. |
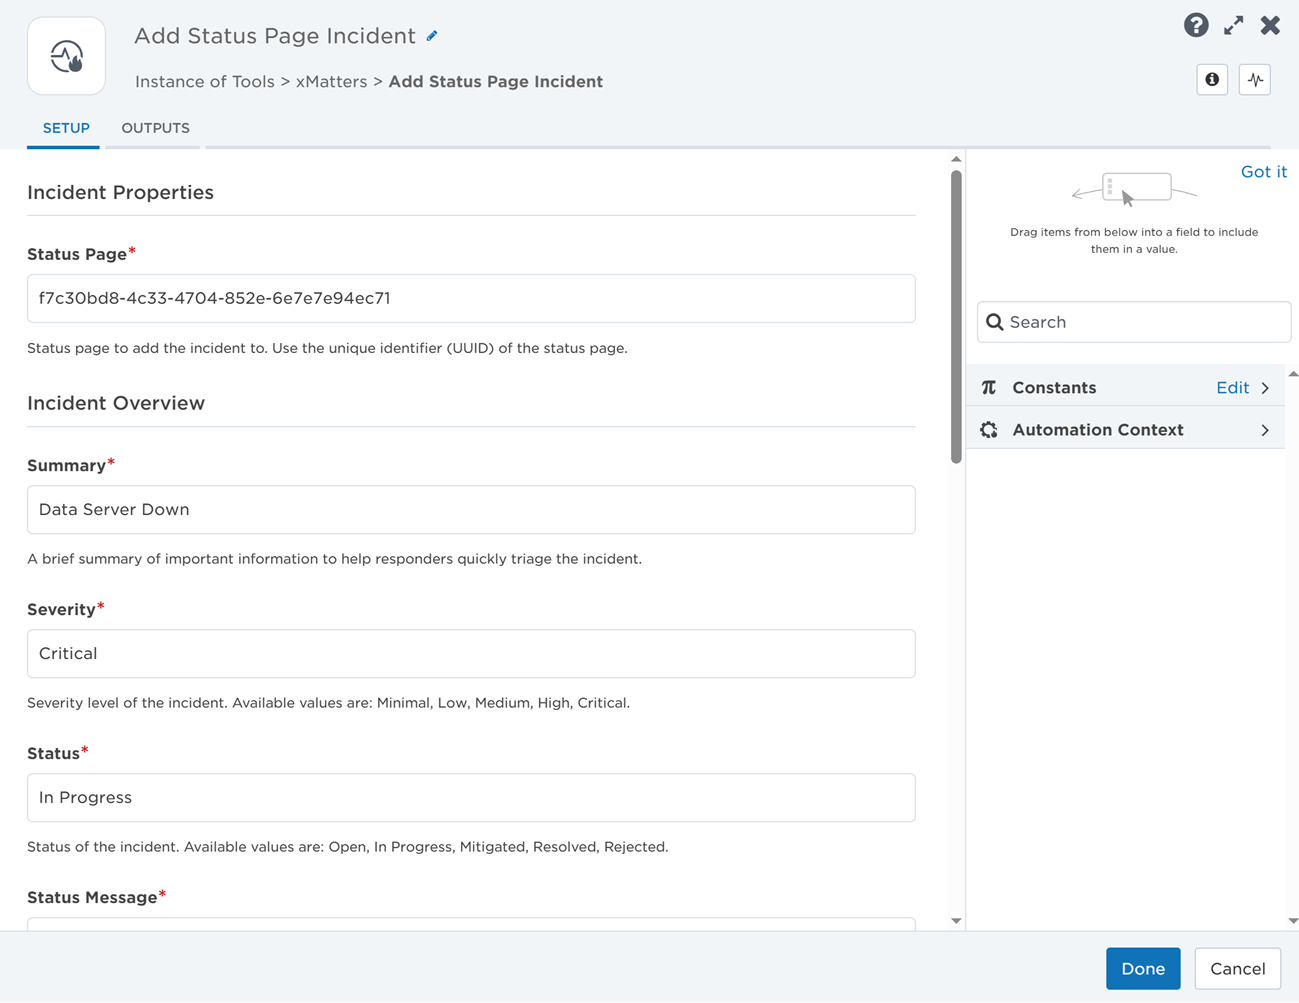
Add Status Page Incident
The Add Status Page Incident step allows you to add an incident to a specified status page. Any incidents added to a status page will be linked to an xMatters incident. Map outputs from previous steps to the inputs to complete the incident details.
- In the Tools tab, under xMatters, drag the Add Status Page Incident step onto the canvas and connect it to your flow.
- Double-click the step to open the setup screen (or move your cursor over the step and click the pencil icon).
- In the Status Page field, enter the UUID of the status page you want to add the incident to.
- Fill in the required fields in the Incident Overview section.
- In the Incident Identifier field, enter the incident ID of the xMatters incident to link to the status page incident. If the value does not match an existing xMatters incident or if the field is left blank, a new xMatters incident will be created to link to the status page incident.
- Add services impacted by the incident by typing text or dragging variables into the designated Impacted Services fields. Each service status has its own field.
- Once you're happy with the settings, click Done.
- Click Save on the canvas.
| Property | Description |
|---|---|
| Incident Identifier | Incident identifier (INC-123) of the xMatters incident linked to the status page incident. |
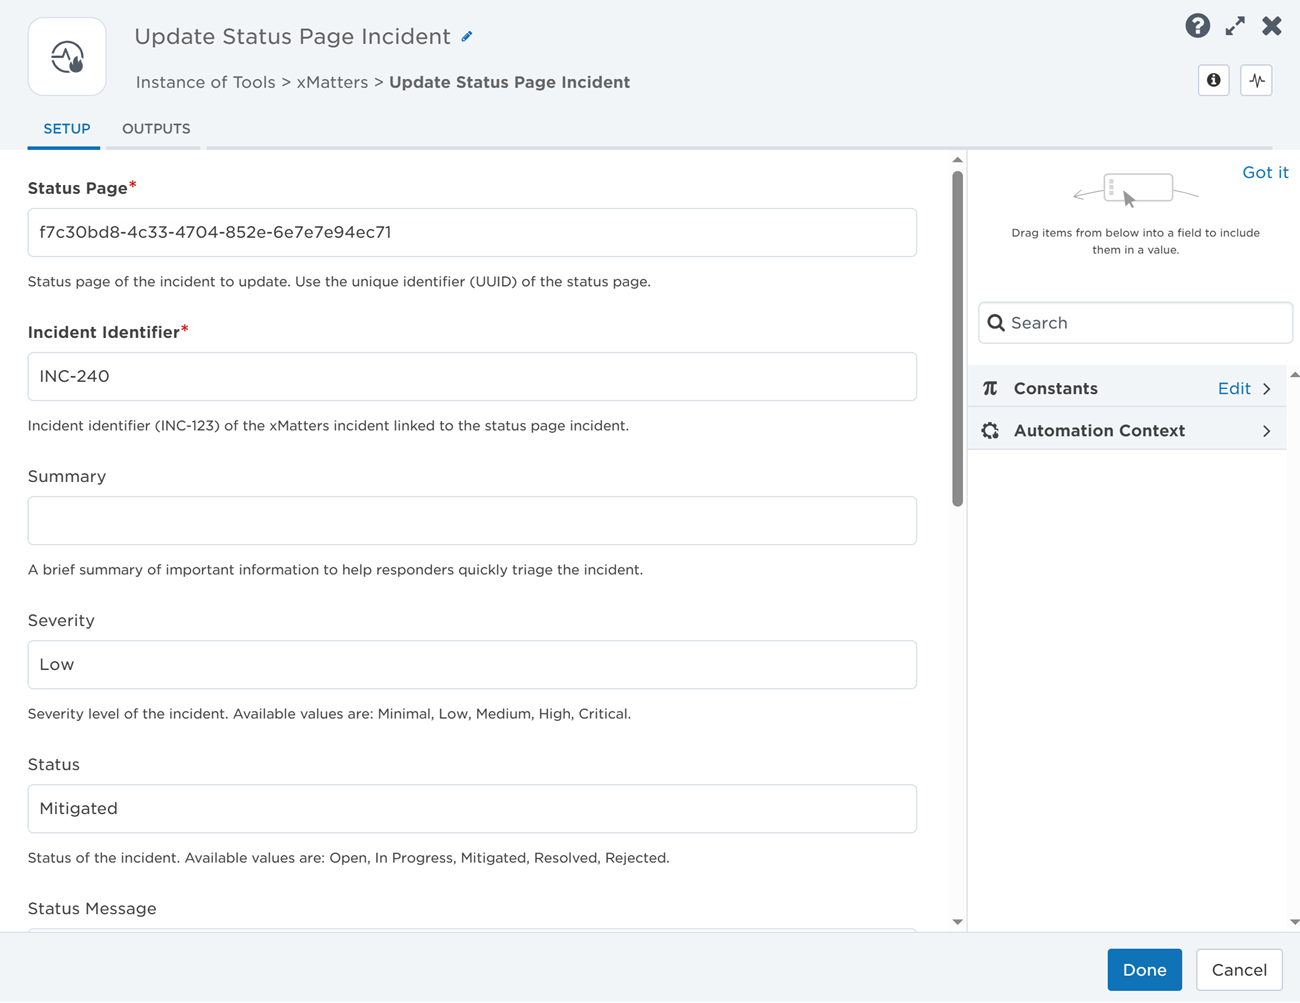
Update Status Page Incident
The Update Status Page Incident step allows you to update an incident on a specified status page. Map outputs of previous steps to the inputs to determine which incident to update and what details to change.
- In the Tools tab, under xMatters, drag the Update Status Page Incident step onto the canvas and connect it to your flow.
- Double-click the step to open the setup screen (or move your cursor over the step and click the pencil icon).
- In the Status Page field, enter the UUID of the status page containing the incident you want to update.
- In the Incident Identifier field, enter the incident ID of the xMatters incident linked to the status page incident.
- Fill in the fields you want to update. The provided values will overwrite any existing values for the status page incident, excluding the impacted service fields. Blank fields will not affect existing information.
- Add services impacted by the incident by typing text or dragging variables into the designated Impacted Services fields. Each service status has its own field.
- If a service is already impacted by the incident, the status you set on this screen will overwrite its previous status.
- Any services you add to the Impacted Services fields on this step will not overwrite the existing impacted services of the status page incident.
- Once you're happy with the settings, click Done.
- Click Save on the canvas.
| Property | Description |
|---|---|
| Incident Identifier | Incident identifier (INC-123) of the xMatters incident linked to the status page incident. |
| Result | Returns 'Success' if the step updated the status page incident. Available values are: Success, Failure. |