Example: Use an email to trigger a flow
Email integration with xMatters can be incredibly powerful when combined with the flexibility of Flow Designer but what if you just want to send an email to initiate an alert? This example walks through the three basic steps of setting that up. Well, two steps really since the third is testing the flow.
Step 1: Add an Email Initiation trigger
An Email Initiation trigger is what receives the email (and lets you control who can trigger the flow and change the email address...if you want to).
- Open the workflow associated with the alert you want to create. In this example, we'll use a Weather Alerts workflow with forms for notifying about tornadoes, blizzards, etc., but the basic setup is the same if you have a Support Request workflow that notifies if there's a new request posted to your "Request Support" web page.
- Go to the Flow Designer tab and open the associated canvas. In this example, we'll open our Weather Alerts canvas.
- Drag the Email Initiation trigger onto the canvas and double-click it to open the setup screen.
- Select the authentication method:
- Send from any email: An email sent from any email address will trigger the flow. The flow runs using the credentials of the user selected in the Authenticating User field.
- Send from an xMatters email device: Only emails sent from an address associated with a valid xMatters device will trigger the flow. The flow runs using the credentials of the user associated with the email address.
- Check the email address. This is the address that you send an email to if you want to initiate the flow.
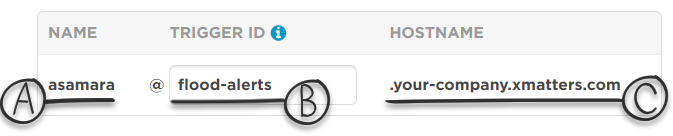
- Name: The setup shows your name in the "to" portion of the email, but you don't have to send it to yourself. When you send the email, you can replace the Name portion with any user or group in xMatters. And you can choose whether or not to use these users or groups as the recipients of the alert.
- Trigger ID: By default, this is some random letter-number combination to ensure it's unique. But you can edit it to make it easier to identify what the trigger relates to. For example, you could change the trigger ID to "tornadoes" (for tornado alerts) or "support-request" (for support request notifications).
- Hostname: This is, well, your xMatters hostname.
- Click OK.
Now that we've configured the Email Initiation trigger, we can connect a step to create an alert in xMatters.
Step 2: Connect a Create Alert Using a Form step
In this example, we'll add a Create Alert Using a Form step immediately after the Email Initiation trigger to keep things simple. But in a different flow, we might only want to send an alert if the blizzard is forecast for a business day, or if the support request applies to a critical system.
- Click on the Tools tab in the palette.
- Connect a Create Alert Using a Form step to the Email Initiation trigger and double-click it to open the setup screen.
- When you first configure a Create Alert Using a Form step, you're asked to pick a form. xMatters gives you the flexibility to target any form in the workflow. Consider our Weather Alerts. For example, you can have one workflow for all weather-related notifications that contains unique forms for different types of weather alerts or for different regions. To keep things simple, we'll pick the form associated with our weather alert canvas.

The person whose credentials are used to run the flow must have sender permissions on the selected form (either the Authenticating user or the user associated with the address the email is sent from).
- Use the Recipients field to set the targeted recipients. To keep it simple, we'll drag the email.recipients output into the field. You can add the target name of any user or group in xMatters, or you can leave it blank if you want to send the notification to whatever default recipients you set in the form.
- Fill in the fields of the step with outputs from the Email Initiation trigger, constants, or plain text. Use the Search bar to quickly find properties or constants. For instructions on pulling information out of the email body, see our article on creating a step tailored to your emails.
Step 3: Test your Email Initiation trigger
Those two steps — add an Email Initiation trigger and connect a create alert step — are all you need to initiate notifications using an email. But it's always a good idea to test your flow to make sure you're getting the results you expect.
- Double-click the Email Initiation trigger and click either Copy Address (copies the address to your clipboard) or Test Emaill (opens your default email client with the To field pre-populated).
- Change the portion of the email before the @ if you want. Because this example uses the "to" to figure out the xMatters recipients to target, we could add "CapCityEmployees" to our Weather Alert email. xMatters would then notify the people in the Capital City employees group of the impending alert. Since this is a test, maybe it's better to send it to ourselves.
- After you send the email, check the Activity panel for the flow to see what happened.
That's all you need to do to integrate with xMatters using email.
What's next
Of course, with the flexibility of Flow Designer, you can do much more.
- Do you want to pull information out of the email body to use in your flow, share with other tools, and include in the alert notification? Create a custom step to parse the email.
- Do you want the Email Initiation trigger to create a Jira Cloud issue, inform your users via a Statuspage, or post to a chat? Connect one of our built-in apps to the flow.
- Maybe you want the flow to change paths based on whether the email subject is "Login Issues" vs "Suggestion for improvement"? Try using a switch step.
- Or do you want to post information from the email (and other steps in the flow) to your custom dashboard? Create a custom step tailored to your tools and your needs.
For instructions on doing more with Email Initiation triggers, see the Easy as Pie: Advanced Email Initiation article on the support site.