Create Alert Using a Form step
The Create Alert step is the improved version of the Create Alert Using a Form step with built-in message and response builders in Flow Designer. We recommend using the Create Alert step unless you want to use recordings in voice messages, configure response counts, and support features like subscriptions, scenarios, or attachments. These options are currently only available using a Create Alert Using a Form step and a messaging form.
The Create Alert Using a Form step (formerly known as the Create Event step) lets you use a messaging form to create a new alert at any point in the flow in response to previous steps, using information from those steps to populate alert details and targeted recipients. You can use any messaging form in the workflow to create the alert.
For example, you might want to create a new alert:
- In response to an email trigger, with the addressees in the email becoming the recipients of the alert notification.
- Based on an "Emergency alert - Location" switch step, creating alerts targeting different groups with different instructions if the location is Los Angeles versus London.
- After an HTTP trigger, populating the alert details using the values of properties in the request, including setting the recipients from an "Assignment Group" output on the trigger.
- Create an alert using a different form that targets your customer support team after a "Customer Impacting" switch step.
Set up a Create Alert Using a Form step
Before using the Create Alert Using a Form step, there are a few things to keep in mind:
- To use this step, you require a messaging form. The step does not appear in the palette unless the workflow contains at least one messaging form.
- The user initiating the flow must have sender permissions for the targeted form.
- The target form defines the notifications that are sent and the responses available. If you're targeting a different form, you can also create a whole new set of flows associated with that form that are triggered by the new alert.
To configure a Create Alert Using a Form step:
- Add the step to the canvas
- Select the form to use for the alert
- Configure recipients and alert properties
- Set devices to target for notification
- Configure a conference bridge to use for the alert
- Configure notification handling settings
After you've finished configuring the step, click Done, then save the canvas.
Step 1: Add the step to the canvas
The Create Alert Using a Form step only appears on the palette if your workflow has a messaging form.
Drag an xMatters Create Alert Using a Form step onto the canvas and double-click the step to open the setup screen (or hover over the step and click the pencil icon). Update the step label to reflect the purpose of the alert. For example, if the step follows a "Customer impacting=true" path on a switch step, you might name it "Create Customer Care Alert".
| Property | Description | Example |
|---|---|---|
| event.id | The unique identifier (UUID) of the alert. | e930e32d-b863-4c55-a528-1d2829e3690e |
| event.eventId | ID assigned to this alert by xMatters and used to track its progress through the system. (Also the number used to reference this alert in the Alerts and Tracking reports.) | 889003 |
| event.status | The current status of the alert. | ACTIVE |
| event.created | Date and time the alert was created in xMatters in ISO-8601 format. | 2019-01-15T18:03:16.580Z |
| event.priority | The priority assigned to the notification in xMatters: LOW, MEDIUM, or HIGH. | HIGH |
| event.recipients | The recipients targeted for notification. | mmcbride|Work Email, AntaresDB-Support |
| event.initiator | The target name of the user who initiated the alert. | integrationUser |
| conference.bridgeNumber | The ID number of the conference associated with the alert. This is only available if there is a conference bridge associated with the form. |
74778487 |
Step 2: Select the form to use for the alert
After you open the step on the canvas, you'll be prompted to select a messaging form to use for the alert (the form description, if it exists, appears below the name). After you make your selection, click Apply. The fields in the Setup tab will be populated using the layout of the form you select.
You can't switch the form used by the step after you click Apply. If you decide you want to target a different form, delete this instance of the step from the canvas and add a new Create Alert Using a Form step.
Step 3: Configure recipients and alert properties
On the Setup tab, fill in the recipients and alert properties using text, outputs from previous steps, trigger properties, constants, or a combination or all three. You can quickly find properties or outputs with the Search bar.
If this step is notifying resolvers for an incident, make sure to populate the Incident ID field with the "Incident ID" output from the connected Initiate Incident step — this is what associates the resolvers to the incident.

If there is an Initiate Incident step preceding the Create Alert step, use the "Incident ID" output from that step in the Incident ID field. This associates the notification with the incident in xMatters.
Specify recipients using the xMatters target name of the user, group, device, or service you want to target. For example, this can include mmcbride, AntaresDB-Support, Responders-Team, mmcbride|Work Email, or API. When you specify a service name, the group which owns the service is targeted.
If the form specifies default recipients, they appear in the Recipients field; delete a default recipient if you don't want to include them in the alert notifications. Populate the Recipients field by mapping an output from a previous step, using a constant, or by hard-coding the target name (or a combination). If you're using a constant or an output from a previous step, make sure it provides the information as an xMatters target name.
To target multiple recipients, use a comma between the input variables or target names. For example, to notify both the CustomerCare group and email the VP of Customer Support, use CustomerCare, mmcbride|Work Email. There is a 20,000 character limit for recipients, so if you need to notify a large number of recipients consider creating a group.
Target names that contain commas aren't supported, and may result in targeting errors. If there are no recipients at runtime, xMatters only notifies subscribed users.
In case the previous step can't provide the target device, you can set the devices to target in the Devices section of the form associated with the Create Alert Using a Form step.
- Use text, constants, outputs from previous steps, or a combination to populate the alert properties.
- The properties you can fill out are based on the properties of the targeted form — if you want to include different properties, you need to add them to the form. Any defaults set for properties other than lists appear on the configuration screen, and any required properties must be filled in.
- If you configured validation on a form property, that validation is done at runtime. If the value is not valid, the flow fails. For example, if a Date property requires the date to be in ISO 8601 format, and a date in a different format comes through at runtime, the flow will fail.
- To enter a hierarchy property, use an angle bracket (">") between the levels of the hierarchy. Here's an example of a "Location" hierarchy::

- To enter multiple values for a list property, use a comma between the two values. Here's an example of a "Systems" list:

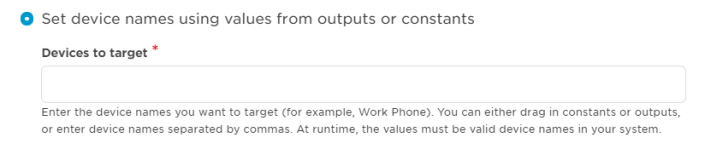
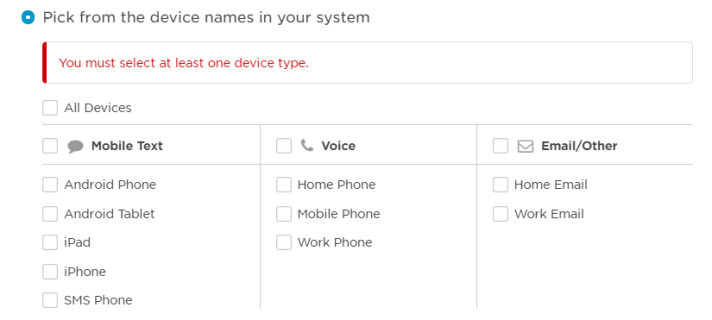
Step 4: Set devices to target for notification
The Devices tab lets you set which device names the Create Alert Using a Form step targets for notification. For example, you can use these settings to specify that this step only notify mobile devices and work phones.
When you add a Create Alert Using a Form step to the canvas, it uses the device settings that exist for the associated form by default. When you change which devices the step targets in Flow Designer, it'll override the settings configured on the form layout when your flow initiates the step. If the associated form does not have the Devices section configured, the Devices tab in Flow Designer uses the built-in default settings.
If a recipient doesn't have one of the specified devices, they won't get notified (unless you've configured failsafe devices for your users and groups).
There are two ways you can specify which device names to target for notification:
You can specify a comma-separated list of device names to target using the outputs of previous steps, constants, or text - or a combination of these. The value that's provided at run-time must match a valid device name (you can see a list of the available device names when you select the next option, to pick from a list of device names).
This is the default option that's selected when you add a new Create Alert Using a Form step. It gives you access to the devices settings configured for the form associated with the step. If you select this option, but the Devices section isn't included on the associated form, xMatters adds the section and selects all devices by default.
Step 5: Configure a conference bridge to use for the alert
The Conference Bridge tab only appears if the messaging form associated with the Create Alert Using a Form step includes a conference bridge section.
The Conference Bridge tab lets you configure a conference bridge for the alert. The settings on this tab will vary depending on the type of bridge configured for the form (xMatters Hosted Bridge, External Bridge, or both). To edit a setting, select or specify a new value. For some settings, you have the option to 'Use Output or Constant Value'. This allows you to use text, the output of a previous step, or a constant as the value for the setting.
You also have the option to dynamically set the type of conference bridge at runtime with the option to 'Use Output or Constant Value' to set the bridge type.
To configure an xMatters hosted bridge, select xMatters Hosted Bridge. Provide the Bridge ID to join users to an existing bridge or leave the Bridge ID field blank to create a new bridge for the alert.
- Select External Bridge as the bridge type, and then do one of the following:
- Select the name of the conference bridge to use. You may need to provide the bridge number that identifies the conference to the conference bridge provider.
- Select Use Output or Constant Value to use text, the output of a previous step, or a constant value to define which bridge to use. When you select this option, you'll need to provide the name of the bridge and the bridge number.
- Provide a meeting URL or use the default meeting URL configured for the step. You can use text, the output of a previous step, or a constant value to define the meeting URL.
If you see this option, the messaging form associated with the Create Alert Using a Form step allows you to use either xMatters hosted or external bridges and you can dynamically define the details of the bridge using text, the output of a previous step, or a constant value.
Select the option Use Output or Constant Value to set the type of bridge you want to use at runtime (valid values are BRIDGE for xMatters hosted or EXTERNAL for external bridge), then provide the details for the xMatters hosted or external bridge.
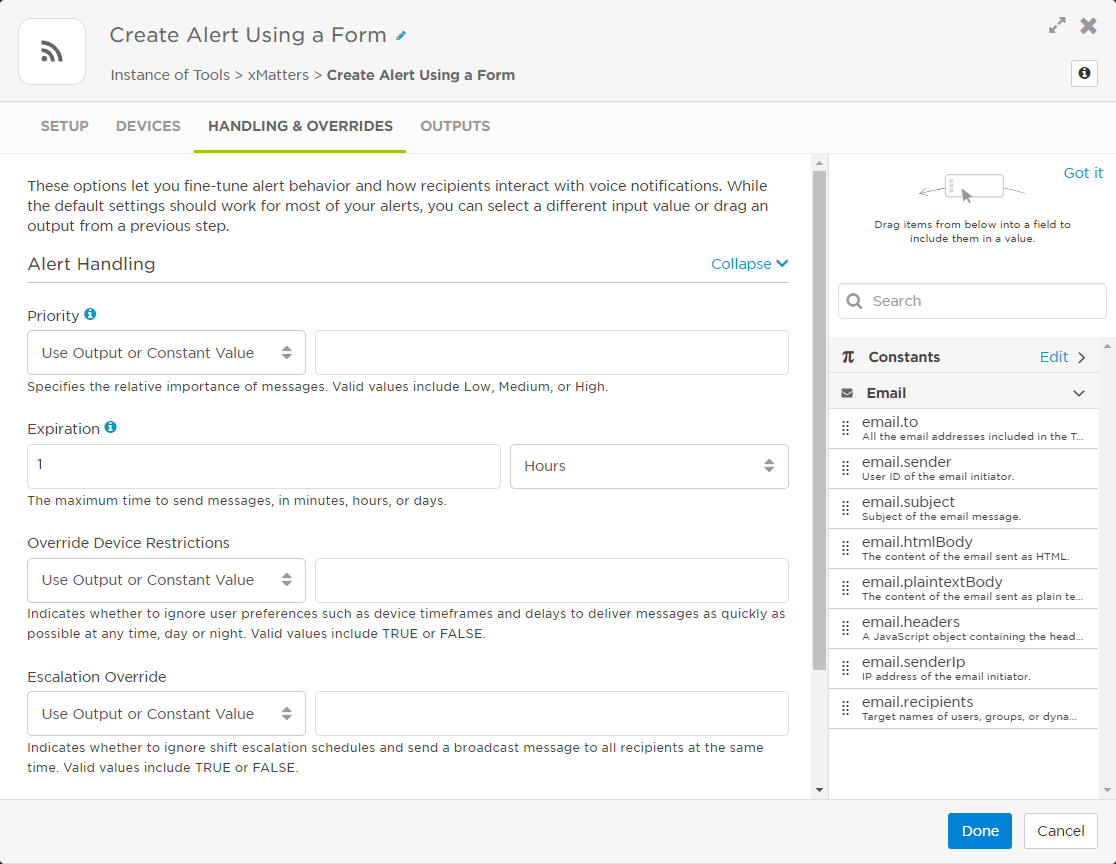
Step 6: Configure notification handling settings
The Handing & Overrides tab gives you access to the handling and sender overrides settings for the form associated with the step. These settings allow you to control how the alert behaves and how recipients interact with voice notifications (for example, you can specify the alert's priority and expiration, as well as several override, password, and voicemail options), and they allow you to override the Caller ID and display name associated with the alert.
When you add a Create Alert Using a Form step to the canvas, it uses the handling and override values that exist for the associated form. You can change the value of any of these settings on the Handling & Overrides tab in Flow Designer, and they'll override the settings configured for the form when your flow initiates the step. If the associated form does not have Handling or Sender Overrides sections configured, the Handling & Overrides tab in Flow Designer uses the built-in default settings.
To edit a setting, select or specify a new value. For some settings, you have the option to Use Output or Constant Value. This allows you to use text, the output of a previous step, or a constant as the value for the setting. The value that's provided at run-time must match one of the valid values listed for that setting.
For example, the value that's passed into the Alert > Priority property as part of your flow must be LOW, MEDIUM, or HIGH when the step is initiates to be a valid input for the Priority alert handling setting: