Outbound integrations
Outbound integrations enable web applications and integrations to extract information from an xMatters alert and take action based on the properties of the alert. You can configure the webhook used in an outbound integration for alert status changes, alert comments, device deliveries, targeted recipient failures, notification responses, and escalations. A webhook's payload contains information about the action that triggered it and may include the value of some form properties.
The applications of outbound integrations are endless; the following examples are just some of the various ways you can use them:
- Notify a help desk system that a user has responded to a notification with a comment or has commented on the alert. The help desk system could add the comment to the associated ticket or assign the ticket to the user who made the response.
- Maintain your own log of xMatters alerts for auditing purposes. You can archive these logs indefinitely to achieve compliance to industry standards for accountability.
- Maintain a two-way email integration between xMatters and a third-party application.
Outbound integrations can be configured for use with any web application able to consume POST requests over HTTP, or with integrations that use the xMatters Integration Agent in indirect mode.
Outbound integrations can be hosted in the xMatters cloud, or run in your own xMatters Agent. The outbound integration can also trigger behaviors on the Integration Agent.
You can configure an outbound integration to perform one of the following actions:
- Run a script: Execute a script, such as a SOAP or REST request, in xMatters.
- Send a webhook: Send a web request to an HTTP endpoint.
- Send to Integration Agent: Send webhooks to an Integration Agent or integration service.
When creating an outbound integration, you select the type of system activity that you want to trigger the integration: alert status updates, device delivery updates, notification responses, alert comments, targeted recipient failures, or escalations.
You can create one outbound integration for each type of system activity associated with your form. For more information about how outbound integrations create and send webhooks, see Outbound integration triggers.
These triggers can be especially powerful when used in conjunction with the xMatters REST API. For more information about using outbound integration triggers with the REST API, see Introduction to xMatters REST APIs.
If you'd like to create a multi-step process that's triggered by a system activity, design a flow in Flow designer.
In general, when building integrations, you should:
- Make sure that anyone allowed to initiate alerts also has the correct permissions required for any requests that target xMatters endpoints in the outbound integration scripts.
- Modify your outbound integration scripts to handle the cases where the initiating user might not have the required permissions. This is especially important if, for example, you're retrieving a list of users and the returned results will be different if the initiating user doesn't have permission to view some of the people in your system.
This applies to all of your users that are authorized to initiate alerts for a workflow with outbound integrations, no matter which method they are using to initiate alerts.
Flow Designer is a visual-workflow builder that lets you easily create multi-step processes between xMatters and your DevOps and IT applications by simply dragging, dropping, and connecting steps.
New or existing outbound integrations created in the Integration Builder are accessible in Flow Designer. When you open the canvas for your form, any outbound integrations that you've built in the Integration Builder appear on the canvas as triggers. You can connect additional steps to these triggers to extend the functionality of your outbound integrations.
Outbound integration triggers
Whenever an outbound integration is triggered, it generates a webhook that includes information about the action that triggered the integration, the associated alert, and the value of some form properties.
By setting a form property to be included in outbound integrations, you can relay any information that is available to the form when the alert is initiated. You can even create form properties that are used exclusively for communicating to third-party systems. For example, you could create a form property that prompts the user to select a category that exists in the third-party system. This value is passed to the webhook but doesn't need to be included in the message body of notifications that are sent to recipients.
Every webhook includes some common information:
- alert identifier: a unique identifier that can be used to track the alert that triggered the integration
- date: the date and time the webhook is created
- alert properties: values of form properties flagged to be included in the webhook
In addition to this common information, each type of webhook payload includes information about the action that triggered it.
Trigger: An alert is started, suspended, resumed, or terminated.
Included information: The status of the alert and the user who initiated the alert status change. See what's included in the payload.
Examples of when to use this trigger:
- Automatically update the record in your monitoring tool to add an annotation that the xMatters alert ended.
- Post alert creation and termination updates to your reporting repository for analytics and observability initiatives.
- Automatically close the ticket in the source system when the xMatters alert ends.
Trigger: A user adds a comment from the mobile app, xMatters Inbox, email, Tracking Report, or via the xMatters REST API.
Included information: The user that made the comment and the content of their comment. See what's included in the payload.
Examples of when to use this trigger:
- Post each comment back to a Slack channel or other ChatOps application.
- Populate the free-form text closure details of a ticket or alert (in this case, you could actually perform your response logic in the alert comment trigger instead of the response trigger!)
- Add the comments to a ticket or alert as annotations, recording the work performed on the alert, either for the next person in the resolution chain or for post-incident analysis.
Trigger: An escalation occurs in a group.
Included information: The group containing the shift with the escalation, the reason for the escalation, the user that escalated the alert (if applicable), the type of escalation, the recipients the alert escalated from, and the recipients the alert escalated to. See what's included in the payload.
Examples of when to use this trigger:
- Automatically launch a new alert warning a manager when an alert has escalated to the point where an SLA (service level agreement) is in jeopardy.
- Automatically update a chat room warning team members when an alert is escalated.
Trigger: A notification is delivered to a device or notification delivery fails.
Included information: The user and device that the message was sent to and whether the delivery was successful. See what's included in the payload.
Examples of when to use this trigger:
- Post details about who was notified and when into a ticket, alert or chat application so the notification process is clearly visible (and documented).
- Post details about device notification failures to a list so you can follow up with users who seem to be experiencing delivery issues.
We've introduced a new Responses trigger in Flow Designer that allows you to easily design flows for individual response choices without scripting. Although existing integrations using the Notification responses trigger will continue to work, we recommend that you use the Responses trigger unless your integration requires parsing out the responses in the scripts (required by some of our community and packaged integrations).
Trigger: A user responds to a message.
Included information: The user and device that made the response, their response choice, and annotations from the mobile app included with the response. See what's included in the payload.
Examples of when to use this trigger:
- Automatically assign an incident when a recipient responds with Accept (or Assign to me or whatever response you have configure for this).
- Approve or reject change requests based on responses.
Trigger: None of the targeted recipients could be immediately notified for an alert.
Included information: The type of failure, the first 100 targeted recipients, and the total number of targeted recipients. See what's included in the payload.
Examples of when to use this trigger:
- Automatically notify a chat room that an alert isn’t currently routing to on-call resources.
For more detailed information about the specific JSON payload for each webhook, refer to the Integration Builder scripting reference.
Configure outbound integrations
The following instructions describe how to use the Integration Builder to configure an outbound integration to perform different actions in the cloud, or in your xMatters Agent or Integration Agent.
You can also now create mulit-step processes between xMatters and your DevOps and IT applications with our new visual-workflow builder, Flow Designer.
- In xMatters, access the Integration Builder tab in the workflow for which you want to create an integration.
- For more information about how to access the Integration Builder, see Access the Integration Builder.
- On the Integration Builder tab, in the Outbound Integrations area, click Add.
- If you haven't already created outbound integrations for this workflow, expand the list to display the Add button.
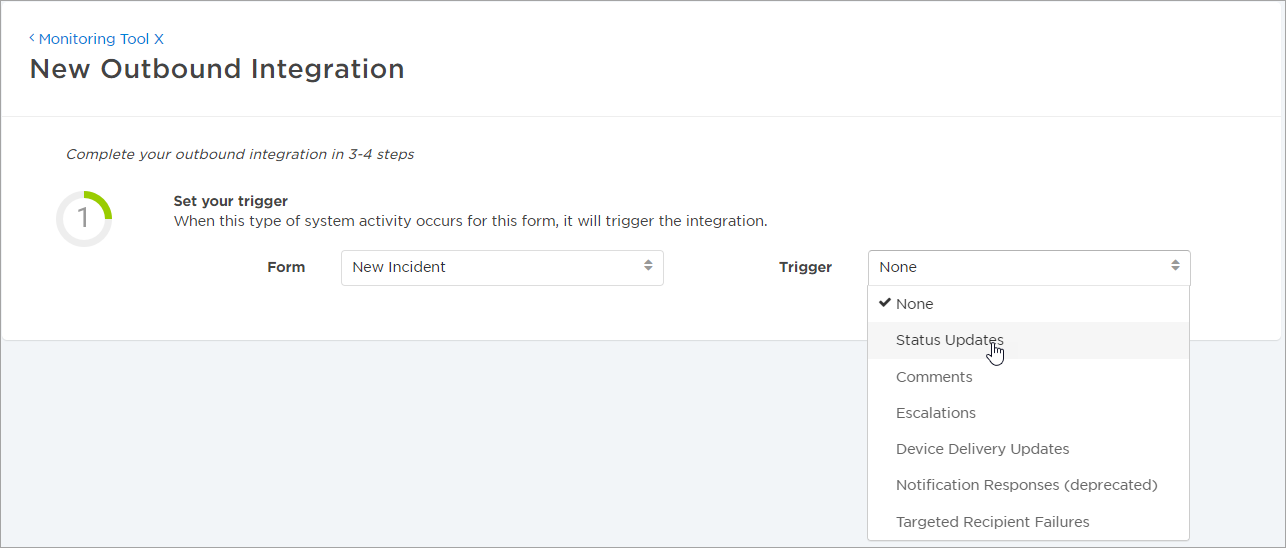
- On the New Outbound Integration page, set the trigger for your integration:
- Select the form to use to trigger the integration when a system activity occurs for that form.
- Forms do not have to be enabled to configure an integration, but must be enabled before you can use them to send a webhook.
- Select the type of system activity that will trigger the integration: Status Updates, Alert Comments, Escalations, Device Delivery Updates, Notification Responses (deprecated) , or Targeted Recipient Failures.
- Select the form to use to trigger the integration when a system activity occurs for that form.

We've introduced a new Responses trigger in Flow Designer that allows you to easily design flows for individual response choices without scripting. Although existing integrations using the Notification responses trigger will continue to work, we recommend that you use the Responses trigger unless your integration requires parsing out the responses in the scripts (required by some of our community or packaged integrations).
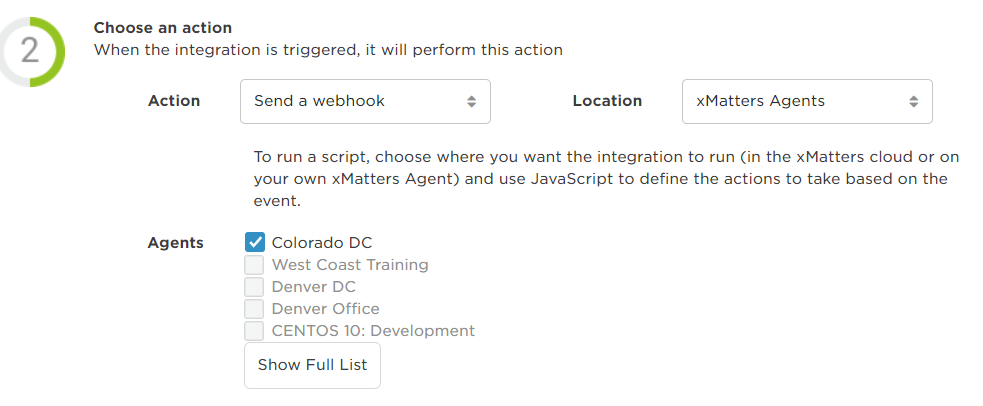
- Choose the action that the integration will perform when it is triggered, and the location where it will run:
- From the Action drop-down list, select Send a Webhook.
- From the Location drop-down list, select xMatters Agents or Cloud.

- For integrations running on xMatters Agents, select one or more agents from the list of available agents.

You must be a registered user of an xMatters Agent to select the xMatters Agent option from the Location list. The list of agents displays all agents in your organization, but you can only select agents for which you are a registered user.
- From the Endpoint drop-down list, select the endpoint that xMatters will send data to when the specified system activity occurs.
- Click Edit Endpoint to edit the details of an existing endpoint or to add a new endpoint. You can also optionally append a path to the endpoint's base URL.

- In the Name field, type a name for your integration.
- This name will be displayed in the list of outbound integrations on the Integration Builder tab, so call your integration something descriptive to be able to identify it later.
- Click Create Outbound Integration.

- In xMatters, access the Integration Builder tab in the workflow for which you want to create an integration.
- For more information about how to access the Integration Builder, see Access the Integration Builder.
- On the Integration Builder tab, in the Outbound Integrations area, click Add.
- If you haven't already created outbound integrations for this workflow, expand the list to display the Add button.
- On the New Outbound Integration page, set the trigger for your integration:
- Select the form to use to trigger the integration when a system activity occurs for that form.
- Forms do not have to be enabled to configure an integration, but must be enabled before you can use them to send a webhook.
- Select the type of system activity that will trigger the integration: Status Updates, Alert Comments, Escalations, Device Delivery Updates, Notification Responses (deprecated), or Targeted Recipient Failures.
- Select the form to use to trigger the integration when a system activity occurs for that form.

We've introduced a new Responses trigger in Flow Designer that allows you to easily design flows for individual response choices without scripting. Although existing integrations using the Notification responses trigger will continue to work, we recommend that you use the Responses trigger unless your integration requires parsing out the responses in the scripts (required by some of our community or packaged integrations).
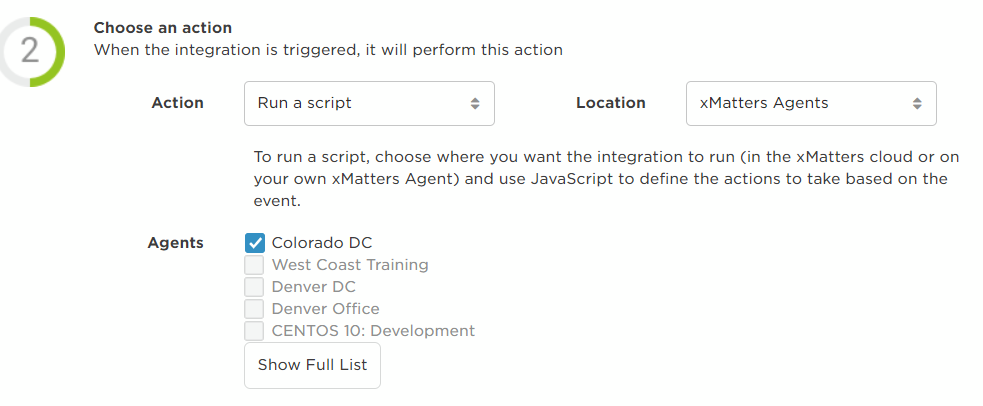
- Choose the action that the integration will perform when it is triggered, and the location where it will run:
- From the Action drop-down list, select Run a script.
- From the Location drop-down list, select xMatters Agents or Cloud.

- For integrations running on xMatters Agents, select one or more agent from the list of available agents.

You must be a registered user of an xMatters Agent to select the xMatters Agent option from the Location list. The list of agents displays all agents in your organization, but you can only select agents for which you are a registered user.
- In the Name field, type a name for your integration.
- This name will be displayed in the list of outbound integrations on the Integration Builder tab, so call your integration something descriptive to be able to identify it later.

- Click Edit Script to modify the transformation script to process the incoming request.
- xMatters automatically creates a default transformation script that prepares an HTTP request body using the alert properties of the webhook of the selected integration trigger-type. It also includes some commented-out examples of how to prepare an HTTP request to target an endpoint.
- Click Create Outbound Integration.
- If you chose to modify the transformation script in the previous step, your integration will already have been saved and added. Click Update Outbound Integration to save any additional changes.

If you change the trigger-type of a saved integration, xMatters does not update the content of the integration's transformation script.
- In xMatters, access the Integration Builder tab in the workflow for which you want to create an integration.
- For more information about how to access the Integration Builder, see Access the Integration Builder.
- On the Integration Builder tab, in the Outbound Integrations area, click Add.
- If you haven't already created outbound integrations for this plan, expand the list to display the Add button.
- On the New Outbound Integration page, set the trigger for your integration:
- Select the form to use to trigger the integration when a system activity occurs for that form.
- Forms do not have to be enabled to configure an integration, but must be enabled before you can use them to send a webhook.
- Select the type of system activity that will trigger the integration: Status Updates, Alert Comments, Escalations, Device Delivery Updates, Notification Responses (deprecated), or Targeted Recipient Failures.
- Select the form to use to trigger the integration when a system activity occurs for that form.

The Responses trigger in Flow Designer allows you to easily design flows for individual response choices without scripting. Although existing integrations using the Notification responses trigger will continue to work, we recommend that you use the Responses trigger unless your integration requires parsing out the responses in the scripts (required by some of our community or packaged integrations).
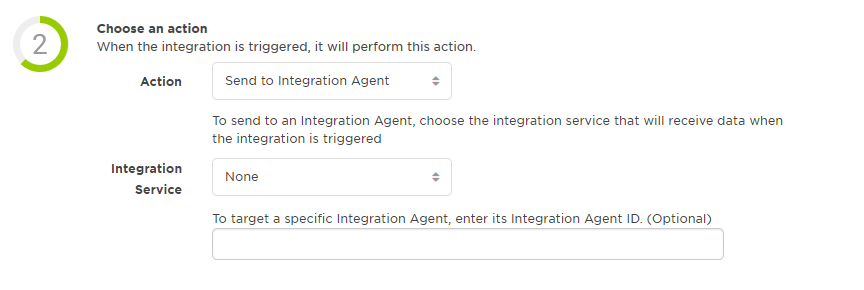
- Choose the action that the integration will perform when it is triggered, and the location where it will run:
- From the Action drop-down list, select Send to Integration Agent.

- From the Integration Service drop-down list, select the integration service that xMatters will send data to when the integration is triggered. To target a specific Integration Agent, you can enter its Integration Agent ID.
- See The integration service and agent identifier for more information about locating the integration service name and agent identifier.
- In the Name field, type a name for your integration.
- This name will be displayed in the list of outbound integrations on the Integration Builder tab, so call your integration something descriptive to be able to identify it later.
- Click Create Outbound Integration.

For more information on sending outbound webhooks to the Integration Agent, see Outbound integrations to the Integration Agent.