Options settings for responses
For each response, there are a number of options you can configure.
- Response actions let you control what action the system takes when a recipient selects the response.
- Contribution values control how the recipient's response is categorized for user and group performance reports.
- Comment settings allows you to set whether a user can add comments when they select the response.
- URL redirect lets you to specify a URL a recipient is redirected to after they select the response.
Configure response actions
The Action drop-down list allows you to control what action the system takes based on the response.
- Click the Options drop-down menu for your response.
- Use the Action drop-down to select an action.
- The Options menu for a response displays the text from the selected action (for example, "Stop Notifying Target") and the color of the selected contribution value (for example, Positive = green).
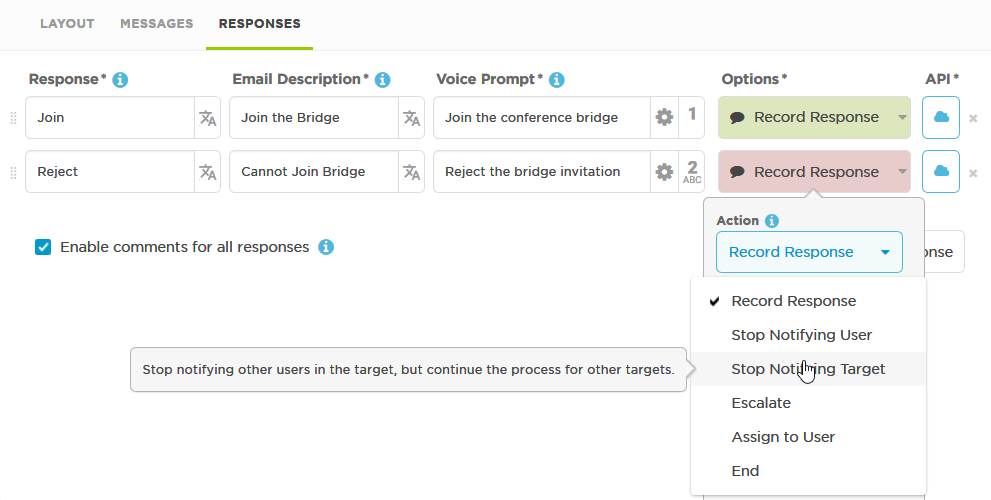
For information on setting response count actions, see Configure response counts.
Actions specify how each response affects the notification flow. Action options should reflect the goals of your form and the processes that exist in your organization. The following table summarizes the available actions (from the perspective of the recipient who is responding to a notification):
| Value | Action |
|---|---|
| Record Response | Record the user's response and stop notifying them, but continue notifying other recipients. When this response action is selected, xMatters does not delink the user from the alert. The user can change their response by responding to the notification again. |
| Stop Notifying User | Stop notifying the user, but continue notifying other recipients. |
| Stop Notifying Target | Stop notifying the user (and any other members if notified as part of an on-call or dynamic group), but keep notifying other users and members of other groups. |
| Escalate | Stop notifying the user and immediately escalate the alert to the next scheduled recipient. |
| Assign to User | Record the user's response and stop notifying other recipients. The user can change their response; however, they are limited to responses that don't notify other recipients: 'End' or 'Record Response'. |
| End | Stop notifying all recipients and immediately terminate the alert. This stops notifications whether the responses came from an individually targeted user, a user in a group, or from within a nested group. |
For more information about how these response actions affect alerts — especially when nested groups are involved — see Response action examples.
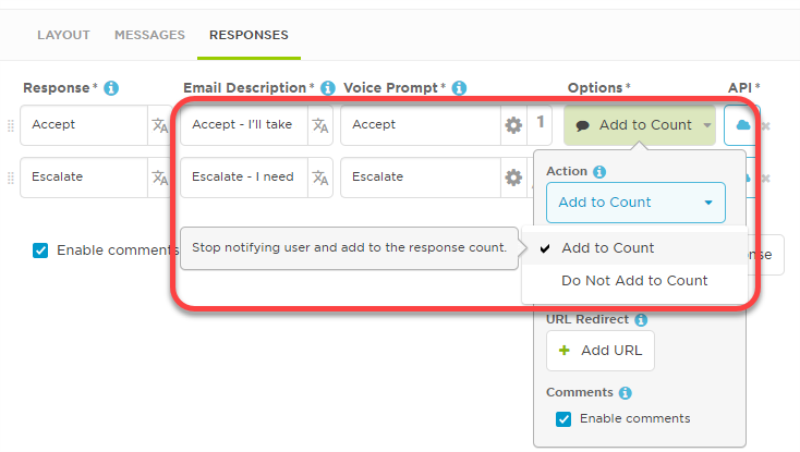
If you have selected the "Count Responses" check box on the Recipients section of your form, the Action drop-down list has different options:
| Value | Result |
|---|---|
| Add to Count | The response is counted towards the total, and xMatters stops notifying the responder. |
| Do Not Add to Count | The response does not count towards the total. xMatters stops notifying the responder and immediately escalates the alert by attempting to notify the next recipient. |
For each response, you can specify whether it should be count towards meeting the required minimum number of responses for each group of recipients. Once the defined "fill count" has been met, xMatters stops notifying the target group. Once all groups have met their fill counts, or the total number of responses determines that the fill count cannot be reached, the alert is terminated.
Response action examples
The response actions you assign to each response can affect how (and when) xMatters continues to notify other recipients in the escalation path. This behavior, especially for messages that include a "Stop Notifying x" or "Escalate" option, can get complicated when groups are ‘nested’ (i.e., groups are members of other groups), and when other recipients are also targeted by the same alert. In addition, recipients can be targeted by several paths; for example, a user may be a member of multiple targeted groups, or may be targeted as a group member and as an individually-targeted user.
The following examples outline the behavior of the "Stop Notifying Target" response in some common situations, and include a few clarifications about the "Escalate" response.
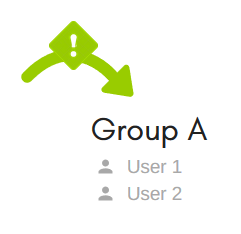
The most basic situation is targeting a group without sub-groups (and that is not itself a sub-group):
- If a recipient within the group responds with Stop Notifying Target, xMatters terminates notifications for the recipient and for the remaining members of the group.
- If a recipient responds with Escalate, xMatters escalates to the next recipient in the group. If there are no more recipients, xMatters records the response, but the alert remains active until it times out.
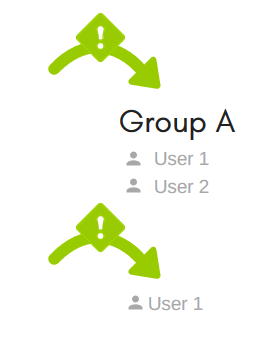
In this case, only one group is targeted, but one of the group members has also been targeted for the same alert: User 1 is part of Group A, but is also targeted as an individual user and would receive two simultaneous notifications.
- If User 1 responds with Stop Notifying Target (or Stop Notifying User), there are two possible outcomes:
- If User 1 is responding to the message sent to Group A, xMatters terminates notifications for User 1 and for the remaining members of Group A.
- If User 1 is responding to the message targeting User 1, xMatters terminates notifications for User 1; notifications will continue for any remaining members of Group A.
- If User 1 responds with Escalate; there are two possible outcomes:
- If User 1 is responding to the message sent to Group A, xMatters terminates notifications for User 1 and immediately escalates to the remaining members of Group A.
- If User 1 is responding to the message targeting User 1, xMatters terminates notifications for User 1 but does not immediately escalate to the next member of Group A. Notifications will continue for any remaining members of Group A after any specified escalation delays have passed.
Example 2a: One group and a non-group recipient
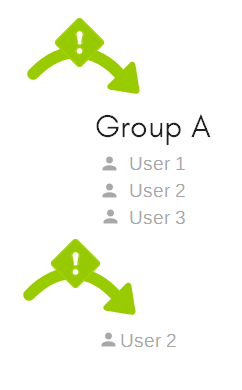
In this case, User 2 would receive a notification as an individual user at the same time as User 1 receives a notification as a member of Group A. If User 2 responds to the notification with Stop Notifying User (or Stop Notifying Target), xMatters terminates notifications for User 2, and notifies User 3 (after any configured delays).
A Stop Notifying Target response at the child level terminates notifications for all of the nested groups ‘above it’ that have been targeted for notification (i.e., if a group has not been targeted, there are no notifications to terminate). The following example shows how this works when there are three (or more) levels of nested groups.
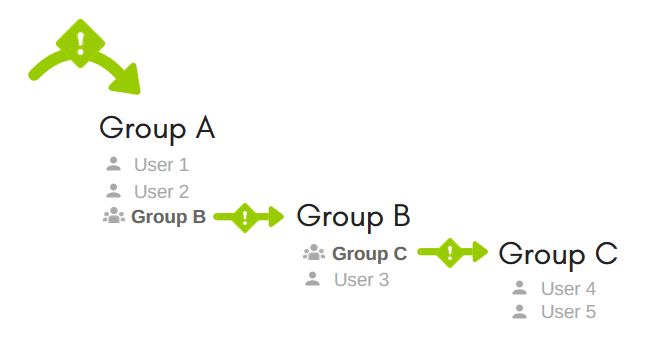
Targeting Group A for notification produces the following results:
- If User 1 responds with Stop Notifying Target, xMatters terminates notifications for User 1 and the other members of Group A, and also for all members of Groups B and C.
- If User 4 responds with Stop Notifying Target, xMatters terminates notifications for User 4 and the other members of Group C. Notifications to User 1 and all members of Groups B and C are also terminated.
Examples 4 and 5 extend the case illustrated in Example 3 as follows:
A Stop Notifying Target response at the child level terminates notifications for all of the nested groups ‘above it’ that have been targeted for notification (i.e., if a group has not been targeted, there are no notifications to terminate). If the groups above the responding child level include additional child groups that have been targeted, xMatters will also terminate notifications to those additional child groups.
An Escalate response at the child level can only escalate to the next member of the sub-group. Because xMatters treats each nested group as its own branch, it will not escalate to the next member of the parent group if the escalation path reaches the last recipient in the nested group until after any delays set in the parent group have expired.
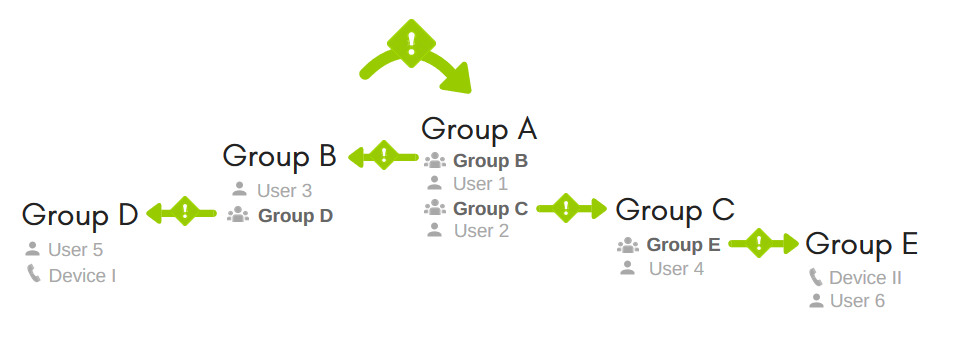
Targeting Group A for notification produces the following results:
- If User 5 responds with Stop Notifying Target, xMatters terminates notifications for User 5 and for the other members of Group D, and for the members of Group A, Group B, Group C, and Group E.
- If User 3 responds with Stop Notifying Target, xMatters terminates notifications for User 3 and for the other members of Group B, and for the members of Group A, Group C, Group D, and Group E.
- If the owner of Device I responds with Escalate, xMatters stops notifying that device, but cannot escalate to anyone because Group D contains no more members. xMatters would notify User 1 after any configured delays between Group B and User 1 had expired.
The group member configuration in this example is the same as in Example 4, but in this case, one of the sub-groups is targeted for notification:

Targeting Group B for notification produces the following results:
- If User 5 responds with Stop Notifying Target, xMatters terminates notifications for User 5 and for the other members of Group D, and for all members of Group B. Notifications for Group A, Group C, and Group E are not terminated because Group A was not targeted.
- If User 3 responds with Stop Notifying Target, xMatters terminates notifications for User 3 and for the other members of Group B, and for all members of Group D. Notifications for Group A, Group C, and Group E are not terminated because Group A was not targeted.
- If the owner of Device I responds with Escalate, xMatters records the response, but the alert remains active until it times out. User 1 is not notified because Group A was not targeted.
Configure response contribution values
The Contribution drop-down list allows you to control how the recipient's response is categorized for the user and group performance reports.
- Click the Options drop-down menu for your response.
- Use the Contribution drop-down to select a contribution value.
- The Options menu for a response displays the color of the selected contribution value (for example, Positive = green), and the text from the selected action (for example, "Stop Notifying Target").
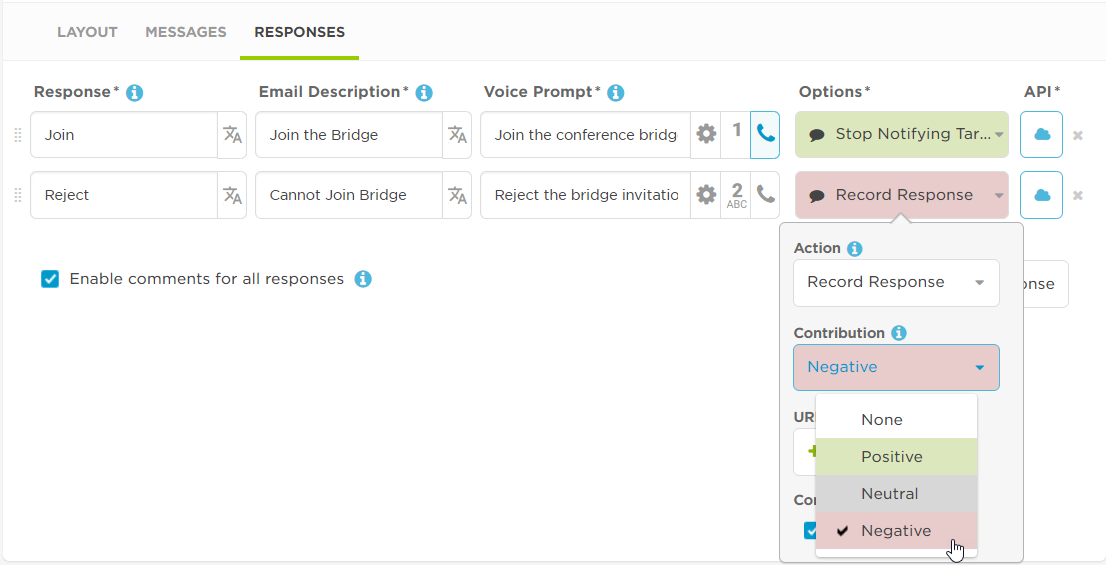
Contribution values are subjective, and their use will depend on your organization's needs. As a result, you should use the Contribution drop-down list to specify response values that make sense in the context of the workflow you are building, as well as your organization's processes and policies.
xMatters does not process data for user and group performance reports unless there is at least one Positive response option available. This is to ensure that performance data is not counted against users who cannot select a positive response.
The following table summarizes the available values:
| Value | Action |
|---|---|
| None | Response is not used when calculating contributions for performance reports, but is still displayed on Events reports. (This value does not have the same meaning as a 'Neutral' contribution value.) |
| Positive |
Response used for reporting. For example, you might assign a positive value to a response of "Accept" or "Own". For alerts related to incident management, only responses with a Positive response contribution will show the responder as Engaged in the Incident Console and add them as a resolver to the incident. |
| Neutral | Response used for reporting, but has no negative or positive connotation. For example, you might assign a neutral value to a response of "Acknowledge" or "Unavailable". (This value does not have the same meaning as a 'None' contribution value). |
| Negative | Response used for reporting. For example, you might assign a negative value to a response of "Reject" or "Escalate". |
Configure response comments
You can configure responses to allow users to comment when they respond to notifications from their email or the xMatters Inbox. The ability to include a comment lets users provide additional details or context with their response. For more information about including a comment with your response, see Receive and respond to email notifications.
Users can always add comments to responses when using the xMatters mobile app. For more information about responding with a comment from the mobile app, see Add a comment to your response from the mobile app.
A comment icon on the Options drop-down menu selector for a response indicates whether email and Inbox comments are enabled for a response.

xMatters automatically enables comments for each new response that you add, unless you have disabled comments for all responses. When the Enable comments for all responses check box has been cleared for a form, any new responses that you add will not have comments enabled.
To enable or disable the ability to comment when users respond to notifications in email or the xMatters Inbox, select or clear the Enable comments for all responses check box at the bottom of the response list.
This check box appears differently based on whether all, none, or some of the response options allow commenting:

|
Comments are enabled for all response options. |

|
Comments are disabled for all response options. |

|
Comments are enabled for some response options. |
To enable or disable comments for individual responses, click the Options drop-down menu for a response and select or clear the Enable comments check box.
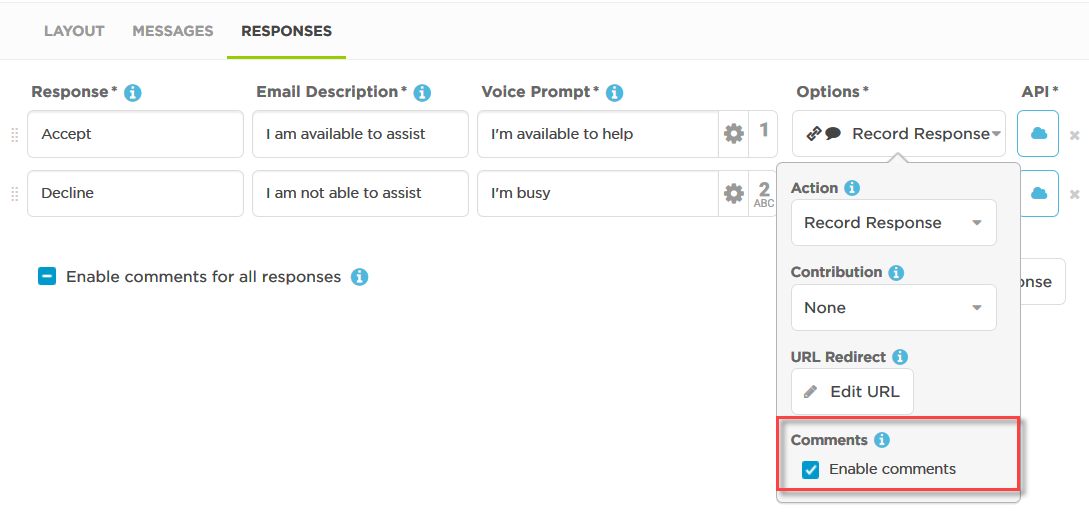
If only a selection of the responses in your form allow comments, the Enable comments for all responses check box on the main responses screen displays a partial selection icon (a dash icon).
Selecting or clearing the Enable comments for all responses check box on the main screen overrides individual response option settings.
Configure response redirects
The URL Redirect setting allows you to associate a URL (web address) with a response option. When users select the response option in an email, xMatters Inbox, mobile app, or chat app notification, the URL automatically opens in a new browser window. For example, after a user responds, you may want to direct them to the next step in an incident management toolchain, such as to a chat room or a service desk ticket.
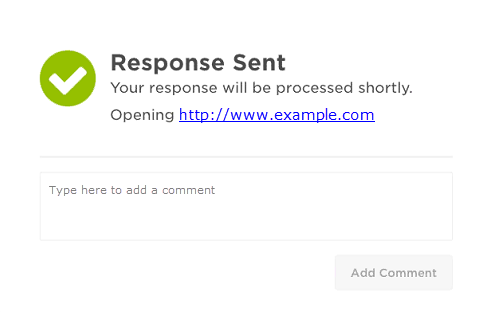
Selecting a conference bridge response in the mobile app will override any URL redirects configured for that response.
- Click the Options drop-down menu for your response.
- Under the URL Redirect setting, click Add URL.
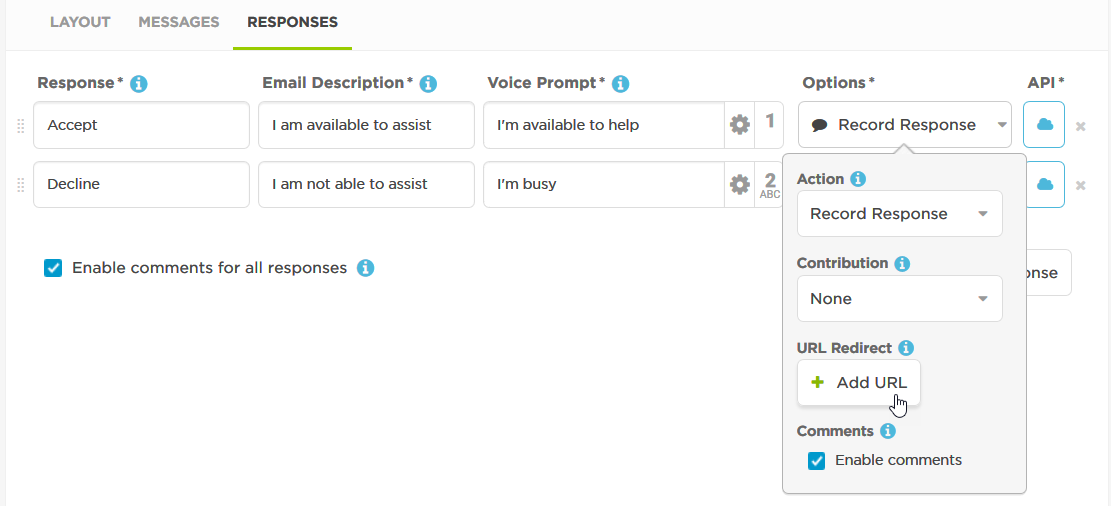
- In the URL redirect dialog, enter a valid http or https URL address, for example: http://www.example.com.
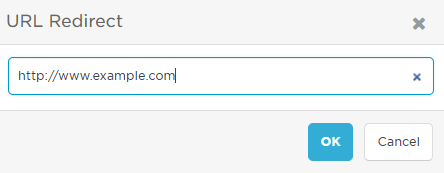
- Click OK.
- Response options configured with a Redirect URL can be identified by a link icon on the Options drop-down menu selector.
![]()
Users may need to enable pop-ups in their browser to open the configured URL.
- Click the Options drop-down menu for your response.
- Under the URL Redirect setting, click Edit URL.

- In the URL redirect dialog, edit the URL or click the X icon in the URL field to delete the URL.
- Click OK.