Add recipients to forms
As a form designer, you can control whether the form:
- Includes recipients by default
- Displays the Recipients section to the person who uses the form to send a message or initiate an incident
- Displays the Recipients section in an expanded or a collapsed view
You can move the Recipients section anywhere on your form or hide it so message senders can't see or change the recipients, or you can remove the Recipients section from the form completely (only for flow trigger forms).
Add predefined recipients
Predefining form recipients is optional. However, when there is some clarity about who needs to be notified about a given situation, you can predefine one or more recipients for your form.
For example, a form named Critical Database Outage might have predefined recipients such as a dynamic group named DBAs - On-site network admins, and a user named Kelly Clarke, who is the VP of Operations. You can even control whether the person using the form can view and edit the predefined recipients list, as explained below.

On the form's Layout tab, you can add either single or multiple recipients.

To add a single recipient, type the name of the user, group, or service into the search bar. Select the recipient from the drop-down list and the name is added to the Recipients list.
To add multiple recipients or devices:
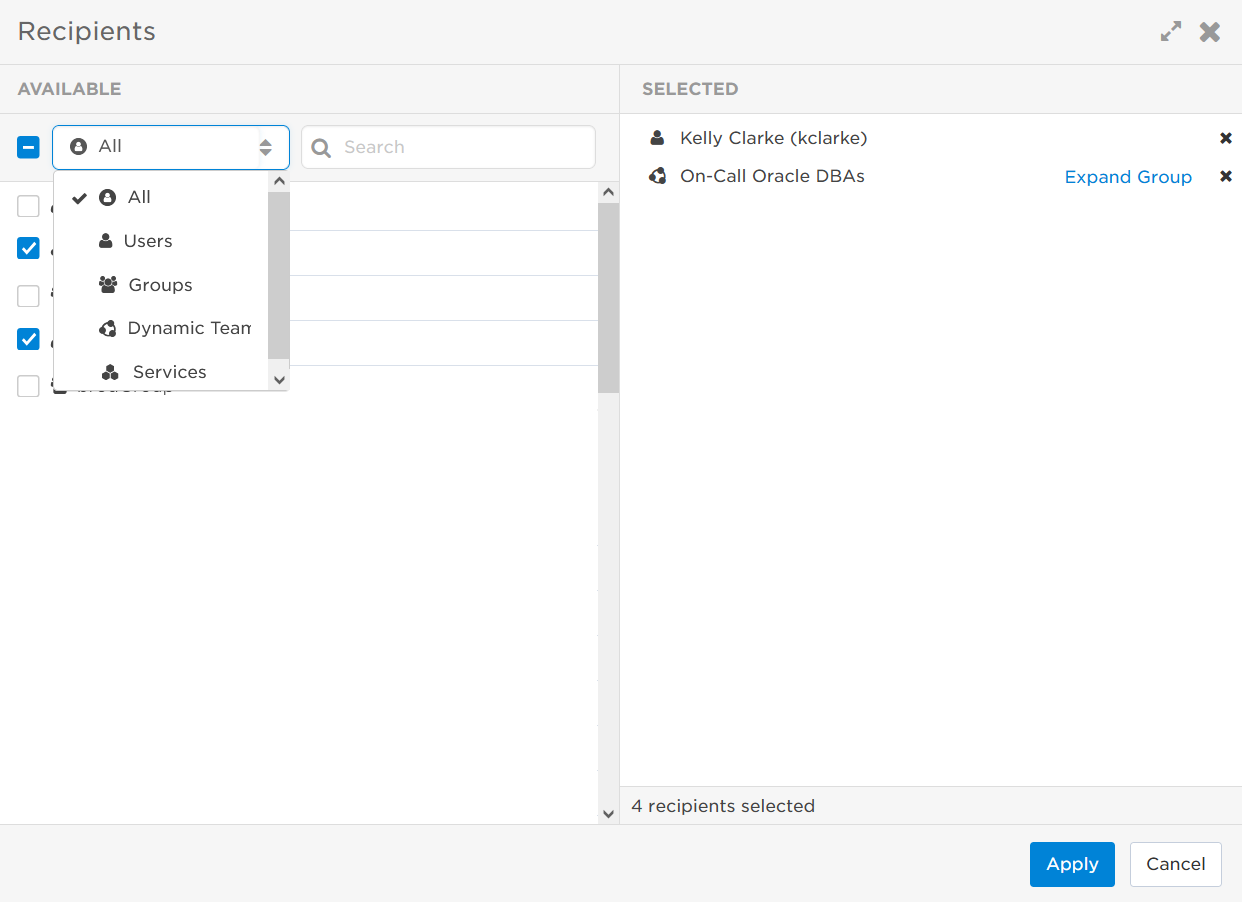
- Click Advanced to open the Recipients window.
- Under Available, select a recipient type from the drop-down menu, and begin typing the name of the recipient in the Search window (or type two spaces to see a list of all recipients you have permission to add).
- The default option is All, but you can change the recipient type to Users (which includes Devices), Groups, or Services.
- When you add a group as a recipient, all group members are notified when the message is sent.
- Add recipients by selecting the check box beside their name. The recipient is added to the Selected window. You can remove recipients from the list either by deselecting the check box by their name, or by clicking the x icon.
- When all recipients are listed in the Selected Recipients window, click Apply.
If you want to count responses, you can select the Count Responses check box, and specify a response count limit for each set of recipients.
Specify response counts
Response counts (also known as fill counts) allow you to control the number of recipients that must respond to a message before xMatters stops attempting to notify a group.
You can use this feature to ensure that a specific set of skills is represented in a business process or that a certain number of the appropriate people are notified for each incident or emergency. For example, you could notify a large group of technicians about a technical problem and, once five people have indicated that they are able to attend, stop notifying the rest of the group.
You could also specify a different response requirement for multiple groups targeted by the same message. For example, if an accident occurs on a factory floor, you might want to make sure that at least one person with medical training can get to the scene, ensure that one of the on-duty managers is notified, and have four of the nearby floor workers attend in case there is heavy lifting required.
If a recipient responds to a notification with an option that indicates they cannot contribute to the response count, xMatters immediately escalates the alert and begins attempting to notify the next scheduled recipient.
- To enable response counts, select the Count Responses check box in the Recipients section of the form.
- After it is enabled, you can set response counts for preconfigured groups. You cannot set response counts for site recipients. Depending on whether the section is visible or not, users sending a message with the form can also configure response counts on the Messaging page before sending the message.

- For each of the responses, set whether they count towards the fill limit or not. See Configure response counts for more information on configuring responses.
Some message forms may be configured to count responses; this feature allows you to control the number of recipients that must respond to a message before xMatters stops attempting to notify a group.
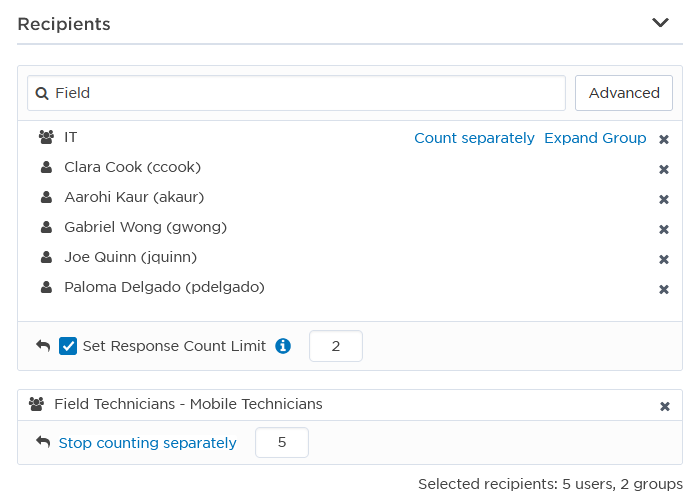
All recipients added to a form that is configured for response counts are listed in the Recipients section. You can set one response count level for all recipients, or separate specific groups to assign them a different response count level.
To specify response counts:
- All of the recipients in the Recipients section are treated as a single response group. Select Set Response Count Limit and enter a response limit number.

- To give a group a different response limit, click Count separately.
- xMatters creates a new section containing only that group or team.
- In the field provided for each response group, type the number of responses you want to receive from that response group before xMatters stops notifying them.
- To combine a separated response group with the Recipients response group, click Stop counting separately for that group.
- Note that this discards any response counts you have specified for the separated group. Ensure that you update the required response counts for the Recipients response group accordingly.
Example
Here's how xMatters notifies recipients with varying response count limits:
- xMatters begins notifying all listed recipients.
- Once five responses are received from the Field Technicians' group, xMatters stops notifying the remaining members of the Field Technicians group.
- Once a total of two responses are received from any combination of the other listed recipients, xMatters stops sending out notifications.

Show or hide the Recipients section
If you do not add any predefined recipients to your form, the Recipients section is automatically shown to the person using the form. However, if you have predefined at least one recipient, you can choose whether the Recipients section is displayed to the message sender (by default, the section is displayed). In effect, hiding or displaying the Recipients section controls whether the person using the form can edit the Recipients list.
In some cases, your organization may have very clear policies about who should receive certain notifications, and in such cases you may choose to hide the Recipients section to prevent changes to the predefined recipients list. In other situations, you may want to have predefined recipients but still allow the person using the form the flexibility to customize the list based on the circumstances of a situation when it occurs.
If you want your form to have no recipients at all, you can remove the Recipients section.
On the form's Layout tab, click the Show/Hide Recipient Section icon (the eye icon).
When the icon is dark gray and the eye is open ( ), the section or element is displayed. When the icon is light gray and has a line across the eye (
 ), it is hidden.
Add or remove the Recipients section in flow trigger forms
You can add or remove the Recipients section in flow trigger forms. Flow trigger forms are used to initiate incidents or run automations. You cannot remove the Recipients section from messaging forms.
If you remove the Recipients section from a form, there will be no alerts sent out after the form is submitted, and the sender will not receive a warning about the form having no recipients. This is different from hiding the Recipients section, where the section is not displayed to the form sender but is still part of the form.
This option is useful if you don't need to notify people every time you run a common automation, or if you initiate an incident that doesn't require alerting other resolvers or teams.
On the form's Layout tab, click the X icon on the upper-right corner of the Recipients section to remove it from the form.
To add the section back, drag it to your desired location on the form from the Sections panel on the right side of the screen. Any recipients that were on the list before the section was removed will also be added back.
Specify the default section view
You can control whether the Recipients section appears by default in an expanded or collapsed state, based on whether your priority is maximum visibility or saving space on the form. For example, if it's likely that the person using the form will modify the recipient list, you might want the section to default to expanded mode. If other aspects of the form are likely to be the focus of person using the form, specifying a collapsed view as the default might be more appropriate.
By default, if no recipients are predefined, the Recipients section appears on the form in expanded mode.
On the form's Layout tab, click the Expand/Collapse Section icon (this icon toggles between the two default views).