Define scenarios
Scenarios enable workflow designers, scenario administrators, and others with the correct permissions to preconfigure forms with values that apply in specific situations. Scenarios enable you to send messages more quickly since you don't have to fill in all the form fields with the same values every time. You can set up multiple scenarios for a single form to account for the variety of real-world incidents.
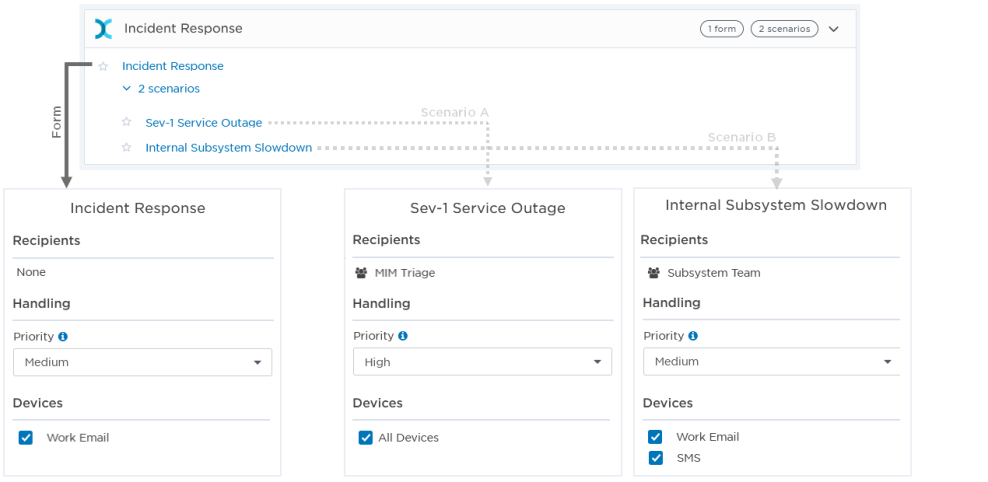
For example, you could use the same Incident Response form as the foundation for two different scenarios:
- Scenario A: Sev-1 Service Outage: Sets the priority to High and targets a special MIM triage team on all available devices for a Sev-1 incident that's impacting customers.
- Scenario B: Internal Subsystem Slowdown: Sets the priority to Medium and targets the applicable service team on work email and text (SMS) devices when your monitoring systems notice that an internal service is getting bogged down.
Understand scenario values
When a message sender selects a scenario, any values configured for the scenario replace the default values on the form:
- Values defined for a scenario appear on the form when someone selects the scenario to send a message.
- For example, if a text property has a default form value of "Service degradation" but the scenario value is "Web app service degradation", the latter text — Web app service degradation — appears on the form for the scenario.
- If you don't specify a value in the scenario, the default form value appears when someone selects the scenario to send a message.
- For example, if a text property has a default form value of "Antares application", and there is no value defined in the scenario, the form value of "Antares application" appears on the form for the scenario.
If you edit the scenario to change its values, the changes are reflected in the scenario form as soon as you save the scenario. You can also add or remove settings (for example, properties or entire sections) from the form layout, and these changes are reflected in the scenario.
Hidden form sections and scenarios
You can configure some form sections (for example, Recipients, Devices, and Handing) to be hidden from form initiators. Form scenarios respect these visibility settings; for example, if a form's Recipients section is hidden, then message senders cannot modify the recipients when initiating the scenario. Scenario editors can still modify the default scenario settings for hidden form sections using the guidelines explained above.
Create and manage scenarios
There are two ways to create and edit scenarios, depending on your scenario permissions:
- If you have access to the workflow and have manage scenario permissions, you can access scenarios from the form's Edit menu.
- If you have manage or editor permissions for the scenarios and sender permissions for the form, you can access scenarios through the form's messaging page.
Create and manage scenarios in the workflow
You can edit the scenario and its permissions in the form's Edit menu.
- In the list of workflows, click the name of the workflow you want to work with.
- Locate the form you want to create or edit a scenario for, and from its Edit menu, select Scenarios.

- In the dialog box, do one of the following:
- To modify an existing scenario, click its Edit button.
- To create a new scenario for the form, click Create Scenario.
- To set scenario permissions, click Permissions (for details, see Scenario permissions).
- Specify the available scenario settings as required, and then click Save.
- Click Close.
For an example of setting up a scenario, see Example scenario: Severity 1 incident.
You can sort the scenarios in your workflow to make it easier for users to manage the list or quickly find specific scenarios.
To change how the Scenarios list is sorted, do one of the following:
- To sort the list in a customized order, click and drag the scenario to change its position.

- To sort the list of scenarios in alphabetical order (A-Z), click Sort Alphabetically. (You can't reverse this action, but can manually change the order once sorted.)
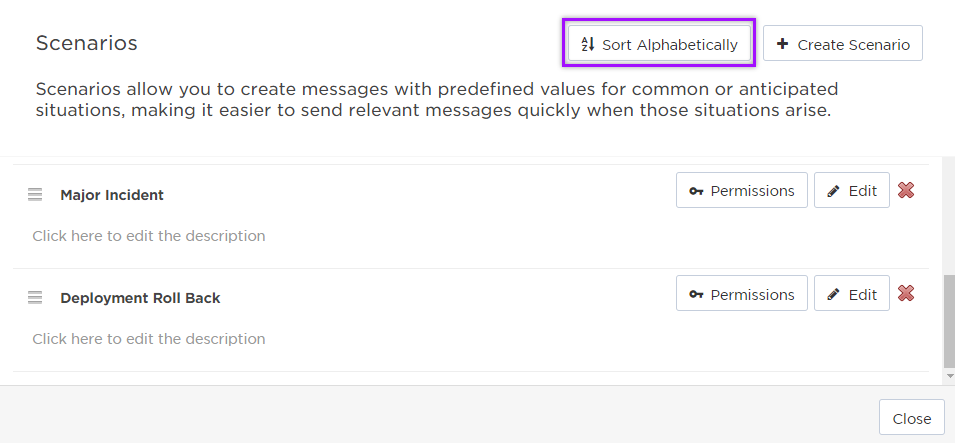
This only sorts the list as it currently appears. After sorting, edited scenarios remain in the same position, new scenarios are added to the bottom of the list.
Create and manage scenarios on the Messaging tab
Depending on your scenario permissions, you can create, modify, rename, and specify permissions for scenarios from the messaging page used to send the form. This makes it easier for users who don't have access to the workflow to create and modify the scenario.
To create or modify a scenario on this page, configure the form as required then save it as a scenario. To save time when creating several similar scenarios, you can use an existing form as a template for a new scenario.
- From the side navigation menu, click Messaging.
- Click the name of the form you want to create a scenario for.
- The form opens in a side panel next to the messaging list.
- Do one of the following (if you do not see these options, you do not have permission to manage scenarios for the form):
- At the top of the form, click Manage Scenarios to open the Scenarios dialog box, and then click Create Scenario.
- At the top of the form, click Save as New Scenario.
- Name the scenario and provide an optional description, then click Create Scenario.
- Click Close.
- From the side navigation menu, click Messaging.
- Click the name of the scenario you want to modify.
- The selected scenario opens in a side panel next to the messaging list.
- Modify the values as required.
- You cannot replace the default values in the following form sections: Conference Bridge, Site Recipients, and Response Overrides. You can still edit the values in these sections before sending the scenario, but you cannot overwrite the default values when you save the scenario.
- Do one of the following:
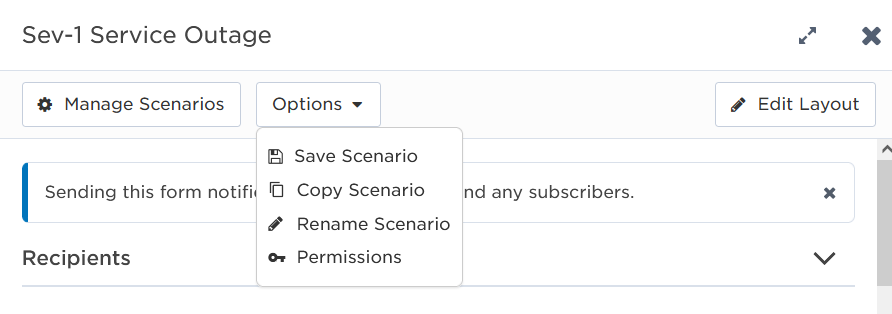
- To save the values in the existing scenario, click the Options drop-down list, select Save Scenario, and click Save Scenario when prompted to confirm overwriting the previous values. With this option, the values you entered become the new default values when someone uses the scenario to send a message.
- To save the values in a new scenario, click the Options drop-down list, select Copy Scenario, specify a name and description for the scenario, and then click Create Scenario. If your company has multiple languages configured, you may be warned about missing recordings and translations; click Save to continue. If you do not see the Copy Scenario option, you do not have permission to manage scenarios for the form.
- From the side navigation menu, click Messaging.
- Click the name of the scenario you want to modify.
- The selected scenario opens in a side panel next to the messaging list.
- Click the Options drop-down list and select Rename Scenario.
- Edit the scenario's name and description, and then click Save.This modifies the name of the scenario for all users with access to it.
- If you've made unsaved changes to the scenario's values you may be warned that your changes will be lost when you rename the scenario. Click OK to continue, or click Cancel to return to the scenario to save your changes before renaming it.
Scenario permissions
You can independently set which users and roles can manage, edit, and initiate scenarios.
- Manage Scenarios: The permission to manage scenarios for a form, including creating, editing, deleting, and adjusting scenario permissions for all scenarios associated with a form. Set which users can manage scenarios in the Sender Permissions for a form.
- Scenario Editor: The permission to edit a scenario, including changing the default values, editing the name, and updating the scenario permissions for the scenario. Set this permission in the Scenario Permissions, accessed either by selecting Edit > Scenario on the form in the workflow or clicking the Scenario menu on the scenario in the Messaging tab.
- Scenario Initiator: The permission to send a message using the scenario. If a user does not have scenario initiator permission for a given scenario, they won't see that scenario in the list of available scenarios when sending a form. Initiators without editor permission can still edit the default values before sending a message, but cannot save them to the scenario. Set this permission in the Scenario Permissions, accessed either by selecting Edit > Scenario on the form in the workflow or clicking the Scenario menu on the scenario in the Messaging tab.
- In the list of workflows, click the name of the workflow you want to work with.
- Locate the form with the scenario you want to edit permissions for, click its Edit drop-down list and select Scenarios.

- In the dialog box, click Permissions for the scenario you want to work with.
- Start typing the name of a user or role in the search field and then click the user or role when it appears in the list of results.
- Repeat this step to add additional users and roles you want to have initiator access to the scenario.
- If you want to remove a user or role, click its red X icon.
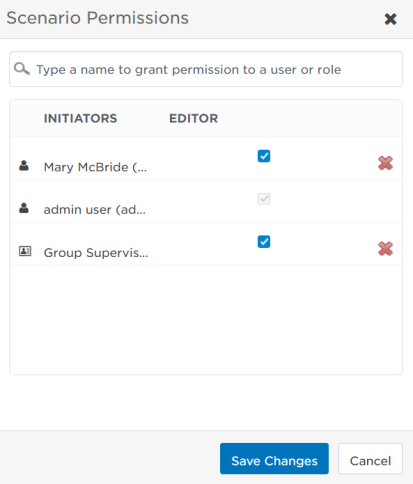
- If you also want the initiator to be able to edit scenarios, select the check box in the Editor column.
- Click Save Changes.
- Click Close.
- From the side navigation menu, click Messaging.
- Click the name of the scenario you want to modify.
- The selected scenario opens in a side panel next to the messaging list.
- Click the Options drop-down and select Permissions.]
- If you do not see this drop-down, you do not have scenario management permission (configured in the Form Permissions dialog box) or scenario editor permission (configured in the Scenarios Permissions dialog box) for this scenario.
- Start typing the name of a user or role in the search field and then click the user or role when it appears in the list of results.
- Repeat this step to add additional users and roles you want to have initiator access to the scenario.
- If you want to remove a user or role, click its X icon.
- If you also want the initiator to be able to edit scenarios, select the check box in the Editor column.
- Click Save.
Example scenario: Severity 1 incident
Configuring scenarios is similar to filling out a form to send a message...except that you don't hit send. In this example, we'll create a scenario for an "Initial Incident" for when the incident is a SEV-1 service outage.
- To start, we navigate to the "Initial Incident" form, click the Edit drop-down list and select Scenarios.

- Click Create Scenario and when prompted, name the scenario. In this case, we'll name it SEV-1 Service Outage. We can also give it a description.
- Click Create Scenario.
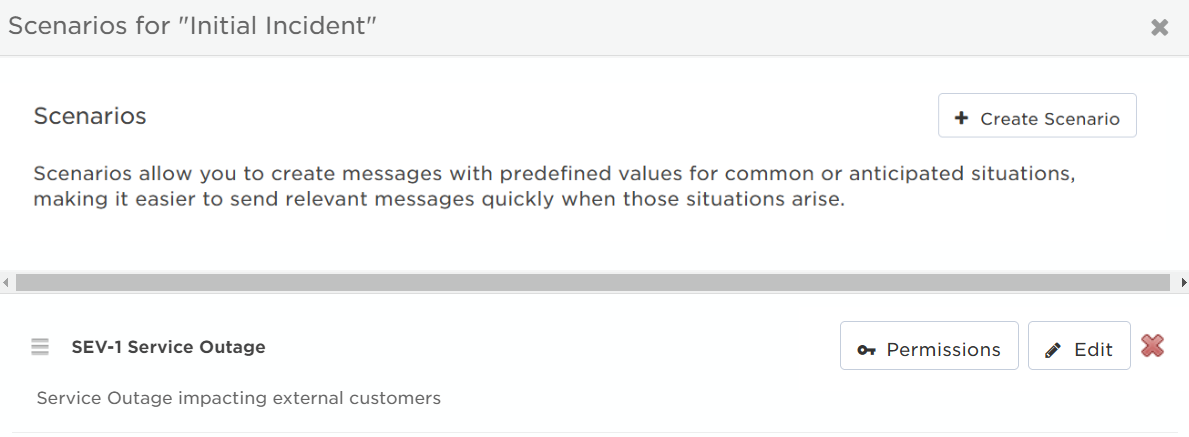
When you create a scenario for a form, it's populated with any values that have been predefined in the form (for example, default recipients, handling options, property values, etc.), and the available sections and their order match those on the underlying form.
We want to modify some of these default values for this scenario. When someone sends a message using the form, they can modify these values further, assuming the section is visible.
- Click Edit to display the scenario values (which will match the form defaults).
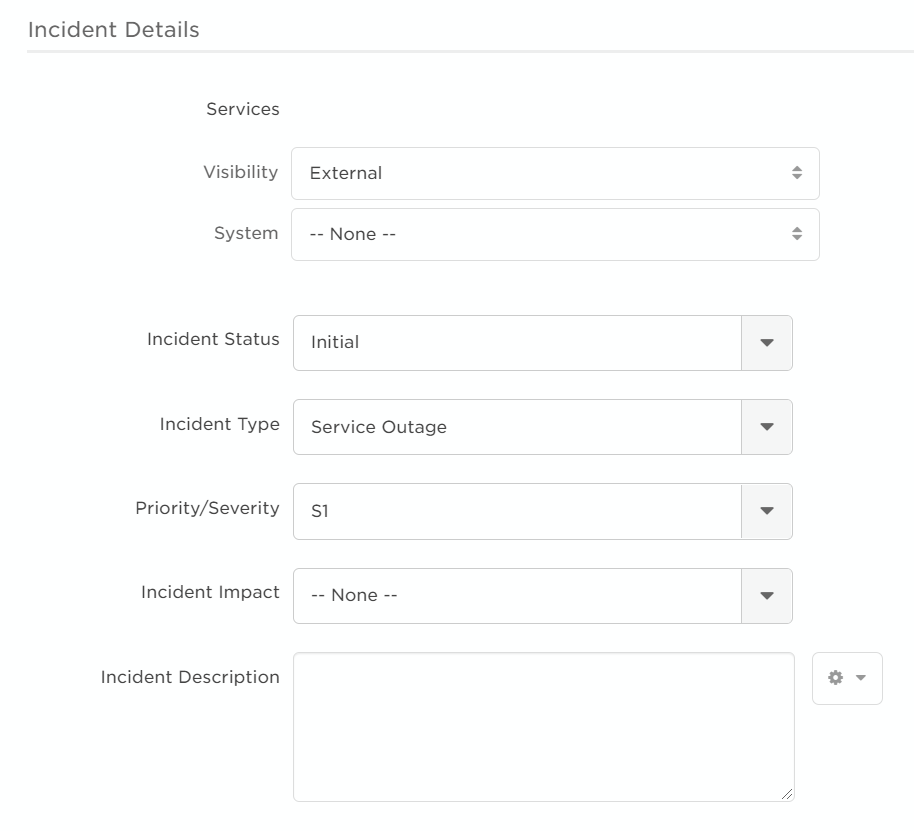
- To save the message sender some time, we predefine the visibility, type, status, and priority/severity.
- Next, we'll edit the default devices. The underlying form only sends notifications to work phone and email devices. However in a SEV-1, it's a greater priority to get a hold of people right away, so we add text, home phone, and home email devices.

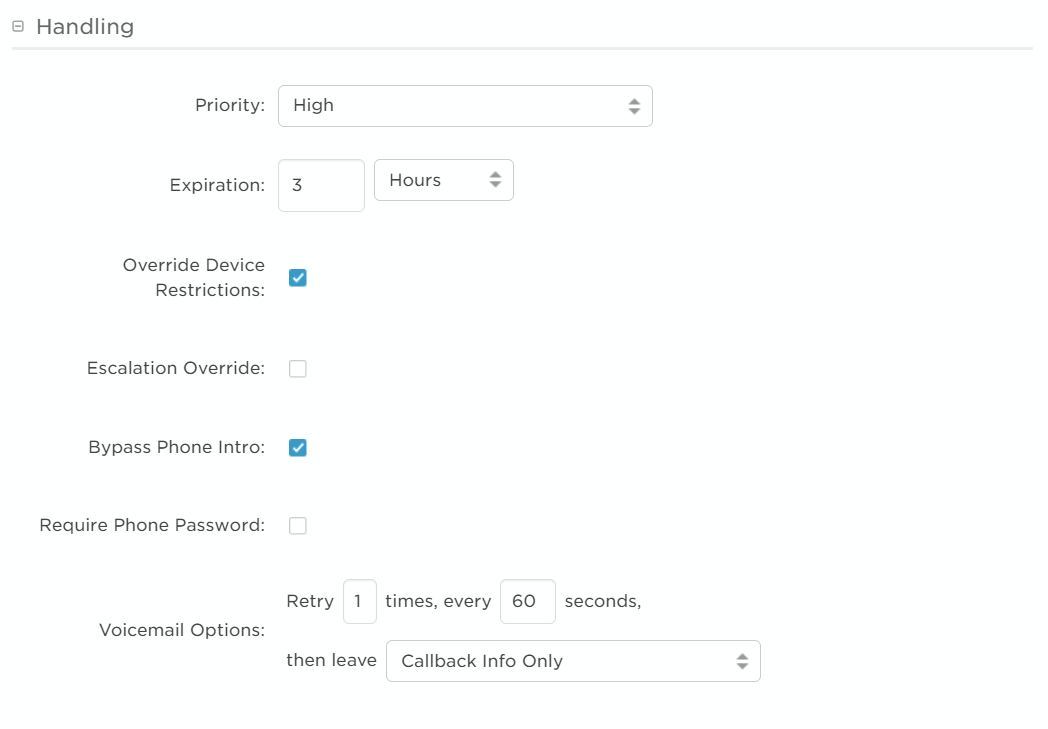
- We'll also change the handling options slightly to set the priority to High, and to override device restrictions and the phone intro to get the people we need involved as soon as possible.
- And lastly, because this is a SEV-1, we set our major incident first line team as a default recipient. To add a single user or group as a recipient, type the name into search bar and select from the drop-down menu. To add multiple recipients or devices, click Advanced.
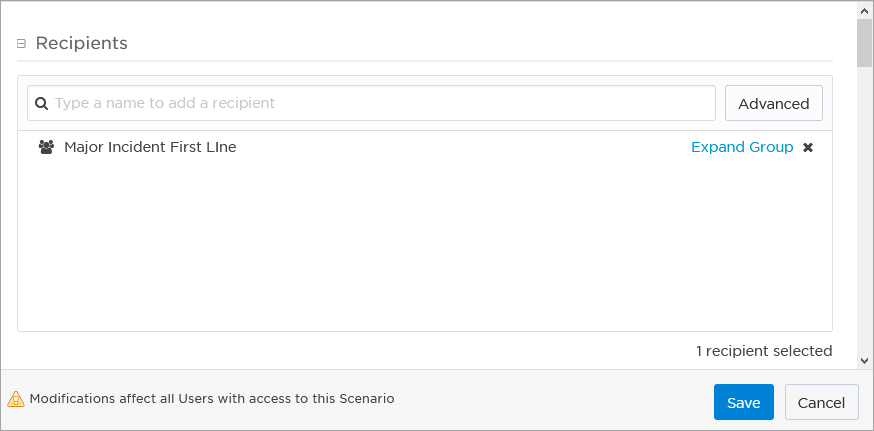
- Click Save and this scenario immediately becomes available to form senders with the correct permissions.
There are three types of permissions that can be granted for scenarios, one at the form level and two at the scenario level:
- Manage: This is set in the form sender permissions and determines whether a form sender can also create and edit scenarios.
- Initiator: Roles and users that have access to the scenario when sending the form (that is, they can see and select the scenario so that its values are loaded into the form).
- Editor: Roles and users that can edit scenarios accessed from the Messaging tab.
In this example, we'll deal with the scenario-level initiator and editor permissions. Let's assume that we want all users with the Full Access User role to be able to initiate the SEV-1 Service Outage scenario, and all users with the Incident Manager role to be able to both initiate and edit the scenario. Additionally, let's add our lead SRE (site reliability engineer) Alissa Mountjoy as a user with the ability to initiate and edit the scenario.
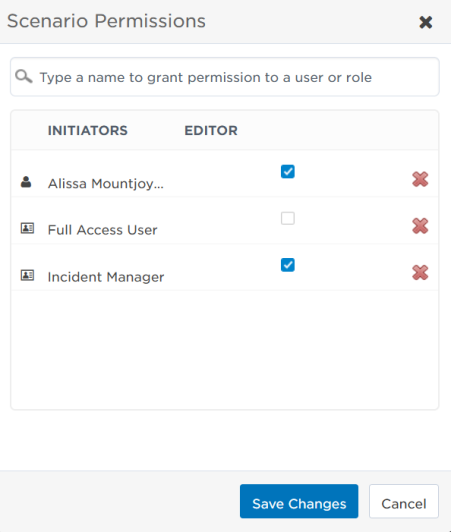
Click Save Changes to save the permissions you've granted for the scenario.
Next steps
Create a few scenarios of your own for one of your workflows, using different property values, recipients, devices, and so on. When you have several scenarios completed for a form, navigate to the form on the Messaging tab and experiment with loading them into the form — and try editing them from that page.