Add a conference bridge to a form
A conference bridge is created for notifications sent using a messaging form with a conference bridge section. When you initiate a messaging form that has a conference bridge (either by manually sending the message or using a Create Alert Using a Form step as part of an automated flow) you enable message recipients to join a conference call. Message recipients that receive phone notifications are prompted to connect directly to the conference bridge by pressing a number on their keypad. Message recipients who receive conference bridge notifications on other devices, such as email or SMS, are provided with the information they need to manually phone in to the conference bridge.
Complete the steps in this topic to add xMatters-hosted bridges or External bridges from third-party conference providers to your messaging forms. To use an external conference bridge, there are additional settings you must configure that instruct xMatters how to contact the bridge.
To create an xMatters-hosted conference when using a flow trigger form, add a Create xMatters Conference step to the connected flow.
You can add conference bridge capability to your form by adding a conference bridge section to the layout of the form. You can configure your form to allow xMatters-hosted conference bridges, externally-hosted conference bridges, or both.
To add a conference bridge to a form:
- On the Workflows tab, click Workflows.
- Locate the workflow that contains the form you want to configure, and then click the name of the workflow.
- Locate the form you want to configure, and click Edit > Layout.
- Drag the Conference Bridge section to the form and set the Type field to one of the following values:
- xMatters Hosted Bridges Only: allows form initiators to select a new xMatters-hosted conference bridge or an xMatters-hosted conference bridge that is already in progress.
- External Bridges Only: allows form initiators to select an externally-hosted conference bridge.
- xMatters Hosted and External Bridges: allows form initiators to use an xMatters-hosted conference bridge or an externally-hosted conference bridge.
- Click Save.
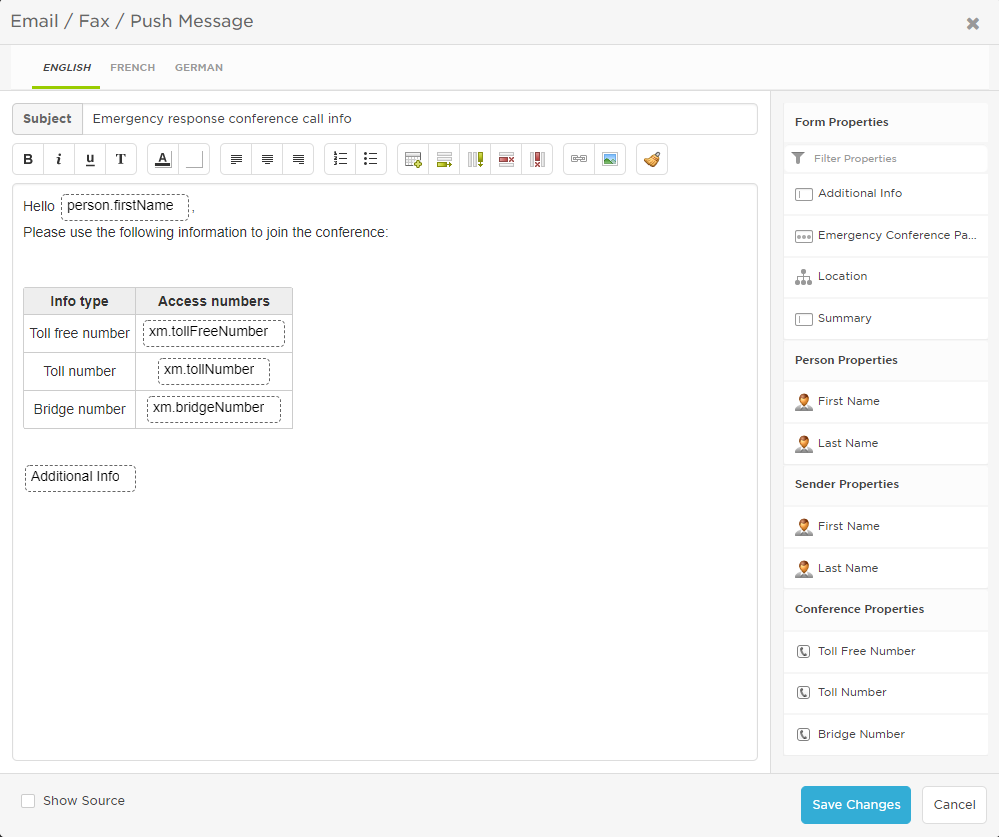
When a conference bridge section is added to the form layout, the Conference Properties section becomes visible in the email and text message editors. You can drag the conference bridge phone and bridge number properties from the Conference Properties section to the body of your message. When the message is sent to recipients, the values of these properties are replaced with the numbers that recipients can use to dial in to the conference.
To add conference bridge properties to email, text, or SMS messages:
- On the Workflows tab, click Workflows.
- Locate the workflow that contains the form you want to configure, and then click the name of the workflow.
- Locate the form you want to configure, and click Edit > Messages.
- Click Edit to open the message editors for email or text messages.
- The Conference Properties section contains the following properties that you can drag into the body of your message:
- Toll-Free Number: The toll-free number that can be used to dial in to the conference.
- Toll Number: The toll number that can be used to dial in to the conference.
- Bridge Number: A number that identifies the conference. Users are typically prompted for this number after they connect to a conference provider.
- Meeting URL: For external bridges, a direct link users can click to join the bridge from an email, push notification, or text message.
- Click Save Changes.
You can use xMatters-hosted and externally-hosted conference bridges in your forms. The values of conference properties for xMatters-hosted conference bridges are determined by global settings in xMatters. The values of conference properties for externally-hosted conference bridges are determined by the settings on the Manage Conference Bridges page.

Once you have added a conference bridge section to the layout of your form, you can configure voice messages to connect recipients to the conference bridge when they press a number on their keypad.
To configure voice responses to connect to a conference bridge:
When the layout of a form contains a conference bridge section, each response option displays a phone icon next to the response digit. If the phone icon is selected, then pressing the response digit connects the user to the conference bridge. At lease one response option is required to allow phone users to connect to the conference.
- On the Workflows tab, click Workflows.
- Locate the workflow that contains the form you want to configure, and then click the name of the workflow.
- Locate the form that you want to configure, and click Edit > Responses.
- If the form does not already contain responses, create some (see Define response options for messaging forms).
- Set whether each response option connects the recipient to the conference bridge.
- To set a response option to connect the recipient to the conference bridge, select the phone icon.
- You can set multiple response options to connect to the conference bridge.

When you configure voice responses to enable phone users to connect to the bridge, you are also required to supply response options that will appear in email, text, or SMS versions of the message. Only the numbered voice phone responses are used to automatically connect a user to the conference bridge. Response options included in email, text, or SMS are used to confirm which users are connecting to the bridge, or to escalate the notification to another user.
The default behavior used by xMatters for voice notifications about conference call requests is to call a user once, and if there is no answer leave a voicemail message with callback information. To change the number times xMatters will attempt to call users, the wait time between retry attempts, and voicemail options, see the Voicemail Options settings in Handling options.
External conference bridges
To use a third-party conference provider (for example, WebEx, InterCall, or GoToMeeting) with a messaging form, create an external conference bridge so xMatters knows how to contact and interact with the bridge.
- On the Workflows menu, under Workflow Tools, click External Conference Bridges.
- Click Add Conference Bridge.
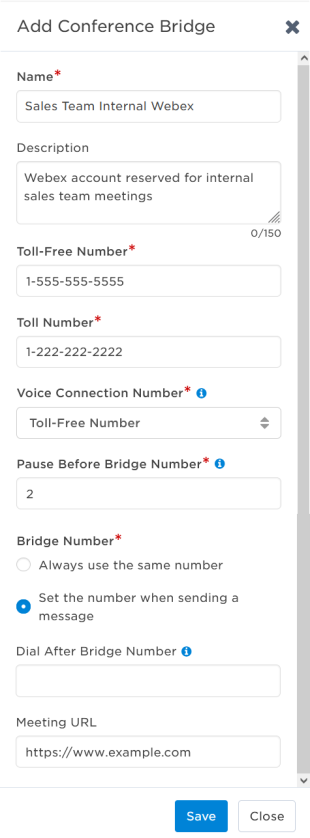
- In the Add Conference Bridge side panel that appears, configure the following settings:
- Name: Give the conference bridge a unique name.
- Description: Provide a meaningful description of the conference bridge.
- Toll-Free Number: The toll-free number that can be used to connect to the conference bridge. This number is displayed as the Toll-Free Number property in the email and text message editors.
- Toll Number: The toll number that can be used to connect to the conference bridge. This number is displayed as the Toll Number property in the email and text message editors.
- Voice Connection Number: Voice notifications can be configured to connect recipients directly to the conference bridge when they press a number on their keypad. The Voice Connection Number field specifies whether xMatters uses the toll number or the toll-free number to make this connection.
- Pause Before Bridge Number: The number of seconds to wait after connecting to the conference provider before dialing the bridge number. Use this setting to wait for the system to finish playing greetings before dialing the bridge number. See below for a list suggested settings for various third-party providers.
- Bridge Number: The number that identifies the conference to the conference bridge provider. This number is displayed as the Bridge Number property in the email and text message editors.
- To use the same bridge number every time, select Always use the same number and then type the bridge number. Use this option if the bridge number is always the same regardless of when you send the message.
- To allow message senders to enter the bridge number when they send a message, select Set the number when sending a message. Use this option if the bridge number is not known until the message is sent.
- Dial After Bridge Number: This setting allows you to dial more digits, characters, and pauses after the bridge number. You can use this field to navigate menus or provide other information that you are prompted for after entering the conference bridge number. This field accepts the characters # * w and the digits 0-9, where the w character denotes a 1-second pause. For example, to wait 5 seconds, dial 1, wait 4 more seconds and then dial #, type wwwww1wwww# in this field. See below for a list suggested settings for various third-party providers.
- Meeting URL: A link that users can click to join the bridge from a email, push, or text messages. The link is displayed as the Meeting URL property in the email and text message editors.
-
Click Save.

Suggested settings for third-party providers:
| Setting | Webex | InterCall | GoToMeeting |
|---|---|---|---|
| Pause before bridge number | leave blank | leave blank | leave blank |
| Dial after bridge number | leave blank | leave blank | #wwwwwwwwwww1www# |
- On the External Conference Bridges page, click the name of the conference bridge.
- In the Edit Conference Bridge side panel that appears, edit the conference bridge's settings.
- Click Save.
- On the External Conference Bridges page, do one of the following:
- Select the check box next to the conference bridge, or bridges, you want to delete.
- Click the name of the conference bridge.
- Click Delete.
- A confirmation dialog box appears.
- To confirm you want to delete the bridge, click Delete Conference Bridge.