Manage your devices
The xMatters web user interface makes it easy to create, modify, and organize the devices xMatters uses to contact you. Devices include voice and text phones, email addresses, pagers, mobile apps and more.
You can configure when xMatters contacts each of your devices, enabling you to receive notifications on the most appropriate device according to your schedule. You can also configure the device order and setting delays between devices to ensure that you have time to respond to a notification on one device before xMatters notifies the next device. By combining these features you can minimize notifications to disruptive devices while ensuring that you don't miss important events.
Some organizations synchronize device data with external systems such as an HR database. If your organization does this, you may need to update your device information in the external system so it is not overwritten by the data synchronization process.
Add and remove devices
The following sections describe how to add, remove, test, and deactivate your devices.
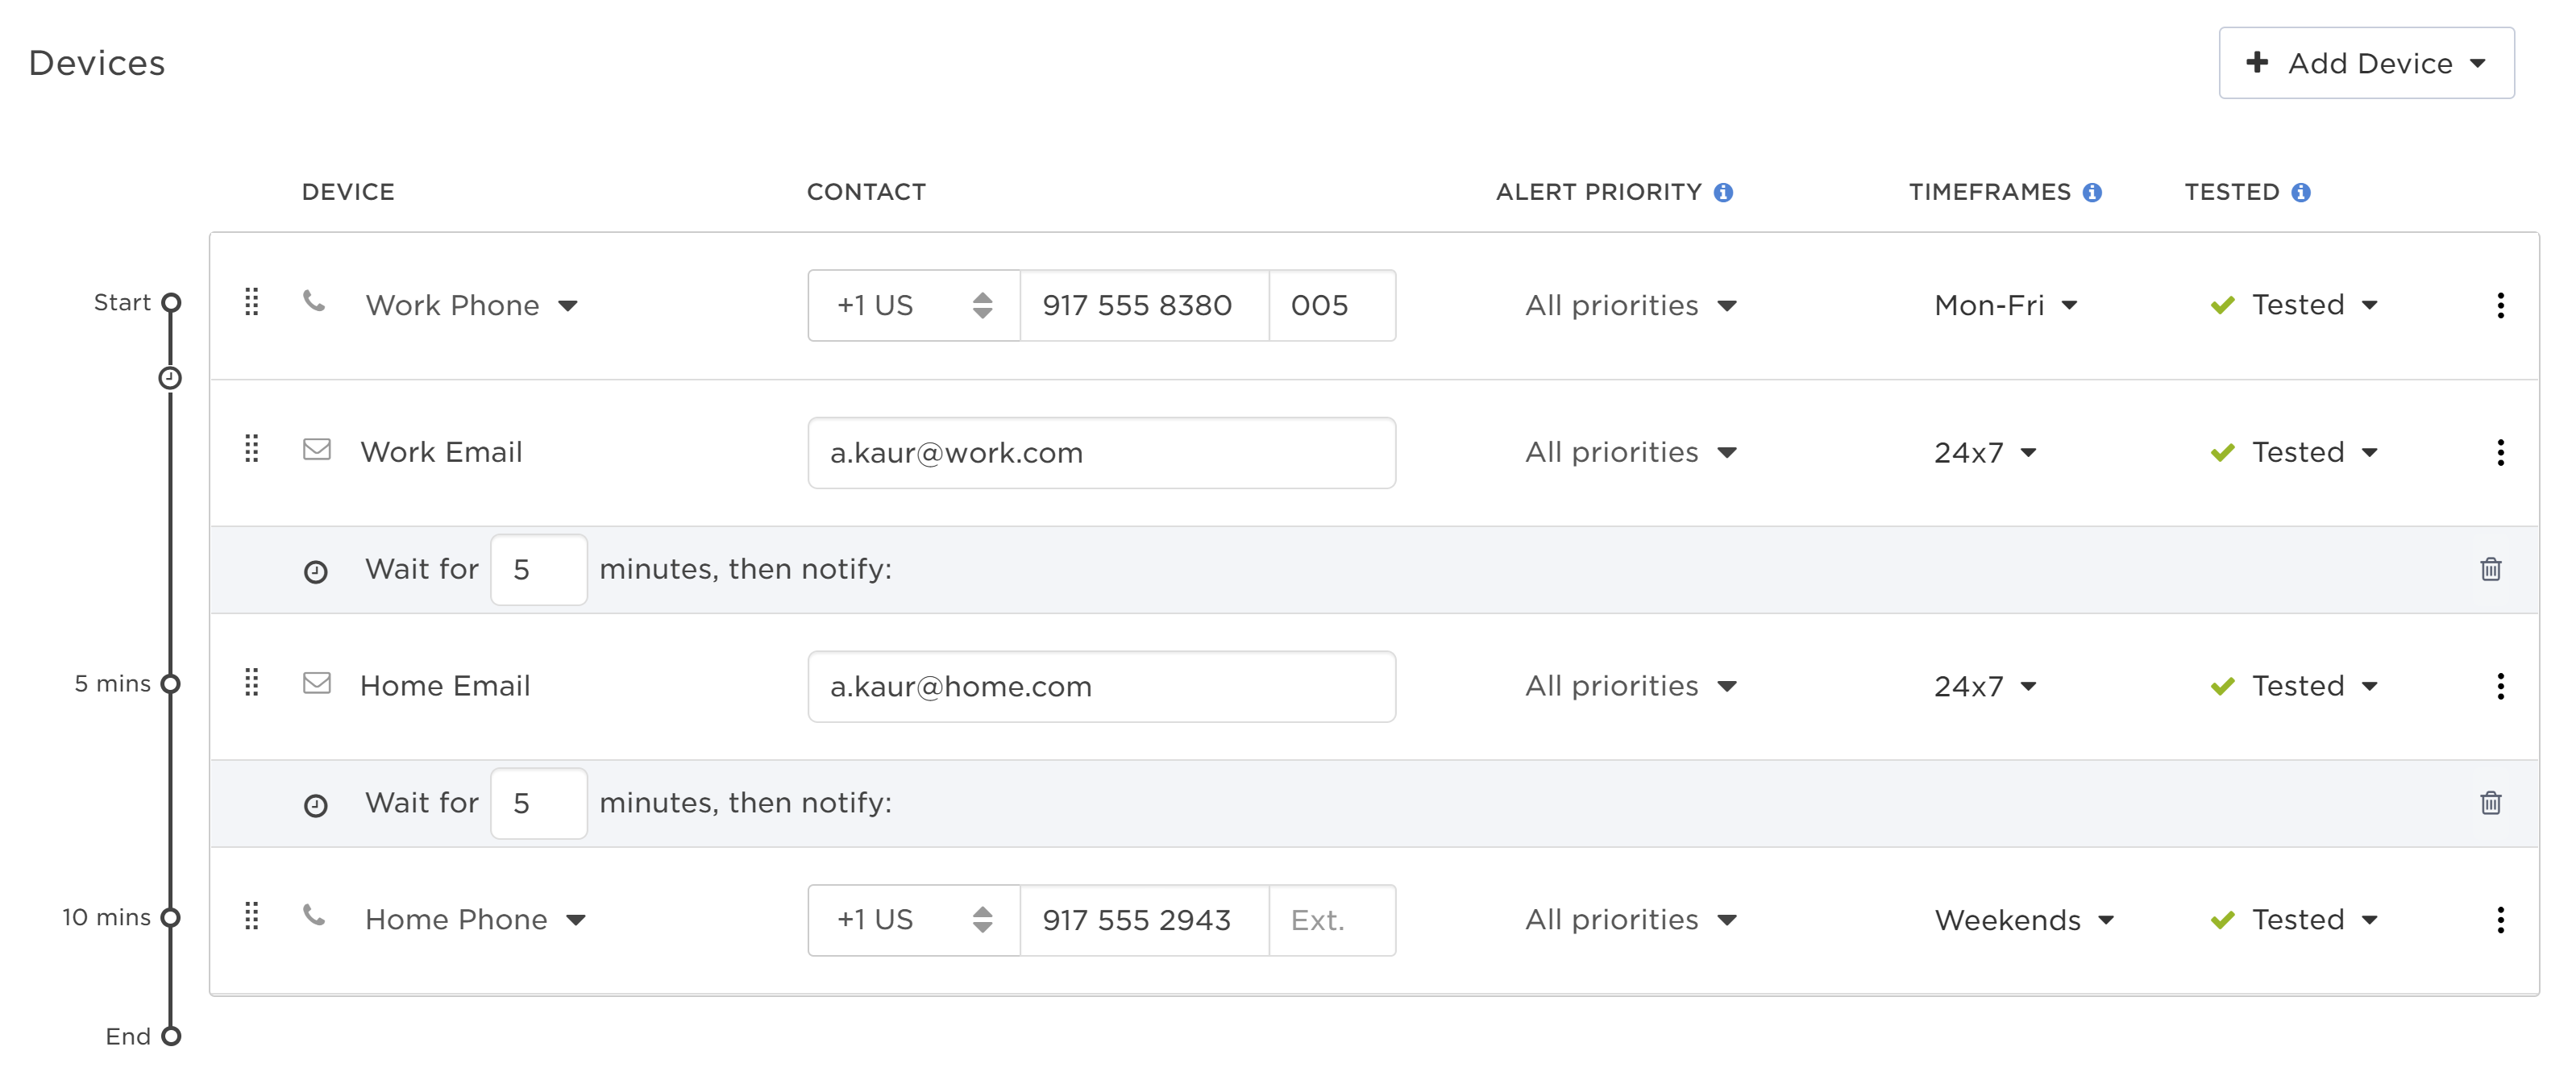
The Devices page displays a summary of your device contact information and the device timeline. For more information about working with the device timeline, see Configure device escalation delays.
To view your devices:
- Click your username at the top-right corner of the xMatters web user interface.
- In the drop-down menu, select Devices to display your device timeline.

Companies are configured with a predefined set of allowed devices. A company could be configured to allow Home Phone, Work Phone, Mobile Phone, Home Email, and Work Email devices. You can add one device of each allowed device type.
To add a device:
- Click your username at the top-right corner of the xMatters web user interface.
- In the drop-down menu, select Devices to display your device timeline.
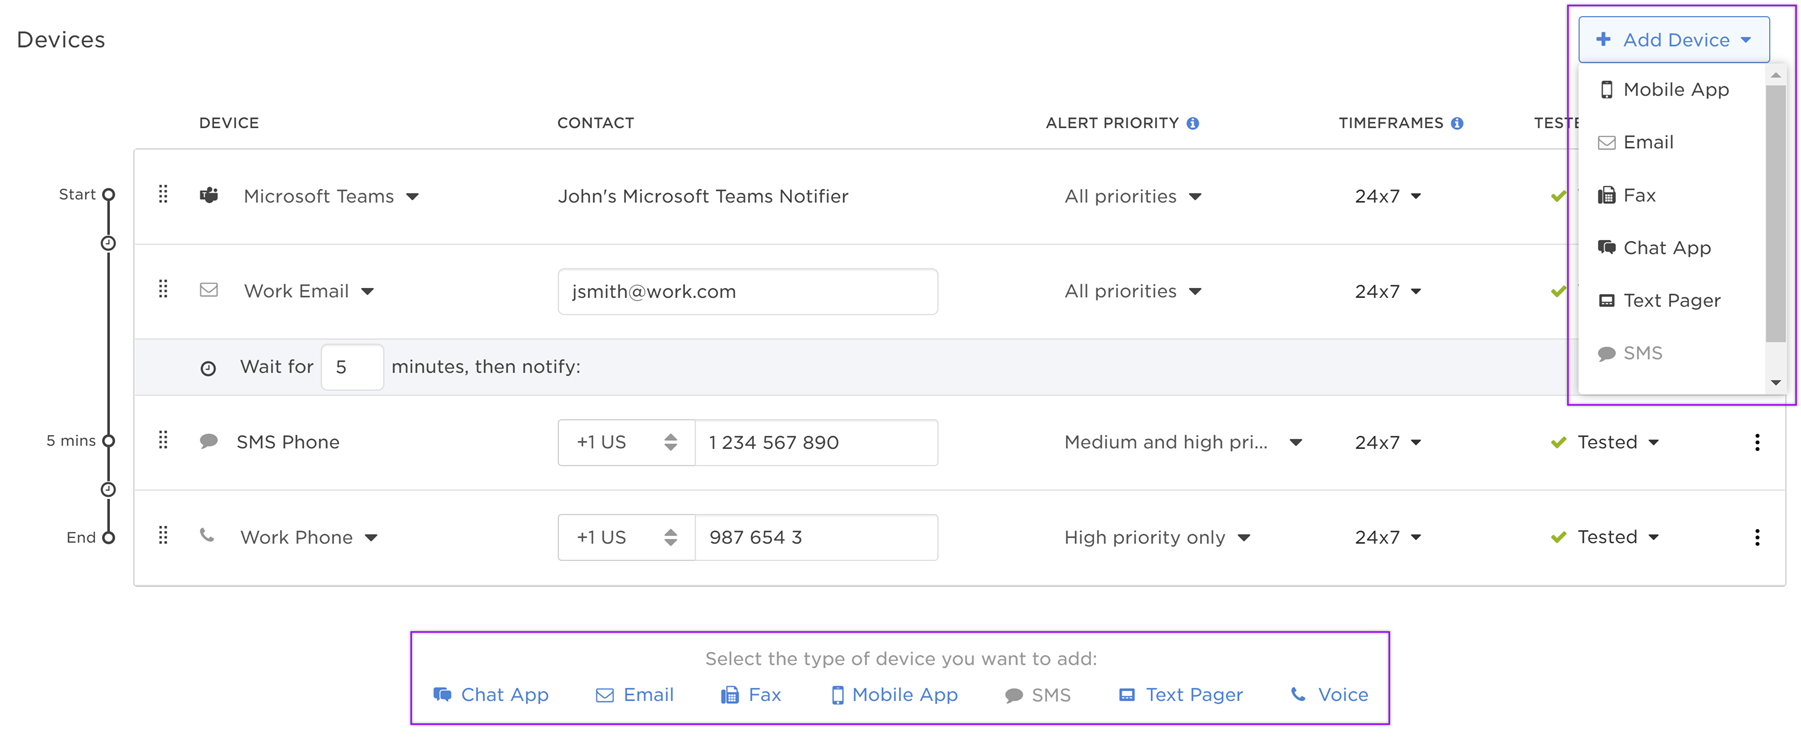
- On the Devices page, click Add Device, and then select the type of device you want to add from the drop-down menu. There are also convenient shortcut links at the bottom of the Devices page that you can use to add devices without going to the Add Device menu.
- The device is added to the end of the device timeline.
- For the mobile app, follow the on-screen instructions to install the xMatters mobile app on your smart phone (push device). For more information about installing the mobile app, see Get the xMatters mobile app.
- For chat apps like Microsoft Teams and Slack, follow the on-screen instructions to register your chat app accounts as a device.

- Click on the device name (e.g., Work Email) to open a drop-down menu where you can select a new device name from the available options. The drop-down list does not appear if there are no other available device names.
- Enter the required contact information for your device such as the email address or phone number.
- Press the Enter key or click out of the device information field to save it.
Once you have added a device, you can configure advanced options such as whether it is active, the priority of notifications that are delivered to the device, the timeframes that xMatters may contact the device, and whether it is a failsafe device. For more information about configuring advanced settings, see Customize how xMatters contacts you.
Removing a device permanently deletes it from xMatters. If you want to temporarily suspend a device, you can deactivate it. For more information about deactivating devices, see Deactivate a device.
To remove a device:
- Click your username at the top-right corner of the xMatters web user interface.
- In the drop-down menu, select Devices to display your device timeline.
- Locate the device and click on the More Options menu (the three vertical dots at the far right of a device row) and select Delete device.
- Click Delete on the pop-up dialog box to confirm that you want to delete the device.
You may be unable to delete devices that are externally owned. Contact your internal xMatters representative to find out how to delete externally owned devices.
After you have configured a device, it is recommended to test it so that you know it is able to receive xMatters notifications. When you test a device, xMatters sends a notification to it. Responding to this notification causes xMatters to automatically mark the device as tested. Alternatively, you can manually mark a device as tested if you do not want to send a test notification to it.
If your device does not receive the test notification, it may not be able to receive other xMatters notifications. In this case, review the device settings and ensure you have entered correct contact information such as email addresses and phone numbers.
User supervisors can search for users with untested devices and follow up with them to ensure that they can receive notifications. For more information about viewing users with untested devices, see Filter the users list.
To test a device:
- Click your username at the top-right corner of the xMatters web user interface.
- In the drop-down menu, select Devices to display your device timeline.
- Locate the device and click the Not Tested drop-down menu under the Tested column.
- From the drop-down menu, click Send Test Message to send a test message to the device, or click Mark as Tested to mark the device as tested without sending a message.
- If you receive a test notification on your device, respond to it. xMatters then marks the device as tested.
You can only test active devices. You can activate a device from the More Options menu (the three vertical dots at the far right of a device row).
You can mark a device as inactive to temporarily suspend notifications to it without removing it from xMatters.
To deactivate (or activate) a device:
- Click your username at the top-right corner of the xMatters web user interface.
- In the drop-down menu, select Devices to display your device timeline.
- Locate the device and click on the More Options menu (the three vertical dots at the far right of a device row).
- Use the Active/Inactive toggle to set the new device status.
Automatic deactivation of inefficient devices
Automatic deactivation is currently enabled for SMS and voice devices.
An inefficient device is any device that xMatters is consistently and repeatedly unable to contact. For example, an SMS device might not work because someone accidentally transposed two numbers when entering a phone number. Another device might simply be out-dated because a user got a new phone number and never updated their settings. If xMatters is trying to send you a high-priority notification and can't complete a call to your phone, you're not being notified as quickly as you should. These repeated attempts also put a strain on available resources, and raise the costs of the service.
If xMatters is unable to successfully contact a device 100 times in the same week, the device will be deactivated. A failure only counts towards this limit if all attempts to connect to the device are unsuccessful; if an attempt is initially unsuccessful but the same notification succeeds on a retry attempt, it is not considered a failure.
The device information will stay in the owner's user profile but the device will be marked as "Inactive" and xMatters will not attempt to call it again. These inactive devices are also marked as "invalid" in xMatters. The Users page includes a filter that you can use to find all of the users in your system that have invalid devices.
If the user who owns the deactivated voice device has any email devices, they will receive an email explaining the problem. The user's supervisor will also receive a notification that the device has been deactivated. The user can log into xMatters to update or double-check their device settings. If they determine that the voice device is still in use, they can reactivate their phone and make a test notification to ensure that notifications can now get through.
Customize how xMatters contacts you
The following sections describe how to refine device notification settings so that you receive notifications on the most appropriate device according to your schedule, the importance of the notification, and how long xMatters has been attempting to contact you.
If a device is targeted directly, such as when a device is a member of a group or if you add a device as a direct recipient of a message, xMatters ignores any configured timeframes, priority settings, and delays, and sends the notification to the device immediately.
You can adjust when xMatters notifies each device so that you receive notifications on the most appropriate device according to your schedule. You could configure your work phone to be active during working hours, your mobile phone to be active until 10 PM, and your work email to always be active.
Newly-created devices are configured to be available all the time. To change when xMatters contacts a device, replace the default 24x7 timeframe with timeframes that represent when you want to allow xMatters to contact you on the device. (If your device is configured to be a failsafe device, xMatters may contact it outside of these timeframes in certain situations.)
To add or edit a device timeframe:
- Click your username at the top-right corner of the xMatters web user interface.
- In the drop-down menu, select Devices to display your device timeline.
- Under the Timeframes column, click on the current device timeframes to open the drop-down menu.
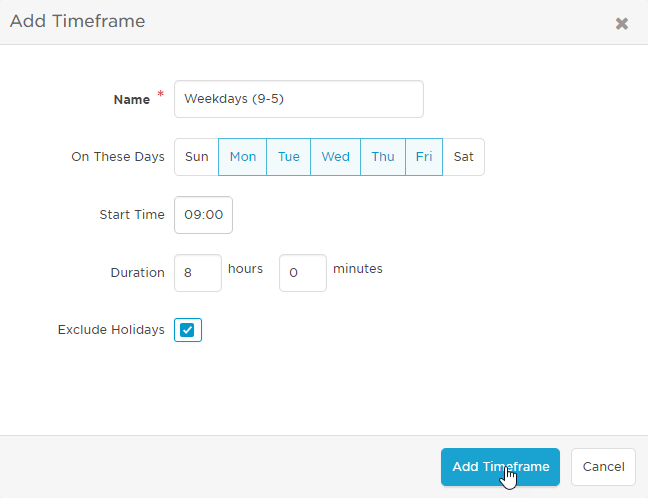
- To add a new timeframe, select Add Timeframe to open the Add Timeframe dialog box.
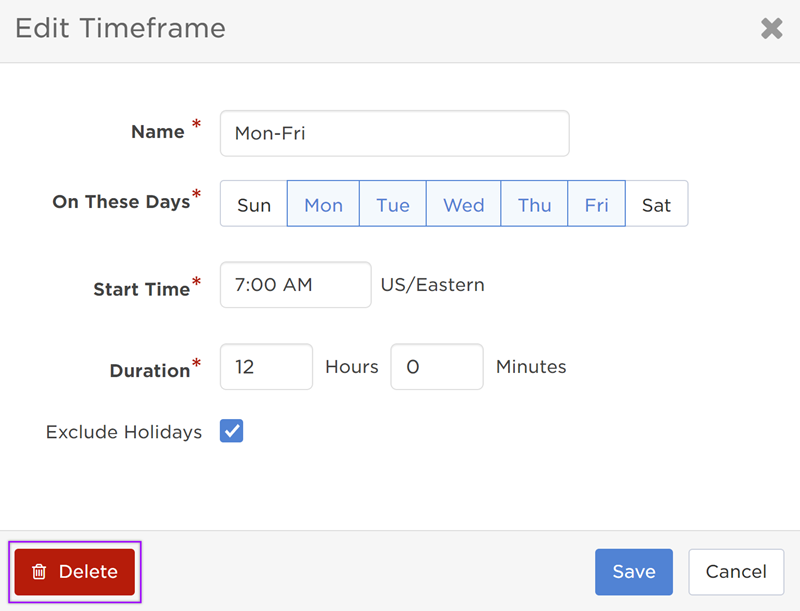
- To edit an existing timeframe, select the name of the timeframe you want to edit to open the Edit Timeframe dialog box.
- Type a descriptive name for the timeframe in the Name field, for example, type "Weekdays (9-5)".
- Use the On These Days selector to choose the days of the week that the device may be contacted, for example, select Mon Tue Wed Thu Fri.
- In the Start Time area, type the time the device may begin receiving notifications; for example, type 09:00 to start receiving notifications on this device at 9 AM.
- In the Duration area, type the number of hours and minutes after the start time that the device may receive notifications.
- If you set the duration to 0, the device is only notified if one of the following applies: the message sender chooses to Override Device Restrictions; the device is directly targeted as a recipient; or the device is targeted as a failsafe device.
- To prevent your device from being contacted on holidays, select Exclude Holidays.
- Click Add Timeframe (or Save when you're editing an existing timeframe).

To delete a timeframe:
- Click your username at the top-right corner of the xMatters web user interface.
- In the drop-down menu, select Devices to display your device timeline.
- Under the Timeframes column, click on the current device timeframes to open the drop-down menu.
- Select the timeframe you want to delete.
- On the Edit Timeframe dialog box, click the Delete button. You must have more than one timeframe for the Delete button to be visible.

You can configure device delays to allow you to have some time to respond to a notification on one device before the notification is delivered to the next device. This gives you an opportunity to handle a notification on a less-disruptive device such as email before xMatters notifies a more-disruptive device such as a mobile phone. If you do not configure device delays, you may receive notifications on multiple devices at the same time.
To configure xMatters to wait for you to respond on one device before notifying another device, add a device delay to the timeline. Device delays may occur between any two devices. Your supervisor can also configure a default device delay that will automatically be included before each new device added to your profile, with the exception of the first device. You cannot add device delays at the start or end of the device timeline.
When you belong to a group that uses escalations delays, ensure that you do not configure your device delays to be longer than the group's escalation delays. If your device delays are too long then a notification could escalate to the next group member before you have received it on all of your devices.
To configure the device escalation timeline:
- If the devices are not already in the order that you want to be contacted, reorder them by grabbing the drag handles and dragging them to a new position in the list.

- To add a wait time between devices, click the clock icon that appears on the device timeline in between the two devices.

- Type in the number of minutes for xMatters to wait before notifying the next device in the list.
- The timeline now displays the elapsed time that will have passed before each device is notified.
- Repeat this process to add additional waits between other devices in your device timeline.
- To remove a delay, click the trash can icon at the right side of your delay entry in the device timeline.
You can configure a device to only accept notifications for higher-priority alerts. xMatters only notifies devices when the priority of an alert is equal to or higher than the device alert priority threshold. By default, new devices receive notifications for all alerts. You may want to configure your personal mobile phone to only accept high-priority notifications and configure your work email to receive all notifications regardless of priority.
To set the device alert priority threshold:
- Click your username at the top-right corner of the xMatters web user interface.
- In the drop-down menu, select Devices to display your device timeline.
- Under the Alert Priority column, click on the current device alert priority to open the drop-down menu.
- Select one of the following priority options:
- To receive only high-priority alerts on this device, select High priority only.
- To receive high and medium-priority alerts on this device, select Medium and high priority.
- To receive all alerts on this device, select All priorities.
Set a device to be failsafe
xMatters contacts failsafe devices in some situations when you do not have any other devices that are configured to receive notifications.
When you set a device to be failsafe, you may receive notifications on the device outside of its active timeframes. This happens when a notification is sent to a group you belong to that is configured to use failsafe devices, and you do not have any other devices with an active timeframe. The failsafe setting does not apply when you are targeted directly by a notification or if the group is not configured to use failsafe devices.
To set a device to be a failsafe device:
- Click your username at the top-right corner of the xMatters web user interface.
- In the drop-down menu, select Devices to display your device timeline.
- Locate the device and click on the More Options menu (the three vertical dots at the far right of a device row).
- Select the Set as failsafe device checkbox.
Advanced device settings
The following sections describe some advanced configuration settings for devices.
Pager devices can be classified as one-way pagers or two-way pagers. One-way pagers can receive notifications but cannot respond to them. Two-way pagers are able to receive notifications and send responses back to xMatters.
If your pager is a two-way pager, enable two-way communication so that xMatters includes response options in the pager message. You can then respond to xMatters notifications directly from your pager.
If your pager is a one-way pager, disable two-way communication so that xMatters does not include response options in pager messages. You can then respond to notifications by calling in to xMatters or logging on to the xMatters user interface.
To enable two-way communication for pager devices:
- Click your username at the top-right corner of the xMatters web user interface.
- In the drop-down menu, select Devices to display your device timeline.
- Locate the device and click on the More Options menu (the three vertical dots at the far right of a device row).
- Perform one of the following actions:
- If your pager is a two-way pager, select Enable two-way communication. xMatters then includes response options in the pager message body.
- If your pager is a one-way pager, deselect Enable two-way communication. xMatters then does not include response options in the pager message body.
Some systems are configured to use more than one device provider to communicate with devices. Different device providers may support different features, so you may have to select a specific provider to access the corresponding features they support.
Most of the time you do not need to change the default device provider. Your system administrator can help you decide if you need to use an alternate provider.
To configure a device provider:
- Click your username at the top-right corner of the xMatters web user interface.
- In the drop-down menu, select Devices to display your device timeline.
- Locate the device and click on the More Options menu (the three vertical dots at the far right of a device row).
- If your system has more than one device provider, the Provider options are displayed. Select the appropriate device provider.
A device icon displays a lock badge when it is managed by an external system and one or more of its fields cannot be edited in xMatters.
To change the value of a locked field, you must first update it in the external system. xMatters will then update this value the next time the data synchronization process occurs. The process for updating your contact information in an external system is unique to each organization but typically involves updating a system such as an HR database or LDAP server. Contact your internal xMatters representative to find out how to best update locked fields.